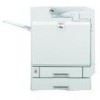
Product Guide
Page 7
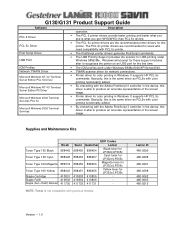
Basically, this is the same driver as PCL5e with color printing functionality added. • By interacting with the Adobe PostScript 3 controller in Windows. Supplies and Maintenance Kits Toner Type 160 Black Ricoh 888442 Toner Type 160 Cyan 888445 Toner Type 160 Magenta 885374 Toner Type 160 Yellow 888443 Staple...toner for LP332c/LP335c 888453 888457 Cyan toner for LP332c/LP335c 888452 888456 Magenta toner for LP332c/LP335c 888451 888455 Yellow toner for this printer. Lanier ID 480-0295 480-0298 480-0297 480-0298 480-0062 480-0063 480-0215 Version - 1.0 It supports HP PCL ...
Basically, this is the same driver as PCL5e with color printing functionality added. • By interacting with the Adobe PostScript 3 controller in Windows. Supplies and Maintenance Kits Toner Type 160 Black Ricoh 888442 Toner Type 160 Cyan 888445 Toner Type 160 Magenta 885374 Toner Type 160 Yellow 888443 Staple...toner for LP332c/LP335c 888453 888457 Cyan toner for LP332c/LP335c 888452 888456 Magenta toner for LP332c/LP335c 888451 888455 Yellow toner for this printer. Lanier ID 480-0295 480-0298 480-0297 480-0298 480-0062 480-0063 480-0215 Version - 1.0 It supports HP PCL ...

Product Guide
Page 15
... / Supply Locations Dust Filter Fusing Unit Waste Toner Bottle Toner Black PCU/ Development Unit Color PCU's/ Development Units User Maintenance Table Main Unit Item Prints or Developments 30K 40K 80K 150K Remarks Black PCU Prints R Included in maintenance kit F Color (Y/M/C) PCU... Prints R Included in maintenance kit A Black Development Unit Prints R Included in maintenance kit D Color (C/M/Y) Development Unit Prints R Included in maintenance kit B Fusing Unit Prints ...
... / Supply Locations Dust Filter Fusing Unit Waste Toner Bottle Toner Black PCU/ Development Unit Color PCU's/ Development Units User Maintenance Table Main Unit Item Prints or Developments 30K 40K 80K 150K Remarks Black PCU Prints R Included in maintenance kit F Color (Y/M/C) PCU... Prints R Included in maintenance kit A Black Development Unit Prints R Included in maintenance kit D Color (C/M/Y) Development Unit Prints R Included in maintenance kit B Fusing Unit Prints ...

Product Guide
Page 17
... Feed AF031049 Feed Roller AF032049 Separation Roller B1802900 Torque Limiter AZ320143 Power Pack:CAC/DC:BDC B1805130 PCB:DRB AZ240106 Power Supply Unit:Main:Dom/NA G1315051 PCB:BCU G1315701 PCB:JP4:Assy AW100102 Thermistor: Fusing B1804066 Thermostat: Welding AX430146 Heater:120V:... Blade: Ass'y G1311854 Imaging Unit AX060286 Ploygon Mirror Motor B1803301 Air Pump:Toner Supply:Ass'y G0803301 Air Pump:Toner Supply Items in Red = PM Part Description AE040042 Oil Supply Roller:Pressure:DIA16 AE044066 Stripper Pawls:pFa AE044050 Stripper Pawl B1804101 Fusing Belt:MM60:Ass...
... Feed AF031049 Feed Roller AF032049 Separation Roller B1802900 Torque Limiter AZ320143 Power Pack:CAC/DC:BDC B1805130 PCB:DRB AZ240106 Power Supply Unit:Main:Dom/NA G1315051 PCB:BCU G1315701 PCB:JP4:Assy AW100102 Thermistor: Fusing B1804066 Thermostat: Welding AX430146 Heater:120V:... Blade: Ass'y G1311854 Imaging Unit AX060286 Ploygon Mirror Motor B1803301 Air Pump:Toner Supply:Ass'y G0803301 Air Pump:Toner Supply Items in Red = PM Part Description AE040042 Oil Supply Roller:Pressure:DIA16 AE044066 Stripper Pawls:pFa AE044050 Stripper Pawl B1804101 Fusing Belt:MM60:Ass...

Maintenance Manual
Page 36
Replacing Consumables and Maintenance Kit Using the Screwdriver The screwdriver supplied is used for attaching options and is located inside of the front cover. er. G1307528_1.00 Copyright © 2005 36 B Insert the screw into the screwdriver, you can work without having to worry about dropping the screw. ❒ After using the screwdriver, return it to its original position inside the front cover. A Open the printer's front cover, and then remove the provided screwdriv- By pushing the screw into the screwdriver.
Replacing Consumables and Maintenance Kit Using the Screwdriver The screwdriver supplied is used for attaching options and is located inside of the front cover. er. G1307528_1.00 Copyright © 2005 36 B Insert the screw into the screwdriver, you can work without having to worry about dropping the screw. ❒ After using the screwdriver, return it to its original position inside the front cover. A Open the printer's front cover, and then remove the provided screwdriv- By pushing the screw into the screwdriver.

Maintenance Manual
Page 84
...10066; If suitable results cannot be apparent. ❒ This requires the use of the supplied Color Calibration Sample Sheet. ❒ Corrections to obtain suitable print results, color gradation can correct the gradation in two areas: the bright part (highlighted) and the medium...- When this happens, to color gradation are set using "Calibr.1" and "Calibr.2" respectively. 84 The correction value for the highlighted and the middle parts are performed in color tones. Adjusting the Printer Correcting the Color Gradation Color gradation during color printing various slightly depending on ...
...10066; If suitable results cannot be apparent. ❒ This requires the use of the supplied Color Calibration Sample Sheet. ❒ Corrections to obtain suitable print results, color gradation can correct the gradation in two areas: the bright part (highlighted) and the medium...- When this happens, to color gradation are set using "Calibr.1" and "Calibr.2" respectively. 84 The correction value for the highlighted and the middle parts are performed in color tones. Adjusting the Printer Correcting the Color Gradation Color gradation during color printing various slightly depending on ...

Maintenance Manual
Page 86
...C/Y:3/3 K Set the gradation correction values for gradation correction 1 of the Color Calibration Sample Sheet, and set between 0 and 6. Adjusting the Printer A confirmation message appears when complete. I Set the gradation correction value of the closest color using either the {U} or {T} key. J Press the {# Enter...shows the display of 1. ❒ The correction value can be set the numerical value of the highlighted part using the supplied Color Calibration Sample Sheet and the gradation correction sheet 1 printed in increments of the control panel when the correction value for the...
...C/Y:3/3 K Set the gradation correction values for gradation correction 1 of the Color Calibration Sample Sheet, and set between 0 and 6. Adjusting the Printer A confirmation message appears when complete. I Set the gradation correction value of the closest color using either the {U} or {T} key. J Press the {# Enter...shows the display of 1. ❒ The correction value can be set the numerical value of the highlighted part using the supplied Color Calibration Sample Sheet and the gradation correction sheet 1 printed in increments of the control panel when the correction value for the...
Maintenance Manual
Page 106
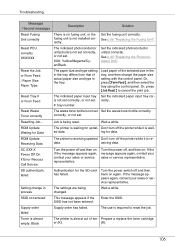
.... Enter the SSID. Set the fusing unit correctly. Reset Tray # or Form Feed The indicated paper input tray is /are being reset. Supply order failed Supply order has failed. Or, press {Job Reset} to reset the job. Don't turn off , and then on . Turn the power switch...Job is not set . ing for updat- If the message appears again, contact your sales or service representative. Turn the power off the printer while it is almost out of ton- failed Authentication for the SD card has failed. Setting change in the tray, and then change ...
.... Enter the SSID. Set the fusing unit correctly. Reset Tray # or Form Feed The indicated paper input tray is /are being reset. Supply order failed Supply order has failed. Or, press {Job Reset} to reset the job. Don't turn off , and then on . Turn the power switch...Job is not set . ing for updat- If the message appears again, contact your sales or service representative. Turn the power off the printer while it is almost out of ton- failed Authentication for the SD card has failed. Setting change in the tray, and then change ...

Maintenance Manual
Page 121
If a supply was then back on the control panel. Confirm [Notify by Email] After changing the setting, turn the printer's power off before the e-mail is transmitted, the e-mail will not be received. See "System Menu", Software Guide. Confirm the printer's operation history using the System Menu on again. ... on as an Administrator, and then confirm the settings of the SMTP server in the area the strange noise is coming from, check the supply or option is set for [Notify by Email] is properly attached. Check the e-mail address set to [On] using the Web Image ...
If a supply was then back on the control panel. Confirm [Notify by Email] After changing the setting, turn the printer's power off before the e-mail is transmitted, the e-mail will not be received. See "System Menu", Software Guide. Confirm the printer's operation history using the System Menu on again. ... on as an Administrator, and then confirm the settings of the SMTP server in the area the strange noise is coming from, check the supply or option is set for [Notify by Email] is properly attached. Check the e-mail address set to [On] using the Web Image ...

Maintenance Manual
Page 161
...contact the store where they were purchased. ❒ When you are using, the contents of use the four toner cartridges packaged with this printer, use . ❒ Toner cartridges (consumables) are as follows: Toner cartridge Black Cyan, Magenta, Yellow Average printable number of pages ...cartridge depends on the type and size of paper you first use this printer are not covered by an authorized dealer. When purchasing expendable supplies, we recommend using the toner cartridge supplied with the printer. ❒ Numbers of pages that toner cartridges may need to deterioration ...
...contact the store where they were purchased. ❒ When you are using, the contents of use the four toner cartridges packaged with this printer, use . ❒ Toner cartridges (consumables) are as follows: Toner cartridge Black Cyan, Magenta, Yellow Average printable number of pages ...cartridge depends on the type and size of paper you first use this printer are not covered by an authorized dealer. When purchasing expendable supplies, we recommend using the toner cartridge supplied with the printer. ❒ Numbers of pages that toner cartridges may need to deterioration ...

Maintenance Manual
Page 169
... number of devices in a bus: Maximum 63 ❖ Allowed cable hops in a bus: Maximum 16 ❖ Data Transmission: 400 Mbps (Maximum) ❖ Power Supply: No separate power supply Cable Power repeated (IEEE 1394a-2000 compliant) IEEE 1284 Interface Board Type A ❖ Transmission Spec.: IEEE 1284 ❖ Required Cable Standard IEEE 1284 compliant...
... number of devices in a bus: Maximum 63 ❖ Allowed cable hops in a bus: Maximum 16 ❖ Data Transmission: 400 Mbps (Maximum) ❖ Power Supply: No separate power supply Cable Power repeated (IEEE 1394a-2000 compliant) IEEE 1284 Interface Board Type A ❖ Transmission Spec.: IEEE 1284 ❖ Required Cable Standard IEEE 1284 compliant...

Setup Guide
Page 7
... Do not use the machine in a burn. • Touch only the handles, no other conductive paper. When installing a new fusing unit, turn off the printer and wait about an hour. Otherwise, the machine might occur. • When removing misfed paper, do not touch the fusing section because it might fall... machine away from the wall outlet to avoid fire or electric shock. • When machine will burn your hands if you only use these specified supplies. • Do not eat or swallow toner. • Keep toner (used or unused) and toner containers out of reach of dust. Otherwise, a fire ...
... Do not use the machine in a burn. • Touch only the handles, no other conductive paper. When installing a new fusing unit, turn off the printer and wait about an hour. Otherwise, the machine might occur. • When removing misfed paper, do not touch the fusing section because it might fall... machine away from the wall outlet to avoid fire or electric shock. • When machine will burn your hands if you only use these specified supplies. • Do not eat or swallow toner. • Keep toner (used or unused) and toner containers out of reach of dust. Otherwise, a fire ...
Setup Guide
Page 11
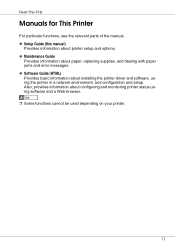
... the manual. ❖ Setup Guide (this manual) Provides information about printer setup and options. ❖ Maintenance Guide Provides information about paper, replacing supplies, and dealing with paper jams and error messages. ❖ Software Guide (HTML) Provides basic information about configuring and monitoring printer status using the printer in a network environment, and configuration and setup.
... the manual. ❖ Setup Guide (this manual) Provides information about printer setup and options. ❖ Maintenance Guide Provides information about paper, replacing supplies, and dealing with paper jams and error messages. ❖ Software Guide (HTML) Provides basic information about configuring and monitoring printer status using the printer in a network environment, and configuration and setup.

Setup Guide
Page 26
Paper Feed Unit Labels Color Calibration Sample Sheet 26 Setting Up Magenta (M), Cyan (C), Yellow (Y) Toner Cartridges Rev. 11/2006 Ferrite Core Paper guide ( ), Paper guide cover ( ), Paper guide holder ( ) (G131 only) ❒ This items are supplied with the duplex unit standard model.
Paper Feed Unit Labels Color Calibration Sample Sheet 26 Setting Up Magenta (M), Cyan (C), Yellow (Y) Toner Cartridges Rev. 11/2006 Ferrite Core Paper guide ( ), Paper guide cover ( ), Paper guide holder ( ) (G131 only) ❒ This items are supplied with the duplex unit standard model.

Setup Guide
Page 33
P Put labels "1" and "2" on the left and right. Q A sticker, stating that paper for an ink-jet printer cannot be used with this to the near right corner of the paper trays. Please attach this printer, is also necessary:) 33 Setting Up O Close the front cover slowly by pushing the two areas on the front of the printer's top [A], so it is easy to see. (For the duplex unit standard model, the following procedure is supplied.
P Put labels "1" and "2" on the left and right. Q A sticker, stating that paper for an ink-jet printer cannot be used with this to the near right corner of the paper trays. Please attach this printer, is also necessary:) 33 Setting Up O Close the front cover slowly by pushing the two areas on the front of the printer's top [A], so it is easy to see. (For the duplex unit standard model, the following procedure is supplied.

Setup Guide
Page 87
A Check the contents of the box. ❒ The external antenna (not shown) is supplied, but it cannot be used with printing due to of poor radio reception, connect an ex- Static electricity can damage the IEEE 802.11b interface ... physical shocks. ❒ The IEEE 802.11b interface unit and Ethernet interface cannot be used at the same time. ❒ If problems occur with the printer. ❖ IEEE 802.11b Interface Unit Type H • Interface Unit • Card 87 ternal antenna.
A Check the contents of the box. ❒ The external antenna (not shown) is supplied, but it cannot be used with printing due to of poor radio reception, connect an ex- Static electricity can damage the IEEE 802.11b interface ... physical shocks. ❒ The IEEE 802.11b interface unit and Ethernet interface cannot be used at the same time. ❒ If problems occur with the printer. ❖ IEEE 802.11b Interface Unit Type H • Interface Unit • Card 87 ternal antenna.

Setup Guide
Page 115
...printer to the ethernet port. B Connect the ethernet cable to the computer through the network. Select your cable according to the machine's ethernet port. G1307525_1.00 Copyright © 2005 115 Unshielded cables create electromagnetic interference that could cause malfunctions. ❒ Ethernet cable is not supplied...loop at the end of the ethernet cable. Alternatively, the optional gigabit ethernet board, which supports 1000BASE-T, is supplied with this machine. Prepare the hub and other network devices before connecting the 10BASE-T or 100BASE-TX cable to the network ...
...printer to the ethernet port. B Connect the ethernet cable to the computer through the network. Select your cable according to the machine's ethernet port. G1307525_1.00 Copyright © 2005 115 Unshielded cables create electromagnetic interference that could cause malfunctions. ❒ Ethernet cable is not supplied...loop at the end of the ethernet cable. Alternatively, the optional gigabit ethernet board, which supports 1000BASE-T, is supplied with this machine. Prepare the hub and other network devices before connecting the 10BASE-T or 100BASE-TX cable to the network ...

Setup Guide
Page 118
Obtain it separately, according to the printer. B If the gigabit ethernet board is attached, connect the square-shaped connector of the USB2.0 cable to the... p.84 "Attaching Gigabit Ethernet Type 7300". 118 Connecting the Printer USB Connection ❒ USB2.0 interface cable is only possible via the printer's USB port. A Connect the square-shaped connector of the board. ❒ The printer's ethernet and USB ports are not available when the gigabit ... OS X v10.3.3 or higher. ❒ Windows 98SE/Me supports USB1.1 speeds. ❒ USB connection with Macintosh is not supplied.
Obtain it separately, according to the printer. B If the gigabit ethernet board is attached, connect the square-shaped connector of the USB2.0 cable to the... p.84 "Attaching Gigabit Ethernet Type 7300". 118 Connecting the Printer USB Connection ❒ USB2.0 interface cable is only possible via the printer's USB port. A Connect the square-shaped connector of the board. ❒ The printer's ethernet and USB ports are not available when the gigabit ... OS X v10.3.3 or higher. ❒ Windows 98SE/Me supports USB1.1 speeds. ❒ USB connection with Macintosh is not supplied.

Setup Guide
Page 119
... connection printing, see Software Guide. B Use the USB cable supplied with the PictBridge card to the USB host interface unit. 119 Connecting the Printer C Connect the opposite end's flat connector to devices such as your digital camera is supplied with a USB cable and a hook onto which allows you ...can roll up and hang the cable. ❒ Make sure your digital camera supports PictBridge. Connect the flat connector of the USB cable to connect the printer and the digital camera. puter's...
... connection printing, see Software Guide. B Use the USB cable supplied with the PictBridge card to the USB host interface unit. 119 Connecting the Printer C Connect the opposite end's flat connector to devices such as your digital camera is supplied with a USB cable and a hook onto which allows you ...can roll up and hang the cable. ❒ Make sure your digital camera supports PictBridge. Connect the flat connector of the USB cable to connect the printer and the digital camera. puter's...
Setup Guide
Page 149
G1307502_1.00 Copyright © 2005 9 Read This First Manuals for This Printer For particular functions, see the relevant parts of the manual. ❖ Setup Guide Provides information about printer setup and options. ❖ Maintenance Guide Provides information about paper, replacing supplies, and dealing with paper jams and error messages. ❖ Software Guide (HTML) (this...
G1307502_1.00 Copyright © 2005 9 Read This First Manuals for This Printer For particular functions, see the relevant parts of the manual. ❖ Setup Guide Provides information about printer setup and options. ❖ Maintenance Guide Provides information about paper, replacing supplies, and dealing with paper jams and error messages. ❖ Software Guide (HTML) (this...

Setup Guide
Page 310
...key down; Ppr • 1200dpi ❒ Default: 600dpi Thin Ppr ❖ Replacmnt Alert Use this function to specify when to warn the user about replacing supplies. • Notify Sooner • Normal • Notify Later ❒ Default: Normal ❖ Date/Time Use this menu item to erase all data ... the machine. 170 the [Off] setting requires the user to default. Erasing all data stored in the hard disk drive and and RAM. Making Printer Settings Using the Control Panel • 600dpi Thin Ppr • 600dpi Norm. The menu appears when the 802.11b interface unit is installed. &#...
...key down; Ppr • 1200dpi ❒ Default: 600dpi Thin Ppr ❖ Replacmnt Alert Use this function to specify when to warn the user about replacing supplies. • Notify Sooner • Normal • Notify Later ❒ Default: Normal ❖ Date/Time Use this menu item to erase all data ... the machine. 170 the [Off] setting requires the user to default. Erasing all data stored in the hard disk drive and and RAM. Making Printer Settings Using the Control Panel • 600dpi Thin Ppr • 600dpi Norm. The menu appears when the 802.11b interface unit is installed. &#...

