Product Guide
Page 8
... Unit G130/G131 only 40KP Printer Maintenance Kit Type 3800E 400662 481-0347 Waste toner bottle G130, G106, G080 and G060 40KP Printer Maintenance Kit Type 7200/7300 F 402310 481-0900 Black PCU G130/G131 only * 150KP Printer Maintenance Kit Type 3800 H 400576 481-0423 Feed Roller G106 and G080 * 50% Color ratio The indicated Yields are...
... Unit G130/G131 only 40KP Printer Maintenance Kit Type 3800E 400662 481-0347 Waste toner bottle G130, G106, G080 and G060 40KP Printer Maintenance Kit Type 7200/7300 F 402310 481-0900 Black PCU G130/G131 only * 150KP Printer Maintenance Kit Type 3800 H 400576 481-0423 Feed Roller G106 and G080 * 50% Color ratio The indicated Yields are...

Product Guide
Page 15
... Product Support Guide Maintenance Kit / Supply Locations Dust Filter Fusing Unit Waste Toner Bottle Toner Black PCU/ Development Unit Color PCU's/ Development Units User Maintenance Table Main Unit Item Prints or Developments 30K 40K 80K 150K Remarks Black PCU Prints R Included in maintenance kit F Color (Y/M/C) PCU Prints R Included in maintenance kit A Black Development Unit Prints R Included...
... Product Support Guide Maintenance Kit / Supply Locations Dust Filter Fusing Unit Waste Toner Bottle Toner Black PCU/ Development Unit Color PCU's/ Development Units User Maintenance Table Main Unit Item Prints or Developments 30K 40K 80K 150K Remarks Black PCU Prints R Included in maintenance kit F Color (Y/M/C) PCU Prints R Included in maintenance kit A Black Development Unit Prints R Included...

Maintenance Manual
Page 2
... 62 Replacing the Waste Toner Bottle 65 Replacing the Paper Feed Roller 68 Cleaning Cautions to Take When Cleaning 72 Cleaning the Registration Roller 73 Cleaning the DustProof Glass 75 Checking the Earth Leakage Breaker 77 Adjusting the Printer Adjusting the Color Registration 79 Auto ...Adjust...79 Adjusting the Fuser for Thick Paper 80 Test Sheet Samples 83 Correcting the Color Gradation 84 Set the Gradation Correction Value 84 Viewing the Color Calibration Sample Sheet and Gradation ...
... 62 Replacing the Waste Toner Bottle 65 Replacing the Paper Feed Roller 68 Cleaning Cautions to Take When Cleaning 72 Cleaning the Registration Roller 73 Cleaning the DustProof Glass 75 Checking the Earth Leakage Breaker 77 Adjusting the Printer Adjusting the Color Registration 79 Auto ...Adjust...79 Adjusting the Fuser for Thick Paper 80 Test Sheet Samples 83 Correcting the Color Gradation 84 Set the Gradation Correction Value 84 Viewing the Color Calibration Sample Sheet and Gradation ...

Maintenance Manual
Page 65
B Take the new waste toner bottle out of the bag. Replace Waste Toner (Type E) A Turn off the power, and then unplug the power cable. C Slowly open the front cover by pulling down from the two areas on the display, replace the waste toner bottle. Replacing Consumables and Maintenance Kit Replacing the Waste Toner Bottle If "Replace Waste Toner (Type E)" appears on the left and right. 65
B Take the new waste toner bottle out of the bag. Replace Waste Toner (Type E) A Turn off the power, and then unplug the power cable. C Slowly open the front cover by pulling down from the two areas on the display, replace the waste toner bottle. Replacing Consumables and Maintenance Kit Replacing the Waste Toner Bottle If "Replace Waste Toner (Type E)" appears on the left and right. 65

Maintenance Manual
Page 66
E Remove the lid ( ), and then put it in the position shown in the illustra- tion ( ). G Insert the new waste toner bottle as shown. 66 F Put the used waste toner bottle from inside the printer. ❒ Be sure to handle the bottle carefully so waste toner does not spill. Replacing Consumables and Maintenance Kit D Slowly remove the used waste toner bottle into the bag that contained the new waste toner bottle, and then seal the bag. ❒ Be sure to remove the waste toner bottle horizontally.
E Remove the lid ( ), and then put it in the position shown in the illustra- tion ( ). G Insert the new waste toner bottle as shown. 66 F Put the used waste toner bottle from inside the printer. ❒ Be sure to handle the bottle carefully so waste toner does not spill. Replacing Consumables and Maintenance Kit D Slowly remove the used waste toner bottle into the bag that contained the new waste toner bottle, and then seal the bag. ❒ Be sure to remove the waste toner bottle horizontally.

Maintenance Manual
Page 67
Replacing Consumables and Maintenance Kit H Push it in the power cable, and then turn on the left and right. J Plug in until it stops. ❒ Be sure to firmly insert the waste toner bottle to avoid toner leakage inside the printer. I Slowly close the front cover by pushing the two areas on the power. 67
Replacing Consumables and Maintenance Kit H Push it in the power cable, and then turn on the left and right. J Plug in until it stops. ❒ Be sure to firmly insert the waste toner bottle to avoid toner leakage inside the printer. I Slowly close the front cover by pushing the two areas on the power. 67

Maintenance Manual
Page 105
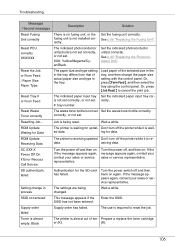
... your service contract, contact your sales or service representative. Replace Fusing Unit soon (C) The time to replace the waste toner. on . Replace the waste toner bottle. Depending on the display. Unit correctly XXX/XXX The indicated development unit(s) is soon. Reset Duplex Unit correctly ...the Options". 105 Troubleshooting Messages / Second messages Description Solution Replace Color PCU soon (A) The time to replace the color PCU when the message "Replace Color PCU (Type A)" appears on the display. Prepare to replace the color PCU is /are not set correctly, or not set . ...
... your service contract, contact your sales or service representative. Replace Fusing Unit soon (C) The time to replace the waste toner. on . Replace the waste toner bottle. Depending on the display. Unit correctly XXX/XXX The indicated development unit(s) is soon. Reset Duplex Unit correctly ...the Options". 105 Troubleshooting Messages / Second messages Description Solution Replace Color PCU soon (A) The time to replace the color PCU when the message "Replace Color PCU (Type A)" appears on the display. Prepare to replace the color PCU is /are not set correctly, or not set . ...
Maintenance Manual
Page 106
... and then select the tray using the control panel. correctly, or not set Set the waste toner bottle correctly. Job is being changed. ROM Update Waiting for Data The printer is receiving updated Don't turn off and then back on again. ed data. ROM Update ..."Replacing the Fusing Unit". Or, press {Job Reset} to reset the job. Reset Waste Toner correctly The waste toner bottle is /are being reset. Wait a while. Enter the SSID. Toner is almost empty: Black The printer is not installed correctly. Reset PCU correctly XXX/XXX The indicated photoconductor unit(s) is not...
... and then select the tray using the control panel. correctly, or not set Set the waste toner bottle correctly. Job is being changed. ROM Update Waiting for Data The printer is receiving updated Don't turn off and then back on again. ed data. ROM Update ..."Replacing the Fusing Unit". Or, press {Job Reset} to reset the job. Reset Waste Toner correctly The waste toner bottle is /are being reset. Wait a while. Enter the SSID. Toner is almost empty: Black The printer is not installed correctly. Reset PCU correctly XXX/XXX The indicated photoconductor unit(s) is not...

Maintenance Manual
Page 107
... your sales or service representative. ON to replace the waste toner bottle. Warming up and Wait until the printer signals Ready. See p.65 "Replacing the Waste Toner Bottle". 107 Prepare a replace the toner cartridge er (M). (M). Wait a while. Update Mode Err. Waste Toner is almost full (E) The waste toner bottle is almost out of ton- The printer is almost out of ton- Prepare a replace the...
... your sales or service representative. ON to replace the waste toner bottle. Warming up and Wait until the printer signals Ready. See p.65 "Replacing the Waste Toner Bottle". 107 Prepare a replace the toner cartridge er (M). (M). Wait a while. Update Mode Err. Waste Toner is almost full (E) The waste toner bottle is almost out of ton- The printer is almost out of ton- Prepare a replace the...

Maintenance Manual
Page 162
... Kit Type 7200/7300A Printer Maintenance Kit Type 7200/7300B Printer Maintenance Kit Type 7200/7300C Printer Maintenance Kit Type 7200/7300D Printer Maintenance Kit Type 3800E Printer Maintenance Kit Type 7200/7300F Printer Maintenance Kit Type 3800H Consumables Color photoconductor unit × 3 Color development unit × 3 Fusing unit × 1 Black development unit × 1 Waste toner bottle × 1 Black ... Other consumables ❒ The actual lifespan of consumables depends on the type and size of paper you are using, content of black & white and color pages is common.
... Kit Type 7200/7300A Printer Maintenance Kit Type 7200/7300B Printer Maintenance Kit Type 7200/7300C Printer Maintenance Kit Type 7200/7300D Printer Maintenance Kit Type 3800E Printer Maintenance Kit Type 7200/7300F Printer Maintenance Kit Type 3800H Consumables Color photoconductor unit × 3 Color development unit × 3 Fusing unit × 1 Black development unit × 1 Waste toner bottle × 1 Black ... Other consumables ❒ The actual lifespan of consumables depends on the type and size of paper you are using, content of black & white and color pages is common.

Setup Guide
Page 13
... Open this to 500 sheets of plain paper tray for letter size paper (11 × 81/2 K). 5. Control panel Contains keys for printing. 6. Guide to show printer status. Power switch Use this when replacing the waste toner bottle, development unit or photoconductor unit. Tray 1 Loads up to switch between power on and off. 4.
... Open this to 500 sheets of plain paper tray for letter size paper (11 × 81/2 K). 5. Control panel Contains keys for printing. 6. Guide to show printer status. Power switch Use this when replacing the waste toner bottle, development unit or photoconductor unit. Tray 1 Loads up to switch between power on and off. 4.

Setup Guide
Page 19
... one black development unit and three color (yellow, cyan, magenta) development units. Toner Cartridge Loads from the printer rear, in the order of the toner cartridge. ❒ The color is wasted during printing. Unit (Type D)" or "Replace Color Dev. (Type B)" appears on the display, replace the waste toner bottle. 5. When "Replace Black Dev. When "Replace Waste Toner (Type E)" appears on the display...
... one black development unit and three color (yellow, cyan, magenta) development units. Toner Cartridge Loads from the printer rear, in the order of the toner cartridge. ❒ The color is wasted during printing. Unit (Type D)" or "Replace Color Dev. (Type B)" appears on the display, replace the waste toner bottle. 5. When "Replace Black Dev. When "Replace Waste Toner (Type E)" appears on the display...

Setup Guide
Page 351
...the following events: • Service call. • Toner cartridge is empty. • Toner cartridge is nearly empty. • Photoconductor unit needs replacing. • Photoconductor unit will need replacing soon. • Waste toner bottle is full. • Waste toner bottle is nearly full. • Stapler has no staples...; Development Unit will need replacing soon. • Transfer Unit needs replacing. B Open a Web browser, and then enter "http: //(printer's address)/" in the address bar. 211 The default is issued to the registered addresses to [On] using the control pan- el. ...
...the following events: • Service call. • Toner cartridge is empty. • Toner cartridge is nearly empty. • Photoconductor unit needs replacing. • Photoconductor unit will need replacing soon. • Waste toner bottle is full. • Waste toner bottle is nearly full. • Stapler has no staples...; Development Unit will need replacing soon. • Transfer Unit needs replacing. B Open a Web browser, and then enter "http: //(printer's address)/" in the address bar. 211 The default is issued to the registered addresses to [On] using the control pan- el. ...

Setup Guide
Page 390
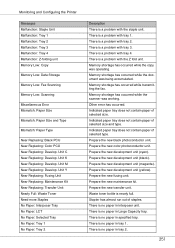
... Counter not inserted Loading Toner... There is full. Low: Black Toner Low: Cyan Toner Low: Magenta Toner Low: Toner Low: Yellow Toner Malfunction: Booklet Processor Malfunction: Ext. Toner that is not recommended is set correctly, or toner is almost running out. Monitoring and Configuring the Printer Messages Full: Hole Punch Receptacle Full: Standard Tray Full: Waste Toner Full: Waste Toner Bottle Hex Dump Mode...
... Counter not inserted Loading Toner... There is full. Low: Black Toner Low: Cyan Toner Low: Magenta Toner Low: Toner Low: Yellow Toner Malfunction: Booklet Processor Malfunction: Ext. Toner that is not recommended is set correctly, or toner is almost running out. Monitoring and Configuring the Printer Messages Full: Hole Punch Receptacle Full: Standard Tray Full: Waste Toner Full: Waste Toner Bottle Hex Dump Mode...
Setup Guide
Page 391
...: Black PCU Near Replacing: Color PCU Near Replacing: Develop. There is a problem with tray 2. Memory shortage has occurred while the copy was working. Memory shortage has occurred while the scanner was operating. Indicated paper tray does not contain paper of staples. Prepare the new fusing unit. Waste toner bottle is no paper in specified...
...: Black PCU Near Replacing: Color PCU Near Replacing: Develop. There is a problem with tray 2. Memory shortage has occurred while the copy was working. Memory shortage has occurred while the scanner was operating. Indicated paper tray does not contain paper of staples. Prepare the new fusing unit. Waste toner bottle is no paper in specified...

Setup Guide
Page 392
...not correctly set . Waste toner bottle is not correctly set . 252 There is no paper in tray 3. Finisher is not correctly set . A large amount of paper feed tray is not correctly set . Tray 4 is not correctly set . Monitoring and Configuring the Printer Messages No Paper: Tray... 3 No Paper: Tray 4 Not Detected: B2 Lever Not Detected: Black Toner Not Detected: Cyan Toner Not Detected: Develop. Unit (C) Not Detected: Develop. The transfer unit is not correctly...
...not correctly set . Waste toner bottle is not correctly set . 252 There is no paper in tray 3. Finisher is not correctly set . A large amount of paper feed tray is not correctly set . Tray 4 is not correctly set . Monitoring and Configuring the Printer Messages No Paper: Tray... 3 No Paper: Tray 4 Not Detected: B2 Lever Not Detected: Black Toner Not Detected: Cyan Toner Not Detected: Develop. Unit (C) Not Detected: Develop. The transfer unit is not correctly...
Setup Guide
Page 483
... 62 Replacing the Waste Toner Bottle 65 Replacing the Paper Feed Roller 68 Cleaning Cautions to Take When Cleaning 72 Cleaning the Registration Roller 73 Cleaning the DustProof Glass 75 Checking the Earth Leakage Breaker 77 Adjusting the Printer Adjusting the Color Registration 79 Auto ...Adjust...79 Adjusting the Fuser for Thick Paper 80 Test Sheet Samples 83 Correcting the Color Gradation 84 Set the Gradation Correction Value 84 Viewing the Color Calibration Sample Sheet and Gradation ...
... 62 Replacing the Waste Toner Bottle 65 Replacing the Paper Feed Roller 68 Cleaning Cautions to Take When Cleaning 72 Cleaning the Registration Roller 73 Cleaning the DustProof Glass 75 Checking the Earth Leakage Breaker 77 Adjusting the Printer Adjusting the Color Registration 79 Auto ...Adjust...79 Adjusting the Fuser for Thick Paper 80 Test Sheet Samples 83 Correcting the Color Gradation 84 Set the Gradation Correction Value 84 Viewing the Color Calibration Sample Sheet and Gradation ...

Setup Guide
Page 546
C Slowly open the front cover by pulling down from the two areas on the display, replace the waste toner bottle. Replace Waste Toner (Type E) A Turn off the power, and then unplug the power cable. B Take the new waste toner bottle out of the bag. Replacing Consumables and Maintenance Kit Replacing the Waste Toner Bottle If "Replace Waste Toner (Type E)" appears on the left and right. 65
C Slowly open the front cover by pulling down from the two areas on the display, replace the waste toner bottle. Replace Waste Toner (Type E) A Turn off the power, and then unplug the power cable. B Take the new waste toner bottle out of the bag. Replacing Consumables and Maintenance Kit Replacing the Waste Toner Bottle If "Replace Waste Toner (Type E)" appears on the left and right. 65

Setup Guide
Page 547
G Insert the new waste toner bottle as shown. 66 Replacing Consumables and Maintenance Kit D Slowly remove the used waste toner bottle into the bag that contained the new waste toner bottle, and then seal the bag. ❒ Be sure to remove the waste toner bottle horizontally. F Put the used waste toner bottle from inside the printer. ❒ Be sure to handle the bottle carefully so waste toner does not spill. tion ( ). E Remove the lid ( ), and then put it in the position shown in the illustra-
G Insert the new waste toner bottle as shown. 66 Replacing Consumables and Maintenance Kit D Slowly remove the used waste toner bottle into the bag that contained the new waste toner bottle, and then seal the bag. ❒ Be sure to remove the waste toner bottle horizontally. F Put the used waste toner bottle from inside the printer. ❒ Be sure to handle the bottle carefully so waste toner does not spill. tion ( ). E Remove the lid ( ), and then put it in the position shown in the illustra-

Setup Guide
Page 548
J Plug in until it stops. ❒ Be sure to firmly insert the waste toner bottle to avoid toner leakage inside the printer. I Slowly close the front cover by pushing the two areas on the power. 67 Replacing Consumables and Maintenance Kit H Push it in the power cable, and then turn on the left and right.
J Plug in until it stops. ❒ Be sure to firmly insert the waste toner bottle to avoid toner leakage inside the printer. I Slowly close the front cover by pushing the two areas on the power. 67 Replacing Consumables and Maintenance Kit H Push it in the power cable, and then turn on the left and right.


