
Maintenance Manual
Page 1
...13 Storing Paper ...13 Types of Paper and Other Media 13 Paper not supported by this printer 17 Print Area ...18 Loading Paper ...20 Loading Paper in Tray 1/2 and the optional paper feed unit 20 Loading Paper in the Bypass Tray 28 Switching between Paper Trays 34 Replacing Consumables and ...Detaching and Reattaching the Options 37 Detaching the SR960 (2 Tray Finisher 37 Detaching the SR950 (Booklet Finisher 38 Opening and Closing the Duplex Reversal Unit 38 Replacing the Toner Cartridge 40 Replacing the Photoconductor Unit 45 G1307528_1.00 EN USA G130-7509 Copyright © 2005 1
...13 Storing Paper ...13 Types of Paper and Other Media 13 Paper not supported by this printer 17 Print Area ...18 Loading Paper ...20 Loading Paper in Tray 1/2 and the optional paper feed unit 20 Loading Paper in the Bypass Tray 28 Switching between Paper Trays 34 Replacing Consumables and ...Detaching and Reattaching the Options 37 Detaching the SR960 (2 Tray Finisher 37 Detaching the SR950 (Booklet Finisher 38 Opening and Closing the Duplex Reversal Unit 38 Replacing the Toner Cartridge 40 Replacing the Photoconductor Unit 45 G1307528_1.00 EN USA G130-7509 Copyright © 2005 1
Maintenance Manual
Page 45
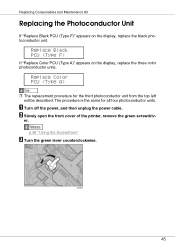
.... p.36 "Using the Screwdriver" C Turn the green lever counterclockwise. 45 Replace Color PCU (Type A) ❒ The replacement procedure for all four photoconductor units. B Slowly open the front cover of the printer, remove the green screwdriv- The procedure is the same for the third photoconductor unit from the top left will be described. Replace Black PCU (Type...
.... p.36 "Using the Screwdriver" C Turn the green lever counterclockwise. 45 Replace Color PCU (Type A) ❒ The replacement procedure for all four photoconductor units. B Slowly open the front cover of the printer, remove the green screwdriv- The procedure is the same for the third photoconductor unit from the top left will be described. Replace Black PCU (Type...

Maintenance Manual
Page 46
You cannot remove these two screws. F Remove the photoconductor unit you want to the right, as shown. Replacing Consumables and Maintenance Kit D Loosen the two screws fastening the inner cover, using the provided screwdriver. E Lift the inner cover until it clicks into place and holds. The photoconductor units are attached in the order of the photoconductor unit. 46 The green hook is located on the upper right of black (K), yellow (Y), cyan (C), and magenta (M). Starting from the upper left, the units are installed as shown. Move the green hook slowly to replace.
You cannot remove these two screws. F Remove the photoconductor unit you want to the right, as shown. Replacing Consumables and Maintenance Kit D Loosen the two screws fastening the inner cover, using the provided screwdriver. E Lift the inner cover until it clicks into place and holds. The photoconductor units are attached in the order of the photoconductor unit. 46 The green hook is located on the upper right of black (K), yellow (Y), cyan (C), and magenta (M). Starting from the upper left, the units are installed as shown. Move the green hook slowly to replace.

Maintenance Manual
Page 47
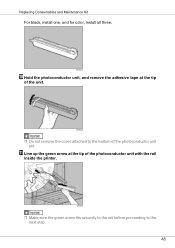
I Install the new photoconductor unit. G Hold the hook down, grip the green areas at the top ( ), and then slowly pull out the unit ( ). Take the unit out of the photoconductor unit, and then slowly pull the unit out until you can see the entire green handle. ❒ Pulling out the photoconductor unit quickly might cause it to fall. H Lift and hold the green handle at the top and bottom of the bag. 47 Replacing Consumables and Maintenance Kit For black, remove the upper left one, and for color, remove the three on the right.
I Install the new photoconductor unit. G Hold the hook down, grip the green areas at the top ( ), and then slowly pull out the unit ( ). Take the unit out of the photoconductor unit, and then slowly pull the unit out until you can see the entire green handle. ❒ Pulling out the photoconductor unit quickly might cause it to fall. H Lift and hold the green handle at the top and bottom of the bag. 47 Replacing Consumables and Maintenance Kit For black, remove the upper left one, and for color, remove the three on the right.
Maintenance Manual
Page 48
K Line up the green arrow at the tip of the unit. ❒ Do not remove the cover attached to the bottom of the photoconductor unit with the rail inside the printer. ❒ Make sure the green arrow fits securely to the rail before proceeding to the next step. 48 Replacing Consumables and Maintenance Kit For black, install one, and for color, install all three. J Hold the photoconductor unit, and remove the adhesive tape at the tip of the photoconductor unit yet.
K Line up the green arrow at the tip of the unit. ❒ Do not remove the cover attached to the bottom of the photoconductor unit with the rail inside the printer. ❒ Make sure the green arrow fits securely to the rail before proceeding to the next step. 48 Replacing Consumables and Maintenance Kit For black, install one, and for color, install all three. J Hold the photoconductor unit, and remove the adhesive tape at the tip of the photoconductor unit yet.

Maintenance Manual
Page 49
til it stops. ❒ If you do not attach the green arrow of the photoconductor unit securely to the rail, you might damage the photoconductor unit. ❒ Do not touch the light-sensitive area of the photoconductor unit, slide the unit on the cover, and then push in the photoconductor unit, un- N Slowly lower the inner cover out. 49 Replacing Consumables and Maintenance Kit L Slowly push the front of the photoconductor unit. M Remove the cover, and then slowly push in until it stops.
til it stops. ❒ If you do not attach the green arrow of the photoconductor unit securely to the rail, you might damage the photoconductor unit. ❒ Do not touch the light-sensitive area of the photoconductor unit, slide the unit on the cover, and then push in the photoconductor unit, un- N Slowly lower the inner cover out. 49 Replacing Consumables and Maintenance Kit L Slowly push the front of the photoconductor unit. M Remove the cover, and then slowly push in until it stops.

Maintenance Manual
Page 104
... replace the black PCU is soon. See p.52 "Replacing the Development Unit". See p.45 "Replacing the Photoconductor Unit". Replace Black Develop.soon (D) The time to replace the black development unit. velopment unit. Unit(TypeD) It is time to replace the black development unit is soon. Replace Color Dev. Depending on your service contract, contact your sales or service...
... replace the black PCU is soon. See p.52 "Replacing the Development Unit". See p.45 "Replacing the Photoconductor Unit". Replace Black Develop.soon (D) The time to replace the black development unit. velopment unit. Unit(TypeD) It is time to replace the black development unit is soon. Replace Color Dev. Depending on your service contract, contact your sales or service...
Maintenance Manual
Page 106
...if the SSID has not been entered. Toner is almost empty: Black The printer is required to cancel the print job. Reset PCU correctly XXX/XXX The indicated photoconductor unit(s) is re- ROM Update Receiving Data The printer is receiving updated Don't turn off and then on. SC XXX-X Power ...Off On If Error Reoccur Call Service Turn the power off the printer while it is /are being reset. failed ...
...if the SSID has not been entered. Toner is almost empty: Black The printer is required to cancel the print job. Reset PCU correctly XXX/XXX The indicated photoconductor unit(s) is re- ROM Update Receiving Data The printer is receiving updated Don't turn off and then on. SC XXX-X Power ...Off On If Error Reoccur Call Service Turn the power off the printer while it is /are being reset. failed ...

Maintenance Manual
Page 114
...A)" or "Replace Black PCU (Type F)" appears on the control panel. Postcards are especially prone to curling while being printed on the RPCSTM printer driver's [Print Quality] tab, printing becomes faint. Straighten them . To adjust the print density, press the {Menu} key on the control... prints on the control panel. See p.45 "Replacing the Photoconductor Unit". The paper size and feed direction settings on the control panel may have smudges on the display, replace the appropriate color toner cartridge. Make the settings that is a color) appears on the back. If "Add Toner XXX" (...
...A)" or "Replace Black PCU (Type F)" appears on the control panel. Postcards are especially prone to curling while being printed on the RPCSTM printer driver's [Print Quality] tab, printing becomes faint. Straighten them . To adjust the print density, press the {Menu} key on the control... prints on the control panel. See p.45 "Replacing the Photoconductor Unit". The paper size and feed direction settings on the control panel may have smudges on the display, replace the appropriate color toner cartridge. Make the settings that is a color) appears on the back. If "Add Toner XXX" (...
Maintenance Manual
Page 115
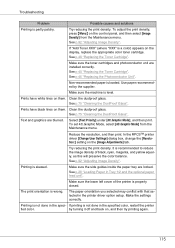
...DustProof Glass". Make sure the lower left cover of black, cyan, magenta, and yellow equally, as this will preserve the color balance. See p.45 "Replacing the Photoconductor Unit". Use paper recommended by turning it off and back on them . Reduce the resolution, and then print. Try reducing ...from the Maintenance menu. It is skewed. See p.92 "Adjusting Image Density". Printing is recommended to reduce the image density of the printer is partly patchy. Make sure the side guides inside the paper tray are locked. The print orientation is not done in the speci...
...DustProof Glass". Make sure the lower left cover of black, cyan, magenta, and yellow equally, as this will preserve the color balance. See p.45 "Replacing the Photoconductor Unit". Use paper recommended by turning it off and back on them . Reduce the resolution, and then print. Try reducing ...from the Maintenance menu. It is skewed. See p.92 "Adjusting Image Density". Printing is recommended to reduce the image density of the printer is partly patchy. Make sure the side guides inside the paper tray are locked. The print orientation is not done in the speci...

Maintenance Manual
Page 162
... Kit Type 7200/7300A Printer Maintenance Kit Type 7200/7300B Printer Maintenance Kit Type 7200/7300C Printer Maintenance Kit Type 7200/7300D Printer Maintenance Kit Type 3800E Printer Maintenance Kit Type 7200/7300F Printer Maintenance Kit Type 3800H Consumables Color photoconductor unit × 3 Color development unit × 3 Fusing unit × 1 Black development unit × 1 Waste toner bottle × 1 Black photoconductor unit × 1 Paper feed roller...
... Kit Type 7200/7300A Printer Maintenance Kit Type 7200/7300B Printer Maintenance Kit Type 7200/7300C Printer Maintenance Kit Type 7200/7300D Printer Maintenance Kit Type 3800E Printer Maintenance Kit Type 7200/7300F Printer Maintenance Kit Type 3800H Consumables Color photoconductor unit × 3 Color development unit × 3 Fusing unit × 1 Black development unit × 1 Waste toner bottle × 1 Black photoconductor unit × 1 Paper feed roller...

Setup Guide
Page 13
... is stacked here with the print side down. Power switch Use this when replacing the waste toner bottle, development unit or photoconductor unit. Tray 2 Loads up to 500 sheets of plain paper tray for printer operation and a display to switch between power on and off. 4. G1307525_1.00 Copyright © 2005 13 Control panel Contains... of plain paper tray for letter size paper (11 × 81/2 K). 5. Only for printing. 6. See p.20 "Control Panel". 2. Standard tray Output is attached to the Printer Exterior: Front View 1.
... is stacked here with the print side down. Power switch Use this when replacing the waste toner bottle, development unit or photoconductor unit. Tray 2 Loads up to 500 sheets of plain paper tray for printer operation and a display to switch between power on and off. 4. G1307525_1.00 Copyright © 2005 13 Control panel Contains... of plain paper tray for letter size paper (11 × 81/2 K). 5. Only for printing. 6. See p.20 "Control Panel". 2. Standard tray Output is attached to the Printer Exterior: Front View 1.

Setup Guide
Page 19
... (M), cyan (C), yellow (Y), and black (K). Photo Conductor Unit The printer comes with one black and three color (yellow, cyan, and magenta) photoconductor units. When "Replace Black PCU (Type F)" or "Replace Color PCU (Type A)" appears on the display, replace the development unit. 19 Development unit The printer comes with one black development unit and three color (yellow, cyan, magenta) development units. Guide to the...
... (M), cyan (C), yellow (Y), and black (K). Photo Conductor Unit The printer comes with one black and three color (yellow, cyan, and magenta) photoconductor units. When "Replace Black PCU (Type F)" or "Replace Color PCU (Type A)" appears on the display, replace the development unit. 19 Development unit The printer comes with one black development unit and three color (yellow, cyan, magenta) development units. Guide to the...

Setup Guide
Page 351
...printer's address)/" in the address bar. 211 Notification timing and e-mail content can make the e-mail notification settings. el. For details, see p.171 "System Menu". The default is full. • Development Unit needs replacing. • Development Unit will need replacing soon. • Transfer Unit...: • Service call. • Toner cartridge is empty. • Toner cartridge is nearly empty. • Photoconductor unit needs replacing. • Photoconductor unit will need replacing soon. • Waste toner bottle is full. • Waste toner bottle is nearly full. •...
...printer's address)/" in the address bar. 211 Notification timing and e-mail content can make the e-mail notification settings. el. For details, see p.171 "System Menu". The default is full. • Development Unit needs replacing. • Development Unit will need replacing soon. • Transfer Unit...: • Service call. • Toner cartridge is empty. • Toner cartridge is nearly empty. • Photoconductor unit needs replacing. • Photoconductor unit will need replacing soon. • Waste toner bottle is full. • Waste toner bottle is nearly full. •...
Setup Guide
Page 391
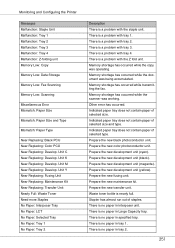
...Printer Messages Malfunction: Staple Unit Malfunction: Tray 1 Malfunction: Tray 2 Malfunction: Tray 3 Malfunction: Tray 4 Malfunction: Z-folding unit Memory Low: Copy Memory Low: Data Storage Memory Low: Fax Scanning Memory Low: Scanning Miscellaneous Error Mismatch: Paper Size Mismatch: Paper Size and Type Mismatch: Paper Type Near Replacing: Black PCU Near Replacing: Color... the new color photoconductor unit. Unit K Near Replacing: Develop. There is a problem with tray 2. Unit Y Near Replacing: Fusing Unit Near Replacing: Maintenance Kit Near Replacing: Transfer Unit Nearly Full:...
...Printer Messages Malfunction: Staple Unit Malfunction: Tray 1 Malfunction: Tray 2 Malfunction: Tray 3 Malfunction: Tray 4 Malfunction: Z-folding unit Memory Low: Copy Memory Low: Data Storage Memory Low: Fax Scanning Memory Low: Scanning Miscellaneous Error Mismatch: Paper Size Mismatch: Paper Size and Type Mismatch: Paper Type Near Replacing: Black PCU Near Replacing: Color... the new color photoconductor unit. Unit K Near Replacing: Develop. There is a problem with tray 2. Unit Y Near Replacing: Fusing Unit Near Replacing: Maintenance Kit Near Replacing: Transfer Unit Nearly Full:...

Setup Guide
Page 392
...) is not correctly set . The duplex feed unit is not correctly set . The fusing unit is not correctly set . The photoconductor unit (black) is not correctly set . The photoconductor unit (yellow) is not correctly set . The transfer roller is not correctly set . Monitoring and Configuring the Printer Messages No Paper: Tray 3 No Paper: Tray 4 Not Detected: B2...
...) is not correctly set . The duplex feed unit is not correctly set . The fusing unit is not correctly set . The photoconductor unit (black) is not correctly set . The photoconductor unit (yellow) is not correctly set . The transfer roller is not correctly set . Monitoring and Configuring the Printer Messages No Paper: Tray 3 No Paper: Tray 4 Not Detected: B2...

Setup Guide
Page 393
... correctly set . The original remains on Exposure Glass Panel Off Mode Panel Off Mode>>Printing ava. The paper remains in the duplex unit. The paper has jammed in the duplex unit. The paper remains in progress. It is time to replace the photoconductor unit (color). Printing is offline. Unit Replace Develop. Printer is in Finisher Shift Tray 2.
... correctly set . The original remains on Exposure Glass Panel Off Mode Panel Off Mode>>Printing ava. The paper remains in the duplex unit. The paper has jammed in the duplex unit. The paper remains in progress. It is time to replace the photoconductor unit (color). Printing is offline. Unit Replace Develop. Printer is in Finisher Shift Tray 2.
Setup Guide
Page 394
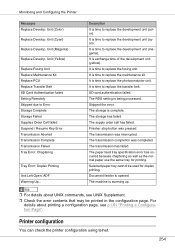
...photoconductor unit. Skipped the error. For details about UNIX commands, see p.161 "Printing a Configuration Page". The RDS setting is exchange time of the development unit (yellow). The transmission completion was pressed. The transmission has failed. Unit (Cyan) Replace Develop. Description It is time to replace the development unit (color...supply order call has failed. It is time to replace the development unit (cyan). The transmission was interrupted. Printer configuration You can check the printer configuration using telnet. 254 It is time to Error Storage Complete ...
...photoconductor unit. Skipped the error. For details about UNIX commands, see p.161 "Printing a Configuration Page". The RDS setting is exchange time of the development unit (yellow). The transmission completion was pressed. The transmission has failed. Unit (Cyan) Replace Develop. Description It is time to replace the development unit (color...supply order call has failed. It is time to replace the development unit (cyan). The transmission was interrupted. Printer configuration You can check the printer configuration using telnet. 254 It is time to Error Storage Complete ...

Setup Guide
Page 482
...13 Storing Paper ...13 Types of Paper and Other Media 13 Paper not supported by this printer 17 Print Area ...18 Loading Paper ...20 Loading Paper in Tray 1/2 and the optional paper feed unit 20 Loading Paper in the Bypass Tray 28 Switching between Paper Trays 34 Replacing Consumables and ...Detaching and Reattaching the Options 37 Detaching the SR960 (2 Tray Finisher 37 Detaching the SR950 (Booklet Finisher 38 Opening and Closing the Duplex Reversal Unit 38 Replacing the Toner Cartridge 40 Replacing the Photoconductor Unit 45 G1307528_1.00 EN USA G130-7509 Copyright © 2005 1
...13 Storing Paper ...13 Types of Paper and Other Media 13 Paper not supported by this printer 17 Print Area ...18 Loading Paper ...20 Loading Paper in Tray 1/2 and the optional paper feed unit 20 Loading Paper in the Bypass Tray 28 Switching between Paper Trays 34 Replacing Consumables and ...Detaching and Reattaching the Options 37 Detaching the SR960 (2 Tray Finisher 37 Detaching the SR950 (Booklet Finisher 38 Opening and Closing the Duplex Reversal Unit 38 Replacing the Toner Cartridge 40 Replacing the Photoconductor Unit 45 G1307528_1.00 EN USA G130-7509 Copyright © 2005 1

Setup Guide
Page 526
...replacement procedure for all four photoconductor units. Replace Black PCU (Type F) If "Replace Color PCU (Type A)" appears on the display, replace the black photoconductor unit. B Slowly open the front cover of the printer, remove the green screwdriv- ...A Turn off the power, and then unplug the power cable. Replacing Consumables and Maintenance Kit Replacing the Photoconductor Unit If "Replace Black PCU (Type F)" appears on the display, replace the three color photoconductor units...
...replacement procedure for all four photoconductor units. Replace Black PCU (Type F) If "Replace Color PCU (Type A)" appears on the display, replace the black photoconductor unit. B Slowly open the front cover of the printer, remove the green screwdriv- ...A Turn off the power, and then unplug the power cable. Replacing Consumables and Maintenance Kit Replacing the Photoconductor Unit If "Replace Black PCU (Type F)" appears on the display, replace the three color photoconductor units...


