
Operating Instructions
Page 4
... and Closing the Duplex Reversal Unit 6 Replacing the Fuser Oil Unit 7 Replacing the Photoconductor Unit 11 Replacing the Development Unit 15 Replacing the Fusing Unit 19 Replacing the Dustproof Filter 22 Replacing the Waste Toner Bottle 24 Replacing the Paper Feed Rollers 26 2. TABLE OF CONTENTS Trademarks...i 1. Cleaning and Adjusting the Printer Cautions to Take When Cleaning...
... and Closing the Duplex Reversal Unit 6 Replacing the Fuser Oil Unit 7 Replacing the Photoconductor Unit 11 Replacing the Development Unit 15 Replacing the Fusing Unit 19 Replacing the Dustproof Filter 22 Replacing the Waste Toner Bottle 24 Replacing the Paper Feed Rollers 26 2. TABLE OF CONTENTS Trademarks...i 1. Cleaning and Adjusting the Printer Cautions to Take When Cleaning...

Operating Instructions
Page 17
... the front cover of black (K), yellow (Y), cyan (C), and magenta (M). ZHXH460J The photoconductor units are attached in the order of the printer, remove the green screwdriver. Replacing the Photoconductor Unit Replacing the Photoconductor Unit If "Replace Black PCU (Type F)" appears on the display, replace the three color photoconductor units. E Lift the inner cover until it clicks into place and holds. plug...
... the front cover of black (K), yellow (Y), cyan (C), and magenta (M). ZHXH460J The photoconductor units are attached in the order of the printer, remove the green screwdriver. Replacing the Photoconductor Unit Replacing the Photoconductor Unit If "Replace Black PCU (Type F)" appears on the display, replace the three color photoconductor units. E Lift the inner cover until it clicks into place and holds. plug...

Operating Instructions
Page 18
...black, remove the upper left 1 one , and for color, remove the three on the upper right of the photoconductor unit. A Take the unit out of the unit. The green hook is located on the right. ZDJH221J B Hold the photoconductor unit, and remove the adhesive tape at - For black, ...install one , and for color, install all three. ZHXH890J Important ❒...
...black, remove the upper left 1 one , and for color, remove the three on the upper right of the photoconductor unit. A Take the unit out of the unit. The green hook is located on the right. ZDJH221J B Hold the photoconductor unit, and remove the adhesive tape at - For black, ...install one , and for color, install all three. ZHXH890J Important ❒...

Operating Instructions
Page 19
... Tighten the two screws using the provided screwdriver. D Slowly push the front of the photoconductor unit, slide the unit on the back of the photoconductor unit. ZHXH510J Important ❒ If you might damage the photoconductor unit. ❒ Do not touch the light-sensitive area of the front cover. 13 ZHXH520J...then push in the photoconductor unit, until it stops. 1 ZHXH500J Important ❒ Make sure the green arrow fits securely to the rail before proceeding to the rail, you do not attach the green arrow of the photoconductor unit with the rail inside the printer. C Line up...
... Tighten the two screws using the provided screwdriver. D Slowly push the front of the photoconductor unit, slide the unit on the back of the photoconductor unit. ZHXH510J Important ❒ If you might damage the photoconductor unit. ❒ Do not touch the light-sensitive area of the front cover. 13 ZHXH520J...then push in the photoconductor unit, until it stops. 1 ZHXH500J Important ❒ Make sure the green arrow fits securely to the rail before proceeding to the rail, you do not attach the green arrow of the photoconductor unit with the rail inside the printer. C Line up...
Operating Instructions
Page 76
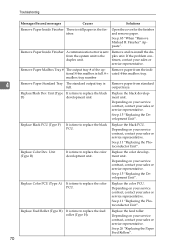
... # The output tray # of the op- Depending on your service contract, contact your sales or service representative. Unit (Type B) It is still paper in the finisher. See p.11 "Replacing the Photoconductor Unit". Replace Color Dev. Replace the color PCU. See p.85 "When "Remove Misfeed R: Finisher" Appears". Replace Black Dev. Replace the feed roller. See p.26...
... # The output tray # of the op- Depending on your service contract, contact your sales or service representative. Unit (Type B) It is still paper in the finisher. See p.11 "Replacing the Photoconductor Unit". Replace Color Dev. Replace the color PCU. See p.85 "When "Remove Misfeed R: Finisher" Appears". Replace Black Dev. Replace the feed roller. See p.26...

Operating Instructions
Page 78
... Toner Cyan The indicated toner cartridge is not set correctly. Set the indicated toner cartridge(s) correctly. Reset Tray Correctly The printer detected, when processing a job through Auto Tray Select, that a paper input tray is not set . rectly, or not... a magenta cartridge suitable for the machine. Reset PCU Correctly /Yellow/Magenta Cyan/Black 4 The indicated photoconductor unit(s) is not set cor- See p.11 "Replacing the Photoconductor Unit". See "Installing the Toner Cartridge", Setup Guide. See "Installing the Toner Cartridge", Setup Guide. Reset...
... Toner Cyan The indicated toner cartridge is not set correctly. Set the indicated toner cartridge(s) correctly. Reset Tray Correctly The printer detected, when processing a job through Auto Tray Select, that a paper input tray is not set . rectly, or not... a magenta cartridge suitable for the machine. Reset PCU Correctly /Yellow/Magenta Cyan/Black 4 The indicated photoconductor unit(s) is not set cor- See p.11 "Replacing the Photoconductor Unit". See "Installing the Toner Cartridge", Setup Guide. See "Installing the Toner Cartridge", Setup Guide. Reset...
Operating Instructions
Page 107
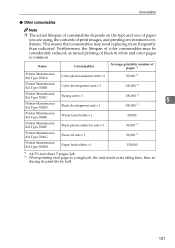
..., thus re- Name Consumables Average printable number of pages *1 Printer Maintenance Kit Type 7000A Color photoconductor unit × 3 50,000 *2 Printer Maintenance Kit Type 7000B Color development unit × 3 100,000 *2 Printer Maintenance Kit Type 7000C Fusing unit × 1 100,000 *2 5 Printer Maintenance Kit Type 7000D Black development unit × 1 100,000 *2 Printer Maintenance Kit Type 3800E Waste toner bottle × 1 50...
..., thus re- Name Consumables Average printable number of pages *1 Printer Maintenance Kit Type 7000A Color photoconductor unit × 3 50,000 *2 Printer Maintenance Kit Type 7000B Color development unit × 3 100,000 *2 Printer Maintenance Kit Type 7000C Fusing unit × 1 100,000 *2 5 Printer Maintenance Kit Type 7000D Black development unit × 1 100,000 *2 Printer Maintenance Kit Type 3800E Waste toner bottle × 1 50...

Operating Instructions
Page 108
... 37 Appendix, 97 B Bypass Tray Custom Size, 58 Paper Type, 59 C Cleaning and Adjusting the Printer, 29 Cleaning the DustProof Glass, 31 Cleaning the Registration Roller, 30 Color Adjustment Checking the Test Sheet, 35 Consumables, 100 D Data In indicator, 75 Detaching the 2 Tray ... Misfed Paper into the Duplex Feed Unit, 88 Removing Punch-hole Chips, 95 Replacing Consumables and Maintenance Kit, 1 Replacing the Development Unit, 15 Replacing the Dustproof Filter, 22 Replacing the Fuser Oil Unit, 7 Replacing the Fusing Unit, 19 Replacing the Photoconductor Unit, 11 Replacing the Toner Cartridge, ...
... 37 Appendix, 97 B Bypass Tray Custom Size, 58 Paper Type, 59 C Cleaning and Adjusting the Printer, 29 Cleaning the DustProof Glass, 31 Cleaning the Registration Roller, 30 Color Adjustment Checking the Test Sheet, 35 Consumables, 100 D Data In indicator, 75 Detaching the 2 Tray ... Misfed Paper into the Duplex Feed Unit, 88 Removing Punch-hole Chips, 95 Replacing Consumables and Maintenance Kit, 1 Replacing the Development Unit, 15 Replacing the Dustproof Filter, 22 Replacing the Fuser Oil Unit, 7 Replacing the Fusing Unit, 19 Replacing the Photoconductor Unit, 11 Replacing the Toner Cartridge, ...


