
Operating Instructions
Page 4
... and Adjusting the Printer Cautions to Take When Cleaning 29 Cleaning the Registration Roller 30 Cleaning the DustProof Glass 31 Adjusting the Color Registration 32 Auto Adjust...32 Adjusting the Fuser for Thick Paper... 33 Test Sheet Samples 35 Adjusting Image Density 36 Adjusting Tray Registration 37 3. Replacing Consumables and Maintenance Kit Using the Screwdriver 1 Replacing the Toner Cartridge 2 Detaching the SR770 (2 Tray Finisher 5 Opening and Closing the Duplex Reversal Unit 6 Replacing the Fuser Oil...
... and Adjusting the Printer Cautions to Take When Cleaning 29 Cleaning the Registration Roller 30 Cleaning the DustProof Glass 31 Adjusting the Color Registration 32 Auto Adjust...32 Adjusting the Fuser for Thick Paper... 33 Test Sheet Samples 35 Adjusting Image Density 36 Adjusting Tray Registration 37 3. Replacing Consumables and Maintenance Kit Using the Screwdriver 1 Replacing the Toner Cartridge 2 Detaching the SR770 (2 Tray Finisher 5 Opening and Closing the Duplex Reversal Unit 6 Replacing the Fuser Oil...

Operating Instructions
Page 13
...in a burn. • Keep the fuser oil unit away from the printer. ZHXH090J Reference p.6 "Opening and Closing the Duplex Reversal Unit" ZHXH100J 7 tach it (B). plug the power cable. wait about an hour to • The fusing unit becomes very the printer, raise it in the direc- 1 hot.... A Turn off the printer and move it from flames. Reference p.5 "Detaching the SR770 (2 Tray Finisher)" C If the duplex unit is a risk of the arrow (A), and then re- stall the new fuser unit. F Open the upper left cover. If "Replace Fuser Oil Unit (TypeG)" appears on...
...in a burn. • Keep the fuser oil unit away from the printer. ZHXH090J Reference p.6 "Opening and Closing the Duplex Reversal Unit" ZHXH100J 7 tach it (B). plug the power cable. wait about an hour to • The fusing unit becomes very the printer, raise it in the direc- 1 hot.... A Turn off the printer and move it from flames. Reference p.5 "Detaching the SR770 (2 Tray Finisher)" C If the duplex unit is a risk of the arrow (A), and then re- stall the new fuser unit. F Open the upper left cover. If "Replace Fuser Oil Unit (TypeG)" appears on...

Operating Instructions
Page 14
...seals to avoid malfunction. ❒ Be sure to remove seal (A) first, and then seal (B) to avoid oil leakage. ❒ Be sure to put the fuser oil unit in the bag that comes with the new fuser oil unit, and then seal the bag. 1 2 ZHXH050J Important ❒ Do not touch the inside of ... out horizontally. Finally, hold the up- H Hold the fusing unit handle using one hand, and then slowly pull the fuser oil unit out horizontally. ZHXHK041J Note ❒ Be sure to avoid oil leakage. 8 seal (A), and then slowly peel the seal off . Put the unit in a stable and level place to...
...seals to avoid malfunction. ❒ Be sure to remove seal (A) first, and then seal (B) to avoid oil leakage. ❒ Be sure to put the fuser oil unit in the bag that comes with the new fuser oil unit, and then seal the bag. 1 2 ZHXH050J Important ❒ Do not touch the inside of ... out horizontally. Finally, hold the up- H Hold the fusing unit handle using one hand, and then slowly pull the fuser oil unit out horizontally. ZHXHK041J Note ❒ Be sure to avoid oil leakage. 8 seal (A), and then slowly peel the seal off . Put the unit in a stable and level place to...

Operating Instructions
Page 15
ly, in the direction of the arrow. 1 ZHXH060J Important ❒ Be careful not to get oil on the top metal part of the fuser oil unit. ❒ Insert the fuser oil unit firmly, until it to the printer. ZHXH070J 2 ZHXH082J M If you . Reference p.6 "Opening and Closing the Duplex Reversal Unit" O If the 2 ...tray finisher is installed, close the duplex reversal unit. Replacing the Fuser Oil Unit ❒ After removing the seals, be careful not to the printer. L Close the upper left cover (A), and then push the part labeled "PUSH" next to the handle at...
ly, in the direction of the arrow. 1 ZHXH060J Important ❒ Be careful not to get oil on the top metal part of the fuser oil unit. ❒ Insert the fuser oil unit firmly, until it to the printer. ZHXH070J 2 ZHXH082J M If you . Reference p.6 "Opening and Closing the Duplex Reversal Unit" O If the 2 ...tray finisher is installed, close the duplex reversal unit. Replacing the Fuser Oil Unit ❒ After removing the seals, be careful not to the printer. L Close the upper left cover (A), and then push the part labeled "PUSH" next to the handle at...

Operating Instructions
Page 16
Replacing Consumables and Maintenance Kit P Plug in the power cable, and then turn on the power. Note 1 ❒ If you dispose of used fuser oil unit by yourself, dispose ac- cording to local regulations. 10
Replacing Consumables and Maintenance Kit P Plug in the power cable, and then turn on the power. Note 1 ❒ If you dispose of used fuser oil unit by yourself, dispose ac- cording to local regulations. 10
Operating Instructions
Page 25
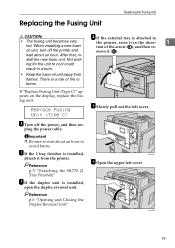
Not wait- ing for the unit to avoid burns. A Turn off the printer and move it (B). stall the new fuser unit. plug the power cable. F Open the upper left cover. After that, in a burn. • Keep the fuser oil unit away from the printer. If "Replace Fusing Unit (Type C)" appears on the display, replace the fusing...
Not wait- ing for the unit to avoid burns. A Turn off the printer and move it (B). stall the new fuser unit. plug the power cable. F Open the upper left cover. After that, in a burn. • Keep the fuser oil unit away from the printer. If "Replace Fusing Unit (Type C)" appears on the display, replace the fusing...

Operating Instructions
Page 26
...any areas other than the green felt parts. There is a risk of the fusing unit. ❒ When moving the fusing unit, ZHXH800J keep it . The fuser oil unit gets very hot and will burn your hands if you touch it down on yourself, do not touch any area other parts. H Hold the...then insert it horizontally into the part of the bag and put it . K Install the fuser oil unit removed in stepI in the new fusing unit. ZHXH790J R CAUTION: • Keep the fuser oil unit away from flames. Hold the fuser oil unit as shown, slowly pull the fusing unit up, and then put it down slightly...
...any areas other than the green felt parts. There is a risk of the fusing unit. ❒ When moving the fusing unit, ZHXH800J keep it . The fuser oil unit gets very hot and will burn your hands if you touch it down on yourself, do not touch any area other parts. H Hold the...then insert it horizontally into the part of the bag and put it . K Install the fuser oil unit removed in stepI in the new fusing unit. ZHXH790J R CAUTION: • Keep the fuser oil unit away from flames. Hold the fuser oil unit as shown, slowly pull the fusing unit up, and then put it down slightly...

Operating Instructions
Page 27
... Important O Close the upper left cover (A), ❒ Be careful not to get oil on the power. 21 N Slowly turn on the and then push the part labeled top metal part of the fuser oil "PUSH" next to the printer. Reference p.5 "Detaching the SR770 (2 Tray Finisher)" S Plug in step D, reattach... it to the handle at the unit. er oil unit, and then seal it. 1 M Hold the fusing unit handle ...
... Important O Close the upper left cover (A), ❒ Be careful not to get oil on the power. 21 N Slowly turn on the and then push the part labeled top metal part of the fuser oil "PUSH" next to the printer. Reference p.5 "Detaching the SR770 (2 Tray Finisher)" S Plug in step D, reattach... it to the handle at the unit. er oil unit, and then seal it. 1 M Hold the fusing unit handle ...
Operating Instructions
Page 77
...Replacing the Fusing Unit". Depending on your sales or service representative. Reset Finisher Correctly The finisher is not set . Reset Fuser Oil Unit Correctly The fuser oil unit is not set . Depending on your service 4 contract, contact your sales or service representative. unit. vice contract... is not installed, is /are not set correctly, or not set correct- See p.7 "Replacing the Fuser Oil Unit". 71 Replace Fuser Oil Unit soon (Type G) The fuser oil unit should be re- Reset Develop. Unit Correctly /Yellow/Magenta Cyan/Black The indicated development unit(s) is...
...Replacing the Fusing Unit". Depending on your sales or service representative. Reset Finisher Correctly The finisher is not set . Reset Fuser Oil Unit Correctly The fuser oil unit is not set . Depending on your service 4 contract, contact your sales or service representative. unit. vice contract... is not installed, is /are not set correctly, or not set correct- See p.7 "Replacing the Fuser Oil Unit". 71 Replace Fuser Oil Unit soon (Type G) The fuser oil unit should be re- Reset Develop. Unit Correctly /Yellow/Magenta Cyan/Black The indicated development unit(s) is...
Operating Instructions
Page 107
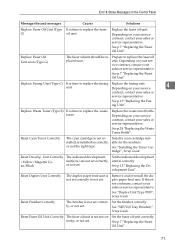
... Type 7000F Black photoconductor unit × 1 50,000 *2 Printer Maintenance Kit Type 7000G Fuser oil unit × 1 30,000 *2 Printer Maintenance Kit Type 3800H Paper feed rollers × 1 150,000 *1 A4 5% test chart, 5 pages/job *2 When printing each page as mixed printing of black & white and color pages is common. Furthermore, the lifespan of print...
... Type 7000F Black photoconductor unit × 1 50,000 *2 Printer Maintenance Kit Type 7000G Fuser oil unit × 1 30,000 *2 Printer Maintenance Kit Type 3800H Paper feed rollers × 1 150,000 *1 A4 5% test chart, 5 pages/job *2 When printing each page as mixed printing of black & white and color pages is common. Furthermore, the lifespan of print...

Operating Instructions
Page 108
...Registration, 37 Appendix, 97 B Bypass Tray Custom Size, 58 Paper Type, 59 C Cleaning and Adjusting the Printer, 29 Cleaning the DustProof Glass, 31 Cleaning the Registration Roller, 30 Color Adjustment Checking the Test Sheet, 35 Consumables, 100 D Data In indicator, 75 Detaching the 2 Tray Finisher, ... Chips, 95 Replacing Consumables and Maintenance Kit, 1 Replacing the Development Unit, 15 Replacing the Dustproof Filter, 22 Replacing the Fuser Oil Unit, 7 Replacing the Fusing Unit, 19 Replacing the Photoconductor Unit, 11 Replacing the Toner Cartridge, 2 Replacing the Waste Toner Bottle, 24...
...Registration, 37 Appendix, 97 B Bypass Tray Custom Size, 58 Paper Type, 59 C Cleaning and Adjusting the Printer, 29 Cleaning the DustProof Glass, 31 Cleaning the Registration Roller, 30 Color Adjustment Checking the Test Sheet, 35 Consumables, 100 D Data In indicator, 75 Detaching the 2 Tray Finisher, ... Chips, 95 Replacing Consumables and Maintenance Kit, 1 Replacing the Development Unit, 15 Replacing the Dustproof Filter, 22 Replacing the Fuser Oil Unit, 7 Replacing the Fusing Unit, 19 Replacing the Photoconductor Unit, 11 Replacing the Toner Cartridge, 2 Replacing the Waste Toner Bottle, 24...


