User Guide
Page 1
...list is meant as a result of this machine. Notes Some illustrations in , certain units may be liable for which country you are in this manual carefully before using the machine. For details, please contact your local dealer. Do not copy or print any questions concerning the legality of copying or... printing certain items, consult with your safety and benefit, read this manual might not be slightly different from the machine. We assume no event will the company be optional. If you have any item for direct,...
...list is meant as a result of this machine. Notes Some illustrations in , certain units may be liable for which country you are in this manual carefully before using the machine. For details, please contact your local dealer. Do not copy or print any questions concerning the legality of copying or... printing certain items, consult with your safety and benefit, read this manual might not be slightly different from the machine. We assume no event will the company be optional. If you have any item for direct,...

User Guide
Page 2
... (or indirect reflected) eye contact with your office products. Caution: Use of controls or adjustments or performance of procedures other than those specified in this manual might result in hazardous radiation exposure. Laser Safety: This machine is attached on rear side of the printer. The following label is considered class 1 laser...
... (or indirect reflected) eye contact with your office products. Caution: Use of controls or adjustments or performance of procedures other than those specified in this manual might result in hazardous radiation exposure. Laser Safety: This machine is attached on rear side of the printer. The following label is considered class 1 laser...
User Guide
Page 3
...; Place the machine on the ambient temperature and humidity, steam may result in an area that is outside the recommended ranges of ozone, locate this manual, the following safety precautions should always be Used R WARNING: • Keep the machine away from humidity and dust. If it might occur. • Do not...
...; Place the machine on the ambient temperature and humidity, steam may result in an area that is outside the recommended ranges of ozone, locate this manual, the following safety precautions should always be Used R WARNING: • Keep the machine away from humidity and dust. If it might occur. • Do not...
User Guide
Page 4
... the wall outlet if the machine will not be unplugged easily. • Avoid connecting multiple devices including this may result in the HTML manual or "Safety Information" (the printed manual). R CAUTION: • To disconnect the power cord, pull it can be used for use with wet hands. Handling Power Cords and Power...
... the wall outlet if the machine will not be unplugged easily. • Avoid connecting multiple devices including this may result in the HTML manual or "Safety Information" (the printed manual). R CAUTION: • To disconnect the power cord, pull it can be used for use with wet hands. Handling Power Cords and Power...

User Guide
Page 6
... tray when pulling out or pushing in burns. • When removing misfed paper, do not touch the fusing unit because it may result in this manual. • Do not take apart or attempt any covers or screws other than those specified in burns. • Before installing options, the machine should be...
... tray when pulling out or pushing in burns. • When removing misfed paper, do not touch the fusing unit because it may result in this manual. • Do not take apart or attempt any covers or screws other than those specified in burns. • Before installing options, the machine should be...
User Guide
Page 19
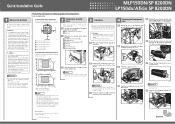
...within 5 mm, 0.2˝ from the printer to a wall outlet and do not use with tape. Quick Installation Guide Read this manual carefully before using the handles on a flat surface. Connect the power cord directly to its performance. Power sources not specified in the...inches) or more MLP150DN/SP 8200DN LP150dn/Aficio SP 8200DN Unpacking To protect it will be sure to where it from both sides. BEK011S Lift the printer with corrosive gases • Areas that the following items. CD-ROM "Printer Drivers and Utilities" CD-ROM "Manuals" CD-ROM "Document Management...
...within 5 mm, 0.2˝ from the printer to a wall outlet and do not use with tape. Quick Installation Guide Read this manual carefully before using the handles on a flat surface. Connect the power cord directly to its performance. Power sources not specified in the...inches) or more MLP150DN/SP 8200DN LP150dn/Aficio SP 8200DN Unpacking To protect it will be sure to where it from both sides. BEK011S Lift the printer with corrosive gases • Areas that the following items. CD-ROM "Printer Drivers and Utilities" CD-ROM "Manuals" CD-ROM "Document Management...
User Guide
Page 22
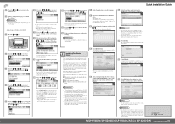
.... • Enable IPv4 to select [Active] or [Inactive], and then press the {OK} key. Log on the CD-ROM labeled "Manuals". Copyright © 2007 EN USA G179-7536 MLP150DN/SP 8200DN/LP150dn/Aficio SP 8200DN 2/2 Quick Installation Guide Press the {Escape} key until the screen returns to complete installation. For more information about restarting the computer...
.... • Enable IPv4 to select [Active] or [Inactive], and then press the {OK} key. Log on the CD-ROM labeled "Manuals". Copyright © 2007 EN USA G179-7536 MLP150DN/SP 8200DN/LP150dn/Aficio SP 8200DN 2/2 Quick Installation Guide Press the {Escape} key until the screen returns to complete installation. For more information about restarting the computer...

User Guide
Page 25
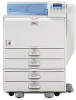
For safe and correct use this machine and keep it handy for future reference. Operating Instructions Hardware Guide 1 Guide to the Printer 2 Installing Options 3 Connecting the Printer Cables 4 Configuration 5 Paper and Other Media 6 Replacing Consumables 7 Cleaning the Printer 8 Adjusting the Printer 9 Troubleshooting 10 Removing Misfed Paper 11 Appendix Read this manual carefully before you use , be sure to read the Safety Information before using the machine.
For safe and correct use this machine and keep it handy for future reference. Operating Instructions Hardware Guide 1 Guide to the Printer 2 Installing Options 3 Connecting the Printer Cables 4 Configuration 5 Paper and Other Media 6 Replacing Consumables 7 Cleaning the Printer 8 Adjusting the Printer 9 Troubleshooting 10 Removing Misfed Paper 11 Appendix Read this manual carefully before you use , be sure to read the Safety Information before using the machine.

User Guide
Page 26
For your safety and benefit, read the "Safety Information" before using the machine. Keep this manual in a handy place for quick reference.For safe and correct use of this manual carefully before using the printer. Introduction This manual contains detailed instructions and notes on the operation and use , be sure to read this printer.
For your safety and benefit, read the "Safety Information" before using the machine. Keep this manual in a handy place for quick reference.For safe and correct use of this manual carefully before using the printer. Introduction This manual contains detailed instructions and notes on the operation and use , be sure to read this printer.
User Guide
Page 27
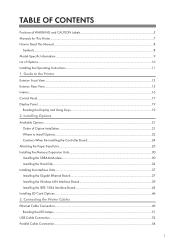
... Options Available Options...21 Order of Options...10 Installing the Operating Instructions...11 1. TABLE OF CONTENTS Positions of WARNING and CAUTION Labels 5 Manuals for This Printer...7 How to Read This Manual...8 Symbols...8 Model-Specific Information...9 List of Option Installation...21 Where to the Printer Exterior: Front View...13 Exterior: Rear View...15...
... Options Available Options...21 Order of Options...10 Installing the Operating Instructions...11 1. TABLE OF CONTENTS Positions of WARNING and CAUTION Labels 5 Manuals for This Printer...7 How to Read This Manual...8 Symbols...8 Model-Specific Information...9 List of Option Installation...21 Where to the Printer Exterior: Front View...13 Exterior: Rear View...15...
User Guide
Page 33
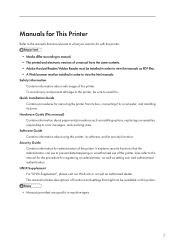
...data tampering or unauthorized use of functions and settings that are specific to a computer, and installing its security functions. This manual includes descriptions of the printer. Quick Installation Guide Contains procedures for registering an administrator, as well as installing options, replacing... consumables, responding to view the html manuals. To avoid injury and prevent damage to the printer, be installed in order to error messages, and resolving jams. ...
...data tampering or unauthorized use of functions and settings that are specific to a computer, and installing its security functions. This manual includes descriptions of the printer. Quick Installation Guide Contains procedures for registering an administrator, as well as installing options, replacing... consumables, responding to view the html manuals. To avoid injury and prevent damage to the printer, be installed in order to error messages, and resolving jams. ...

User Guide
Page 34
... found in moderate or minor injury, or damage to the machine or to originals, or loss of this manual. How to read these notes. Ignoring these notes. Be sure to Read This Manual Symbols This manual uses the following symbols: Indicates important safety notes. They can be found in serious injury or death...
... found in moderate or minor injury, or damage to the machine or to originals, or loss of this manual. How to read these notes. Ignoring these notes. Be sure to Read This Manual Symbols This manual uses the following symbols: Indicates important safety notes. They can be found in serious injury or death...

User Guide
Page 35
This indicates information about the 120 V model printer. BEK189S 9 Read if you have purchased this model. • Check the label on the rear of the printer to identify the printer's model. Read if you have purchased this model. This indicates information about the 220 to a specific printer model. Model-Specific Information In this manual, the following symbols indicate information that relates to 240 V model printer.
This indicates information about the 120 V model printer. BEK189S 9 Read if you have purchased this model. • Check the label on the rear of the printer to identify the printer's model. Read if you have purchased this model. This indicates information about the 220 to a specific printer model. Model-Specific Information In this manual, the following symbols indicate information that relates to 240 V model printer.

User Guide
Page 36
... unit Bridge unit 10 List of Options This section provides a list of options for this printer, and how they are referred to as in this manual.
... unit Bridge unit 10 List of Options This section provides a list of options for this printer, and how they are referred to as in this manual.

User Guide
Page 37
...and click [OK]. 4. Follow the instructions below to your computer's hard drive, and then run "Setup.exe". • To delete an installed manual, on the [Start] menu, click All Programs, then [Product Name], and then uninstall the data. • If you are installing the... Run may not work under certain operating system settings. Installing the Operating Instructions The CD-ROM "Manuals" provided with this case, launch "Setup.exe" in the CD-ROM root directory. 3. If you cannot install a manual, copy the "MANUAL_HTML" folder to install it. • System Requirements: • Windows 95...
...and click [OK]. 4. Follow the instructions below to your computer's hard drive, and then run "Setup.exe". • To delete an installed manual, on the [Start] menu, click All Programs, then [Product Name], and then uninstall the data. • If you are installing the... Run may not work under certain operating system settings. Installing the Operating Instructions The CD-ROM "Manuals" provided with this case, launch "Setup.exe" in the CD-ROM root directory. 3. If you cannot install a manual, copy the "MANUAL_HTML" folder to install it. • System Requirements: • Windows 95...

User Guide
Page 43
When the keys appear in red or yellow when a printer error occurs. Lights up in this manual, press the scroll key of the control panel. It is unlit when the power is in each direction. Entering energy saver mode turns off or ...
When the keys appear in red or yellow when a printer error occurs. Lights up in this manual, press the scroll key of the control panel. It is unlit when the power is in each direction. Entering energy saver mode turns off or ...

User Guide
Page 46
When the keys appear in each direction. When this manual, press the scroll key of the display. Guide to the Printer 1. [Escape] key Cancels an operation or returns to "press [Option]", press the left selection key. 20 Selection keys Correspond to the function items shown on the bottom line of the same direction. 3. [OK] key Confirms settings or setting values, or moves to the next menu level. 4. Scroll keys 1 Move the cursor in this manual instructs you to the previous display. 2. 1.
When the keys appear in each direction. When this manual, press the scroll key of the display. Guide to the Printer 1. [Escape] key Cancels an operation or returns to "press [Option]", press the left selection key. 20 Selection keys Correspond to the function items shown on the bottom line of the same direction. 3. [OK] key Confirms settings or setting values, or moves to the next menu level. 4. Scroll keys 1 Move the cursor in this manual instructs you to the previous display. 2. 1.

User Guide
Page 103
..., B5 JIS 81/2" × 11" (Letter) Imperial version 11" × 17" , 81/2" × , 14" (Legal) , 81/2" × 11" (Letter) , A5 , B5 JIS Paper sizes requiring manual setting B4 JIS , 11" × 17" , 81/2" × 14" (Legal) , 8" × 13" (F/GL) , 81/2" × 13" (Foolscap) , 81/2" × 11" (Letter) , ..." in width, 5.83" to 17.00" in length • When using paper whose sizes are not automatically selected, select the paper size manually using the control panel. 5. See "Loading Paper". • p.89 "Loading Paper" 77 The direction is determined for Each Tray This section ...
..., B5 JIS 81/2" × 11" (Letter) Imperial version 11" × 17" , 81/2" × , 14" (Legal) , 81/2" × 11" (Letter) , A5 , B5 JIS Paper sizes requiring manual setting B4 JIS , 11" × 17" , 81/2" × 14" (Legal) , 8" × 13" (F/GL) , 81/2" × 13" (Foolscap) , 81/2" × 11" (Letter) , ..." in width, 5.83" to 17.00" in length • When using paper whose sizes are not automatically selected, select the paper size manually using the control panel. 5. See "Loading Paper". • p.89 "Loading Paper" 77 The direction is determined for Each Tray This section ...

User Guide
Page 104
Bypass Tray Paper sizes selected automatically Paper sizes requiring manual setting Metric version A3 , A4 , A5 Imperial version 11" × 17" , 81/2" × 11" (Letter) , 51/2" × 81/2" (Half Letter) A4 , A5 , A6 , B4 JIS , ...
Bypass Tray Paper sizes selected automatically Paper sizes requiring manual setting Metric version A3 , A4 , A5 Imperial version 11" × 17" , 81/2" × 11" (Letter) , 51/2" × 81/2" (Half Letter) A4 , A5 , A6 , B4 JIS , ...

User Guide
Page 105
... lb.) 52 to 216 g/m2 (14 to 23.62" in length. • When using paper whose sizes are not automatically selected, select the paper size manually using the control panel. Supported Paper for Each Tray Metric version 71/2" , C5 Env. , C6 Env. , DL Env Custom size: 90 to 305 mm in...
... lb.) 52 to 216 g/m2 (14 to 23.62" in length. • When using paper whose sizes are not automatically selected, select the paper size manually using the control panel. Supported Paper for Each Tray Metric version 71/2" , C5 Env. , C6 Env. , DL Env Custom size: 90 to 305 mm in...


