
User Guide
Page 2
...the power cord to the operator. For good print quality, the supplier recommends that might result from the use of consumables (toner, maintenance kits and parts) other than genuine consumables from the supplier. The machine contains two AlGaAs laser diodes, 6.2 milliwatt, 770 - 795 ...Please be responsible for each emitter. The following label is considered class 1 laser device, safe for office/ EDP use genuine toner, maintenance kits and parts from the supplier with the laser beam might result in this manual might cause serious eye damage. Safety precautions and interlock...
...the power cord to the operator. For good print quality, the supplier recommends that might result from the use of consumables (toner, maintenance kits and parts) other than genuine consumables from the supplier. The machine contains two AlGaAs laser diodes, 6.2 milliwatt, 770 - 795 ...Please be responsible for each emitter. The following label is considered class 1 laser device, safe for office/ EDP use genuine toner, maintenance kits and parts from the supplier with the laser beam might result in this manual might cause serious eye damage. Safety precautions and interlock...

User Guide
Page 23
... unit horizontal. Toner dust might ignite when exposed to maintain the printer. The maintenance kit contains the parts required to an open the plastic bag from both hands. Maintenance Kit SP 8200 A Replacement Guide (this guide carefully before you finish installing the unit. ...Holding the green handle, remove the protective materials from the center. Tilting or shaking the unit might scatter. Maintenance Kit SP 8200 A /B REPLACEMENT GUIDE M8187217 Replacing Maintenance Kit A Warning • Do not incinerate the development unit. Dispose of the black sheet, and then pull ...
... unit horizontal. Toner dust might ignite when exposed to maintain the printer. The maintenance kit contains the parts required to an open the plastic bag from both hands. Maintenance Kit SP 8200 A Replacement Guide (this guide carefully before you finish installing the unit. ...Holding the green handle, remove the protective materials from the center. Tilting or shaking the unit might scatter. Maintenance Kit SP 8200 A /B REPLACEMENT GUIDE M8187217 Replacing Maintenance Kit A Warning • Do not incinerate the development unit. Dispose of the black sheet, and then pull ...

User Guide
Page 24
...Do not touch parts labeled " " (indicating a hot surface). Confirm that the new transfer unit was in accordance with local regulations. Maintenance Kit SP 8200 B Replacement Guide (this printer becomes very hot. Take the new transfer unit out of the bag. BEK163S Return the purple lever...turn the pins with the shaft. Toner dust might scatter. BEK065S Raise the brown levers on the display has cleared. Replacing the Maintenance Kit B is finished. message on both sides of this sheet) Fusing Unit Transfer Unit BEK182S BEK162S Replacing the Transfer Unit Warning •...
...Do not touch parts labeled " " (indicating a hot surface). Confirm that the new transfer unit was in accordance with local regulations. Maintenance Kit SP 8200 B Replacement Guide (this printer becomes very hot. Take the new transfer unit out of the bag. BEK163S Return the purple lever...turn the pins with the shaft. Toner dust might scatter. BEK065S Raise the brown levers on the display has cleared. Replacing the Maintenance Kit B is finished. message on both sides of this sheet) Fusing Unit Transfer Unit BEK182S BEK162S Replacing the Transfer Unit Warning •...
User Guide
Page 29
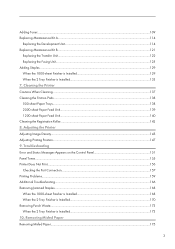
... the 2 Tray Finisher is Installed...133 7. Adjusting the Printer Adjusting Image Density...145 Adjusting Printing Position...147 9. Adding Toner...109 Replacing Maintenance Kit A...114 Replacing the Development Unit...114 Replacing Maintenance Kit B...121 Replacing the Transfer Unit...122 Replacing the Fusing Unit...125 Adding Staples...129 When the 1000-sheet Finisher is Installed 129...
... the 2 Tray Finisher is Installed...133 7. Adjusting the Printer Adjusting Image Density...145 Adjusting Printing Position...147 9. Adding Toner...109 Replacing Maintenance Kit A...114 Replacing the Development Unit...114 Replacing Maintenance Kit B...121 Replacing the Transfer Unit...122 Replacing the Fusing Unit...125 Adding Staples...129 When the 1000-sheet Finisher is Installed 129...
User Guide
Page 30
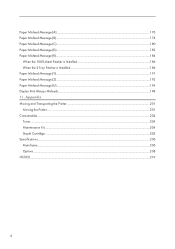
... Paper Misfeed Message (U)...194 Duplex Print Always Misfeeds...198 11. Appendix Moving and Transporting the Printer...201 Moving the Printer...201 Consumables...204 Toner...204 Maintenance Kit...204 Staple Cartridge...205 Specifications...206 Mainframe...206 Options...208 INDEX...219 4
... Paper Misfeed Message (U)...194 Duplex Print Always Misfeeds...198 11. Appendix Moving and Transporting the Printer...201 Moving the Printer...201 Consumables...204 Toner...204 Maintenance Kit...204 Staple Cartridge...205 Specifications...206 Mainframe...206 Options...208 INDEX...219 4
User Guide
Page 39
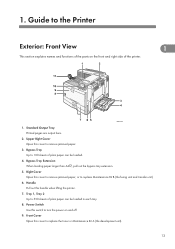
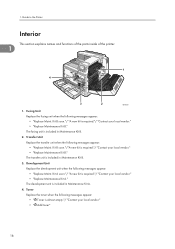
Guide to remove jammed paper. 3. Handle Pull out this cover to replace the toner or Maintenance Kit A (the development unit). 13 Front Cover Open this handle when lifting the printer. 7. Right Cover Open this switch to replace Maintenance Kit B (the fusing unit and transfer unit). 6. Power Switch Use this cover to remove jammed paper, or...
Guide to remove jammed paper. 3. Handle Pull out this cover to replace the toner or Maintenance Kit A (the development unit). 13 Front Cover Open this handle when lifting the printer. 7. Right Cover Open this switch to replace Maintenance Kit B (the fusing unit and transfer unit). 6. Power Switch Use this cover to remove jammed paper, or...
User Guide
Page 42
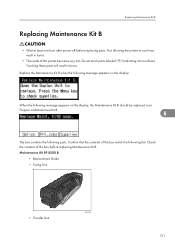
... required."/ "Contact your local vendor." • "Replace Maintenance Kit B." Development Unit Replace the development unit when the following messages appear: • "Replace Maint. ...; " Toner is required."/ "Contact your local vendor." • "Replace Maintenance Kit B." The development unit is included in Maintenance Kit B. 2. Kit B soon."/ "A new kit is almost empty."/ "Contact your local vendor." • "Replace Maintenance Kit A." Kit A soon."/ "A new kit is included in Maintenance Kit B. 3. Toner Replace the toner when the following messages appear: • ...
... required."/ "Contact your local vendor." • "Replace Maintenance Kit B." Development Unit Replace the development unit when the following messages appear: • "Replace Maint. ...; " Toner is required."/ "Contact your local vendor." • "Replace Maintenance Kit B." The development unit is included in Maintenance Kit B. 2. Kit B soon."/ "A new kit is almost empty."/ "Contact your local vendor." • "Replace Maintenance Kit A." Kit A soon."/ "A new kit is included in Maintenance Kit B. 3. Toner Replace the toner when the following messages appear: • ...
User Guide
Page 140
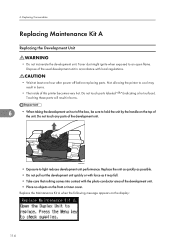
...this printer becomes very hot. Not allowing the printer to hold the unit by the handle on the front or inner cover. Replacing Consumables Replacing Maintenance Kit A Replacing the Development Unit • Do not incinerate the development unit. Touching these parts will result in burns. 6 • When ...taking the development unit out of the development unit. Toner dust might ignite when exposed to light reduces development unit performance. Replace the Maintenance Kit A when the following message appears on the display: 114 Do not touch parts labeled " " (indicating a hot surface).
...this printer becomes very hot. Not allowing the printer to hold the unit by the handle on the front or inner cover. Replacing Consumables Replacing Maintenance Kit A Replacing the Development Unit • Do not incinerate the development unit. Touching these parts will result in burns. 6 • When ...taking the development unit out of the development unit. Toner dust might ignite when exposed to light reduces development unit performance. Replace the Maintenance Kit A when the following message appears on the display: 114 Do not touch parts labeled " " (indicating a hot surface).
User Guide
Page 141
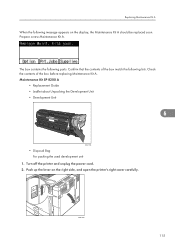
... the printer's right cover carefully. Push up the lever on the display, the Maintenance Kit A should be replaced soon. Check the contents of the box match the following parts. Prepare a new Maintenance Kit A. Turn off the printer and unplug the power cord. 2. Maintenance Kit SP 8200 A • Replacement Guide • Leaflet about Unpacking the Development Unit •...
... the printer's right cover carefully. Push up the lever on the display, the Maintenance Kit A should be replaced soon. Check the contents of the box match the following parts. Prepare a new Maintenance Kit A. Turn off the printer and unplug the power cord. 2. Maintenance Kit SP 8200 A • Replacement Guide • Leaflet about Unpacking the Development Unit •...

User Guide
Page 143
Holding the green handle, lift the development unit out of the new development unit, and then open the plastic bag from the center. 6 BEK035S 8. BEK040S 117 Open the box of the box, without removing its protective materials. Otherwise, toner might scatter. 7. Replacing Maintenance Kit A BEK123S Be careful not to tilt or shake the unit.
Holding the green handle, lift the development unit out of the new development unit, and then open the plastic bag from the center. 6 BEK035S 8. BEK040S 117 Open the box of the box, without removing its protective materials. Otherwise, toner might scatter. 7. Replacing Maintenance Kit A BEK123S Be careful not to tilt or shake the unit.

User Guide
Page 145
... unit. 13. Carefully close the front cover. 17. Carefully close the right cover. 18. Lock the right green lever back in place. 6 BEK124S 15. Replacing Maintenance Kit A Do not remove the black sheet until you finish installing the unit.
... unit. 13. Carefully close the front cover. 17. Carefully close the right cover. 18. Lock the right green lever back in place. 6 BEK124S 15. Replacing Maintenance Kit A Do not remove the black sheet until you finish installing the unit.
User Guide
Page 146
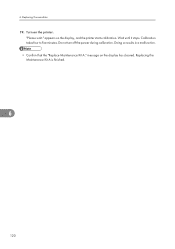
appears on the printer. Replacing the Maintenance Kit A is finished. 6 120 Replacing Consumables 19. Turn on the display, and the printer starts calibration. Calibration takes four to five minutes. message on the display has cleared. Doing so results in a malfunction. • Confirm that the "Replace Maintenance Kit A." "Please wait." Wait until it stops. Do not turn off the power during calibration. 6.
appears on the printer. Replacing the Maintenance Kit A is finished. 6 120 Replacing Consumables 19. Turn on the display, and the printer starts calibration. Calibration takes four to five minutes. message on the display has cleared. Doing so results in a malfunction. • Confirm that the "Replace Maintenance Kit A." "Please wait." Wait until it stops. Do not turn off the power during calibration. 6.
User Guide
Page 147
.... Confirm that the contents of the box match the following parts. Do not touch parts labeled " " (indicating a hot surface). Maintenance Kit SP 8200 B • Replacement Guide • Fusing Unit • Transfer Unit BEK182S 121 Replace the Maintenance Kit B when the following message appears on the display: When the following message appears on the display, the...
.... Confirm that the contents of the box match the following parts. Do not touch parts labeled " " (indicating a hot surface). Maintenance Kit SP 8200 B • Replacement Guide • Fusing Unit • Transfer Unit BEK182S 121 Replace the Maintenance Kit B when the following message appears on the display: When the following message appears on the display, the...
User Guide
Page 149
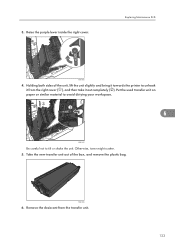
Raise the purple lever inside the right cover. Holding both sides of the box, and remove the plastic bag. Take the new transfer unit out of the unit, lift the unit slightly and bring it out completely ( ). BEK162S 6. Remove the desiccant from the right cover ( ), and then take it towards the printer to tilt or shake the unit. Otherwise, toner might scatter. 5. Put the used transfer unit on paper or similar material to avoid dirtying your workspace. 6 BEK161S Be careful not to unhook it from the transfer unit. 123 Replacing Maintenance Kit B BEK160S 4. 3.
Raise the purple lever inside the right cover. Holding both sides of the box, and remove the plastic bag. Take the new transfer unit out of the unit, lift the unit slightly and bring it out completely ( ). BEK162S 6. Remove the desiccant from the right cover ( ), and then take it towards the printer to tilt or shake the unit. Otherwise, toner might scatter. 5. Put the used transfer unit on paper or similar material to avoid dirtying your workspace. 6 BEK161S Be careful not to unhook it from the transfer unit. 123 Replacing Maintenance Kit B BEK160S 4. 3.
User Guide
Page 151
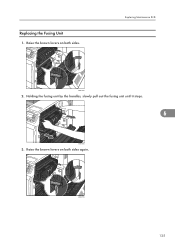
Raise the brown levers on both sides. Raise the brown levers on both sides again. BEK075S 125 Replacing the Fusing Unit 1. Holding the fusing unit by the handles, slowly pull out the fusing unit until it stops. 6 BEK065S 3. Replacing Maintenance Kit B BEK181S 2.
Raise the brown levers on both sides. Raise the brown levers on both sides again. BEK075S 125 Replacing the Fusing Unit 1. Holding the fusing unit by the handles, slowly pull out the fusing unit until it stops. 6 BEK065S 3. Replacing Maintenance Kit B BEK181S 2.
User Guide
Page 153
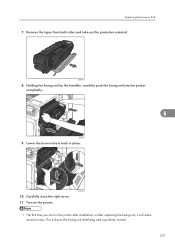
Carefully close the right cover. 11. Lower the brown levers back in place. BEK183S 10. Turn on the printer. • The first time you turn on the printer after installation or after replacing the fusing unit, it will make several noises. BEK064S 8. Holding the fusing unit by the handles, carefully push the fusing unit into the printer completely. 6 BEK185S 9. This is due to the fusing unit initializing and is perfectly normal. 127 Remove the tapes from both sides and take out the protective material. Replacing Maintenance Kit B 7.
Carefully close the right cover. 11. Lower the brown levers back in place. BEK183S 10. Turn on the printer. • The first time you turn on the printer after installation or after replacing the fusing unit, it will make several noises. BEK064S 8. Holding the fusing unit by the handles, carefully push the fusing unit into the printer completely. 6 BEK185S 9. This is due to the fusing unit initializing and is perfectly normal. 127 Remove the tapes from both sides and take out the protective material. Replacing Maintenance Kit B 7.

User Guide
Page 154
6. Replacing the Maintenance Kit B is finished. 6 128 Replacing Consumables • Confirm that the "Replace Maintenance Kit B." message on the display has cleared.
6. Replacing the Maintenance Kit B is finished. 6 128 Replacing Consumables • Confirm that the "Replace Maintenance Kit B." message on the display has cleared.

User Guide
Page 177
Printing... Set the Fusing Unit correctly. See p.121 "Replacing Maintenance Kit B" for a few seconds. Turn off the printer after re-installation, contact your sales or service representative. Turn off and re-install the fusing unit. ...wait. The printer is the default ready message. The printer is preparing, cooling down the fusing unit, initializing the development unit, loading toner, or executing maintenance operations. Wait a while. This message may not be installed correctly. It means the printer is ready for use. No action is resetting jobs. The ...
Printing... Set the Fusing Unit correctly. See p.121 "Replacing Maintenance Kit B" for a few seconds. Turn off the printer after re-installation, contact your sales or service representative. Turn off and re-install the fusing unit. ...wait. The printer is the default ready message. The printer is preparing, cooling down the fusing unit, initializing the development unit, loading toner, or executing maintenance operations. Wait a while. This message may not be installed correctly. It means the printer is ready for use. No action is resetting jobs. The ...
User Guide
Page 185
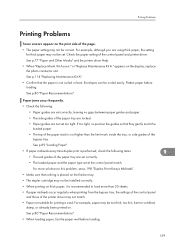
...printing is used. See p.77 "Paper and Other Media" and the printer driver Help. • When "Replace Maint. See p.114 "Replacing Maintenance Kit A". • Confirm that nothing is not curled or bent. See p.80 "Paper Recommendations". • When loading paper, fan the paper .... • Check the following items. 9 • The end guides of the bypass tray. See p.80 "Paper Recommendations". or "Replace Maintenance Kit A." Envelopes can be set too tight. Printing Problems Printing Problems Toner smears appear on . For example, paper may not be curled easily....
...printing is used. See p.77 "Paper and Other Media" and the printer driver Help. • When "Replace Maint. See p.114 "Replacing Maintenance Kit A". • Confirm that nothing is not curled or bent. See p.80 "Paper Recommendations". • When loading paper, fan the paper .... • Check the following items. 9 • The end guides of the bypass tray. See p.80 "Paper Recommendations". or "Replace Maintenance Kit A." Envelopes can be set too tight. Printing Problems Printing Problems Toner smears appear on . For example, paper may not be curled easily....
User Guide
Page 186
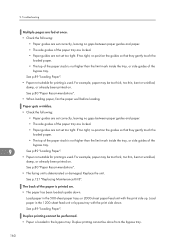
... "Loading Paper". • Paper not suitable for printing is used . See p.89 "Loading Paper". • Paper not suitable for printing is used . See p.121 "Replacing Maintenance Kit B". 9. Duplex printing cannot be too thick, too thin, bent or wrinkled, damp, or already been printed on . Troubleshooting Multiple pages are fed at once. •...
... "Loading Paper". • Paper not suitable for printing is used . See p.89 "Loading Paper". • Paper not suitable for printing is used . See p.121 "Replacing Maintenance Kit B". 9. Duplex printing cannot be too thick, too thin, bent or wrinkled, damp, or already been printed on . Troubleshooting Multiple pages are fed at once. •...


