Hardware Guide
Page 1
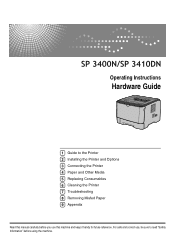
For safe and correct use, be sure to the Printer 2 Installing the Printer and Options 3 Connecting the Printer 4 Paper and Other Media 5 Replacing Consumables 6 Cleaning the Printer 7 Troubleshooting 8 Removing Misfed Paper 9 Appendix Read this machine and keep it handy for future reference. Operating Instructions Hardware Guide 1 Guide to read "Safety Information" before you use this manual carefully before using the machine.
For safe and correct use, be sure to the Printer 2 Installing the Printer and Options 3 Connecting the Printer 4 Paper and Other Media 5 Replacing Consumables 6 Cleaning the Printer 7 Troubleshooting 8 Removing Misfed Paper 9 Appendix Read this machine and keep it handy for future reference. Operating Instructions Hardware Guide 1 Guide to read "Safety Information" before you use this manual carefully before using the machine.
Hardware Guide
Page 2
... optional. Depending on the operation and use of handling or operating the machine. In no responsibility for direct, indirect, special, incidental, or consequential damages as a guide only and is not inclusive. Copying or printing the following items is prohibited by local law: bank notes, revenue stamps, bonds, stock certificates, bank drafts...
... optional. Depending on the operation and use of handling or operating the machine. In no responsibility for direct, indirect, special, incidental, or consequential damages as a guide only and is not inclusive. Copying or printing the following items is prohibited by local law: bank notes, revenue stamps, bonds, stock certificates, bank drafts...
Hardware Guide
Page 3
Guide to Read This Manual 3 Symbols ...3 Printer Types ...4 Using Manuals...5 Installing Manuals on Your Computer 5 Opening Manuals ...6 Removing Manuals from Your Computer 7 1. Paper and Other Media ...
Guide to Read This Manual 3 Symbols ...3 Printer Types ...4 Using Manuals...5 Installing Manuals on Your Computer 5 Opening Manuals ...6 Removing Manuals from Your Computer 7 1. Paper and Other Media ...
Hardware Guide
Page 6
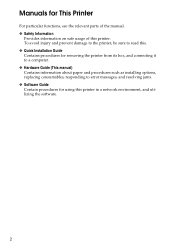
...prevent damage to the printer, be sure to read this. ❖ Quick Installation Guide Contains procedures for removing the printer from its box, and connecting it to a computer. ❖ Hardware Guide (This manual) Contains information about paper and procedures such as installing options, replacing... consumables, responding to error messages, and resolving jams. ❖ Software Guide Contain procedures for This Printer For particular functions, see the relevant parts of the manual. ❖ Safety Information Provides ...
...prevent damage to the printer, be sure to read this. ❖ Quick Installation Guide Contains procedures for removing the printer from its box, and connecting it to a computer. ❖ Hardware Guide (This manual) Contains information about paper and procedures such as installing options, replacing... consumables, responding to error messages, and resolving jams. ❖ Software Guide Contain procedures for This Printer For particular functions, see the relevant parts of the manual. ❖ Safety Information Provides ...
Hardware Guide
Page 13
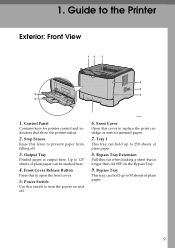
.... Tray 1 This tray can hold up to prevent paper from falling off . 1. Front Cover Release Button Press this cover to the Printer Exterior: Front View 1. Guide to replace the print cartridge or remove jammed paper. 7.
.... Tray 1 This tray can hold up to prevent paper from falling off . 1. Front Cover Release Button Press this cover to the Printer Exterior: Front View 1. Guide to replace the print cartridge or remove jammed paper. 7.
Hardware Guide
Page 14
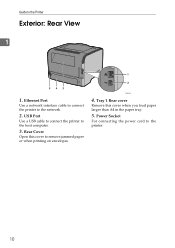
Ethernet Port Use a network interface cable to connect the printer to the Printer Exterior: Rear View 1 1. BXG004 4. Guide to the network. 2. Tray 1 Rear cover Remove this cover to the host computer. 3. USB Port Use a USB cable to connect the printer to remove jammed paper or when printing on envelopes. Rear Cover Open this cover when you load paper larger than A4 in the paper tray. 5. Power Socket For connecting the power cord to the printer. 10
Ethernet Port Use a network interface cable to connect the printer to the Printer Exterior: Rear View 1 1. BXG004 4. Guide to the network. 2. Tray 1 Rear cover Remove this cover to the host computer. 3. USB Port Use a USB cable to connect the printer to remove jammed paper or when printing on envelopes. Rear Cover Open this cover when you load paper larger than A4 in the paper tray. 5. Power Socket For connecting the power cord to the printer. 10
Hardware Guide
Page 16
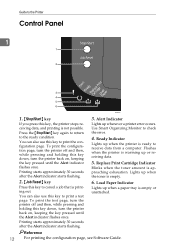
Guide to the Printer Control Panel 1 1 2 3 4 5 6 BXG220 1. {Stop/Start} key If you press this key to print a test page. You can also use this key, the ... starts approximately 30 seconds after the Alert indicator starts flashing. 3. Lights up whenever a printer error occurs. Reference 12 For printing the configuration page, see Software Guide. Ready Indicator Lights up when the printer is empty. 6. Load Paper Indicator Lights up or receiving data. 5. To print the configuration page, turn the printer...
Guide to the Printer Control Panel 1 1 2 3 4 5 6 BXG220 1. {Stop/Start} key If you press this key to print a test page. You can also use this key, the ... starts approximately 30 seconds after the Alert indicator starts flashing. 3. Lights up whenever a printer error occurs. Reference 12 For printing the configuration page, see Software Guide. Ready Indicator Lights up when the printer is empty. 6. Load Paper Indicator Lights up or receiving data. 5. To print the configuration page, turn the printer...
Hardware Guide
Page 29
... it properly even after attempting reinstallation, contact your sales or service representative. 2 Reference For loading paper into the paper tray, see Software Guide. ing this procedure. For details, see Software Guide. 25 Installing the Optional Paper Feed Unit Note ❒ When moving the printer, remove the optional paper feed unit. ❒ After...
... it properly even after attempting reinstallation, contact your sales or service representative. 2 Reference For loading paper into the paper tray, see Software Guide. ing this procedure. For details, see Software Guide. 25 Installing the Optional Paper Feed Unit Note ❒ When moving the printer, remove the optional paper feed unit. ❒ After...
Hardware Guide
Page 31
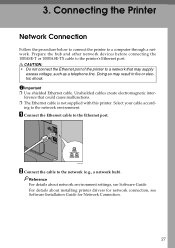
... interference that may result in fire or electric shock. Reference For details about installing printer drivers for network connection, see Software Guide. For details about network environment settings, see Software Installation Guide for Network Connection. 27 R CAUTION: • Do not connect the Ethernet port of the printer to the network (e.g., a network hub...
... interference that may result in fire or electric shock. Reference For details about installing printer drivers for network connection, see Software Guide. For details about network environment settings, see Software Installation Guide for Network Connection. 27 R CAUTION: • Do not connect the Ethernet port of the printer to the network (e.g., a network hub...
Hardware Guide
Page 33
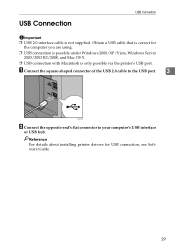
Obtain a USB cable that is correct for USB connection, see Software Guide. 29 A Connect the square-shaped connector of the USB 2.0 cable to the USB port. 3 BXG025 B Connect the opposite end's flat connector to your computer's USB ...
Obtain a USB cable that is correct for USB connection, see Software Guide. 29 A Connect the square-shaped connector of the USB 2.0 cable to the USB port. 3 BXG025 B Connect the opposite end's flat connector to your computer's USB ...
Hardware Guide
Page 45
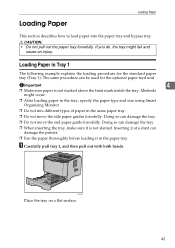
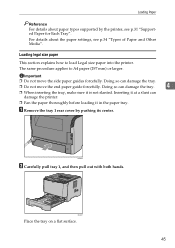
... CAUTION: • Do not pull out the paper tray forcefully. Loading Paper in the same paper tray. ❒ Do not move the end paper guide forcefully. BXG031 Place the tray on a flat surface. 41 If you do, the tray might occur. ❒ After loading paper in the tray, specify... explains the loading procedure for the optional paper feed unit. The same procedure can damage the tray. ❒ Do not move the side paper guides forcefully. Misfeeds might fall and cause an injury. Doing so can damage the printer. ❒ Fan the paper thoroughly before loading it is not...
... CAUTION: • Do not pull out the paper tray forcefully. Loading Paper in the same paper tray. ❒ Do not move the end paper guide forcefully. BXG031 Place the tray on a flat surface. 41 If you do, the tray might occur. ❒ After loading paper in the tray, specify... explains the loading procedure for the optional paper feed unit. The same procedure can damage the tray. ❒ Do not move the side paper guides forcefully. Misfeeds might fall and cause an injury. Doing so can damage the printer. ❒ Fan the paper thoroughly before loading it is not...
Hardware Guide
Page 46
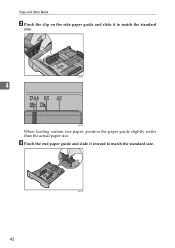
C Pinch the end paper guide and slide it to match the standard size. 42 BXG105 Paper and Other Media B Pinch the clip on the side paper guide and slide it inward to match the standard size. BXG032 4 BXG104 When loading custom size paper, position the paper guide slightly wider than the actual paper size.
C Pinch the end paper guide and slide it to match the standard size. 42 BXG105 Paper and Other Media B Pinch the clip on the side paper guide and slide it inward to match the standard size. BXG032 4 BXG104 When loading custom size paper, position the paper guide slightly wider than the actual paper size.
Hardware Guide
Page 47
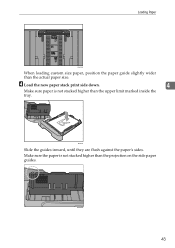
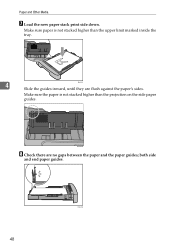
D Load the new paper stack print side down. 4 Make sure paper is not stacked higher than the projection on the side paper guides. BXG036 Slide the guides inward, until they are flush against the paper's sides. BSP065S 43 Loading Paper BXG106 When loading custom size paper, position the paper guide slightly wider than the upper limit marked inside the tray. Make sure the paper is not stacked higher than the actual paper size.
D Load the new paper stack print side down. 4 Make sure paper is not stacked higher than the projection on the side paper guides. BXG036 Slide the guides inward, until they are flush against the paper's sides. BSP065S 43 Loading Paper BXG106 When loading custom size paper, position the paper guide slightly wider than the upper limit marked inside the tray. Make sure the paper is not stacked higher than the actual paper size.
Hardware Guide
Page 48
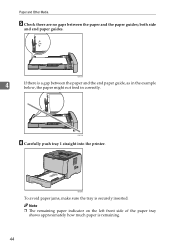
both side and end paper guides. BXG109 4 If there is remaining. 44 Note ❒ The remaining paper indicator on the left front side of the paper tray shows approximately how much paper is a gap between the paper and the paper guides; BXG108 F Carefully push tray 1 straight into the printer. BXG040 To avoid paper jams, make sure the tray is securely inserted. Paper and Other Media E Check there are no gaps between the paper and the end paper guide, as in the example below, the paper might not feed in correctly.
both side and end paper guides. BXG109 4 If there is remaining. 44 Note ❒ The remaining paper indicator on the left front side of the paper tray shows approximately how much paper is a gap between the paper and the paper guides; BXG108 F Carefully push tray 1 straight into the printer. BXG040 To avoid paper jams, make sure the tray is securely inserted. Paper and Other Media E Check there are no gaps between the paper and the end paper guide, as in the example below, the paper might not feed in correctly.
Hardware Guide
Page 49
... p.34 "Types of Paper and Other Media". Doing so can damage the tray. ❒ Do not move the side paper guides forcefully. Important ❒ Do not move the end paper guide forcefully. For details about paper types supported by pushing its center. Loading legal size paper This section explains how to A4...
... p.34 "Types of Paper and Other Media". Doing so can damage the tray. ❒ Do not move the side paper guides forcefully. Important ❒ Do not move the end paper guide forcefully. For details about paper types supported by pushing its center. Loading legal size paper This section explains how to A4...
Hardware Guide
Page 51
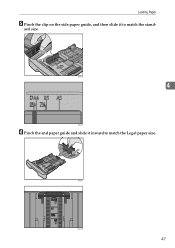
BXG214 BXG106 47 BXG103 4 BXG104 F Pinch the end paper guide and slide it to match the Legal paper size. Loading Paper E Pinch the clip on the side paper guide, and then slide it inward to match the stand- ard size.
BXG214 BXG106 47 BXG103 4 BXG104 F Pinch the end paper guide and slide it to match the Legal paper size. Loading Paper E Pinch the clip on the side paper guide, and then slide it inward to match the stand- ard size.
Hardware Guide
Page 52
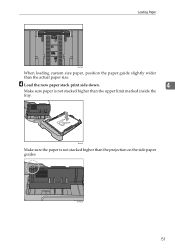
both side and end paper guides. 48 BXG109 Make sure the paper is not stacked higher than the projection on the side paper guides. BXG107 4 Slide the guides inward, until they are no gaps between the paper and the paper guides; BSP065S H Check there are flush against the paper's sides. Make sure paper is not stacked higher than the upper limit marked inside the tray. Paper and Other Media G Load the new paper stack print side down.
both side and end paper guides. 48 BXG109 Make sure the paper is not stacked higher than the projection on the side paper guides. BXG107 4 Slide the guides inward, until they are no gaps between the paper and the paper guides; BSP065S H Check there are flush against the paper's sides. Make sure paper is not stacked higher than the upper limit marked inside the tray. Paper and Other Media G Load the new paper stack print side down.

Hardware Guide
Page 53
... supported by the printer, see p.34 "Types of the paper tray shows approximately how much paper is a gap between the paper and the end paper guide, as in the example below, the paper might not feed in correctly. BXG108 I Carefully push tray 1 straight into the printer. 4 BXG040 To avoid paper jams...
... supported by the printer, see p.34 "Types of the paper tray shows approximately how much paper is a gap between the paper and the end paper guide, as in the example below, the paper might not feed in correctly. BXG108 I Carefully push tray 1 straight into the printer. 4 BXG040 To avoid paper jams...

Hardware Guide
Page 54
B Pinch the clips on a flat surface. Paper and Other Media Loading Paper in Tray 2 The following example explains the loading procedure for tray 2. A Pull tray 2, and then pull it out with both hands. 4 BXG048 Place the tray on the side paper guide, and then slide it inward to match the paper size. BXG032 C Pinch the clip on the end paper guide and slide it to match the paper size. 50 BXG105
B Pinch the clips on a flat surface. Paper and Other Media Loading Paper in Tray 2 The following example explains the loading procedure for tray 2. A Pull tray 2, and then pull it out with both hands. 4 BXG048 Place the tray on the side paper guide, and then slide it inward to match the paper size. BXG032 C Pinch the clip on the end paper guide and slide it to match the paper size. 50 BXG105
Hardware Guide
Page 55
BXG036 Make sure the paper is not stacked higher than the upper limit marked inside the tray. Loading Paper BXG106 When loading custom size paper, position the paper guide slightly wider than the projection on the side paper guides. BSP065S 51 D Load the new paper stack print side down. 4 Make sure paper is not stacked higher than the actual paper size.
BXG036 Make sure the paper is not stacked higher than the upper limit marked inside the tray. Loading Paper BXG106 When loading custom size paper, position the paper guide slightly wider than the projection on the side paper guides. BSP065S 51 D Load the new paper stack print side down. 4 Make sure paper is not stacked higher than the actual paper size.