User Guide
Page 12
B This manual may not be liable for "Adobe PostScript 3 Emulation". Disclaimer A In no event will the company be reproduced in whole or in part, modified, quoted, or reprinted without Hyper-VTM Note ❒ PostScript 3 in this manual stands for direct, indirect, special, incidental, or consequential damages as a result of ...
B This manual may not be liable for "Adobe PostScript 3 Emulation". Disclaimer A In no event will the company be reproduced in whole or in part, modified, quoted, or reprinted without Hyper-VTM Note ❒ PostScript 3 in this manual stands for direct, indirect, special, incidental, or consequential damages as a result of ...
User Guide
Page 16
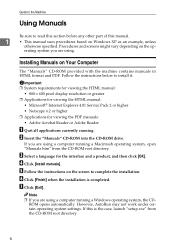
... currently running a Macintosh operating system, open "Manuals.htm" from the CD-ROM root directory. 6 Follow the instructions below to read this section before any other part of this is completed. F Click [Finish] when the installation is the case, launch "setup.exe" from the CD-ROM root directory. However, AutoRun may not...
... currently running a Macintosh operating system, open "Manuals.htm" from the CD-ROM root directory. 6 Follow the instructions below to read this section before any other part of this is completed. F Click [Finish] when the installation is the case, launch "setup.exe" from the CD-ROM root directory. However, AutoRun may not...
User Guide
Page 31
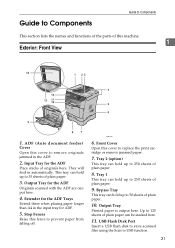
... using the Scan to remove originals jammed in the ADF. 2. Guide to Components Guide to Components This section lists the names and functions of the parts of this cover to replace the print cartridge or remove jammed paper. 7. BSP016S 6. ADF (Auto document feeder) Cover Open this fence to prevent paper from...
... using the Scan to remove originals jammed in the ADF. 2. Guide to Components Guide to Components This section lists the names and functions of the parts of this cover to replace the print cartridge or remove jammed paper. 7. BSP016S 6. ADF (Auto document feeder) Cover Open this fence to prevent paper from...
User Guide
Page 34
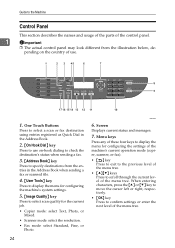
.... • Fax mode: select Standard, Fine, or Photo. 24 BSP020S 6. Guide to the Machine Control Panel This section describes the names and usage of the parts of the control panel. 1 Important ❒ The actual control panel may look different from the entries in the Address Book. 2. {On Hook Dial} key Press...
.... • Fax mode: select Standard, Fine, or Photo. 24 BSP020S 6. Guide to the Machine Control Panel This section describes the names and usage of the parts of the control panel. 1 Important ❒ The actual control panel may look different from the entries in the Address Book. 2. {On Hook Dial} key Press...
User Guide
Page 71
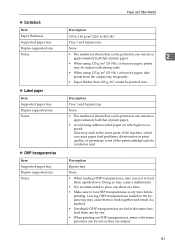
... load them upside down. Doing so may cause a malfunction. • It is recommended to place one sheet at a time. • Make sure to the inner parts of the machine, which glue is approximately half that of the print cartridge's photo conductor unit. Glue may be output with strong curls. • When...
... load them upside down. Doing so may cause a malfunction. • It is recommended to place one sheet at a time. • Make sure to the inner parts of the machine, which glue is approximately half that of the print cartridge's photo conductor unit. Glue may be output with strong curls. • When...
User Guide
Page 89
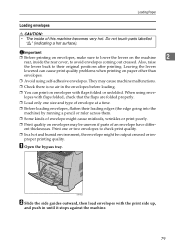
A Open the bypass tray. Do not touch parts labelled "v" (indicating a hot surface). Leaving the levers lowered can print on envelopes may cause machine malfunctions. ❒ Check there is no air in until it ... their leading edges (the edge going into the machine) by running a pencil or ruler across them. ❒ Some kinds of envelope might be uneven if parts of this machine becomes very hot. Print one size and type of envelope at a time. ❒ Before loading envelopes, flatten their original positions after printing...
A Open the bypass tray. Do not touch parts labelled "v" (indicating a hot surface). Leaving the levers lowered can print on envelopes may cause machine malfunctions. ❒ Check there is no air in until it ... their leading edges (the edge going into the machine) by running a pencil or ruler across them. ❒ Some kinds of envelope might be uneven if parts of this machine becomes very hot. Print one size and type of envelope at a time. ❒ Before loading envelopes, flatten their original positions after printing...
User Guide
Page 94
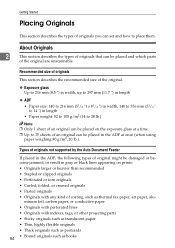
... 80 g/m2, 20 lb.). Getting Started Placing Originals This section describes the types of originals you can be placed and which parts of the original are unscannable. About Originals 2 This section describes the types of originals that can set and how to 35 sheets...; Perforated or torn originals • Curled, folded, or creased originals • Pasted originals • Originals with indexes, tags, or other projecting parts • Sticky originals such as translucent paper • Thin, highly flexible originals • Thick originals such as postcards 84 • Bound originals ...
... 80 g/m2, 20 lb.). Getting Started Placing Originals This section describes the types of originals you can be placed and which parts of the original are unscannable. About Originals 2 This section describes the types of originals that can set and how to 35 sheets...; Perforated or torn originals • Curled, folded, or creased originals • Pasted originals • Originals with indexes, tags, or other projecting parts • Sticky originals such as translucent paper • Thin, highly flexible originals • Thick originals such as postcards 84 • Bound originals ...
User Guide
Page 193
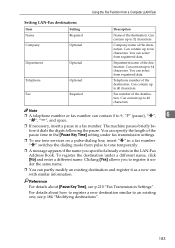
You can partly modify an existing destination and register it as a new one , see p.210 "Fax Transmission Settings". Clicking [Yes] allows you specified already exists in the [Pause ...
You can partly modify an existing destination and register it as a new one , see p.210 "Fax Transmission Settings". Clicking [Yes] allows you specified already exists in the [Pause ...
User Guide
Page 210
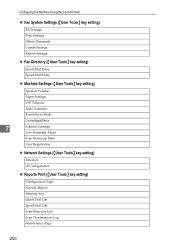
... setting) Quick Dial Entry Speed Dial Entry ❖ Machine Settings ({User Tools} key setting) Speaker Volume Paper Settings I/O Timeout Auto Continue Toner Saver Mode Cartridge&Parts 7 Scanner Carriage Low Humidity Mode Scan Warm-up Time User Registration ❖ Network Settings ({User Tools} key setting) Ethernet IP Configuration ❖ Reports Print ({User...
... setting) Quick Dial Entry Speed Dial Entry ❖ Machine Settings ({User Tools} key setting) Speaker Volume Paper Settings I/O Timeout Auto Continue Toner Saver Mode Cartridge&Parts 7 Scanner Carriage Low Humidity Mode Scan Warm-up Time User Registration ❖ Network Settings ({User Tools} key setting) Ethernet IP Configuration ❖ Reports Print ({User...
User Guide
Page 225
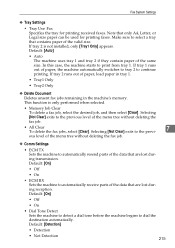
..., and then select [Clear]. Default: [On] • Off • On • ECM RX Sets the machine to automatically receive parts of paper, the machine automatically switches to tray 2 to automatically resend parts of the same size. If tray 1 runs out of the data that are lost during reception. This function is not...
..., and then select [Clear]. Default: [On] • Off • On • ECM RX Sets the machine to automatically receive parts of paper, the machine automatically switches to tray 2 to automatically resend parts of the same size. If tray 1 runs out of the data that are lost during reception. This function is not...
User Guide
Page 232
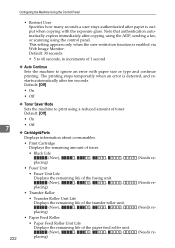
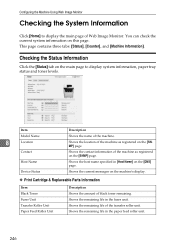
... stops temporarily when an error is output when copying with paper size or type and continue printing. Default: [Off] • On 7 • Off ❖ Cartridge&Parts Displays information about consumables. • Print Cartridge Displays the remaining amount of toner. • Black Life (New), , , , , placing) • Fuser Unit • Fuser Unit Life...
... stops temporarily when an error is output when copying with paper size or type and continue printing. Default: [Off] • On 7 • Off ❖ Cartridge&Parts Displays information about consumables. • Print Cartridge Displays the remaining amount of toner. • Black Life (New), , , , , placing) • Fuser Unit • Fuser Unit Life...
User Guide
Page 239
... Tray Shows paper size and type settings. • Tray 1 Shows paper size and type settings. • Tray 2 Shows paper size and type settings. ❖ Cartridge & Parts Information Shows the information about supply levels. • Black Toner • Fuser Unit • Transfer Roller • Paper Feed Roller 7 229 Reports Print ❖ Speed...
... Tray Shows paper size and type settings. • Tray 1 Shows paper size and type settings. • Tray 2 Shows paper size and type settings. ❖ Cartridge & Parts Information Shows the information about supply levels. • Black Toner • Fuser Unit • Transfer Roller • Paper Feed Roller 7 229 Reports Print ❖ Speed...
User Guide
Page 256
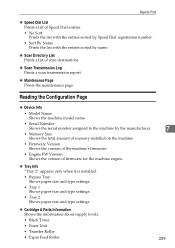
... unit. Shows the remaining life of the machine. Shows the contact information of the machine as registered on the machine's display. ❖ Print Cartridge & Replaceable Parts Information Item Black Toner Fuser Unit Transfer Roller Unit Paper Feed Roller Unit Description Shows the amount of Web Image Monitor. Configuring the Machine Using...
... unit. Shows the remaining life of the machine. Shows the contact information of the machine as registered on the machine's display. ❖ Print Cartridge & Replaceable Parts Information Item Black Toner Fuser Unit Transfer Roller Unit Paper Feed Roller Unit Description Shows the amount of Web Image Monitor. Configuring the Machine Using...
User Guide
Page 266
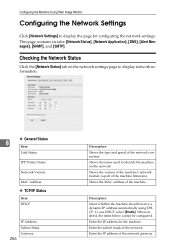
... Status Click the [Network Status] tab on the network. Enter the subnet mask of the machine firmware). Shows the version of the machine's network module (a part of the network. Description Select whether the machine should receive a dynamic IP address automatically using DHCP. Shows the name used to display the page for...
... Status Click the [Network Status] tab on the network. Enter the subnet mask of the machine firmware). Shows the version of the machine's network module (a part of the network. Description Select whether the machine should receive a dynamic IP address automatically using DHCP. Shows the name used to display the page for...
User Guide
Page 283
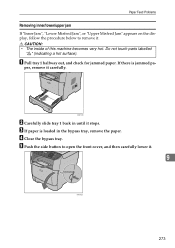
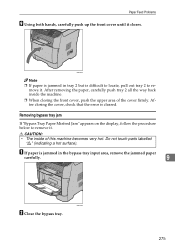
...", or "Upper Misfeed Jam" appears on the display, follow the procedure below to open the front cover, and then carefully lower it . Do not touch parts labelled "v" (indicating a hot surface). per, remove it stops.
...", or "Upper Misfeed Jam" appears on the display, follow the procedure below to open the front cover, and then carefully lower it . Do not touch parts labelled "v" (indicating a hot surface). per, remove it stops.
User Guide
Page 285
Do not touch parts labelled "v" (indicating a hot surface). After closing the front cover, push the upper area of this machine becomes very hot. A If paper is cleared. move it ...
Do not touch parts labelled "v" (indicating a hot surface). After closing the front cover, push the upper area of this machine becomes very hot. A If paper is cleared. move it ...
User Guide
Page 288
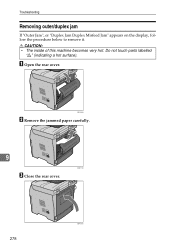
BSP238S B Remove the jammed paper carefully. 9 BSP119S C Close the rear cover. 278 BSP251S Troubleshooting Removing outer/duplex jam If "Outer Jam", or "Duplex Jam Duplex Misfeed Jam" appears on the display, follow the procedure below to remove it. R CAUTION: • The inside of this machine becomes very hot. A Open the rear cover. Do not touch parts labelled "v" (indicating a hot surface).
BSP238S B Remove the jammed paper carefully. 9 BSP119S C Close the rear cover. 278 BSP251S Troubleshooting Removing outer/duplex jam If "Outer Jam", or "Duplex Jam Duplex Misfeed Jam" appears on the display, follow the procedure below to remove it. R CAUTION: • The inside of this machine becomes very hot. A Open the rear cover. Do not touch parts labelled "v" (indicating a hot surface).
User Guide
Page 295
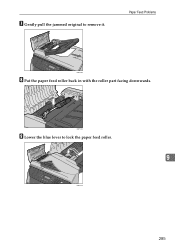
Paper Feed Problems BSP129S H Put the paper feed roller back in with the roller part facing downwards. G Gently pull the jammed original to lock the paper feed roller. 9 BSP131S 285 BSP130S I Lower the blue lever to remove it.
Paper Feed Problems BSP129S H Put the paper feed roller back in with the roller part facing downwards. G Gently pull the jammed original to lock the paper feed roller. 9 BSP131S 285 BSP130S I Lower the blue lever to remove it.
User Guide
Page 307
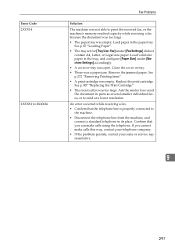
... paper. Error Code 2XXX14 2XXX32 to 2XXX84 Fax Problems Solution The machine was not able to send at a lower resolution. Load valid size paper in parts as several smaller individual faxes, or to print the received fax, or the machine's memory reached capacity while receiving a fax because the document was too...
... paper. Error Code 2XXX14 2XXX32 to 2XXX84 Fax Problems Solution The machine was not able to send at a lower resolution. Load valid size paper in parts as several smaller individual faxes, or to print the received fax, or the machine's memory reached capacity while receiving a fax because the document was too...
User Guide
Page 309
...has been jammed inside the ADF. • Remove jammed originals, and then place them again. See p.86 "Placing Originals". "X" indicates the parts of the messages that appear on a specific situation, such as several smaller individual faxes, or to cancel the job. 299 capacity while receiving a...Jams". • Check the originals are listed in alphabetical order in the paper machine's memory reached tray. Load valid size paper in parts as the paper sizes or types, or tray names. Replace the print car- Remove the jammed paper. Error and Status Messages on ...
...has been jammed inside the ADF. • Remove jammed originals, and then place them again. See p.86 "Placing Originals". "X" indicates the parts of the messages that appear on a specific situation, such as several smaller individual faxes, or to cancel the job. 299 capacity while receiving a...Jams". • Check the originals are listed in alphabetical order in the paper machine's memory reached tray. Load valid size paper in parts as the paper sizes or types, or tray names. Replace the print car- Remove the jammed paper. Error and Status Messages on ...


