Manuals
Page 26
... without permission. • You can control the use of the machine, as well as prevent machine settings from being changed without authorization. • By setting passwords, you can prevent unauthorized access via the network. • You can erase or encrypt the data on the hard disk to prevent the information from...
... without permission. • You can control the use of the machine, as well as prevent machine settings from being changed without authorization. • By setting passwords, you can prevent unauthorized access via the network. • You can erase or encrypt the data on the hard disk to prevent the information from...

Manuals
Page 42
... top left of prints Facsimile: Scan Settings, density, Original Feed Type, File Type, Store File (except for User Name and Password), Preview, transmission type, destinations (except for folder destinations), Select Line, Adv.Features, memory transmission/immediate transmission, TX Status Report, TX ...Notice This section explains how to programs: Copier: Original type, density, Special Original, paper tray, Store File (except for User Name and Password), Create Margin, Finishing, Cover/Slip Sheet, Edit / Stamp, Dup./Combine/Series, Reduce / Enlarge, number of copies Document Server (on ...
... top left of prints Facsimile: Scan Settings, density, Original Feed Type, File Type, Store File (except for User Name and Password), Preview, transmission type, destinations (except for folder destinations), Select Line, Adv.Features, memory transmission/immediate transmission, TX Status Report, TX ...Notice This section explains how to programs: Copier: Original type, density, Special Original, paper tray, Store File (except for User Name and Password), Create Margin, Finishing, Cover/Slip Sheet, Edit / Stamp, Dup./Combine/Series, Reduce / Enlarge, number of copies Document Server (on ...
Manuals
Page 49
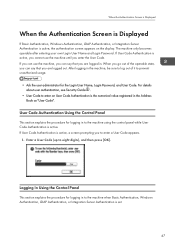
Enter a User Code (up to prevent unauthorized usage. • Ask the user administrator for the Login User Name, Login Password, and User Code. If you can use the machine until you to the machine using the control panel while User Code Authentication is active.... explains the procedure for logging in to enter on the display. The machine only becomes operable after entering your own Login User Name and Login Password. If User Code Authentication is active, a screen prompting you enter the User Code. When the Authentication Screen is Displayed When the Authentication Screen ...
Enter a User Code (up to prevent unauthorized usage. • Ask the user administrator for the Login User Name, Login Password, and User Code. If you can use the machine until you to the machine using the control panel while User Code Authentication is active.... explains the procedure for logging in to enter on the display. The machine only becomes operable after entering your own Login User Name and Login Password. If User Code Authentication is active, a screen prompting you enter the User Code. When the Authentication Screen is Displayed When the Authentication Screen ...

Manuals
Page 50
...] key. Logging Out Using the Control Panel This section explains the procedure for the function you have finished using appears. Press [Yes]. 48 Enter a Login Password, and then press [OK]. When the user is authenticated, the screen for logging out the machine when Basic Authentication, Windows Authentication, LDAP Authentication, or Integration...
...] key. Logging Out Using the Control Panel This section explains the procedure for the function you have finished using appears. Press [Yes]. 48 Enter a Login Password, and then press [OK]. When the user is authenticated, the screen for logging out the machine when Basic Authentication, Windows Authentication, LDAP Authentication, or Integration...

Manuals
Page 76
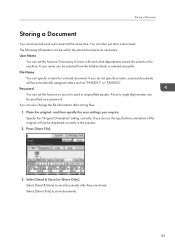
... original. 6. Thus you can check the stored documents from the Document Server screen. Press [OK]. 4. Press the [Start] key. 3. Enter a file name, user name, or password if necessary. 3. Stores scanned originals in the Document Server The Document Server enables you want to store documents being read with the copy feature on...
... original. 6. Thus you can check the stored documents from the Document Server screen. Press [OK]. 4. Press the [Start] key. 3. Enter a file name, user name, or password if necessary. 3. Stores scanned originals in the Document Server The Document Server enables you want to store documents being read with the copy feature on...
Manuals
Page 87
.../bottom orientation of the original will be specified as not to send to eight digit number can set this function so as a password. Press [Store File]. 3. If you require. Password You can be automatically assigned names such as necessary: User Name You can also change the file information after they are stored...
.../bottom orientation of the original will be specified as not to send to eight digit number can set this function so as a password. Press [Store File]. 3. If you require. Password You can be automatically assigned names such as necessary: User Name You can also change the file information after they are stored...

Manuals
Page 88
Set the user name, file name, and password as necessary. • User Name Press [User Name], and then select a user name. To specify an unregistered user name, press [Manual Entry], and then enter ..., press [OK]. • File Name Press [File Name], enter a file name, and then press [OK]. • Password Press [Password], enter a password using the number keys, and then press [OK]. Press the [Start] key. 4. Re-enter the password for confirmation, and then press [OK]. 5. Fax 4. If you have selected [Send & Store], specify the receiver. 7. The...
Set the user name, file name, and password as necessary. • User Name Press [User Name], and then select a user name. To specify an unregistered user name, press [Manual Entry], and then enter ..., press [OK]. • File Name Press [File Name], enter a file name, and then press [OK]. • Password Press [Password], enter a password using the number keys, and then press [OK]. Press the [Start] key. 4. Re-enter the password for confirmation, and then press [OK]. 5. Fax 4. If you have selected [Send & Store], specify the receiver. 7. The...

Manuals
Page 89
... key to switch the screen to stored documents, place the original, and then select any scan settings you require. 7. When you select a document with a password, enter the password using the number keys, and then press [OK]. 4. 1. Specify the destination, and then press the [Start] key. 87 If you want to add your...
... key to switch the screen to stored documents, place the original, and then select any scan settings you require. 7. When you select a document with a password, enter the password using the number keys, and then press [OK]. 4. 1. Specify the destination, and then press the [Start] key. 87 If you want to add your...

Manuals
Page 94
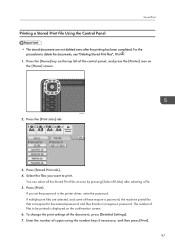
... a Locked Print File Using the Control Panel • When printing is completed, the stored file will be deleted. 1. Click the WordPad menu button in the "Password:" box. 7. Click [OK]. 8. Change any other print settings if necessary. 9. In the "Select Printer" list, select the printer you want to use. 3.... [Details...]. 6. 5. Start printing from the application's [Print] dialog box. Enter a User ID in the "User ID:" box, and then enter a password in the upper left of the window, and then click [Print]. 2. Press the [Home] key on the top left corner of the control panel, and...
... a Locked Print File Using the Control Panel • When printing is completed, the stored file will be deleted. 1. Click the WordPad menu button in the "Password:" box. 7. Click [OK]. 8. Change any other print settings if necessary. 9. In the "Select Printer" list, select the printer you want to use. 3.... [Details...]. 6. 5. Start printing from the application's [Print] dialog box. Enter a User ID in the "User ID:" box, and then enter a password in the upper left of the window, and then click [Print]. 2. Press the [Home] key on the top left corner of the control panel, and...

Manuals
Page 95
Locked Print 3. Enter the password using the number keys if necessary, and then press [Print]. 93 To change the print settings of copies using the number keys, and then press [OK]. 7. Select the files you want to print. Press [Print]. 6. Press [Locked Print Job]. 4. 2. Press the [Print Jobs] tab. You can select all the Locked Print files at once by pressing [Select All Jobs] after selecting a file. 5. Enter the number of the document, press [Detailed Settings]. 8.
Locked Print 3. Enter the password using the number keys if necessary, and then press [Print]. 93 To change the print settings of copies using the number keys, and then press [OK]. 7. Select the files you want to print. Press [Print]. 6. Press [Locked Print Job]. 4. 2. Press the [Print Jobs] tab. You can select all the Locked Print files at once by pressing [Select All Jobs] after selecting a file. 5. Enter the number of the document, press [Detailed Settings]. 8.

Manuals
Page 98
... the file immediately and also stores the file in the machine and allows any user who has print privileges can optionally set a file name and a password of the window, and then click [Print]. 2. Start printing from the application's [Print] dialog box. 96 5. Change any stored file afterward. 5. In the "Job Type...
... the file immediately and also stores the file in the machine and allows any user who has print privileges can optionally set a file name and a password of the window, and then click [Print]. 2. Start printing from the application's [Print] dialog box. 96 5. Change any stored file afterward. 5. In the "Job Type...
Manuals
Page 99
... • The stored documents are selected, and some of these require a password, the machine prints files that correspond to the entered password and files that do not require a password. Select the files you set the password in the printer driver, enter the password. Press [Print]. You can select all the Stored Print files at once...
... • The stored documents are selected, and some of these require a password, the machine prints files that correspond to the entered password and files that do not require a password. Select the files you set the password in the printer driver, enter the password. Press [Print]. You can select all the Stored Print files at once...
Manuals
Page 105
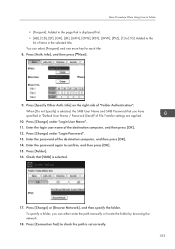
...] or [Browse Network], and then specify the folder. Info] on the right side of the destination computer, and then press [OK]. 12. Enter the password again to confirm, and then press [OK]. 15. Press [Folder]. 16. Press [Connection Test] to check the path is selected, the SMB User Name.... • [AB], [CD], [EF], [GH], [IJK], [LMN], [OPQ], [RST], [UVW], [XYZ], [1] to [10]: Added to the list of items in "Default User Name / Password (Send)" of the destination computer, and then press [OK]. 14. To specify a folder, you have specified in the selected title. You can either enter the...
...] or [Browse Network], and then specify the folder. Info] on the right side of the destination computer, and then press [OK]. 12. Enter the password again to confirm, and then press [OK]. 15. Press [Folder]. 16. Press [Connection Test] to check the path is selected, the SMB User Name.... • [AB], [CD], [EF], [GH], [IJK], [LMN], [OPQ], [RST], [UVW], [XYZ], [1] to [10]: Added to the list of items in "Default User Name / Password (Send)" of the destination computer, and then press [OK]. 14. To specify a folder, you have specified in the selected title. You can either enter the...

Manuals
Page 108
Press [Manual Entry] on the destination setting, enter the user name for the password to the computer. Press [Manual Entry] to display the soft keyboard. 7. Depending on the right side of the user name field to the right of ... the computer name is performed to the Destination Manually 1. A connection test is "desk01": \\desk01\user 5. Press [OK]. 106 Depending on the destination setting, enter the password for the folder. 6. Scan Entering the Path to check whether the specified shared folder exists. 9. Press [Manual Entry]. 2.
Press [Manual Entry] on the destination setting, enter the user name for the password to the computer. Press [Manual Entry] to display the soft keyboard. 7. Depending on the right side of the user name field to the right of ... the computer name is performed to the Destination Manually 1. A connection test is "desk01": \\desk01\user 5. Press [OK]. 106 Depending on the destination setting, enter the password for the folder. 6. Scan Entering the Path to check whether the specified shared folder exists. 9. Press [Manual Entry]. 2.

Manuals
Page 113
...local area network using the hard disk to HDD]. 6. The supplier shall not be responsible for any damage that are not password-protected can specify a password for each stored file. Press the [Home] key on the top left of failure occurs. We advise against using DeskTopBinder...the documentation for DeskTopBinder. 1. Basic Procedure for Storing Scan Files Basic Procedure for Storing Scan Files • You can be accessed by specifying passwords. • Scan file stored in the machine may result from unauthorized access by other users on the [Home] screen. If a previous ...
...local area network using the hard disk to HDD]. 6. The supplier shall not be responsible for any damage that are not password-protected can specify a password for each stored file. Press the [Home] key on the top left of failure occurs. We advise against using DeskTopBinder...the documentation for DeskTopBinder. 1. Basic Procedure for Storing Scan Files Basic Procedure for Storing Scan Files • You can be accessed by specifying passwords. • Scan file stored in the machine may result from unauthorized access by other users on the [Home] screen. If a previous ...

Manuals
Page 114
... After specifying a user name, press [OK]. • File Name Press [File Name], enter a file name, and then press [OK]. • Password Press [Password], enter a password, and then press [OK]. Re-enter the password for confirmation, and then press [OK]. 7. Press the [Start] key. Checking a Stored File Selected from the List This section explains how...
... After specifying a user name, press [OK]. • File Name Press [File Name], enter a file name, and then press [OK]. • Password Press [Password], enter a password, and then press [OK]. Re-enter the password for confirmation, and then press [OK]. 7. Press the [Start] key. Checking a Stored File Selected from the List This section explains how...

Manuals
Page 117
...accessed by the scanner, make sure that stored the documents. You can specify a password for the documents, the key icon appears on the Document Server. • A document accessed with a correct password remains selected even after operations are ended. Depending on the fax transmission or scanning... 7. For the information not included in the Document Server is to identify the user or user group that all other users. Password To prevent unauthorized printing, you can change the file name. Storing Data This section describes the procedure for Facsimile/Scanner Functions", ...
...accessed by the scanner, make sure that stored the documents. You can specify a password for the documents, the key icon appears on the Document Server. • A document accessed with a correct password remains selected even after operations are ended. Depending on the fax transmission or scanning... 7. For the information not included in the Document Server is to identify the user or user group that all other users. Password To prevent unauthorized printing, you can change the file name. Storing Data This section describes the procedure for Facsimile/Scanner Functions", ...

Manuals
Page 118
...Press [User Name]. 4. Enter a file name, and then press [OK]. 7. The document is scanned. You can use four to eight digits for the password. 9. If the list does not appear, press [Finish Scanning]. 116 Press [To Scanning Screen]. 3. After scanning, a list of the control panel, ...] screen. CJS113 2. Specify a user name, and then press [OK]. Press [File Name]. 6. Press [Password]. 8. Enter a password with the number keys, and then press [OK]. For double-check, enter the password again, and then press [OK]. 10. Place the original. 11. The original is saved in the Document ...
...Press [User Name]. 4. Enter a file name, and then press [OK]. 7. The document is scanned. You can use four to eight digits for the password. 9. If the list does not appear, press [Finish Scanning]. 116 Press [To Scanning Screen]. 3. After scanning, a list of the control panel, ...] screen. CJS113 2. Specify a user name, and then press [OK]. Press [File Name]. 6. Press [Password]. 8. Enter a password with the number keys, and then press [OK]. For double-check, enter the password again, and then press [OK]. 10. Place the original. 11. The original is saved in the Document ...
Manuals
Page 157
... because paper has jammed, the toner needs replenishing, or other machine conditions. For details about left on the control panel or screen, or the entered password was incorrect. A control panel or screen key was performed through the simple display of the Copier/ Document Server function, the Facsimile function, or the Scanner...
... because paper has jammed, the toner needs replenishing, or other machine conditions. For details about left on the control panel or screen, or the entered password was incorrect. A control panel or screen key was performed through the simple display of the Copier/ Document Server function, the Facsimile function, or the Scanner...
Manuals
Page 159
... showing. For details about how to store pages that can be stored on the main power switch. "Please wait." your login user name and user password. This message appears when the machine is Displayed", Getting Started . Code Authentication. Do not turn off . This message appears when you want to store scanned...
... showing. For details about how to store pages that can be stored on the main power switch. "Please wait." your login user name and user password. This message appears when the machine is Displayed", Getting Started . Code Authentication. Do not turn off . This message appears when you want to store scanned...


