Quick Start Guide
Page 3
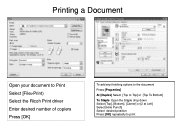
Printing a Document Open your document to Print Select [File>Print) Select the Ricoh Print driver Enter desired number of copiers Press [OK] To add any finishing options to the document Press [Properties] At [Duplex] Select [Top to Top] or [Top To Bottom] To Staple: Open the Staple drop down Select [Top], [Bottom], [Center] or [2 at Left] Select [Hole Punch] Select desired position Press [OK] repeatedly to print
Printing a Document Open your document to Print Select [File>Print) Select the Ricoh Print driver Enter desired number of copiers Press [OK] To add any finishing options to the document Press [Properties] At [Duplex] Select [Top to Top] or [Top To Bottom] To Staple: Open the Staple drop down Select [Top], [Bottom], [Center] or [2 at Left] Select [Hole Punch] Select desired position Press [OK] repeatedly to print
Quick Start Guide
Page 4
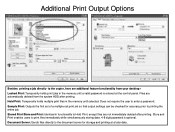
.... Hold Print: Temporarily holds multiple print files in the memory until a valid password is optional. Additional Print Output Options Besides printing a job directly to the copier, here are additional feature functionality from the system HDD after printing.
.... Hold Print: Temporarily holds multiple print files in the memory until a valid password is optional. Additional Print Output Options Besides printing a job directly to the copier, here are additional feature functionality from the system HDD after printing.
Quick Start Guide
Page 7
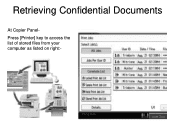
Retrieving Confidential Documents At Copier PanelPress [Printer] key to access the list of stored files from your computer as listed on right:-
Retrieving Confidential Documents At Copier PanelPress [Printer] key to access the list of stored files from your computer as listed on right:-
Quick Start Guide
Page 8
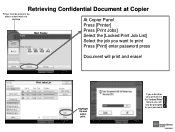
Retrieving Confidential Document at Copier Printer must be online to be prompted for your password. Print Jobs List Highlight file and select print. If you submitted your print job via the "locked Print" feature, you will now be able to submit work via desktop At Copier Panel Press [Printer] Main Display Press [Print Jobs] Select the [Locked Print Job List] Select the job you want to print Press [Print] enter password press Document will print and erase!
Retrieving Confidential Document at Copier Printer must be online to be prompted for your password. Print Jobs List Highlight file and select print. If you submitted your print job via the "locked Print" feature, you will now be able to submit work via desktop At Copier Panel Press [Printer] Main Display Press [Print Jobs] Select the [Locked Print Job List] Select the job you want to print Press [Print] enter password press Document will print and erase!
Quick Start Guide
Page 9
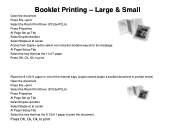
Press OK, Ok, Ok, to print the document. Booklet Printing - Large & Small Open the document Press File >print Select the Ricoh Print Driver (PCL5e/PCL6) Press Properties At Page Set up Tab Select Duplex>booklet Select Staple>2 at center Across from Duplex option select non reduction ... paper Press OK, Ok, Ok, to print Place the 8 1/2x11 paper in one of the internal trays (copier cannot staple a booklet document in portrait mode) Open the document Press File >print Select the Ricoh Print Driver (PCL5e/PCL6) Press Properties At Page Set up Tab Select Duplex>booklet Select Staple>2 at center...
Press OK, Ok, Ok, to print the document. Booklet Printing - Large & Small Open the document Press File >print Select the Ricoh Print Driver (PCL5e/PCL6) Press Properties At Page Set up Tab Select Duplex>booklet Select Staple>2 at center Across from Duplex option select non reduction ... paper Press OK, Ok, Ok, to print Place the 8 1/2x11 paper in one of the internal trays (copier cannot staple a booklet document in portrait mode) Open the document Press File >print Select the Ricoh Print Driver (PCL5e/PCL6) Press Properties At Page Set up Tab Select Duplex>booklet Select Staple>2 at center...
Quick Start Guide
Page 10
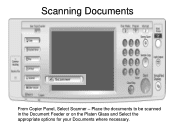
Scanning Documents From Copier Panel, Select Scanner - Place the documents to be scanned in the Document Feeder or on the Platen Glass and Select the appropriate options for your Documents where necessary.
Scanning Documents From Copier Panel, Select Scanner - Place the documents to be scanned in the Document Feeder or on the Platen Glass and Select the appropriate options for your Documents where necessary.

Quick Start Guide
Page 12
Basic Scanning 1. Select destination [email address or folder location 4. Your display may vary depending on Glass 5. Select [E-mail] or [Folder] Tab 3. Place Originals in Feeder or on your operating system and device.) Press [Start] (Note: Screenshots are provided for reference purposes only. At copier Screen Press [Scanner] 2.
Basic Scanning 1. Select destination [email address or folder location 4. Your display may vary depending on Glass 5. Select [E-mail] or [Folder] Tab 3. Place Originals in Feeder or on your operating system and device.) Press [Start] (Note: Screenshots are provided for reference purposes only. At copier Screen Press [Scanner] 2.
Quick Start Guide
Page 15
Faxing Documents From Copier
Faxing Documents From Copier
Quick Start Guide
Page 17
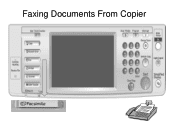
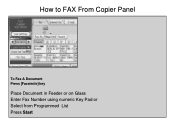
How to FAX From Copier Panel To Fax A Document Press [Facsimile] key Place Document in Feeder or on Glass Enter Fax Number using numeric Key Pad or Select from Programmed List Press Start
How to FAX From Copier Panel To Fax A Document Press [Facsimile] key Place Document in Feeder or on Glass Enter Fax Number using numeric Key Pad or Select from Programmed List Press Start

Quick Start Guide
Page 18
When Networked, users have the option of Copier Use to Store a FAX Destination Users can print automatically, selectively, for faxing documents from the desktop with fax Covers and other options. Use The Original Feed type to one or more users simultaneously. Select Stored Fax Destination(s) or enter a New Destination using the Numeric Key Pad on Right Side of Installing the LAN fax driver for errors only or off. Confirmations can send single document to select 2 sided when originals are 2 sided and copier Will scan and send both sides.
When Networked, users have the option of Copier Use to Store a FAX Destination Users can print automatically, selectively, for faxing documents from the desktop with fax Covers and other options. Use The Original Feed type to one or more users simultaneously. Select Stored Fax Destination(s) or enter a New Destination using the Numeric Key Pad on Right Side of Installing the LAN fax driver for errors only or off. Confirmations can send single document to select 2 sided when originals are 2 sided and copier Will scan and send both sides.
User Guide
Page 3
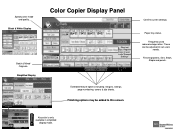
Finishing options. Extended feature options including; Short cut keys. Register keys in simplified display mode. Finishing options may be adjusted to this screen. Specify color mode and quality. Black & White Display Batch & Mixed Originals. These can be added to suit users needs. Key color is only available in user tools "General Settings" Paper tray status. Simplified Display Color Copier Display Panel Confirm current settings. Sort, Stack, Staple and punch. Frequently used reduce/enlarge ratios. margins, stamps, page numbering, covers & slip sheets.
Finishing options. Extended feature options including; Short cut keys. Register keys in simplified display mode. Finishing options may be adjusted to this screen. Specify color mode and quality. Black & White Display Batch & Mixed Originals. These can be added to suit users needs. Key color is only available in user tools "General Settings" Paper tray status. Simplified Display Color Copier Display Panel Confirm current settings. Sort, Stack, Staple and punch. Frequently used reduce/enlarge ratios. margins, stamps, page numbering, covers & slip sheets.

User Guide
Page 4
... face down on the glass at the position of arrow regardless of size Select any finishing options Enter desired number of copies Press [Sample Copy] copier will print one completed set and prompt you [Suspend] to cancel job or change settings [Continue] if job is correct to complete remaining copy sets...
... face down on the glass at the position of arrow regardless of size Select any finishing options Enter desired number of copies Press [Sample Copy] copier will print one completed set and prompt you [Suspend] to cancel job or change settings [Continue] if job is correct to complete remaining copy sets...

User Guide
Page 5
... the [Auto Density] option to further lighten or darken your copies. magazines) • Copied Photo: • Use when copying copies or originals generated by color copiers Auto Image Density is suitable for your originals to enhance your document settings. Generation Copy For originals that are five original types available: Text For...
... the [Auto Density] option to further lighten or darken your copies. magazines) • Copied Photo: • Use when copying copies or originals generated by color copiers Auto Image Density is suitable for your originals to enhance your document settings. Generation Copy For originals that are five original types available: Text For...
User Guide
Page 6
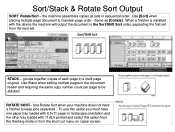
... page document to keep jobs separated . Same as sets in the Sort/Shift Sort order, separating the first set from the short cut menu on copier screen. Use Rotate Sort when your machine does not have one paper tray loaded with 11x8.5 portrait and select this option from the finishing mode...
... page document to keep jobs separated . Same as sets in the Sort/Shift Sort order, separating the first set from the short cut menu on copier screen. Use Rotate Sort when your machine does not have one paper tray loaded with 11x8.5 portrait and select this option from the finishing mode...

User Guide
Page 9
Duplex Copying (2 Sided Output) Place Originals in Feeder Landscape orientation or Portrait orientation Select or Select You can select these options from the main copier panel Press OK Enter desired options Select copy count Press START
Duplex Copying (2 Sided Output) Place Originals in Feeder Landscape orientation or Portrait orientation Select or Select You can select these options from the main copier panel Press OK Enter desired options Select copy count Press START
User Guide
Page 27
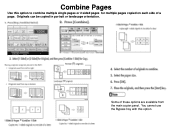
Some of a page. You cannot use the Bypass tray with this option to combine multiple single pages or 2 sided pages for multiple pages copied on each side of these options are available from the main copier panel. Originals can be copied in portrait or landscape orientation. Combine Pages Use this option.
Some of a page. You cannot use the Bypass tray with this option to combine multiple single pages or 2 sided pages for multiple pages copied on each side of these options are available from the main copier panel. Originals can be copied in portrait or landscape orientation. Combine Pages Use this option.
User Guide
Page 32
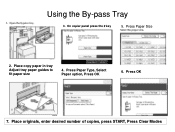
Place copy paper in tray Adjust tray paper guides to fit paper size 4. Press OK 7. On copier panel press the # key 5. Press Paper Type, Select Paper option, Press OK 6. Press Paper Size 2. Place originals, enter desired number of copies, press START, Press Clear Modes Using the By-pass Tray 3.
Place copy paper in tray Adjust tray paper guides to fit paper size 4. Press OK 7. On copier panel press the # key 5. Press Paper Type, Select Paper option, Press OK 6. Press Paper Size 2. Place originals, enter desired number of copies, press START, Press Clear Modes Using the By-pass Tray 3.
User Guide
Page 38
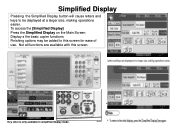
To access the [Simplified Display] Press the Simplified Display on the Main Screen Display s the basic copier functions Finishing options may be displayed at a larger size, making operations easier. Key color is only available in simplified display mode. Not all functions are available with this screen for ease of use. Simplified Display Pressing the Simplified Display button will cause letters and keys to be added to this screen.
To access the [Simplified Display] Press the Simplified Display on the Main Screen Display s the basic copier functions Finishing options may be displayed at a larger size, making operations easier. Key color is only available in simplified display mode. Not all functions are available with this screen for ease of use. Simplified Display Pressing the Simplified Display button will cause letters and keys to be added to this screen.
User Guide
Page 46
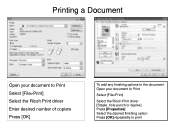
Printing a Document Open your document to Print Select [File>Print] Select the Ricoh Print driver Enter desired number of copiers Press [OK] To add any finishing options to the document Open your document to Print Select [File>Print) Select the Ricoh Print driver [Staple, hole punch or duplex] Press [Properties] Select the desired finishing option Press [OK] repeatedly to print
Printing a Document Open your document to Print Select [File>Print] Select the Ricoh Print driver Enter desired number of copiers Press [OK] To add any finishing options to the document Open your document to Print Select [File>Print) Select the Ricoh Print driver [Staple, hole punch or duplex] Press [Properties] Select the desired finishing option Press [OK] repeatedly to print
User Guide
Page 50
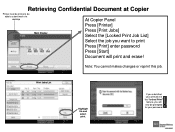
Print Jobs List Highlight file and select print. Note: You cannot makes changes or reprint this job. Retrieving Confidential Document at Copier Printer must be online to be able to print Press [Print] enter password Press [Start] Document will now be prompted for your print job via desktop At Copier Panel Press [Printer] Main Display Press [Print Jobs] Select the [Locked Print Job List] Select the job you want to submit work via the "locked Print" feature, you submitted your password. If you will print and erase!
Print Jobs List Highlight file and select print. Note: You cannot makes changes or reprint this job. Retrieving Confidential Document at Copier Printer must be online to be able to print Press [Print] enter password Press [Start] Document will now be prompted for your print job via desktop At Copier Panel Press [Printer] Main Display Press [Print Jobs] Select the [Locked Print Job List] Select the job you want to submit work via the "locked Print" feature, you submitted your password. If you will print and erase!


