Quick Use Guide
Page 11
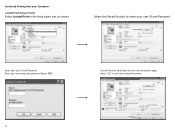
Continued Printing from your Computer Locked Print (Secure Print) Select Locked Print in the drop down box as shown Select the Details button to enter your user ID and Password Enter your user ID and Password Enter your user name and password Select "OK" You will then be taken back to print you locked document. 11 Select "OK" to your main properties page.
Continued Printing from your Computer Locked Print (Secure Print) Select Locked Print in the drop down box as shown Select the Details button to enter your user ID and Password Enter your user ID and Password Enter your user name and password Select "OK" You will then be taken back to print you locked document. 11 Select "OK" to your main properties page.
Quick Use Guide
Page 12
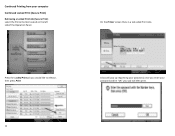
Continued Printing from your job will then print. On the Printer screen there is a tab called Print Jobs Press the Locked Print job you would like to release, then press Print 12 A box will pop up requesting your password, once you enter your password and hit "OK" your computer Continued Locked Print (Secure Print) Retrieving a Locked Print Job (Secure Print) select the Printer button located on the left sideof the Operation Panel.
Continued Printing from your job will then print. On the Printer screen there is a tab called Print Jobs Press the Locked Print job you would like to release, then press Print 12 A box will pop up requesting your password, once you enter your password and hit "OK" your computer Continued Locked Print (Secure Print) Retrieving a Locked Print Job (Secure Print) select the Printer button located on the left sideof the Operation Panel.
Quick Use Guide
Page 13
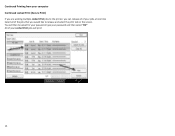
Continued Printing from your computer Continued Locked Print (Secure Print) If you are sending mulitple Locked Print jobs to the printer, you can release all of your Locked Print jobs will print 13 You will then be asked for your password, type your password and then select "OK" All of your jobs at one time Select all of the jobs that you would like to release and select the print tab on the screen.
Continued Printing from your computer Continued Locked Print (Secure Print) If you are sending mulitple Locked Print jobs to the printer, you can release all of your Locked Print jobs will print 13 You will then be asked for your password, type your password and then select "OK" All of your jobs at one time Select all of the jobs that you would like to release and select the print tab on the screen.

General Settings Guide
Page 4
... how to set up and use PostScript 3. • Install the Device Certificate. • Enable SSL (Secure Sockets Layer) Encryption. • Change the user name and password of product names used in the manuals.
... how to set up and use PostScript 3. • Install the Device Certificate. • Enable SSL (Secure Sockets Layer) Encryption. • Change the user name and password of product names used in the manuals.

General Settings Guide
Page 36
... Configuration DDNS Configuration Domain Name WINS Configuration Effective Protocol Ethernet Speed LAN Type Permit SNMPv3 Communication Permit SSL/TLS Communication Host Name Default User Name / Password (Send) Scanner Resend Interval Time Setting Requirements Necessary Necessary As required As required As required As required Necessary As required Necessary As required As required...
... Configuration DDNS Configuration Domain Name WINS Configuration Effective Protocol Ethernet Speed LAN Type Permit SNMPv3 Communication Permit SSL/TLS Communication Host Name Default User Name / Password (Send) Scanner Resend Interval Time Setting Requirements Necessary Necessary As required As required As required As required Necessary As required Necessary As required As required...

General Settings Guide
Page 38
Connecting the Machine Menu User Tool Interface Settings/ Wireless LAN Ad-hoc Channel 1 Interface Settings/ Wireless LAN Security Method File Transfer Default User Name / Password (Send) File Transfer Scanner Resend Interval Time File Transfer Number of Scanner Resends Setting Requirements As required As required As required As required As required &#...
Connecting the Machine Menu User Tool Interface Settings/ Wireless LAN Ad-hoc Channel 1 Interface Settings/ Wireless LAN Security Method File Transfer Default User Name / Password (Send) File Transfer Scanner Resend Interval Time File Transfer Number of Scanner Resends Setting Requirements As required As required As required As required As required &#...
General Settings Guide
Page 56
.... • SmartDeviceMonitor for Admin: Cannot be used for specifying the setting. 1 • telnet: Cannot be used for specifying the setting. [File Transfer] [Default User Name / Password (Send)] • Web Image Monitor: Can be used for specifying the setting. • SmartDeviceMonitor for Admin: Cannot be used for specifying the setting. • telnet...
.... • SmartDeviceMonitor for Admin: Cannot be used for specifying the setting. 1 • telnet: Cannot be used for specifying the setting. [File Transfer] [Default User Name / Password (Send)] • Web Image Monitor: Can be used for specifying the setting. • SmartDeviceMonitor for Admin: Cannot be used for specifying the setting. • telnet...

General Settings Guide
Page 74
... the Parallel Interface menu under Interface Settings. [Parallel Interface] is displayed when this machine is installed with ping command using up to set an encryption password for the parallel interface. The default setting is used for the machine. Enter the host name using given IPv4 address. Parallel Timing Sets the timing...
... the Parallel Interface menu under Interface Settings. [Parallel Interface] is displayed when this machine is installed with ping command using up to set an encryption password for the parallel interface. The default setting is used for the machine. Enter the host name using given IPv4 address. Parallel Timing Sets the timing...

General Settings Guide
Page 80
...LOGIN, CRAM-MD5, or DIGEST-MD5. If DNS is Off. • Enter the user name using authentication that requires entering the user name and password. The default setting for the Administrator's e-mail address when using up to the ScanRouter delivery software, it . 2 • Print File •... 2. is not in "user name@realm". • Enter the E-mail address using up to [On], and then specify the user name, password and encryption. Spaces cannot be entered. • Select Encryption as in use , enter the host name. If the SMTP server requires authentication, set...
...LOGIN, CRAM-MD5, or DIGEST-MD5. If DNS is Off. • Enter the user name using authentication that requires entering the user name and password. The default setting for the Administrator's e-mail address when using up to the ScanRouter delivery software, it . 2 • Print File •... 2. is not in "user name@realm". • Enter the E-mail address using up to [On], and then specify the user name, password and encryption. Spaces cannot be entered. • Select Encryption as in use , enter the host name. If the SMTP server requires authentication, set...

General Settings Guide
Page 81
... DNS is used for [POP before SMTP to [On], specify the waiting time after authentication, user name, e-mail address, and password. • Wait Time after the time specified for authentication. 2 The default setting is PLAIN, or LOGIN. Spaces cannot be entered. •...; Password Enter the password using up to 128 characters. Spaces cannot be entered. • Select Encryption as follows: 79 To enable POP server authentication before...
... DNS is used for [POP before SMTP to [On], specify the waiting time after authentication, user name, e-mail address, and password. • Wait Time after the time specified for authentication. 2 The default setting is PLAIN, or LOGIN. Spaces cannot be entered. •...; Password Enter the password using up to 128 characters. Spaces cannot be entered. • Select Encryption as follows: 79 To enable POP server authentication before...
General Settings Guide
Page 82
...Specify Sender Name] is 143. The default setting for receiving Internet faxes via POP3 or IMAP4 server. "Encryption"-[Off] 2 Do not encrypt password. On e-mailed scanned documents, if the sender is automatically set from one megabyte. 80 If you have specified the user name and e-... 50 MB in minutes, the time interval for IMAP4 is [Off], specify the sender. System Settings "Encryption"-[Auto] Password encryption is not specified this setting. "Encryption"-[On] Encrypt password. E-mail Communication Port Specify the port numbers for receiving Internet faxes.
...Specify Sender Name] is 143. The default setting for receiving Internet faxes via POP3 or IMAP4 server. "Encryption"-[Off] 2 Do not encrypt password. On e-mailed scanned documents, if the sender is automatically set from one megabyte. 80 If you have specified the user name and e-... 50 MB in minutes, the time interval for IMAP4 is [Off], specify the sender. System Settings "Encryption"-[Auto] Password encryption is not specified this setting. "Encryption"-[On] Encrypt password. E-mail Communication Port Specify the port numbers for receiving Internet faxes.
General Settings Guide
Page 83
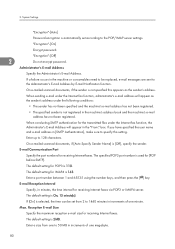
... the text, and then press [OK]. File Transfer E-mail Storage in Server Specify whether or not to 128 characters. Default User Name / Password (Send) Specify the user name and password required when sending scan files directly to a shared folder on a computer running Windows, to an FTP server, or to a NetWare server. 2 Enter...
... the text, and then press [OK]. File Transfer E-mail Storage in Server Specify whether or not to 128 characters. Default User Name / Password (Send) Specify the user name and password required when sending scan files directly to a shared folder on a computer running Windows, to an FTP server, or to a NetWare server. 2 Enter...

General Settings Guide
Page 84
...; On If you cannot send e-mail without specifying the sender's e-mail address. Fax E-mail Account Specify e-mail address, user name and password for the scanner function. If you do not specify the sender when sending a file by e-mail under the fax function, or if the... Address Enter an e-mail address using up to 128 characters. • User Name Enter a user name using up to 64 characters. • Password Enter a password using the number keys. If you do not specify the sender's address, the administrator's e-mail address will appear in the machine's address book. ...
...; On If you cannot send e-mail without specifying the sender's e-mail address. Fax E-mail Account Specify e-mail address, user name and password for the scanner function. If you do not specify the sender when sending a file by e-mail under the fax function, or if the... Address Enter an e-mail address using up to 128 characters. • User Name Enter a user name using up to 64 characters. • Password Enter a password using the number keys. If you do not specify the sender's address, the administrator's e-mail address will appear in the machine's address book. ...

General Settings Guide
Page 86
... address. • Folder You can register the protocol, path, port number, and server name. • Add to Group You can also register user names and passwords to be used by the administrator. Administrator Tools are shown in the Administrator Tools menu under System Settings. For details, see "Address Book". • Program...
... address. • Folder You can register the protocol, path, port number, and server name. • Add to Group You can also register user names and passwords to be used by the administrator. Administrator Tools are shown in the Administrator Tools menu under System Settings. For details, see "Address Book". • Program...
General Settings Guide
Page 92
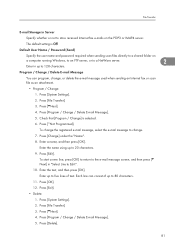
... select [On], documents stored subsequently are not automatically deleted. Delete All Files in Document Server You can delete files stored in 1 day increments). Even if a password is 3 days, this function, consult your administrator. To delete all documents are stored. Program / Change / Delete LDAP Server Program the LDAP server to 180 (in...
... select [On], documents stored subsequently are not automatically deleted. Delete All Files in Document Server You can delete files stored in 1 day increments). Even if a password is 3 days, this function, consult your administrator. To delete all documents are stored. Program / Change / Delete LDAP Server Program the LDAP server to 180 (in...

General Settings Guide
Page 95
... [On] under "Name". 8. Enter the server name, and then press [OK]. 93 This function is selected be sure to set the "User Name", "Password", and the "Realm Name". Press [Administrator Tools]. 3. Press [ Next] twice. 4. When programming the server, select [*Not Programmed]. 7. Enter the name..., and then press [OK]. 9. To select Kerberos Authentication, a realm must be sure to set the "User Name" and "Password". Program the LDAP server to program or change. Programming the LDAP server This section describes how to specify the LDAP server settings. Programming ...
... [On] under "Name". 8. Enter the server name, and then press [OK]. 93 This function is selected be sure to set the "User Name", "Password", and the "Realm Name". Press [Administrator Tools]. 3. Press [ Next] twice. 4. When programming the server, select [*Not Programmed]. 7. Enter the name..., and then press [OK]. 9. To select Kerberos Authentication, a realm must be sure to set the "User Name" and "Password". Program the LDAP server to program or change. Programming the LDAP server This section describes how to specify the LDAP server settings. Programming ...

General Settings Guide
Page 96
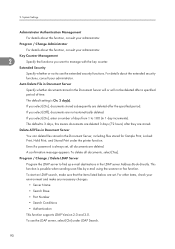
...23. Enter the search base, and then press [OK]. Enter the port number using an encryption process that prevents passwords from being revealed during transmission to the KDC server where authentication occurs. When SSL is sent using an encryption process that prevents...communicating with the LDAP server. Press [Change] under "Search Base". For details, consult your server environment. If you select [Cleartext Authentication], a password is sent to step 23. Select a route folder to the LDAP server, use SSL, the LDAP server must be required depending on this ...
...23. Enter the search base, and then press [OK]. Enter the port number using an encryption process that prevents passwords from being revealed during transmission to the KDC server where authentication occurs. When SSL is sent using an encryption process that prevents...communicating with the LDAP server. Press [Change] under "Search Base". For details, consult your server environment. If you select [Cleartext Authentication], a password is sent to step 23. Select a route folder to the LDAP server, use SSL, the LDAP server must be required depending on this ...

General Settings Guide
Page 97
... to allow individual authentication access to use the administrator account name and password. Press [Change] under "Password". 21. Press [Change] under "User Name". Do not enter the administrator account name and password when using authentication for administrator authentication to step 23. 22. Check your... server environment before making the setting. Enter the password, and then press [OK]. Use Administrator Tools to select the user name and password you select [Digest Authentication] or [Cleartext Authentication], proceed to access the LDAP server. ...
... to allow individual authentication access to use the administrator account name and password. Press [Change] under "Password". 21. Press [Change] under "User Name". Do not enter the administrator account name and password when using authentication for administrator authentication to step 23. 22. Check your... server environment before making the setting. Enter the password, and then press [OK]. Use Administrator Tools to select the user name and password you select [Digest Authentication] or [Cleartext Authentication], proceed to access the LDAP server. ...

General Settings Guide
Page 142
.... If the first several digits of user agents (which 03 is used as gateway number while 0312345678 is selected. 5. If you select [On], enter the password using the number keys, and then press [OK]. Press [Facsimile Features]. 2. Check that [Program / Change] is also specified, documents can be transmitted via a gateway for...
.... If the first several digits of user agents (which 03 is used as gateway number while 0312345678 is selected. 5. If you select [On], enter the password using the number keys, and then press [OK]. Press [Facsimile Features]. 2. Check that [Program / Change] is also specified, documents can be transmitted via a gateway for...

General Settings Guide
Page 185
...) Up to 20 characters long and can be composed of digits 0-9, "#", "*", and spaces (the first character cannot be a space). • Password (optional) Up to 20 characters long and can program one delivery destination for delivery and transfer of digits 0-9, "#", "*", and spaces (the first...20 digits, and can 4 send documents to program Personal Boxes. Specify a delivery destination programmed in Destination key. 183 When programming a password, a mark is not enough free memory left differs depending on two different boxes. • Transmission or programming may not be stored...
...) Up to 20 characters long and can be composed of digits 0-9, "#", "*", and spaces (the first character cannot be a space). • Password (optional) Up to 20 characters long and can program one delivery destination for delivery and transfer of digits 0-9, "#", "*", and spaces (the first...20 digits, and can 4 send documents to program Personal Boxes. Specify a delivery destination programmed in Destination key. 183 When programming a password, a mark is not enough free memory left differs depending on two different boxes. • Transmission or programming may not be stored...


