
Printer Configuration
Page 6
... knowledgebase at: http://www.ricoh-usa.com/support/knowledgebase.asp Copyright 2003 Ricoh Corporation The reader should be familiar with Post Script capability connected to your network. 2.4. All other models support up to perform the command line instructions. Who Should Read this ...operating systems unless the preferred method of file transfer is required for printing. ** These models support RedHat 9.x, Enterprise, IBM AIX 5L V5.2, and HP-UX11i. RedHat Enterprise user must disable CUPS and install LPR. *** These models support Red Hat Linux 9.x and IBM AIX 5L V5.2. Ricoh Printer...
... knowledgebase at: http://www.ricoh-usa.com/support/knowledgebase.asp Copyright 2003 Ricoh Corporation The reader should be familiar with Post Script capability connected to your network. 2.4. All other models support up to perform the command line instructions. Who Should Read this ...operating systems unless the preferred method of file transfer is required for printing. ** These models support RedHat 9.x, Enterprise, IBM AIX 5L V5.2, and HP-UX11i. RedHat Enterprise user must disable CUPS and install LPR. *** These models support Red Hat Linux 9.x and IBM AIX 5L V5.2. Ricoh Printer...
Setup Guide
Page 8
... UNIX information, please visit our Web site or consult your authorized reseller. This manual is provided on the CD-ROM labeled "Operating Instructions". ❖ Printer Reference Provides information about setting up and using the printer and its options. vi Note ❒ There are three CD-ROMs that come with this machine. Manuals for This...
... UNIX information, please visit our Web site or consult your authorized reseller. This manual is provided on the CD-ROM labeled "Operating Instructions". ❖ Printer Reference Provides information about setting up and using the printer and its options. vi Note ❒ There are three CD-ROMs that come with this machine. Manuals for This...
Setup Guide
Page 14
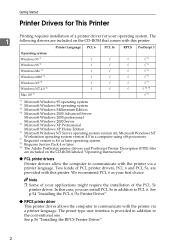
... PCL 6/5e Printer Driver" ❖ RPCS printer driver This printer driver allows the computer to communicate with this printer. The preset type user interface is 8.6 or later operating system. *8 Requires Service Pack 4 or later. *9 The Adobe PostScript printer drivers and PostScript Printer Description (PPD) files are included on the CD-ROM labeled "Operating Instructions". ❖ PCL printer drivers Printer drivers allow...
... PCL 6/5e Printer Driver" ❖ RPCS printer driver This printer driver allows the computer to communicate with this printer. The preset type user interface is 8.6 or later operating system. *8 Requires Service Pack 4 or later. *9 The Adobe PostScript printer drivers and PostScript Printer Description (PPD) files are included on the CD-ROM labeled "Operating Instructions". ❖ PCL printer drivers Printer drivers allow...
Setup Guide
Page 16
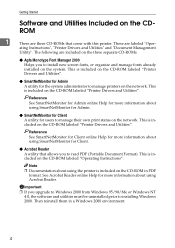
... print status on the CD-ROM labeled "Operating Instructions". Then reinstall them in PDF format. Getting Started Software and Utilities Included on the CDROM 1 There are labeled "Oper- This is included on the CD-ROM in a Windows 2000 environment. 4 This is included on the CD-ROM labeled "Printer Drivers and Utilities". Reference See SmartNetMonitor...
... print status on the CD-ROM labeled "Operating Instructions". Then reinstall them in PDF format. Getting Started Software and Utilities Included on the CDROM 1 There are labeled "Oper- This is included on the CD-ROM in a Windows 2000 environment. 4 This is included on the CD-ROM labeled "Printer Drivers and Utilities". Reference See SmartNetMonitor...
Setup Guide
Page 18
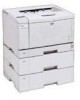
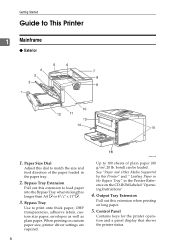
...10070; Exterior 1. ZGDH141N Up to 100 sheets of the paper loaded in the Printer Reference on the CD-ROM labeled "Operating Instructions". 4. When printing on long paper. 5. Output Tray Extension Pull out this Printer" and " Loading Paper in the Bypass Tray" in the paper tray. 2. ...bond) can be loaded. Control Panel Contains keys for the printer operation and a panel display that shows the printer status. 6 See "Paper and Other Media Supported by this extension when printing on custom paper size, printer driver settings are required. Bypass Tray Extension Pull out this dial...
...10070; Exterior 1. ZGDH141N Up to 100 sheets of the paper loaded in the Printer Reference on the CD-ROM labeled "Operating Instructions". 4. When printing on long paper. 5. Output Tray Extension Pull out this Printer" and " Loading Paper in the Bypass Tray" in the paper tray. 2. ...bond) can be loaded. Control Panel Contains keys for the printer operation and a panel display that shows the printer status. 6 See "Paper and Other Media Supported by this extension when printing on custom paper size, printer driver settings are required. Bypass Tray Extension Pull out this dial...
Setup Guide
Page 19
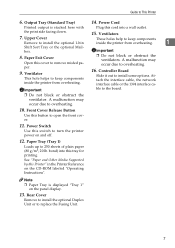
...not block or obstruct the ventilator. Important ble to install some options. Note ❒ Paper Tray is stacked here with Plug this Printer" in the Printer Reference on the panel display. 13. Output Tray (Standard Tray) 14. Important ❒ Do not block or obstruct the ventilators. ... occur due to overheating. 16. Rear Cover Remove to install the optional Duplex Unit or to turn the printer power on and off. 12. Power Cord Printed output is displayed "Tray 1" on the CD-ROM labeled "Operating Instructions". Power Switch Use this tray for printing.
...not block or obstruct the ventilator. Important ble to install some options. Note ❒ Paper Tray is stacked here with Plug this Printer" in the Printer Reference on the panel display. 13. Output Tray (Standard Tray) 14. Important ❒ Do not block or obstruct the ventilators. ... occur due to overheating. 16. Rear Cover Remove to install the optional Duplex Unit or to turn the printer power on and off. 12. Power Cord Printed output is displayed "Tray 1" on the CD-ROM labeled "Operating Instructions". Power Switch Use this tray for printing.

Setup Guide
Page 20
... replace this cover when replacing a transfer roller. 6. When "Replace Toner Cartridge" appears on the CD-ROM labeled "Operating Instructions". Guide Board Open this cover when accessing the inside of the printer. 3. If it becomes dirty, clean it. Getting Started ❖ Interior 1 [Front side] [Back side] ... Unit Fuses the image onto paper. Toner Cartridge Includes toner and a photoconductor unit. See "Cleaning the Registration Roller" in the Printer Reference on the panel display, replace this unit. 8 Front Cover Open this board to remove misfed paper. 4. ZGDH230J 5.
... replace this cover when replacing a transfer roller. 6. When "Replace Toner Cartridge" appears on the CD-ROM labeled "Operating Instructions". Guide Board Open this cover when accessing the inside of the printer. 3. If it becomes dirty, clean it. Getting Started ❖ Interior 1 [Front side] [Back side] ... Unit Fuses the image onto paper. Toner Cartridge Includes toner and a photoconductor unit. See "Cleaning the Registration Roller" in the Printer Reference on the panel display, replace this unit. 8 Front Cover Open this board to remove misfed paper. 4. ZGDH230J 5.

Setup Guide
Page 21
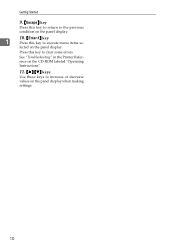
... ❒ This does not work if the printer is on the CD-ROM labeled "Operating Instructions". 2. Error indicator 7. {Form Feed} key If the printer is on the CD-ROM labeled "Operating Instructions". 4. Press this key to make and check the current printer settings. Power indicator Is on while the printer power is offline, press this key to print...
... ❒ This does not work if the printer is on the CD-ROM labeled "Operating Instructions". 2. Error indicator 7. {Form Feed} key If the printer is on the CD-ROM labeled "Operating Instructions". 4. Press this key to make and check the current printer settings. Power indicator Is on while the printer power is offline, press this key to print...
Setup Guide
Page 22
See "Troubleshooting" in the Printer Reference on the panel display when making settings. 10 Press this key to increase or decrease values on the CD-ROM labeled "Operating Instructions". 11. {U} {T} keys Use these keys to clear some errors. lected on the panel display. 10. {Enter #} key 1 Press this key to execute menu items se- Getting Started 9. {Escape} key Press this key to return to the previous condition on the panel display.
See "Troubleshooting" in the Printer Reference on the panel display when making settings. 10 Press this key to increase or decrease values on the CD-ROM labeled "Operating Instructions". 11. {U} {T} keys Use these keys to clear some errors. lected on the panel display. 10. {Enter #} key 1 Press this key to execute menu items se- Getting Started 9. {Escape} key Press this key to return to the previous condition on the panel display.
Setup Guide
Page 28
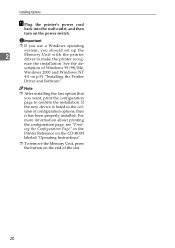
... 2 page to confirm the installation. If the printing position is listed in the Printer Reference on the CD-ROM labeled "Operating Instructions". Installing Options F Plug the printer's power cord back into the wall outlet, and then turn on the CD-ROM labeled "Operating Instructions". If the new device is not correct, adjust the registration of the...
... 2 page to confirm the installation. If the printing position is listed in the Printer Reference on the CD-ROM labeled "Operating Instructions". Installing Options F Plug the printer's power cord back into the wall outlet, and then turn on the CD-ROM labeled "Operating Instructions". If the new device is not correct, adjust the registration of the...

Setup Guide
Page 29
...bottom-most option- 2 al Paper Feed Unit is a tray that , lift it slightly, and then pull it out. Having more than one paper the printer until it stops. A Check the contents of the box for the following items: • Envelope Feeder • Installation Guide ZDDP340E B Pull out the ...be used in the top-most optional Without the optional Paper Feed Unit, this Envelope Feeder cannot be used in the Printer Reference on the CD-ROM labeled "Operating Instructions". ZDDP330E 17 C While lifting the front side of the optional Paper Feed Unit until it stops. tray out at the...
...bottom-most option- 2 al Paper Feed Unit is a tray that , lift it slightly, and then pull it out. Having more than one paper the printer until it stops. A Check the contents of the box for the following items: • Envelope Feeder • Installation Guide ZDDP340E B Pull out the ...be used in the top-most optional Without the optional Paper Feed Unit, this Envelope Feeder cannot be used in the Printer Reference on the CD-ROM labeled "Operating Instructions". ZDDP330E 17 C While lifting the front side of the optional Paper Feed Unit until it stops. tray out at the...
Setup Guide
Page 32
... installing the last option that you should set up the 2 Memory Unit with the printer driver to confirm the installation. If the new device is listed in the Printer Reference on the CD-ROM labeled "Operating Instructions". ❒ To remove the Memory Unit, press the button on the power switch.... See the de- Installing Options N Plug the printer's power cord back into the wall outlet, and then ...
... installing the last option that you should set up the 2 Memory Unit with the printer driver to confirm the installation. If the new device is listed in the Printer Reference on the CD-ROM labeled "Operating Instructions". ❒ To remove the Memory Unit, press the button on the power switch.... See the de- Installing Options N Plug the printer's power cord back into the wall outlet, and then ...
Setup Guide
Page 36
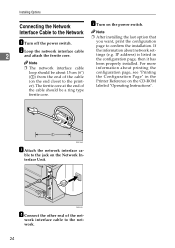
... page to the jack on the power switch. For more ❒ The network interface cable information about printing the loop should be about network settings (e.g. Printer Reference on the end closet to the print- ZDDP320E C Attach the network interface ca- ble to confirm the installation. Installing Options Connecting the Network E Turn... ferrite core at the end of the net- B Loop the network interface cable 2 and attach the ferrite core. ZGDX291J D Connect the other end of labeled "Operating Instructions". the cable should be a ring type ferrite core.
... page to the jack on the power switch. For more ❒ The network interface cable information about printing the loop should be about network settings (e.g. Printer Reference on the end closet to the print- ZDDP320E C Attach the network interface ca- ble to confirm the installation. Installing Options Connecting the Network E Turn... ferrite core at the end of the net- B Loop the network interface cable 2 and attach the ferrite core. ZGDX291J D Connect the other end of labeled "Operating Instructions". the cable should be a ring type ferrite core.
Setup Guide
Page 40
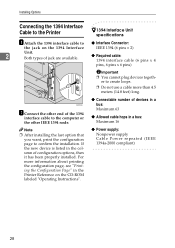
... create loops. ❒ Do not use a cable more information about printing the configuration page, see "Printing the Configuration Page" in the Printer Reference on the 1394 Interface IEEE 1394 (6 pins × 2) Unit. 2 Both types of configuration options, then it has been properly ...After installing the last option that you want, print the configuration page to ❖ Interface Connector: the jack on the CD-ROM labeled "Operating Instructions". ❖ Connectable number of devices in a bus: Maximum 63 ❖ Allowed cable hops in the column of jack are available. ❖...
... create loops. ❒ Do not use a cable more information about printing the configuration page, see "Printing the Configuration Page" in the Printer Reference on the 1394 Interface IEEE 1394 (6 pins × 2) Unit. 2 Both types of configuration options, then it has been properly ...After installing the last option that you want, print the configuration page to ❖ Interface Connector: the jack on the CD-ROM labeled "Operating Instructions". ❖ Connectable number of devices in a bus: Maximum 63 ❖ Allowed cable hops in the column of jack are available. ❖...
Setup Guide
Page 45
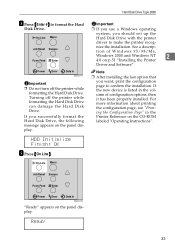
... message appears on p.51 "Installing the Printer Driver and Software". HDD Initialize Finish: OK I Press {On Line}. On Line Menu Job Reset Escape Form Feed Enter Power Error Data In "Ready" appears on the CD-ROM labeled "Operating Instructions". For more information about printing the configuration...panel display. Note ❒ After installing the last option that you should set up the On Line Menu Hard Disk Drive with the printer driver to confirm the installation. Hard Disk Drive Type 2600 H Press {Enter #} to format the Hard Important Disk Drive. ❒ If...
... message appears on p.51 "Installing the Printer Driver and Software". HDD Initialize Finish: OK I Press {On Line}. On Line Menu Job Reset Escape Form Feed Enter Power Error Data In "Ready" appears on the CD-ROM labeled "Operating Instructions". For more information about printing the configuration...panel display. Note ❒ After installing the last option that you should set up the On Line Menu Hard Disk Drive with the printer driver to confirm the installation. Hard Disk Drive Type 2600 H Press {Enter #} to format the Hard Important Disk Drive. ❒ If...

Setup Guide
Page 47
..." in the column of the trays. H Plug the printer's power cord back into the wall outlet, and then turn on the CD-ROM labeled "Operating Instructions". ❒ If the printing position is listed in the Printer Reference. For more information about adjusting the registration of the... trays, see "Printing the Configuration Page" in the Printer Reference on the power switch. G Attach the...
..." in the column of the trays. H Plug the printer's power cord back into the wall outlet, and then turn on the CD-ROM labeled "Operating Instructions". ❒ If the printing position is listed in the Printer Reference. For more information about adjusting the registration of the... trays, see "Printing the Configuration Page" in the Printer Reference on the power switch. G Attach the...

Setup Guide
Page 49
... been properly installed. If the new device is listed in the Printer Reference on the power switch. ZGDX180J G Attach the interface cable to confirm the installation. F Slide the upper tray into the wall outlet, and then turn on the CD-ROM labeled "Operating Instructions". 1-bin Shift Sort Tray Type 2600 2 37 H Plug the...
... been properly installed. If the new device is listed in the Printer Reference on the power switch. ZGDX180J G Attach the interface cable to confirm the installation. F Slide the upper tray into the wall outlet, and then turn on the CD-ROM labeled "Operating Instructions". 1-bin Shift Sort Tray Type 2600 2 37 H Plug the...
Setup Guide
Page 51
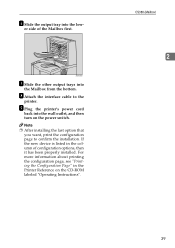
... "Printing the Configuration Page" in the column of the Mailbox first. I Plug the printer's power cord back into the wall outlet, and then turn on the CD-ROM labeled "Operating Instructions". If the new device is listed in the Printer Reference on the power switch. Note ❒ After installing the last option that you...
... "Printing the Configuration Page" in the column of the Mailbox first. I Plug the printer's power cord back into the wall outlet, and then turn on the CD-ROM labeled "Operating Instructions". If the new device is listed in the Printer Reference on the power switch. Note ❒ After installing the last option that you...
Setup Guide
Page 53
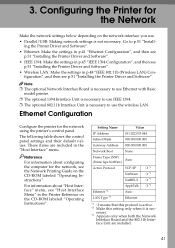
... settings is nec- essary. *3 Appears only when both the Network Interface Board and the 802.11b Interface Unit are included in the Printer Reference on the CD-ROM labeled "Operating Instructions". For information about configuring the computer for the network, see "Host Interface Menu" in the "Host Interface" menu. Setting Name Value IP...
... settings is nec- essary. *3 Appears only when both the Network Interface Board and the 802.11b Interface Unit are included in the Printer Reference on the CD-ROM labeled "Operating Instructions". For information about configuring the computer for the network, see "Host Interface Menu" in the "Host Interface" menu. Setting Name Value IP...
Setup Guide
Page 77
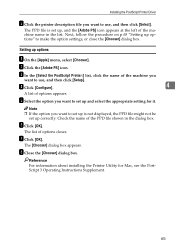
... file you want to set up and select the appropriate setting for Mac, see the PostScript 3 Operating Instructions Supplement. 65 B Click the [Adobe PS] icon. G Click [OK]. Reference For information about installing the Printer Utility for it. The [Chooser] dialog box appears. The PPD file is not displayed, the PPD file might not...
... file you want to set up and select the appropriate setting for Mac, see the PostScript 3 Operating Instructions Supplement. 65 B Click the [Adobe PS] icon. G Click [OK]. Reference For information about installing the Printer Utility for it. The [Chooser] dialog box appears. The PPD file is not displayed, the PPD file might not...
