Hardware Guide
Page 12
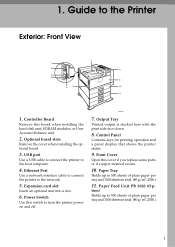
...4. Control Panel Contains keys for printing operation and a panel display that shows the printer status. 9. Optional board slots Remove the cover when installing the optional board. 3. USB port Use a USB cable to connect the printer to the network. 5. Front Cover Open this switch to 550 sheets of plain ...paper per tray and 1100 sheets in total. (80 g/m2, 20 lb.) 1 Paper Tray Holds up to the Printer Exterior: Front View 1. Output Tray Printed...
...4. Control Panel Contains keys for printing operation and a panel display that shows the printer status. 9. Optional board slots Remove the cover when installing the optional board. 3. USB port Use a USB cable to connect the printer to the network. 5. Front Cover Open this switch to 550 sheets of plain ...paper per tray and 1100 sheets in total. (80 g/m2, 20 lb.) 1 Paper Tray Holds up to the Printer Exterior: Front View 1. Output Tray Printed...
Hardware Guide
Page 16
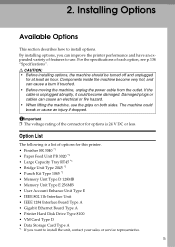
... 24 V DC or less. Damaged plugs or cables can cause an electrical or fire hazard. • When lifting the machine, use . The machine could become very hot, and can improve the printer performance and have an expanded variety of each option, see p.134 "Specifications". Important &#...on both sides. Components inside the machine become damaged. R CAUTION: • Before installing options, the machine should be turned off and unplugged for this printer. • Finisher SR 3040 *1 • Paper Feed Unit PB 3020 *1 • Large Capacity Tray RT45 *1 • Bridge Unit Type 2045 *1...
... 24 V DC or less. Damaged plugs or cables can cause an electrical or fire hazard. • When lifting the machine, use . The machine could become very hot, and can improve the printer performance and have an expanded variety of each option, see p.134 "Specifications". Important &#...on both sides. Components inside the machine become damaged. R CAUTION: • Before installing options, the machine should be turned off and unplugged for this printer. • Finisher SR 3040 *1 • Paper Feed Unit PB 3020 *1 • Large Capacity Tray RT45 *1 • Bridge Unit Type 2045 *1...

Hardware Guide
Page 22
It is unplugged from the wall outlet. ing material. Do not remove the tape that holds the paper feed unit, and then remove the pack- C Remove the tape that holds the connector cable inside the connector cover on the back of the paper feed unit in the fur- ther step. 2 AQV041S AQV040S 11 Attaching Paper Feed Unit PB 3020 B Confirm that the printer is turned off, and the power cord is removed in this step.
It is unplugged from the wall outlet. ing material. Do not remove the tape that holds the paper feed unit, and then remove the pack- C Remove the tape that holds the connector cable inside the connector cover on the back of the paper feed unit in the fur- ther step. 2 AQV041S AQV040S 11 Attaching Paper Feed Unit PB 3020 B Confirm that the printer is turned off, and the power cord is removed in this step.

Hardware Guide
Page 25
Hang the lock plate hook in the illustration. AQV009S L Fasten the band as shown in the hole inside (2), and then fasten the plate with the knob screw using your fingers. 2 AQV042S J Close the lower vertical paper feed cover. K Open the connector cover (2), remove the tape that holds the connector ca- Installing Options I Open the lower vertical paper feed cover on the right side of the paper feed unit (1). ble and attach the connector cables (3) as shown until it clicks to secure the cable. 14 AQV522S
Hang the lock plate hook in the illustration. AQV009S L Fasten the band as shown in the hole inside (2), and then fasten the plate with the knob screw using your fingers. 2 AQV042S J Close the lower vertical paper feed cover. K Open the connector cover (2), remove the tape that holds the connector ca- Installing Options I Open the lower vertical paper feed cover on the right side of the paper feed unit (1). ble and attach the connector cables (3) as shown until it clicks to secure the cable. 14 AQV522S

Hardware Guide
Page 31
.... ❒ Before touching the hard disk drive, touch something metal to make the settings in the printer driver. Installing Options Attaching Printer Hard Disk Drive Type 8100 R CAUTION: • Do not touch the inside of the controller board... compartment. Doing so may cause a machine malfunction or a burn. 2 Important ❒ Before installation, be sure to discharge any static electricity. A Check the package contains the following: ❖ Hard Disk Drive ❖ Flat Cable...
.... ❒ Before touching the hard disk drive, touch something metal to make the settings in the printer driver. Installing Options Attaching Printer Hard Disk Drive Type 8100 R CAUTION: • Do not touch the inside of the controller board... compartment. Doing so may cause a machine malfunction or a burn. 2 Important ❒ Before installation, be sure to discharge any static electricity. A Check the package contains the following: ❖ Hard Disk Drive ❖ Flat Cable...

Hardware Guide
Page 32
AQV222S 21 C Pull out the first paper tray (Tray 1) and take the screwdriver (1) from the tray. ❖ Power Cable Attaching Printer Hard Disk Drive Type 8100 2 AQV760S ❖ Supplied Screws AQV739S ❖ Protective Sheet AQV740S B Turn off the printer. Each screw to be removed requires this screwdriver.
AQV222S 21 C Pull out the first paper tray (Tray 1) and take the screwdriver (1) from the tray. ❖ Power Cable Attaching Printer Hard Disk Drive Type 8100 2 AQV760S ❖ Supplied Screws AQV739S ❖ Protective Sheet AQV740S B Turn off the printer. Each screw to be removed requires this screwdriver.

Hardware Guide
Page 34
Press down the levers on the controller board as shown, to leave any SDRAM module in the slots. H Place the protective sheet on both sides (1) to remove the SDRAM module (2). 2 AQV763S Be sure not to protect the controller board. AQV736S I Connect the flat cable (1) and power cable (2) to the hard disk drive. 1 2 AQV519S 23 Attaching Printer Hard Disk Drive Type 8100 G Remove the default or optional SDRAM module before installing the hard disk drive. Doing so may damage SDRAM modules when installing the hard disk drive.
Press down the levers on the controller board as shown, to leave any SDRAM module in the slots. H Place the protective sheet on both sides (1) to remove the SDRAM module (2). 2 AQV763S Be sure not to protect the controller board. AQV736S I Connect the flat cable (1) and power cable (2) to the hard disk drive. 1 2 AQV519S 23 Attaching Printer Hard Disk Drive Type 8100 G Remove the default or optional SDRAM module before installing the hard disk drive. Doing so may damage SDRAM modules when installing the hard disk drive.

Hardware Guide
Page 35
Installing Options J Carefully insert the hard disk drive into the center of the front end of the controller board. 2 AQV517S K Fasten the screws clockwise as shown. AQV730S L Connect the power cable to secure the hard disk drive. Hook this part over the flange (curled part) in the slot (1) on the controller board. 24 AQV520S There is a lip cut into the controller board as shown by using the provided screwdriver, to the socket on the controller board, and then align (2) and (3) with the screw holes in the rear edge of the hard disk drive's casing.
Installing Options J Carefully insert the hard disk drive into the center of the front end of the controller board. 2 AQV517S K Fasten the screws clockwise as shown. AQV730S L Connect the power cable to secure the hard disk drive. Hook this part over the flange (curled part) in the slot (1) on the controller board. 24 AQV520S There is a lip cut into the controller board as shown by using the provided screwdriver, to the socket on the controller board, and then align (2) and (3) with the screw holes in the rear edge of the hard disk drive's casing.

Hardware Guide
Page 36
... SDRAM modules, see p.27 "Attaching Memory Unit Type D 128MB, Memory Unit Type E 256MB (SDRAM Module)". 25 AQV737S Be sure to the printer, and attach an SDRAM module. N Remove the protective sheet when installing the hard disk drive is completely secured before removing the sheet. Attaching... Printer Hard Disk Drive Type 8100 M Connect the blue end of the flat cable to the socket on the controller board. 2 AQV521S When installing an SDRAM module on the controller board, ...
... SDRAM modules, see p.27 "Attaching Memory Unit Type D 128MB, Memory Unit Type E 256MB (SDRAM Module)". 25 AQV737S Be sure to the printer, and attach an SDRAM module. N Remove the protective sheet when installing the hard disk drive is completely secured before removing the sheet. Attaching... Printer Hard Disk Drive Type 8100 M Connect the blue end of the flat cable to the socket on the controller board. 2 AQV521S When installing an SDRAM module on the controller board, ...

Hardware Guide
Page 44
C Remove the screw by turning it counterclockwise using the provided screwdriver, and then remove the cover of the 802.11b interface board slot. D Fully insert the 802.11b interface board into the slot. AQV510S 33 AQV509S The removed cover is not used when installing the interface unit. • Antenna Attaching IEEE 802.11b Interface Unit ZHBP430E • Antenna Cap 2 AAL888S B Turn off the power, and then unplug the power cable.
C Remove the screw by turning it counterclockwise using the provided screwdriver, and then remove the cover of the 802.11b interface board slot. D Fully insert the 802.11b interface board into the slot. AQV510S 33 AQV509S The removed cover is not used when installing the interface unit. • Antenna Attaching IEEE 802.11b Interface Unit ZHBP430E • Antenna Cap 2 AAL888S B Turn off the power, and then unplug the power cable.

Hardware Guide
Page 47
... interface board slot. A Check the package contains the following: ❖ IEEE 1284 Interface Board Type A ABT041S1 B Turn off the power, and then unplug the power cable. AQV509S The removed cover is not used when installing the 1284 interface board. 36 Installing Options Attaching IEEE 1284 Interface Board Type A R CAUTION: • Do...
... interface board slot. A Check the package contains the following: ❖ IEEE 1284 Interface Board Type A ABT041S1 B Turn off the power, and then unplug the power cable. AQV509S The removed cover is not used when installing the 1284 interface board. 36 Installing Options Attaching IEEE 1284 Interface Board Type A R CAUTION: • Do...

Hardware Guide
Page 49
...gigabit ethernet board to the printer. A Check the contents of the box. ❖ Gigabit Ethernet Board Type A AGY096S ❖ Protective caps (one each for the ethernet port and the USB port) AGY097S B Turn off the power, and then unplug the power cable. 38 Installing Options Attaching ...Gigabit Ethernet Board Important ❒ The printer's ethernet and USB ports are not available when the gigabit eth- Static electricity can use the ethernet port ...
...gigabit ethernet board to the printer. A Check the contents of the box. ❖ Gigabit Ethernet Board Type A AGY096S ❖ Protective caps (one each for the ethernet port and the USB port) AGY097S B Turn off the power, and then unplug the power cable. 38 Installing Options Attaching ...Gigabit Ethernet Board Important ❒ The printer's ethernet and USB ports are not available when the gigabit eth- Static electricity can use the ethernet port ...

Hardware Guide
Page 50
AQV509S The removed cover is not used when installing the interface unit. E Fully insert the Gigabit ethernet board into the slot. er, and cover each port with its protective cap. 2 AQV562S D Remove the screw by turning it counterclockwise using the provided screwdriver, and then remove the cover of the print- AQV514S 39 Attaching Gigabit Ethernet Board C Disconnect the cables from the ethernet port and the USB port of the Gigabit ethernet board slot.
AQV509S The removed cover is not used when installing the interface unit. E Fully insert the Gigabit ethernet board into the slot. er, and cover each port with its protective cap. 2 AQV562S D Remove the screw by turning it counterclockwise using the provided screwdriver, and then remove the cover of the print- AQV514S 39 Attaching Gigabit Ethernet Board C Disconnect the cables from the ethernet port and the USB port of the Gigabit ethernet board slot.

Hardware Guide
Page 52
... inserting the unit. 2 A Check the package contains the following: ❖ VM Card Type D AET104S B Turn off the power, and then unplug the power cable. AQV504S D Carefully insert the VM card into the slot, until the card clicks into place. AQV553S 41 If the optional SDRAM module is not installed..., the printer does not detect the unit, and also it does not function because of the expansion card slot. C Remove the cover of memory shortage. ❒...
... inserting the unit. 2 A Check the package contains the following: ❖ VM Card Type D AET104S B Turn off the power, and then unplug the power cable. AQV504S D Carefully insert the VM card into the slot, until the card clicks into place. AQV553S 41 If the optional SDRAM module is not installed..., the printer does not detect the unit, and also it does not function because of the expansion card slot. C Remove the cover of memory shortage. ❒...

Hardware Guide
Page 54
... the data storage card into the slot, until the card clicks into place. AQV553S Note ❒ Do not touch the data storage card while the printer is recommended for inserting the unit. Attaching Data Storage Card Type A Attaching Data Storage Card Type A Important ❒ Protect the data storage card from physical... slot is in use. A Check the package contains the following: ❖ Data Storage Card Type A 2 AET104S B Turn off the power, and then unplug the power cable. It may come loose, even if pushed only slightly. 43
... the data storage card into the slot, until the card clicks into place. AQV553S Note ❒ Do not touch the data storage card while the printer is recommended for inserting the unit. Attaching Data Storage Card Type A Attaching Data Storage Card Type A Important ❒ Protect the data storage card from physical... slot is in use. A Check the package contains the following: ❖ Data Storage Card Type A 2 AET104S B Turn off the power, and then unplug the power cable. It may come loose, even if pushed only slightly. 43

Hardware Guide
Page 56
... devices before connecting the 10BASE-T or 100BASE-TX cable to the computer through the network. Unshielded cables create electromagnetic inter- AQV744S B Connect the Ethernet cable to the printer's network, such as a hub. 45 Select your cable accord- A Attach the supplied ferrite core at the printer end of the cable to the Ethernet port. 3. ing to the network...
... devices before connecting the 10BASE-T or 100BASE-TX cable to the computer through the network. Unshielded cables create electromagnetic inter- AQV744S B Connect the Ethernet cable to the printer's network, such as a hub. 45 Select your cable accord- A Attach the supplied ferrite core at the printer end of the cable to the Ethernet port. 3. ing to the network...

Hardware Guide
Page 57
Connecting the Printer Using the Gigabit Ethernet cable A For using the gigabit ethernet cable, attach one ferrite core at the printer end of the cable to the printer's network, such as shown. 3 AQV564S B Connect the ethernet cable to the printer. AQV551S C Connect the other end of the Ethernet cable, and attach the other ferrite core about 10 cm (4 inches) ( ) from...
Connecting the Printer Using the Gigabit Ethernet cable A For using the gigabit ethernet cable, attach one ferrite core at the printer end of the cable to the printer's network, such as shown. 3 AQV564S B Connect the ethernet cable to the printer. AQV551S C Connect the other end of the Ethernet cable, and attach the other ferrite core about 10 cm (4 inches) ( ) from...
Hardware Guide
Page 59
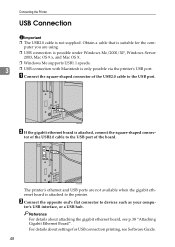
...or a USB hub. C Connect the opposite end's flat connector to the printer. A Connect the square-shaped connector of the board. tor of the USB2.0 cable to the USB port of the USB2.0 cable to the USB port. Reference For details about settings for the computer you..., see Software Guide. 48 Connecting the Printer USB Connection Important ❒ The USB2.0 cable is attached, connect the square-shaped connec- Obtain a cable that is suitable for USB connection printing, see p.38 "Attaching Gigabit Ethernet Board". AQV550S The printer's ethernet and USB ports are using. ...
...or a USB hub. C Connect the opposite end's flat connector to the printer. A Connect the square-shaped connector of the board. tor of the USB2.0 cable to the USB port of the USB2.0 cable to the USB port. Reference For details about settings for the computer you..., see Software Guide. 48 Connecting the Printer USB Connection Important ❒ The USB2.0 cable is attached, connect the square-shaped connec- Obtain a cable that is suitable for USB connection printing, see p.38 "Attaching Gigabit Ethernet Board". AQV550S The printer's ethernet and USB ports are using. ...

Hardware Guide
Page 60
.... Reference For details about settings for parallel connection printing, see Software Guide. 49 Parallel Connection Parallel Connection Important ❒ The parallel interface cable is not supplied with the printer. ❒ The printer's parallel connection is a standard bidirectional interface that could cause malfunctions. ❒ Voltage rating of the computer's parallel port: DC 5 V (max.) 3 A Turn...
.... Reference For details about settings for parallel connection printing, see Software Guide. 49 Parallel Connection Parallel Connection Important ❒ The parallel interface cable is not supplied with the printer. ❒ The printer's parallel connection is a standard bidirectional interface that could cause malfunctions. ❒ Voltage rating of the computer's parallel port: DC 5 V (max.) 3 A Turn...

Hardware Guide
Page 112
...10070; Ad hoc Mode or 802.11 Ad hoc Mode when using the correct interface cable? If the signal is damaged or worn, replace it with the store where the printer was purchased for information about checking the port connection, see p.102 "Checking the ...10070; Network Connection Contact your network administrator. Printer Does Not Print Printer Does Not Print Possible Cause Solutions Is the power on ? printer malfunction. Is the interface cable con- printer and the computer? For details about the location of interface cable you use depends on the control panel. How...
...10070; Ad hoc Mode or 802.11 Ad hoc Mode when using the correct interface cable? If the signal is damaged or worn, replace it with the store where the printer was purchased for information about checking the port connection, see p.102 "Checking the ...10070; Network Connection Contact your network administrator. Printer Does Not Print Printer Does Not Print Possible Cause Solutions Is the power on ? printer malfunction. Is the interface cable con- printer and the computer? For details about the location of interface cable you use depends on the control panel. How...
