
Setup Guide
Page 1
... 9 How to Read This Manual 10 Guide to the Printer Exterior: Front View 11 Exterior: Rear View 12 Inside...14 Control Panel...15 Setting Up Where to Put the Printer 17 Checking the Contents of the Box 20 Unpacking...22 Installing the Waste Toner Bottle and Photo Conductor Unit 23 Installing the Toner Cartridge 29 Loading Paper ...33 Turning the Power On 36 Selecting the Display Language 38 Test Printing ...40 G1398501_1.00...
... 9 How to Read This Manual 10 Guide to the Printer Exterior: Front View 11 Exterior: Rear View 12 Inside...14 Control Panel...15 Setting Up Where to Put the Printer 17 Checking the Contents of the Box 20 Unpacking...22 Installing the Waste Toner Bottle and Photo Conductor Unit 23 Installing the Toner Cartridge 29 Loading Paper ...33 Turning the Power On 36 Selecting the Display Language 38 Test Printing ...40 G1398501_1.00...

Setup Guide
Page 2
... Board Type B 71 Attaching IEEE 802.11b Interface Unit Type H 74 Attaching Bluetooth Interface Unit Type 3245 78 Attaching IEEE 1284 Interface Board Type A 82 Attaching Network Data Protection Unit Type C 84 Connecting the Printer Network Connection 86 USB Connection 88 Parallel Connection 89 IEEE 1394 Connection 90 Configuration Ethernet Configuration 91 IEEE 802.11b (Wireless LAN) Configuration 96 IEEE 1394 Configuration 102 IP over 1394...102 SCSI print...104 Installing the Printer Driver Quick Install...106 Install the Operating Instructions 108...
... Board Type B 71 Attaching IEEE 802.11b Interface Unit Type H 74 Attaching Bluetooth Interface Unit Type 3245 78 Attaching IEEE 1284 Interface Board Type A 82 Attaching Network Data Protection Unit Type C 84 Connecting the Printer Network Connection 86 USB Connection 88 Parallel Connection 89 IEEE 1394 Connection 90 Configuration Ethernet Configuration 91 IEEE 802.11b (Wireless LAN) Configuration 96 IEEE 1394 Configuration 102 IP over 1394...102 SCSI print...104 Installing the Printer Driver Quick Install...106 Install the Operating Instructions 108...

Setup Guide
Page 6
...; Keep toner (used toner is outside the recommended ranges of water and move into your clothes or skin when removing a paper jam or replacing toner. Read This First • Place no objects on a strong and level surface. Operating the machine in an environment that can become an electrical fire hazard. • Place the machine on the right cover. • Do not pull out the paper tray...
...; Keep toner (used toner is outside the recommended ranges of water and move into your clothes or skin when removing a paper jam or replacing toner. Read This First • Place no objects on a strong and level surface. Operating the machine in an environment that can become an electrical fire hazard. • Place the machine on the right cover. • Do not pull out the paper tray...

Setup Guide
Page 9
...; Specifications Energy Saver mode Power Consumption Default Time Recovery Time 10 W or less 1 minutes 3 seconds or less 9 For more information about how to reduce the environmental impact associated with office equipment by means of energy-saving features, such as global warming. This product was designed to configure Energy Saver mode, see "Making Printer Settings with environmental issues, such as Low-power mode. ❖ Low-power Mode (Energy Saver mode...
...; Specifications Energy Saver mode Power Consumption Default Time Recovery Time 10 W or less 1 minutes 3 seconds or less 9 For more information about how to reduce the environmental impact associated with office equipment by means of energy-saving features, such as global warming. This product was designed to configure Energy Saver mode, see "Making Printer Settings with environmental issues, such as Low-power mode. ❖ Low-power Mode (Energy Saver mode...

Setup Guide
Page 11
... for printer control and a panel display that displays the printer's status. 5. Bypass Tray Use this to print onto thick paper, OHP transparencies, custom size paper, and envelopes, as well as plain paper. Special printer driver settings must be loaded here. Front Cover Open this to print onto custom size paper. 7. Guide to 530 sheets of plain paper can be made in order to replace the fusing unit or transfer roller, install the duplex unit, or remove misfed paper. 6. Make sure the ventilator is stacked here print side down. 2. Standard Tray Output...
... for printer control and a panel display that displays the printer's status. 5. Bypass Tray Use this to print onto thick paper, OHP transparencies, custom size paper, and envelopes, as well as plain paper. Special printer driver settings must be loaded here. Front Cover Open this to print onto custom size paper. 7. Guide to 530 sheets of plain paper can be made in order to replace the fusing unit or transfer roller, install the duplex unit, or remove misfed paper. 6. Make sure the ventilator is stacked here print side down. 2. Standard Tray Output...

Setup Guide
Page 12
...; 11". 5. Power Switch Use this out when printing on and off. 4. Expansion Card Slots Install expansion cards in any way obstructed. 2. Standard Tray Extension Pull this to turn the power on paper that is not blocked by objects or in these slots. Up to the Printer Exterior: Rear View 1. Right Cover Open this out to replace photo conductor units, the transfer belt , or the waste toner bottle. 3. Controller Board Slide...
...; 11". 5. Power Switch Use this out when printing on and off. 4. Expansion Card Slots Install expansion cards in any way obstructed. 2. Standard Tray Extension Pull this to turn the power on paper that is not blocked by objects or in these slots. Up to the Printer Exterior: Rear View 1. Right Cover Open this out to replace photo conductor units, the transfer belt , or the waste toner bottle. 3. Controller Board Slide...

Setup Guide
Page 13
USB Port Use a USB cable to connect the printer to a network. 10. Optional Paper Feed Unit Connector Use this socket and the other end of the cable directly to the wall outlet (do not use an extension). 13 Ethernet Port Use a network interface cable to connect the printer to a host computer. 9. Ventilator The ventilator helps keep internal components from overheating. Overheating results in any way obstructed. 11. Make sure the ventilator is not blocked by...
USB Port Use a USB cable to connect the printer to a network. 10. Optional Paper Feed Unit Connector Use this socket and the other end of the cable directly to the wall outlet (do not use an extension). 13 Ethernet Port Use a network interface cable to connect the printer to a host computer. 9. Ventilator The ventilator helps keep internal components from overheating. Overheating results in any way obstructed. 11. Make sure the ventilator is not blocked by...
Setup Guide
Page 14
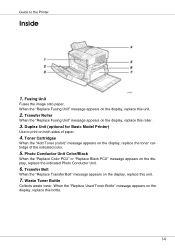
...Used Toner Bottle" message appears on the display, replace this roller. 3. Duplex Unit (optional for Basic Model Printer) Use to the Printer Inside 1. Guide to print on the display, replace this bottle. 14 Waste Toner Bottle Collects waste toner. When the "Replace Fusing Unit" message appears on both sides of the indicated color. 5. Photo Conductor Unit Color/Black When the "Replace Color PCU" or "Replace Black PCU" message appears on the display, replace the toner cartridge of paper. 4. Fusing Unit Fuses the image onto paper. Toner Cartridges When the "Add Toner (color...
...Used Toner Bottle" message appears on the display, replace this roller. 3. Duplex Unit (optional for Basic Model Printer) Use to the Printer Inside 1. Guide to print on the display, replace this bottle. 14 Waste Toner Bottle Collects waste toner. When the "Replace Fusing Unit" message appears on both sides of the indicated color. 5. Photo Conductor Unit Color/Black When the "Replace Color PCU" or "Replace Black PCU" message appears on the display, replace the toner cartridge of paper. 4. Fusing Unit Fuses the image onto paper. Toner Cartridges When the "Add Toner (color...
Setup Guide
Page 15
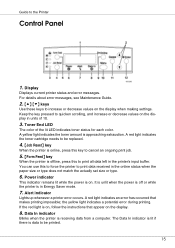
... ongoing print job. 5. {Form Feed} key When the printer is on the display when making settings. Alert indicator Lights up whenever a printer error occurs. For details about error messages, see Maintenance Guide. 2. {U} {T} keys Use these keys to be printed. 15 Data In indicator Blinks when the printer is approaching exhaustion. It is unlit when the power is off or while the printer is on, follow the instructions that makes printing impossible; Toner End LED The color...
... ongoing print job. 5. {Form Feed} key When the printer is on the display when making settings. Alert indicator Lights up whenever a printer error occurs. For details about error messages, see Maintenance Guide. 2. {U} {T} keys Use these keys to be printed. 15 Data In indicator Blinks when the printer is approaching exhaustion. It is unlit when the power is off or while the printer is on, follow the instructions that makes printing impossible; Toner End LED The color...

Setup Guide
Page 16
... Printer 9. {Online} key Indicates whether the printer is online, enabling data reception from the host computer. Guide to make and check the current printer settings. Press this to execute menu items selected on the display. 12. {# Enter} key Press this key to return to the previous condition on the display. 16 For details, See "Making Printer Settings Using the Control Panel", Software Guide. 11. {Escape} key Press this key to switch between online and offline...
... Printer 9. {Online} key Indicates whether the printer is online, enabling data reception from the host computer. Guide to make and check the current printer settings. Press this to execute menu items selected on the display. 12. {# Enter} key Press this key to return to the previous condition on the display. 16 For details, See "Making Printer Settings Using the Control Panel", Software Guide. 11. {Escape} key Press this key to switch between online and offline...

Setup Guide
Page 20
... CD-ROMs Quick Installation Guide CD-ROM "Printer Drivers and Utilities" CD-ROM "Display-Version Manuals (HTML)" CD-ROM "Print-Version Manuals (PDF)" CD-ROM "Document Management Utility" ❖ Parts Power Cable Toner Cartridges: Black (K), Magenta (M), Cyan (C), Yellow (Y) Photo Conductor Unit: Black ( ), Color ( ) 20 Setting Up Checking the Contents of the Box Follow the procedure below to verify the items that come with the printer. ❒ Ensure that the box contains all items listed below.
... CD-ROMs Quick Installation Guide CD-ROM "Printer Drivers and Utilities" CD-ROM "Display-Version Manuals (HTML)" CD-ROM "Print-Version Manuals (PDF)" CD-ROM "Document Management Utility" ❖ Parts Power Cable Toner Cartridges: Black (K), Magenta (M), Cyan (C), Yellow (Y) Photo Conductor Unit: Black ( ), Color ( ) 20 Setting Up Checking the Contents of the Box Follow the procedure below to verify the items that come with the printer. ❒ Ensure that the box contains all items listed below.

Setup Guide
Page 29
... paper type, size, contents, and settings. ❒ Toner Cartridges (consumable) are not covered by drinking a large amount of water and move into a fresh air environment. If your skin comes into the fabric and may make removing the stain impossible. ❒ When you to print up to an open flame. The toner might ignite when exposed to about 2,500 pages. These numbers were obtained from printing...
... paper type, size, contents, and settings. ❒ Toner Cartridges (consumable) are not covered by drinking a large amount of water and move into a fresh air environment. If your skin comes into the fabric and may make removing the stain impossible. ❒ When you to print up to an open flame. The toner might ignite when exposed to about 2,500 pages. These numbers were obtained from printing...

Setup Guide
Page 44
... moving the machine, unplug the power cable from the outlet. Some printer models come with the expansion AD440 (duplex unit) contained as default. If the cable is a list of each option, see Maintenance Guide. • Before installing options, the machine should be turned off and unplugged for this printer. By installing options, you can cause an electrical or fire hazard. • When lifting the machine, use . For the specifications of...
... moving the machine, unplug the power cable from the outlet. Some printer models come with the expansion AD440 (duplex unit) contained as default. If the cable is a list of each option, see Maintenance Guide. • Before installing options, the machine should be turned off and unplugged for this printer. By installing options, you can cause an electrical or fire hazard. • When lifting the machine, use . For the specifications of...

Setup Guide
Page 56
... shocks. ❒ Available memory varies depending on model type. ❒ Before using the new memory unit, you must make settings in the printer driv- B Remove the two screws securing the controller board to the back of the controller board compartment. er. A Turn off the power, and then unplug the power cable. Static electricity can damage the memory unit. ❒ Do not subject the memory unit to secure the controller board. 56 Doing so...
... shocks. ❒ Available memory varies depending on model type. ❒ Before using the new memory unit, you must make settings in the printer driv- B Remove the two screws securing the controller board to the back of the controller board compartment. er. A Turn off the power, and then unplug the power cable. Static electricity can damage the memory unit. ❒ Do not subject the memory unit to secure the controller board. 56 Doing so...

Setup Guide
Page 71
... cable while installing the printer driver. ❒ Use the 1394 interface cable that has administrators access rights. ❒ Before touching the 1394 interface board, ground yourself by touching something metal to discharge any static electricity. Operating system-compatible connection methods are as follows (IEEE 1394 cannot be used with Windows 95/98 and Windows NT 4.0): • Windows Me "IP over 1394" • Windows 2000 "SCSI print" • Windows XP, Windows Server...
... cable while installing the printer driver. ❒ Use the 1394 interface cable that has administrators access rights. ❒ Before touching the 1394 interface board, ground yourself by touching something metal to discharge any static electricity. Operating system-compatible connection methods are as follows (IEEE 1394 cannot be used with Windows 95/98 and Windows NT 4.0): • Windows Me "IP over 1394" • Windows 2000 "SCSI print" • Windows XP, Windows Server...

Setup Guide
Page 96
... (1-13) 13 Auto blank (ASSID) Not Active ❒ To use IEEE 802.11b (Wireless LAN). Configuration IEEE 802.11b (Wireless LAN) Configuration Configure the printer to use IEEE 802.11b (Wireless LAN), select [IEEE 802.11b] for [LAN Type] in [Network Setup] in the [Host Interface] menu, and then set [IP Address], [Subnet Mask], [Gateway Address], [DHCP], [Frame Type (NW)] and [Active Protocol] under "Configuring the Printer for the Network", see Software Guide. ❒...
... (1-13) 13 Auto blank (ASSID) Not Active ❒ To use IEEE 802.11b (Wireless LAN). Configuration IEEE 802.11b (Wireless LAN) Configuration Configure the printer to use IEEE 802.11b (Wireless LAN), select [IEEE 802.11b] for [LAN Type] in [Network Setup] in the [Host Interface] menu, and then set [IP Address], [Subnet Mask], [Gateway Address], [DHCP], [Frame Type (NW)] and [Active Protocol] under "Configuring the Printer for the Network", see Software Guide. ❒...

Setup Guide
Page 104
... then press the {# Enter} key. Menu: Host Interface The interface setting menu appears. C Press the {U} or {T} key to confirm the settings made. D Set [SCSI print] and [Bidi-SCSI print] if necessary. ❒ The default setting is "Active". For details about printing the configuration page, see p.40 "Test Printing". SCSI print A Press the {Menu} key. Configuration J Press the {Online} key. K Print a configuration page to display [IEEE 1394 Setup], and then press the {# Enter} key...
... then press the {# Enter} key. Menu: Host Interface The interface setting menu appears. C Press the {U} or {T} key to confirm the settings made. D Set [SCSI print] and [Bidi-SCSI print] if necessary. ❒ The default setting is "Active". For details about printing the configuration page, see p.40 "Test Printing". SCSI print A Press the {Menu} key. Configuration J Press the {Online} key. K Print a configuration page to display [IEEE 1394 Setup], and then press the {# Enter} key...

Setup Guide
Page 106
... installer starts. D Click [Quick Install]. G1398501_1.00 Copyright © 2005 106 Installing the Printer Driver Quick Install Windows 95/98/Me, Windows 2000/XP, Windows Server 2003, and Windows NT 4.0 users can easily install this printer under Windows 2000/XP Professional, Windows Server 2003, and Windows NT 4.0, you connect using the CD-ROM provided. If this happens, launch "Setup.exe" on as an Administrator. ❒ The Quick Install is not available when using this software using USB, see Software Guide. Using Quick Install, the PCL printer driver...
... installer starts. D Click [Quick Install]. G1398501_1.00 Copyright © 2005 106 Installing the Printer Driver Quick Install Windows 95/98/Me, Windows 2000/XP, Windows Server 2003, and Windows NT 4.0 users can easily install this printer under Windows 2000/XP Professional, Windows Server 2003, and Windows NT 4.0, you connect using the CD-ROM provided. If this happens, launch "Setup.exe" on as an Administrator. ❒ The Quick Install is not available when using this software using USB, see Software Guide. Using Quick Install, the PCL printer driver...

Setup Guide
Page 107
... work with certain operating system settings. H Click [Finish] A message about bidirectional communication between the printer and computer is displayed in [Connect To] to use in the [Select Printer] dialog box. ❒ For network connection via parallel connection. Quick Install is not available unless bidirectional communication between printer and computer. 107 G Click [Install]. The printer driver installation starts. Restart the computer to whose IP address is enabled via TCP/IP, select the printer...
... work with certain operating system settings. H Click [Finish] A message about bidirectional communication between the printer and computer is displayed in [Connect To] to use in the [Select Printer] dialog box. ❒ For network connection via parallel connection. Quick Install is not available unless bidirectional communication between printer and computer. 107 G Click [Install]. The printer driver installation starts. Restart the computer to whose IP address is enabled via TCP/IP, select the printer...

Setup Guide
Page 108
... into the CD-ROM drive. Auto Run may not work under certain operating system setting. Double-click on the CD-ROM root directory. Installing the Printer Driver Install the Operating Instructions The CD-ROM provided with the printer contains an HTML Operating Instructions Manual in the [Start] menu, select your Web browser, a simpler version of the Operating Instructions Manual does not correctly display correctly, open folder "MANUAL\R_MANUAL\ (language) \ (SETUP or MAINTE or SOFTWARE) \unv\" on the...
... into the CD-ROM drive. Auto Run may not work under certain operating system setting. Double-click on the CD-ROM root directory. Installing the Printer Driver Install the Operating Instructions The CD-ROM provided with the printer contains an HTML Operating Instructions Manual in the [Start] menu, select your Web browser, a simpler version of the Operating Instructions Manual does not correctly display correctly, open folder "MANUAL\R_MANUAL\ (language) \ (SETUP or MAINTE or SOFTWARE) \unv\" on the...


