
Brochure
Page 2
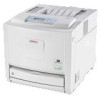
...Maximum Paper Capacity: Acceptable Paper Sizes: Acceptable Paper Weights: Output Capacity: Automatic Duplexing: Duplex Paper Weight: Part # 402434 Desktop Laser beam scanning, color laser electro photographic printing with unique printing requirements. In addition, safeguard your valuable information ...(60 - 105 gm2) Controller Specifications CPU: RM7035 @ 533MHz Printer Languages: Adobe® PostScript® 3™, PCL 6, PCL 5c, PDF Direct, Ricoh RPCS Fonts: Adobe PostScript 3: 136 Type 1 fonts PCL: 45 Intellifonts, 10 TrueType fonts, 1 Bitmap font Memory (RAM): 128MB Std. /...
...Maximum Paper Capacity: Acceptable Paper Sizes: Acceptable Paper Weights: Output Capacity: Automatic Duplexing: Duplex Paper Weight: Part # 402434 Desktop Laser beam scanning, color laser electro photographic printing with unique printing requirements. In addition, safeguard your valuable information ...(60 - 105 gm2) Controller Specifications CPU: RM7035 @ 533MHz Printer Languages: Adobe® PostScript® 3™, PCL 6, PCL 5c, PDF Direct, Ricoh RPCS Fonts: Adobe PostScript 3: 136 Type 1 fonts PCL: 45 Intellifonts, 10 TrueType fonts, 1 Bitmap font Memory (RAM): 128MB Std. /...

User Manual
Page 13
Overheating results in any way obstructed. 11. Optional Paper Feed Unit Connector Use this socket and the other end of the cable directly to a network. 10. Guide to the paper feed unit. 12. Ethernet Port Use a network interface cable to connect the printer to the wall outlet (do ...
Overheating results in any way obstructed. 11. Optional Paper Feed Unit Connector Use this socket and the other end of the cable directly to a network. 10. Guide to the paper feed unit. 12. Ethernet Port Use a network interface cable to connect the printer to the wall outlet (do ...

User Manual
Page 19
..., locate this machine for a long time in a confined space without good ventilation, you keep it well ventilated. ❖ Environments to Avoid ❒ Areas exposed to direct sunlight or strong light ❒ Dusty areas ❒ Areas with corrosive gases ❒ Areas that has an air turnover of more 19 To keep the...
..., locate this machine for a long time in a confined space without good ventilation, you keep it well ventilated. ❖ Environments to Avoid ❒ Areas exposed to direct sunlight or strong light ❒ Dusty areas ❒ Areas with corrosive gases ❒ Areas that has an air turnover of more 19 To keep the...
User Manual
Page 31
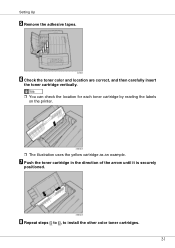
H Repeat steps B to G, to install the other color toner cartridges. 31 Setting Up E Remove the adhesive tapes. G Push the toner cartridge in the direction of the arrow until it is securely positioned. F Check the toner color and location are correct, and then carefully insert the toner cartridge vertically. ❒ You can check the location for each toner cartridge by reading the labels on the printer. ❒ The illustration uses the yellow cartridge as an example.
H Repeat steps B to G, to install the other color toner cartridges. 31 Setting Up E Remove the adhesive tapes. G Push the toner cartridge in the direction of the arrow until it is securely positioned. F Check the toner color and location are correct, and then carefully insert the toner cartridge vertically. ❒ You can check the location for each toner cartridge by reading the labels on the printer. ❒ The illustration uses the yellow cartridge as an example.

User Manual
Page 62
F Insert the printer hard disk by aligning it with the controller board slot. H When installing other options on the controller board. G Secure the printer hard disk using the supplied screw. Slide it in the illustration. Installing Options The printer hard disk is to be installed to the position shown in the direction of the arrow, and then connect it to the connector on the controller board, do not close the controller board, but go to the steps for installing the option. 62
F Insert the printer hard disk by aligning it with the controller board slot. H When installing other options on the controller board. G Secure the printer hard disk using the supplied screw. Slide it in the illustration. Installing Options The printer hard disk is to be installed to the position shown in the direction of the arrow, and then connect it to the connector on the controller board, do not close the controller board, but go to the steps for installing the option. 62