
Operating Instructions
Page 3
... TWAIN Scanner 7 Scan to E-mail...8 Scan to Folder...9 Scan to FTP ...10 Scan to Print...11 Delivery Server...12 Guide to this Scanner 13 Using Keys Displayed on the Screen 15 How to Read This Manual 5 1.
... TWAIN Scanner 7 Scan to E-mail...8 Scan to Folder...9 Scan to FTP ...10 Scan to Print...11 Delivery Server...12 Guide to this Scanner 13 Using Keys Displayed on the Screen 15 How to Read This Manual 5 1.
Operating Instructions
Page 13
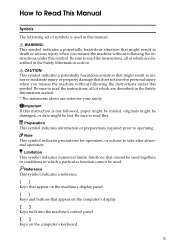
...Information section. * The statements above are described in which a particular function cannot be lost. Reference This symbol indicates a reference. [] Keys that appear on the computer's keyboard. 5 R CAUTION: This symbol indicates a potentially hazardous situation that cannot be used together, or conditions...minor or moderate injury or property damage that appear on the computer's display. {} Keys built into the machine's control panel. {} Keys on the machine's display panel. [] Keys and buttons that does not involve personal injury when you misuse the machine without following...
...Information section. * The statements above are described in which a particular function cannot be lost. Reference This symbol indicates a reference. [] Keys that appear on the computer's keyboard. 5 R CAUTION: This symbol indicates a potentially hazardous situation that cannot be used together, or conditions...minor or moderate injury or property damage that appear on the computer's display. {} Keys built into the machine's control panel. {} Keys on the machine's display panel. [] Keys and buttons that does not involve personal injury when you misuse the machine without following...

Operating Instructions
Page 21
... of this machine's power on and off. 6. Original table Set originals here to be loaded into this key to display list of this Scanner 1 1. ADG018S 8. {Clear Modes} key Press this key to return to the initial screen that is displayed when you turn the power on the screen, or enter... numeric values. 12. {./*} (Title) key Press this machine. Number keys Used to select a menu item displayed on . 9. {Clear/Stop} key Press this key when you want to clear the value that have entered, or stop scanning currently in progress. 10. ...
... of this machine's power on and off. 6. Original table Set originals here to be loaded into this key to display list of this Scanner 1 1. ADG018S 8. {Clear Modes} key Press this key to return to the initial screen that is displayed when you turn the power on the screen, or enter... numeric values. 12. {./*} (Title) key Press this machine. Number keys Used to select a menu item displayed on . 9. {Clear/Stop} key Press this key when you want to clear the value that have entered, or stop scanning currently in progress. 10. ...

Operating Instructions
Page 22
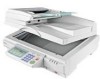
..."Lock" position when you transport this switch to the slot and connecting a USB printer, you do not use the slot for the corresponding function key operations. 1. Power connector For connection of an Ethernet network cable. 7. Network interface connector For connection of the bundled AC power cord. 14 ADG019S... LAN card, instead of the USB interface card. Lock switch Set this machine. 5. By inserting the USB interface card that comes with keys that are loaded in the ADF. 3. What You Can Do With This Machine 15. Exposure glass Place the original here when you can...
..."Lock" position when you transport this switch to the slot and connecting a USB printer, you do not use the slot for the corresponding function key operations. 1. Power connector For connection of an Ethernet network cable. 7. Network interface connector For connection of the bundled AC power cord. 14 ADG019S... LAN card, instead of the USB interface card. Lock switch Set this machine. 5. By inserting the USB interface card that comes with keys that are loaded in the ADF. 3. What You Can Do With This Machine 15. Exposure glass Place the original here when you can...

Operating Instructions
Page 23
Guide to this Scanner Using Keys Displayed on the Screen You can use the function keys, located under the display panel, to operate keys that appear on the display panel. 1 Example: ADG002S To execute a key operation on the display panel, press the relevant function key. • Press A to select [Scan]. • Press B to select [Dest.]. • Press C to select [Sender]. • Press D to select [PrevMenu]. 15
Guide to this Scanner Using Keys Displayed on the Screen You can use the function keys, located under the display panel, to operate keys that appear on the display panel. 1 Example: ADG002S To execute a key operation on the display panel, press the relevant function key. • Press A to select [Scan]. • Press B to select [Dest.]. • Press C to select [Sender]. • Press D to select [PrevMenu]. 15

Operating Instructions
Page 25
... the following settings in advance. • With the options in [2.Send Scan Settings] under Scanner Features menu, which is displayed by pressing the {User Tools} key. [Function Priority] is connected to configure the above settings. 17 Guide to this Scanner Network interface indicators The network interface connector on . Green indicator Lights...
... the following settings in advance. • With the options in [2.Send Scan Settings] under Scanner Features menu, which is displayed by pressing the {User Tools} key. [Function Priority] is connected to configure the above settings. 17 Guide to this Scanner Network interface indicators The network interface connector on . Green indicator Lights...

Operating Instructions
Page 26
...is displayed, depending on the settings in accordance If you want to use any one of the Send Scan initial screens, and pressing the {2} key displays the same screen as the initial screen, depending on the screen, and then press [OK]. • Print Scan Select this option if ...PrevMenu] to display the Select Method screen, and then press the {2} key. What You Can Do With This Machine Function Priority You can also use the {0} or {1} key to display the Select Method screen, and then press the {1} key. The following screens is displayed as Delivery Server/Send File. Send/...
...is displayed, depending on the settings in accordance If you want to use any one of the Send Scan initial screens, and pressing the {2} key displays the same screen as the initial screen, depending on the screen, and then press [OK]. • Print Scan Select this option if ...PrevMenu] to display the Select Method screen, and then press the {2} key. What You Can Do With This Machine Function Priority You can also use the {0} or {1} key to display the Select Method screen, and then press the {1} key. The following screens is displayed as Delivery Server/Send File. Send/...

Operating Instructions
Page 27
...to this Scanner Select Method • The following three options are not available. • Send File/TWAIN Select this machine. Pressing the {2} key displays the Print Scan standby screen. Press [Exit] to return to configure how you use this option if you use e-mail, Send File (... start the network TWAIN driver from a TWAINcompliant application on a client computer, Network TWAIN standby screen is displayed, pressing the {1} key displays Delivery Server standby screen, Email/Send File standby screen, Network TWAIN standby screen, or Network TWAIN exclusive standby screen.
...to this Scanner Select Method • The following three options are not available. • Send File/TWAIN Select this machine. Pressing the {2} key displays the Print Scan standby screen. Press [Exit] to return to configure how you use this option if you use e-mail, Send File (... start the network TWAIN driver from a TWAINcompliant application on a client computer, Network TWAIN standby screen is displayed, pressing the {1} key displays Delivery Server standby screen, Email/Send File standby screen, Network TWAIN standby screen, or Network TWAIN exclusive standby screen.

Operating Instructions
Page 29
... screen. compliant application on a client computer. While this machine as Delivery Server, email or Send File (SMB/FTP), 1 compliant application on Pressing the {User Tools} key displays the Scanner Features menu. functions you want to use the following functions: Print Scan, Delivery Server, e-mail, Send File (SMB), Send File (FTP), sending...
... screen. compliant application on a client computer. While this machine as Delivery Server, email or Send File (SMB/FTP), 1 compliant application on Pressing the {User Tools} key displays the Scanner Features menu. functions you want to use the following functions: Print Scan, Delivery Server, e-mail, Send File (SMB), Send File (FTP), sending...

Operating Instructions
Page 51
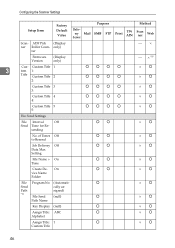
... Deliv- ery Mail SMB FTP Server bbbb bbbb bbbb bbbb Print TW AIN b *4 b b *4 b b *4 b b *4 b Method Scan ner Web bb ×b ×b ×b WEP Setting *9 Disable WEP Key *9 , (null) *12 b b b b b *4 b × b b b b b b *4 b × b Wireless (Display LAN Signal only) Community public *14 b SNMP Name *13 admin *15 (null) *16 Access Type read-only b *14 ...
... Deliv- ery Mail SMB FTP Server bbbb bbbb bbbb bbbb Print TW AIN b *4 b b *4 b b *4 b b *4 b Method Scan ner Web bb ×b ×b ×b WEP Setting *9 Disable WEP Key *9 , (null) *12 b b b b b *4 b × b b b b b b *4 b × b Wireless (Display LAN Signal only) Community public *14 b SNMP Name *13 admin *15 (null) *16 Access Type read-only b *14 ...
Operating Instructions
Page 54
... Web Scan- ADF Pick (Display ner Roller Coun- sending bb ×b No. b Send cally as- Path signed) *19 File Send (null) b Path Name ×b ×b Key Display (null) b ×b Assign Title : ABC b Alphabet ×b Assign Title : 1 Custom Title b ×b 46
... Web Scan- ADF Pick (Display ner Roller Coun- sending bb ×b No. b Send cally as- Path signed) *19 File Send (null) b Path Name ×b ×b Key Display (null) b ×b Assign Title : ABC b Alphabet ×b Assign Title : 1 Custom Title b ×b 46

Operating Instructions
Page 55
er *19 signed) b ×b FTP Server (null) Name b ×b Key Display (null) b ×b Assign Title : ABC Alphabet b ×b Assign Title : 1 Custom Title b ×b Assign Title : On Frequently Used Title(s) b ×b Server Name/Path Name (null) &#...
er *19 signed) b ×b FTP Server (null) Name b ×b Key Display (null) b ×b Assign Title : ABC Alphabet b ×b Assign Title : 1 Custom Title b ×b Assign Title : On Frequently Used Title(s) b ×b Server Name/Path Name (null) &#...

Operating Instructions
Page 56
... ×b SMTP Server 25 b Port No. ×b Domain Name (null) ×b Authentica- sending E- Ad- trator's Ad- of Times 1 b to Resend E- signed) dress *21 Name (null) b Key Display (null) b ×b ×b ×b Configuring the Scanner Settings 3 48 Setup Item Factory Default Value Purpose Method Delivery Mail Server SMB FTP Print TW AIN...
... ×b SMTP Server 25 b Port No. ×b Domain Name (null) ×b Authentica- sending E- Ad- trator's Ad- of Times 1 b to Resend E- signed) dress *21 Name (null) b Key Display (null) b ×b ×b ×b Configuring the Scanner Settings 3 48 Setup Item Factory Default Value Purpose Method Delivery Mail Server SMB FTP Print TW AIN...

Operating Instructions
Page 58
... first. Configuring the Scanner Settings 3 50 Setup Item Factory Default Value Purpose Method Delivery Mail Server SMB FTP Print TW AIN Scan ner Web Print Key Display (null) b er *24 Assign Title : ABC b Alphabet ×b ×b Assign Title : 1 b Custom Title ×b Assign Title : On b Frequently Used Title(s) ×b Attachment Network b Type...
... first. Configuring the Scanner Settings 3 50 Setup Item Factory Default Value Purpose Method Delivery Mail Server SMB FTP Print TW AIN Scan ner Web Print Key Display (null) b er *24 Assign Title : ABC b Alphabet ×b ×b Assign Title : 1 b Custom Title ×b Assign Title : On b Frequently Used Title(s) ×b Attachment Network b Type...

Operating Instructions
Page 60
...enter the IP address to configure 3 these settings using the control panel of xxx.xxx.xxx.xxx (xxx:0 through 255). Pressing the {2} key displays the Print Scan initial screen for information about how to select the initial screen of this machine first. And then, you can configure ... When a fixed IP address is initially displayed. However, you use an optional wireless LAN card. Do not specify this screen, pressing the {1} key displays the Delivery Server standby screen or the E-mail/Send File standby screen, depending on the settings in the System Settings menu. They include an...
...enter the IP address to configure 3 these settings using the control panel of xxx.xxx.xxx.xxx (xxx:0 through 255). Pressing the {2} key displays the Print Scan initial screen for information about how to select the initial screen of this machine first. And then, you can configure ... When a fixed IP address is initially displayed. However, you use an optional wireless LAN card. Do not specify this screen, pressing the {1} key displays the Delivery Server standby screen or the E-mail/Send File standby screen, depending on the settings in the System Settings menu. They include an...

Operating Instructions
Page 63
...and returns to the System Settings menu. Note ❒ Pressing [PrevMenu] returns to the previous screen. A Press the {User Tools} key. • The option that is currently selected is displayed, and "1. The System Settings menu is displayed first. • "*" mark appears along...to se- Note ❒ Pressing [Cancel] discards the selected option, and returns to the parent menu screen. See p.15 "Using Keys Displayed on the screen. Function Priority " appears as the setup item currently selected. F Configure the necessary settings in accordance with the option...
...and returns to the System Settings menu. Note ❒ Pressing [PrevMenu] returns to the previous screen. A Press the {User Tools} key. • The option that is currently selected is displayed, and "1. The System Settings menu is displayed first. • "*" mark appears along...to se- Note ❒ Pressing [Cancel] discards the selected option, and returns to the parent menu screen. See p.15 "Using Keys Displayed on the screen. Function Priority " appears as the setup item currently selected. F Configure the necessary settings in accordance with the option...

Operating Instructions
Page 64
...the IP address of this machine, it was (the option marked with the option currently selected. You can use {11} (or {#} ) and {0} keys to move the highlighting to "000.000.000.000". Access Control " and "6. light the part and then input "008" using the number...for "3. H Use [↑] and [↓] to the previous screen. itation of 0 to this machine. • Input the IP address using the number keys. ample, when you have specified, and returns to specify "5. Note ❒ Pressing [Cancel] leaves the setting as it is not necessary to the previous ...
...the IP address of this machine, it was (the option marked with the option currently selected. You can use {11} (or {#} ) and {0} keys to move the highlighting to "000.000.000.000". Access Control " and "6. light the part and then input "008" using the number...for "3. H Use [↑] and [↓] to the previous screen. itation of 0 to this machine. • Input the IP address using the number keys. ample, when you have specified, and returns to specify "5. Note ❒ Pressing [Cancel] leaves the setting as it is not necessary to the previous ...

Operating Instructions
Page 66
... status. "9. MAC Address " appears as the setup item currently selected. Wireless LAN Signal " appears as the setup item currently selected. When you can press a number key to the standby screen that is a hardware ad- 3 dress that uniquely identifies each of wireless LAN signal by using the control panel of "11. LAN...
... status. "9. MAC Address " appears as the setup item currently selected. Wireless LAN Signal " appears as the setup item currently selected. When you can press a number key to the standby screen that is a hardware ad- 3 dress that uniquely identifies each of wireless LAN signal by using the control panel of "11. LAN...

Operating Instructions
Page 72
...within the range of Scan Option], enter the time during which the setting menu appears. Specify the time in 1MB increments. B Press the {2} key. Select Method " appears as the setup item currently selected. Configuring the Scanner Settings ❖ Job Delivery Data Max. tings using the Web Status...Press the {User Tools} ABK006S The Scanner Features menu is displayed, and "1. ured using the Web Status Monitor. Reference See p.15 "Using Keys Displayed on the Screen" for [End of 3 through 900. When you set - The Send Scan Settings menu is displayed. You can also ...
...within the range of Scan Option], enter the time during which the setting menu appears. Specify the time in 1MB increments. B Press the {2} key. Select Method " appears as the setup item currently selected. Configuring the Scanner Settings ❖ Job Delivery Data Max. tings using the Web Status...Press the {User Tools} ABK006S The Scanner Features menu is displayed, and "1. ured using the Web Status Monitor. Reference See p.15 "Using Keys Displayed on the Screen" for [End of 3 through 900. When you set - The Send Scan Settings menu is displayed. You can also ...

Operating Instructions
Page 73
... " appears. F Press [Next]. "2. TWAIN Standby Time " appears. • Use the {1} and {0} keys to highlight the setting you have entered. Note ❒ To correct the number, press the {Clear/Stop} key to clear the number you want. Note ❒ Pressing [Cancel] discards the selected option, and returns to.... I Press [ OK ] This saves the setting you want for a network TWAIN command (or a [Enter Custom Send File] command) using the number keys. 3 • The option that you main- Scanner Settings C Press [OK] H Select the option you have made, and returns to the Send Scan ...
... " appears. F Press [Next]. "2. TWAIN Standby Time " appears. • Use the {1} and {0} keys to highlight the setting you have entered. Note ❒ To correct the number, press the {Clear/Stop} key to clear the number you want. Note ❒ Pressing [Cancel] discards the selected option, and returns to.... I Press [ OK ] This saves the setting you want for a network TWAIN command (or a [Enter Custom Send File] command) using the number keys. 3 • The option that you main- Scanner Settings C Press [OK] H Select the option you have made, and returns to the Send Scan ...