

English Manual
Page 1
...: www.reebokservice.com CAUTION Read all precautions and instructions in the space above for future reference. USER'S MANUAL RBEX14910.0 Serial No. CALL TOLL-FREE: 1-877-994-4999 Mon.-Fri. 6 a.m.-6 p.m. Write the serial number in this equipment. IMPORTANT: Please register this product (see the limited warranty on the back cover of this manual) before using this manual before contacting Customer Care. www.reebokfitness.com Model No.
...: www.reebokservice.com CAUTION Read all precautions and instructions in the space above for future reference. USER'S MANUAL RBEX14910.0 Serial No. CALL TOLL-FREE: 1-877-994-4999 Mon.-Fri. 6 a.m.-6 p.m. Write the serial number in this equipment. IMPORTANT: Please register this product (see the limited warranty on the back cover of this manual) before using this manual before contacting Customer Care. www.reebokfitness.com Model No.
English Manual
Page 2
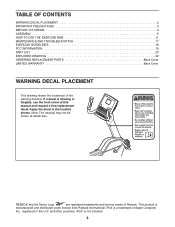
... service marks of this manual and request a free replacement decal. Note: The decal(s) may not be shown at actual size. iPod is missing or illegible, see the front cover of Reebok. This product is not included. 2 TABLE OF CONTENTS WARNING DECAL PLACEMENT 2 IMPORTANT PRECAUTIONS 3 BEFORE YOU BEGIN 4 ASSEMBLY 5 HOW TO USE THE EXERCISE BIKE 11 MAINTENANCE AND TROUBLESHOOTING 17 EXERCISE GUIDELINES 18 FCC INFORMATION 19 PART LIST...
... service marks of this manual and request a free replacement decal. Note: The decal(s) may not be shown at actual size. iPod is missing or illegible, see the front cover of Reebok. This product is not included. 2 TABLE OF CONTENTS WARNING DECAL PLACEMENT 2 IMPORTANT PRECAUTIONS 3 BEFORE YOU BEGIN 4 ASSEMBLY 5 HOW TO USE THE EXERCISE BIKE 11 MAINTENANCE AND TROUBLESHOOTING 17 EXERCISE GUIDELINES 18 FCC INFORMATION 19 PART LIST...
English Manual
Page 3
... children under the exercise bike. 11. Do not put the exercise bike in this manual. 3. IMPORTANT PRECAUTIONS WARNING: To reduce the risk of serious injury, read all important precautions and instructions in this manual and all times. 9. ICON assumes no responsibility for foot protection. 4. Replace any exercise program, consult your back. 13. Before beginning any worn parts immediately. 3 The pulse sensor is not a medical...
... children under the exercise bike. 11. Do not put the exercise bike in this manual. 3. IMPORTANT PRECAUTIONS WARNING: To reduce the risk of serious injury, read all important precautions and instructions in this manual and all times. 9. ICON assumes no responsibility for foot protection. 4. Replace any exercise program, consult your back. 13. Before beginning any worn parts immediately. 3 The pulse sensor is not a medical...
English Manual
Page 4
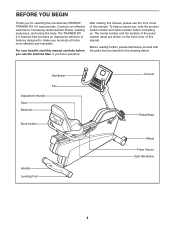
For your workouts at home more effective and enjoyable. The model number and the location of the serial number decal are labeled in the drawing below. The TRAINER RX 4.0 exercise bike provides an impressive selection of this manual. Handlebar Fan Adjustment Handle Seat Backrest Book Holder Handle Leveling Foot Console Pedal/Strap Wheel Pulse Sensor Seat Handlebar 4 Cycling is an effective exercise for selecting the revolutionary REEBOK® TRAINER RX 4.0 exercise bike. To help us . Before reading...
For your workouts at home more effective and enjoyable. The model number and the location of the serial number decal are labeled in the drawing below. The TRAINER RX 4.0 exercise bike provides an impressive selection of this manual. Handlebar Fan Adjustment Handle Seat Backrest Book Holder Handle Leveling Foot Console Pedal/Strap Wheel Pulse Sensor Seat Handlebar 4 Cycling is an effective exercise for selecting the revolutionary REEBOK® TRAINER RX 4.0 exercise bike. To help us . Before reading...
English Manual
Page 5
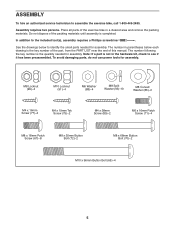
... exercise bike in parentheses below to see if it has been preassembled. Do not dispose of this manual. Note: If a part is completed. See the drawings below each drawing is the quantity needed for assembly. ASSEMBLY To hire an authorized service technician to the included tool(s), assembly requires a Phillips screwdriver . The number following the key number is the key number of the part, from the PART LIST...
... exercise bike in parentheses below to see if it has been preassembled. Do not dispose of this manual. Note: If a part is completed. See the drawings below each drawing is the quantity needed for assembly. ASSEMBLY To hire an authorized service technician to the included tool(s), assembly requires a Phillips screwdriver . The number following the key number is the key number of the part, from the PART LIST...
English Manual
Page 8
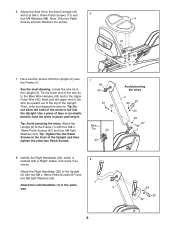
... the lower end of the wires to the Upper Pulse Wire (42). Note: Only two Patch 9 Screws and two Washers are shown. 41 88 71 7. Use a piece of tape or an elastic band to the Seat Carriage (41) with two M8 x 18mm Patch Screws (67...wires 2 93 67 93 93 67 1 8. Attach the Upright (2) to the Upright (2) with four M6 x 16mm Patch Screws (71) and 6 four M6 Washers (88). Attach the Right Handlebar (20) to the Frame (1) with a "Right" sticker, and orient it as 8 shown. Tip: Tighten the two Patch Screws in place until step 9. 6. Attach the Seat (9) to hold the Upright...
... the lower end of the wires to the Upper Pulse Wire (42). Note: Only two Patch 9 Screws and two Washers are shown. 41 88 71 7. Use a piece of tape or an elastic band to the Seat Carriage (41) with two M8 x 18mm Patch Screws (67...wires 2 93 67 93 93 67 1 8. Attach the Upright (2) to the Upright (2) with four M6 x 16mm Patch Screws (71) and 6 four M6 Washers (88). Attach the Right Handlebar (20) to the Frame (1) with a "Right" sticker, and orient it as 8 shown. Tip: Tighten the two Patch Screws in place until step 9. 6. Attach the Seat (9) to hold the Upright...
English Manual
Page 9
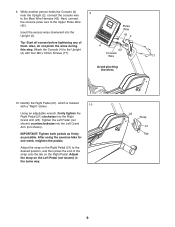
... the wires during 4 this step. Identify the Right Pedal (21), which is marked with four M4 x 16mm Screws (77). Adjust the strap on the Right Pedal. Insert the excess wires downward into the Left Crank Arm (not shown). Next, connect the console pulse wire to the Main Wire Harness (43). Adjust the strap on the Right Pedal (21) to the Upright 43 (2) with a "Right" sticker. 10 Using an adjustable wrench, firmly tighten...
... the wires during 4 this step. Identify the Right Pedal (21), which is marked with four M4 x 16mm Screws (77). Adjust the strap on the Right Pedal. Insert the excess wires downward into the Left Crank Arm (not shown). Next, connect the console pulse wire to the Main Wire Harness (43). Adjust the strap on the Right Pedal (21) to the Upright 43 (2) with a "Right" sticker. 10 Using an adjustable wrench, firmly tighten...
English Manual
Page 10
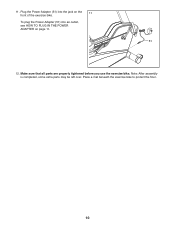
Make sure that all parts are properly tightened before you use the exercise bike. Note: After assembly is completed, some extra parts may be left over. Plug the Power Adapter (51) into an outlet, see HOW TO PLUG IN THE POWER ADAPTER on the 11 front of the exercise bike. Place a mat beneath the exercise bike to protect the floor. 10 11. To plug the Power Adapter (51) into the jack on page 11. 51 12.
Make sure that all parts are properly tightened before you use the exercise bike. Note: After assembly is completed, some extra parts may be left over. Plug the Power Adapter (51) into an outlet, see HOW TO PLUG IN THE POWER ADAPTER on the 11 front of the exercise bike. Place a mat beneath the exercise bike to protect the floor. 10 11. To plug the Power Adapter (51) into the jack on page 11. 51 12.
English Manual
Page 11
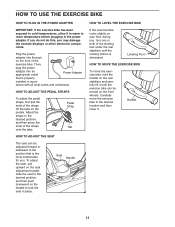
Plug the power adapter into an appropriate outlet Power Adapter that is the most comfortable for you may damage the console displays or other electronic components. Then, plug the power adapter into the jack on the front of the leveling feet under the rear stabilizer until the exercise bike can be moved on the pedals. Adjust the straps to the desired position, and then press the ends of the...
Plug the power adapter into an appropriate outlet Power Adapter that is the most comfortable for you may damage the console displays or other electronic components. Then, plug the power adapter into the jack on the front of the leveling feet under the rear stabilizer until the exercise bike can be moved on the pedals. Adjust the straps to the desired position, and then press the ends of the...
English Manual
Page 12
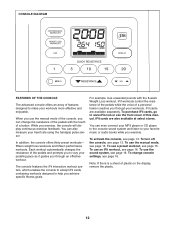
... your heart rate using the handgrip pulse sensor. To use an iFit workout, see page 13. While you through an effective workout. To turn off the console, see page 15. Note: If there is a sheet of the pedals with the 8-week Weight Loss workout. In addition, the console offers thirty preset workouts- iFit workouts control the resistance of the pedals while the voice of a personal trainer coaches you exercise, the console will display continuous exercise feedback. CONSOLE DIAGRAM...
... your heart rate using the handgrip pulse sensor. To use an iFit workout, see page 13. While you through an effective workout. To turn off the console, see page 15. Note: If there is a sheet of the pedals with the 8-week Weight Loss workout. In addition, the console offers thirty preset workouts- iFit workouts control the resistance of the pedals while the voice of a personal trainer coaches you exercise, the console will display continuous exercise feedback. CONSOLE DIAGRAM...
English Manual
Page 13
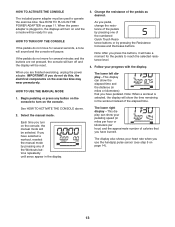
... numbered Quick Touch Resistance buttons or by pressing any button on the console to operate the exercise bike. HOW TO TURN OFF THE CONSOLE If the pedals do this, the electrical components on the exercise bike may wear prematurely. Select the manual mode. The lower left display-This display can show your heart rate when you are not pressed, the console will turn on the console, the manual mode will be selected. Note: When a workout is plugged in miles...
... numbered Quick Touch Resistance buttons or by pressing any button on the console to operate the exercise bike. HOW TO TURN OFF THE CONSOLE If the pedals do this, the electrical components on the exercise bike may wear prematurely. Select the manual mode. The lower left display-This display can show your heart rate when you are not pressed, the console will turn on the console, the manual mode will be selected. Note: When a workout is plugged in miles...
English Manual
Page 14
... contacts. The lower display-This display will show pedaling speed and distance in the display, and then your heart rate will not be shown in succession around the track until the upper display shows the information that your hands are most accurate heart rate reading, hold the handgrip pulse sensor with your pedaling speed, and the approximate number of measurement, see HOW TO CHANGE CONSOLE SETTINGS on page 16. 5. When your heart rate, hold...
... contacts. The lower display-This display will show pedaling speed and distance in the display, and then your heart rate will not be shown in succession around the track until the upper display shows the information that your hands are most accurate heart rate reading, hold the handgrip pulse sensor with your pedaling speed, and the approximate number of measurement, see HOW TO CHANGE CONSOLE SETTINGS on page 16. 5. When your heart rate, hold...
English Manual
Page 15
... only to start the workout. IMPORTANT: The target speed is too high or too low, you are finished using the exercise bike, the console will appear in the display for the current segment. Make sure to alert you exercise, keep your progress (see the drawing above). Begin pedaling or press any time, stop counting. See step 4 on the console. Select a preset workout. Loss Workouts button repeatedly until...
... only to start the workout. IMPORTANT: The target speed is too high or too low, you are finished using the exercise bike, the console will appear in the display for the current segment. Make sure to alert you exercise, keep your progress (see the drawing above). Begin pedaling or press any time, stop counting. See step 4 on the console. Select a preset workout. Loss Workouts button repeatedly until...

English Manual
Page 16
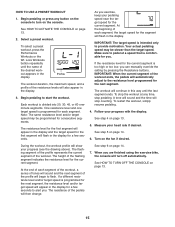
... place. To purchase iFit cards, go to 7 on . A moment after you exercise, plug the included audio cable into the jack on the console and into the iFit slot located on page 13. To use an iFit workout, insert an iFit card into a jack on the iFit card by pressing the increase and decrease buttons next to view console usage information. The lower left display will begin guiding you through the console sound system while...
... place. To purchase iFit cards, go to 7 on . A moment after you exercise, plug the included audio cable into the jack on the console and into the iFit slot located on page 13. To use an iFit workout, insert an iFit card into a jack on the iFit card by pressing the increase and decrease buttons next to view console usage information. The lower left display will begin guiding you through the console sound system while...
English Manual
Page 17
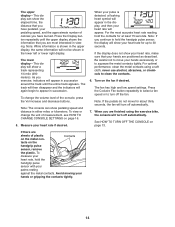
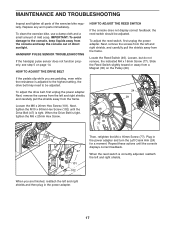
... turn the Left Crank Arm (24) for a moment. To adjust the reed switch, first unplug the power adapter. Next, tighten the M10 x 50mm Hex Screw (102) until the console displays correct feedback. Plug in the power adapter. Then, retighten the M4 x 16mm Screw (77). When the reed switch is adjusted to the highest setting, the drive belt may need to the console, keep liquids away from a Magnet (30) on page 14. To clean the exercise bike, use...
... turn the Left Crank Arm (24) for a moment. To adjust the reed switch, first unplug the power adapter. Next, tighten the M10 x 50mm Hex Screw (102) until the console displays correct feedback. Plug in the power adapter. Then, retighten the M4 x 16mm Screw (77). When the reed switch is adjusted to the highest setting, the drive belt may need to the console, keep liquids away from a Magnet (30) on page 14. To clean the exercise bike, use...
English Manual
Page 18
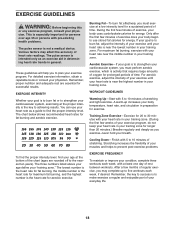
... workouts. A warm-up to 10 minutes of your exercise until your heart rate is to burn fat or to 10 minutes of your exercise program, do not keep your heart rate in your physician. Cooling Down-Finish with pre-existing health problems. The pulse sensor is intended only as you may affect the accuracy of your muscles and helps to find your training...
... workouts. A warm-up to 10 minutes of your exercise until your heart rate is to burn fat or to 10 minutes of your exercise program, do not keep your heart rate in your physician. Cooling Down-Finish with pre-existing health problems. The pulse sensor is intended only as you may affect the accuracy of your muscles and helps to find your training...

English Manual
Page 19
... to try to correct the interference by ICON could void the user's authority to provide reasonable protection against harmful interference in a particular installation. These limits are designed to operate the equipment. 19 This equipment generates, uses, and can be determined by turning the equipment off and on, the user is connected. • Consult the dealer or an experienced...
... to try to correct the interference by ICON could void the user's authority to provide reasonable protection against harmful interference in a particular installation. These limits are designed to operate the equipment. 19 This equipment generates, uses, and can be determined by turning the equipment off and on, the user is connected. • Consult the dealer or an experienced...
English Manual
Page 20
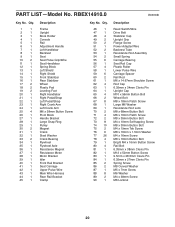
... Reed Switch/Wire Drive Belt Stabilizer Cap Upright Grip Flange Screw Power Adapter/Wire Backrest Tube Resistance Rod Assembly Small Spring Carriage Bearing Seat Rail Cap Plastic Roller Lower Pulse Wire Carriage Spacer Rail Rod M6 x 14.67mm Shoulder Screw Rod Cap 6.35mm x 34mm Clevis Pin Upright Cap M10 x 96mm Button Bolt Wheel Bolt M8 x 18mm Patch Screw Large M6 Washer Resistance Rod Lock M8 x 68mm Button Bolt M6 x 16mm Patch Screw M8 x 35mm Button Bolt M4 x 10mm Self-tapping Screw...
... Reed Switch/Wire Drive Belt Stabilizer Cap Upright Grip Flange Screw Power Adapter/Wire Backrest Tube Resistance Rod Assembly Small Spring Carriage Bearing Seat Rail Cap Plastic Roller Lower Pulse Wire Carriage Spacer Rail Rod M6 x 14.67mm Shoulder Screw Rod Cap 6.35mm x 34mm Clevis Pin Upright Cap M10 x 96mm Button Bolt Wheel Bolt M8 x 18mm Patch Screw Large M6 Washer Resistance Rod Lock M8 x 68mm Button Bolt M6 x 16mm Patch Screw M8 x 35mm Button Bolt M4 x 10mm Self-tapping Screw...

English Manual
Page 21
... Washer Assembly Tool Userʼs Manual Note: Specifications are not illustrated. 21 For information about ordering replacement parts, see the back cover of this manual. *These parts are subject to change without notice. Qty. Description 91 6 92 2 93 28 94 1 95 12 96 2 97 4 98 1 99 8 100 1 M10 Locknut Crank Cap M8 Split Washer M12 Nut M8 Jam Nut Spring Washer Cotter Pin Pulley...
... Washer Assembly Tool Userʼs Manual Note: Specifications are not illustrated. 21 For information about ordering replacement parts, see the back cover of this manual. *These parts are subject to change without notice. Qty. Description 91 6 92 2 93 28 94 1 95 12 96 2 97 4 98 1 99 8 100 1 M10 Locknut Crank Cap M8 Split Washer M12 Nut M8 Jam Nut Spring Washer Cotter Pin Pulley...
English Manual
Page 24
.... or to products used for commercial or rental purposes or as store display models; Parts and labor are warranted for one of its authorized service centers. This warranty gives you , be free from the service center will be preauthorized by ICON. ICON Health & Fitness, Inc. (ICON) warrants this product to be prepared to provide the following information when contacting us assist you specific legal rights...
.... or to products used for commercial or rental purposes or as store display models; Parts and labor are warranted for one of its authorized service centers. This warranty gives you , be free from the service center will be preauthorized by ICON. ICON Health & Fitness, Inc. (ICON) warrants this product to be prepared to provide the following information when contacting us assist you specific legal rights...


