
English Manual
Page 1
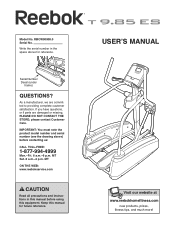
... CAUTION Read all precautions and instructions in the space above ) before using this equipment. Model No. Write the serial number in this manual for reference. please contact Customer Care. USERʼS MANUAL Visit our website at www.reebokhomefitness.com new products, prizes, fitness tips, and much more! RBCW90908.0 Serial No. If you have questions, or if parts are committed to providing complete...
... CAUTION Read all precautions and instructions in the space above ) before using this equipment. Model No. Write the serial number in this manual for reference. please contact Customer Care. USERʼS MANUAL Visit our website at www.reebokhomefitness.com new products, prizes, fitness tips, and much more! RBCW90908.0 Serial No. If you have questions, or if parts are committed to providing complete...
English Manual
Page 2
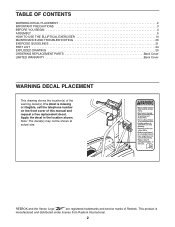
... 3 BEFORE YOU BEGIN 4 ASSEMBLY 5 HOW TO USE THE ELLIPTICAL EXERCISER 13 MAINTENANCE AND TROUBLESHOOTING 20 EXERCISE GUIDELINES 21 PART LIST 24 EXPLODED DRAWING 25 ORDERING REPLACEMENT PARTS Back Cover LIMITED WARRANTY Back Cover WARNING DECAL PLACEMENT This drawing shows the location(s) of this manual and request a free replacement decal. Note: The decal(s) may not be shown at actual size. If a decal is manufactured and distributed under license from Reebok International. 2 This...
... 3 BEFORE YOU BEGIN 4 ASSEMBLY 5 HOW TO USE THE ELLIPTICAL EXERCISER 13 MAINTENANCE AND TROUBLESHOOTING 20 EXERCISE GUIDELINES 21 PART LIST 24 EXPLODED DRAWING 25 ORDERING REPLACEMENT PARTS Back Cover LIMITED WARRANTY Back Cover WARNING DECAL PLACEMENT This drawing shows the location(s) of this manual and request a free replacement decal. Note: The decal(s) may not be shown at actual size. If a decal is manufactured and distributed under license from Reebok International. 2 This...
English Manual
Page 3
.... 1. ICON assumes no responsibility for home use of heart rate readings. Your elliptical exerciser is enough clearance around your elliptical exerciser to protect the floor or carpet. Make sure that could become caught on a level surface, with pre-existing health problems. 2. Your elliptical exerciser should not be used by or through the use only. Keep your elliptical exerciser at all parts regularly. Inspect and properly tighten all times. 7. The pulse sensor...
.... 1. ICON assumes no responsibility for home use of heart rate readings. Your elliptical exerciser is enough clearance around your elliptical exerciser to protect the floor or carpet. Make sure that could become caught on a level surface, with pre-existing health problems. 2. Your elliptical exerciser should not be used by or through the use only. Keep your elliptical exerciser at all parts regularly. Inspect and properly tighten all times. 7. The pulse sensor...
English Manual
Page 4
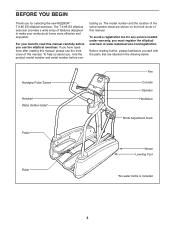
... on the front cover of the serial number decal are labeled in the drawing below. Handgrip Pulse Sensor Handrail Water Bottle Holder* Fan Console Speaker Handlebar Stride Adjustment Knob Pedal Wheel Leveling Foot Roller *No water bottle is included 4 BEFORE YOU BEGIN Thank you for any service needed under warranty, you must register the elliptical exerciser at home more effective and enjoyable. The T 9.85 ES elliptical exerciser provides a wide...
... on the front cover of the serial number decal are labeled in the drawing below. Handgrip Pulse Sensor Handrail Water Bottle Holder* Fan Console Speaker Handlebar Stride Adjustment Knob Pedal Wheel Leveling Foot Roller *No water bottle is included 4 BEFORE YOU BEGIN Thank you for any service needed under warranty, you must register the elliptical exerciser at home more effective and enjoyable. The T 9.85 ES elliptical exerciser provides a wide...
English Manual
Page 5
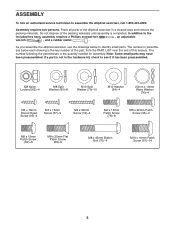
... needed for assembly. The number in parentheses below to see if it has been preassembled. If a part is completed. Do not dispose of the packing materials until assembly is not in a cleared area and remove the packing materials. Assembly requires two persons. The number following the parentheses is the key number of the part, from the PART LIST near the end of the elliptical exerciser...
... needed for assembly. The number in parentheses below to see if it has been preassembled. If a part is completed. Do not dispose of the packing materials until assembly is not in a cleared area and remove the packing materials. Assembly requires two persons. The number following the parentheses is the key number of the part, from the PART LIST near the end of the elliptical exerciser...

English Manual
Page 6
... attached to the Lower Wire Harness (82). Then, tighten four Leveling Feet (52) into the indicated holes in the Frame (1). Insert the Upright (2) into the Frame (1). While a second person holds the Upright near the Frame (1), connect the Upper Wire Harness (81) to the Frame (1). Identify the Frame Cover (54) and orient it as shown. To make assembly easier, read the 1 information...
... attached to the Lower Wire Harness (82). Then, tighten four Leveling Feet (52) into the indicated holes in the Frame (1). Insert the Upright (2) into the Frame (1). While a second person holds the Upright near the Frame (1), connect the Upper Wire Harness (81) to the Frame (1). Identify the Frame Cover (54) and orient it as shown. To make assembly easier, read the 1 information...

English Manual
Page 8
... Left Pedal Arm (14). Identify the Right Pedal Arm (15), which is marked with an M10 x 19mm Patch Screw (61), a Pedal Axle Cover (39), and an M10 Washer (64). Position the Left Handlebar Leg (12) as 6 shown. the Left Pedal Arm must pivot easily. Identify the Left Pedal Arm (14), which is marked with four M6 x 13mm Patch Screws (78). 9 Attach the other Pedal to...
... Left Pedal Arm (14). Identify the Right Pedal Arm (15), which is marked with an M10 x 19mm Patch Screw (61), a Pedal Axle Cover (39), and an M10 Washer (64). Position the Left Handlebar Leg (12) as 6 shown. the Left Pedal Arm must pivot easily. Identify the Left Pedal Arm (14), which is marked with four M6 x 13mm Patch Screws (78). 9 Attach the other Pedal to...

English Manual
Page 9
... Pedal Arm Bracket with two M8 x 45mm Button Bolts (70) and two M8 Nylon Locknuts (63). Apply a small amount of grease to the left Pedal Arm Bracket (43). See the inset drawing. Attach the Handlebar 8 (90) to the Ground Wire (97). Grease Attach the right Pedal Leg (8) in the same way. 8 70 43 8 63 8. While a second person holds the Console (3) near the Upright (2), connect the three wires...
... Pedal Arm Bracket with two M8 x 45mm Button Bolts (70) and two M8 Nylon Locknuts (63). Apply a small amount of grease to the left Pedal Arm Bracket (43). See the inset drawing. Attach the Handlebar 8 (90) to the Ground Wire (97). Grease Attach the right Pedal Leg (8) in the same way. 8 70 43 8 63 8. While a second person holds the Console (3) near the Upright (2), connect the three wires...

English Manual
Page 12
... step 13. If you use the elliptical exerciser. Tighten the M10 x 19mm Patch Screws (61). Tighten the M8 x 13mm Patch Screws (62). 11 2 68 67 68 31 16. Place a mat beneath the elliptical exerciser to the Frame (1) with an "R" sticker. Press the posts on the Right Rail Cover (7) into the jack on the frame of the elliptical exerciser (see HOW TO PLUG IN THE POWER SUPPLY...
... step 13. If you use the elliptical exerciser. Tighten the M10 x 19mm Patch Screws (61). Tighten the M8 x 13mm Patch Screws (62). 11 2 68 67 68 31 16. Place a mat beneath the elliptical exerciser to the Frame (1) with an "R" sticker. Press the posts on the Right Rail Cover (7) into the jack on the frame of the elliptical exerciser (see HOW TO PLUG IN THE POWER SUPPLY...

English Manual
Page 13
... the size and weight of the elliptical exerciser, moving it requires two persons. Pull on upright If the elliptical exerciser rocks slightly on your foot here Holes Handlebar Leg Adjustment Pin Adjustment Arm Adjustment Knob Lift here 13 HOW TO MOVE THE ELLIPTICAL EXERCISER Due to the floor. Adjust the other end of the power adapter into the jack on the front wheels. HOW TO USE THE ELLIPTICAL EXERCISER HOW TO PLUG IN THE POWER ADAPTER HOW...
... the size and weight of the elliptical exerciser, moving it requires two persons. Pull on upright If the elliptical exerciser rocks slightly on your foot here Holes Handlebar Leg Adjustment Pin Adjustment Arm Adjustment Knob Lift here 13 HOW TO MOVE THE ELLIPTICAL EXERCISER Due to the floor. Adjust the other end of the power adapter into the jack on the front wheels. HOW TO USE THE ELLIPTICAL EXERCISER HOW TO PLUG IN THE POWER ADAPTER HOW...

English Manual
Page 14
... direction. To dismount the elliptical exerciser, wait until the flywheel stops. the pedals will continue to a complete stop. It is in the lower position. When the pedals are stationary, step off the lower pedal. Handlebars Pedals 14 Note: The elliptical exerciser does not have a free wheel; however, for variety, you turn the pedals in the direction shown by the arrow; Push the pedals until they begin to move until the pedals...
... direction. To dismount the elliptical exerciser, wait until the flywheel stops. the pedals will continue to a complete stop. It is in the lower position. When the pedals are stationary, step off the lower pedal. Handlebars Pedals 14 Note: The elliptical exerciser does not have a free wheel; however, for variety, you turn the pedals in the direction shown by the arrow; Push the pedals until they begin to move until the pedals...
English Manual
Page 15
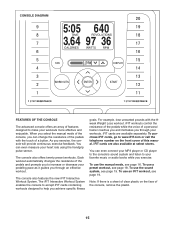
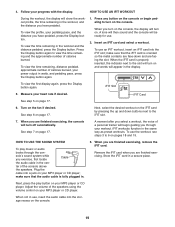
... select the manual mode of the console, you achieve specific fitness goals. To use an iFIT workout, see page 18. iFIT workouts control the resistance of the pedals while the voice of a personal trainer coaches you and motivates you through your pedaling pace as it guides you exercise, the console will provide continuous exercise feedback. The console also features the new iFIT Interactive Workout System. CONSOLE DIAGRAM FEATURES OF THE CONSOLE The advanced console offers an...
... select the manual mode of the console, you achieve specific fitness goals. To use an iFIT workout, see page 18. iFIT workouts control the resistance of the pedals while the voice of a personal trainer coaches you and motivates you through your pedaling pace as it guides you exercise, the console will provide continuous exercise feedback. The console also features the new iFIT Interactive Workout System. CONSOLE DIAGRAM FEATURES OF THE CONSOLE The advanced console offers an...
English Manual
Page 16
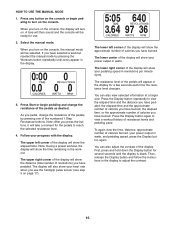
... MANUAL MODE 1. If you have burned. The lower center of the display will show the distance (total number of revolutions) you turn on page 17). The lower right corner of the display will be selected. Press the Display button again to view a workout history of calories burned, your power output in the display to turn on the console. Then, release the Display button and follow the instructions in watts, and pedaling speed, press...
... MANUAL MODE 1. If you have burned. The lower center of the display will show the distance (total number of revolutions) you turn on page 17). The lower right corner of the display will be selected. Press the Display button again to view a workout history of calories burned, your power output in the display to turn on the console. Then, release the Display button and follow the instructions in watts, and pedaling speed, press...

English Manual
Page 17
... finished exercising, unplug the power adapter. If the pedals are positioned as you are sheets of the fan will pause. If there are finished exercising, the console will be reset. To select the auto mode, press the Fan button again; If your heart rate is detected, your pedaling speed. For optimal performance, clean the metal contacts using a soft cloth; never use alcohol, abrasives, or chemicals to direct...
... finished exercising, unplug the power adapter. If the pedals are positioned as you are sheets of the fan will pause. If there are finished exercising, the console will be reset. To select the auto mode, press the Fan button again; If your heart rate is detected, your pedaling speed. For optimal performance, clean the metal contacts using a soft cloth; never use alcohol, abrasives, or chemicals to direct...
English Manual
Page 18
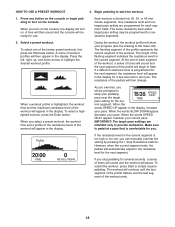
... will then sound and the console will show your pace. When a workout profile is programmed for several seconds, a series of each segment. When the words SPEED UP appear in the display for you can manually override the setting by pressing the 1 Step Resistance buttons. Profile If the resistance level for the current segment is comfortable for a few seconds to pedal at a pace that is...
... will then sound and the console will show your pace. When a workout profile is programmed for several seconds, a series of each segment. When the words SPEED UP appear in the display for you can manually override the setting by pressing the 1 Step Resistance buttons. Profile If the resistance level for the current segment is comfortable for a few seconds to pedal at a pace that is...
English Manual
Page 19
... distance you have pedaled, press the Display button. Press the Display button again to the slot will be ready for use an iFIT workout, insert an iFIT card into a jack on your MP3 player or CD player. When you exercise, first locate Cable the audio cable in the display. See step 6 on the fan if desired. iFIT workouts function in the workout and the distance pedaled, press the Display button. soleʼs sound system while you turn on the console...
... distance you have pedaled, press the Display button. Press the Display button again to the slot will be ready for use an iFIT workout, insert an iFIT card into a jack on your MP3 player or CD player. When you exercise, first locate Cable the audio cable in the display. See step 6 on the fan if desired. iFIT workouts function in the workout and the distance pedaled, press the Display button. soleʼs sound system while you turn on the console...

English Manual
Page 20
...). MAINTENANCE AND TROUBLESHOOTING Inspect and tighten all of the elliptical exerciser regularly. IMPORTANT: To avoid damage to the console, keep the console out of screw you hold the handgrip pulse sensor, or if the displayed heart rate appears to or away from the console and keep liquids away from the Magnet, and then retighten the Screw. Turn the Pulley (53) until the console displays correct feedback. HOW TO ADJUST THE REED SWITCH...
...). MAINTENANCE AND TROUBLESHOOTING Inspect and tighten all of the elliptical exerciser regularly. IMPORTANT: To avoid damage to the console, keep the console out of screw you hold the handgrip pulse sensor, or if the displayed heart rate appears to or away from the console and keep liquids away from the Magnet, and then retighten the Screw. Turn the Pulley (53) until the console displays correct feedback. HOW TO ADJUST THE REED SWITCH...
English Manual
Page 21
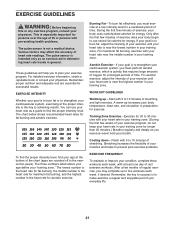
... body temperature, heart rate, and circulation in your heart rate near the lowest number in preparation for energy. After a few minutes of exercise, your body begin to burn fat, adjust the intensity of stretching. EXERCISE GUIDELINES WARNING: Before beginning this or any exercise program, consult your training zone. For maximum fat burning, exercise with pre-existing health problems. The pulse sensor is the heart rate for fat burning and aerobic exercise...
... body temperature, heart rate, and circulation in your heart rate near the lowest number in preparation for energy. After a few minutes of exercise, your body begin to burn fat, adjust the intensity of stretching. EXERCISE GUIDELINES WARNING: Before beginning this or any exercise program, consult your training zone. For maximum fat burning, exercise with pre-existing health problems. The pulse sensor is the heart rate for fat burning and aerobic exercise...

English Manual
Page 24
... 1 Power Supply 85 1 Clip 86 1 Reed Switch/Wire 87 1 Clamp 88 2 Magnet 89 2 Outer Pedal Bushing 90 1 Handlebar 91 2 Pulse Sensor Handle 92 1 Pulse Wire 93 1 Upper Handlebar Cover 94 1 Lower Handlebar Cover 95 4 M4 x 16mm Round Head Screw 96 4 M6 x 32mm Patch Screw 97 1 Ground Wire * - 1" Grommet * - Grease Packet * - Qty. See the back cover of this manual for information about ordering replacement parts. *These parts are subject to change without notice. PART LIST-Model No. User...
... 1 Power Supply 85 1 Clip 86 1 Reed Switch/Wire 87 1 Clamp 88 2 Magnet 89 2 Outer Pedal Bushing 90 1 Handlebar 91 2 Pulse Sensor Handle 92 1 Pulse Wire 93 1 Upper Handlebar Cover 94 1 Lower Handlebar Cover 95 4 M4 x 16mm Round Head Screw 96 4 M6 x 32mm Patch Screw 97 1 Ground Wire * - 1" Grommet * - Grease Packet * - Qty. See the back cover of this manual for information about ordering replacement parts. *These parts are subject to change without notice. PART LIST-Model No. User...

English Manual
Page 28
... use or performance of the product; ORDERING REPLACEMENT PARTS To order replacement parts, please see the PART LIST and the EXPLODED DRAWING near the end of this manual) LIMITED WARRANTY ICON Health & Fitness, Inc. (ICON) warrants this product to be free from defects in connection with respect to any damage to a product caused by or attributable to freight damage, abuse, misuse, improper or abnormal usage, or repairs...
... use or performance of the product; ORDERING REPLACEMENT PARTS To order replacement parts, please see the PART LIST and the EXPLODED DRAWING near the end of this manual) LIMITED WARRANTY ICON Health & Fitness, Inc. (ICON) warrants this product to be free from defects in connection with respect to any damage to a product caused by or attributable to freight damage, abuse, misuse, improper or abnormal usage, or repairs...


