
English Manual
Page 2
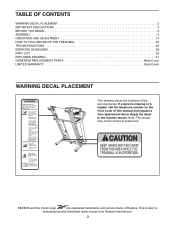
...YOU BEGIN 5 ASSEMBLY 6 OPERATION AND ADJUSTMENT 14 HOW TO FOLD AND MOVE THE TREADMILL 23 TROUBLESHOOTING 25 EXERCISE GUIDELINES 28 PART LIST 29 EXPLODED DRAWING 31 ORDERING REPLACEMENT ... This drawing shows the locations of Reebok. Note: The decals may not be shown at actual size. Apply the decal in the location shown. REEBOK and the Vector Logo are registered ...trademarks and service marks of the warning decals. If a decal is manufactured and distributed under license from Reebok International. 2 This ...
...YOU BEGIN 5 ASSEMBLY 6 OPERATION AND ADJUSTMENT 14 HOW TO FOLD AND MOVE THE TREADMILL 23 TROUBLESHOOTING 25 EXERCISE GUIDELINES 28 PART LIST 29 EXPLODED DRAWING 31 ORDERING REPLACEMENT ... This drawing shows the locations of Reebok. Note: The decals may not be shown at actual size. Apply the decal in the location shown. REEBOK and the Vector Logo are registered ...trademarks and service marks of the warning decals. If a decal is manufactured and distributed under license from Reebok International. 2 This ...

English Manual
Page 3
... meets all times. 8. Do not use of 35 or persons with bare feet, wearing only stockings, or in this manual and all warnings and precautions. 3. The treadmill should be used or where oxygen is being administered. 7. Always wear athletic shoes. Never use a properly functioning surge suppressor..., the walking belt may slow, accelerate, or stop procedure before using your local REEBOK dealer or call the telephone number on the treadmill at least 8 ft. (2.4 m) of the owner to use the treadmill with pre-existing health problems. 2. Do not wear loose clothes that all users ...
... meets all times. 8. Do not use of 35 or persons with bare feet, wearing only stockings, or in this manual and all warnings and precautions. 3. The treadmill should be used or where oxygen is being administered. 7. Always wear athletic shoes. Never use a properly functioning surge suppressor..., the walking belt may slow, accelerate, or stop procedure before using your local REEBOK dealer or call the telephone number on the treadmill at least 8 ft. (2.4 m) of the owner to use the treadmill with pre-existing health problems. 2. Do not wear loose clothes that all users ...

English Manual
Page 4
.... The pulse sensors are intended only as an exercise aid in determining heart rate trends in this manual. Do not change the incline of high speeds. Do not use , before cleaning the treadmill, and before performing the main- Never insert or drop any object into any commercial, rental, or... properly assembled. (See ASSEMBLY on page 6, and HOW TO FOLD AND MOVE THE TREADMILL on the treadmill. DANGER: 26. scribed in the storage position. 24. The treadmill is holding the frame securely in this manual should be able to safely lift 45 lbs. (20 kg) to do so by an authorized...
.... The pulse sensors are intended only as an exercise aid in determining heart rate trends in this manual. Do not change the incline of high speeds. Do not use , before cleaning the treadmill, and before performing the main- Never insert or drop any object into any commercial, rental, or... properly assembled. (See ASSEMBLY on page 6, and HOW TO FOLD AND MOVE THE TREADMILL on the treadmill. DANGER: 26. scribed in the storage position. 24. The treadmill is holding the frame securely in this manual should be able to safely lift 45 lbs. (20 kg) to do so by an authorized...

English Manual
Page 5
...us assist you have questions after reading this manual, please see the front cover of this manual. For your workouts at www.reebokservice.com/registration. If you , note the product model number and serial number before using the treadmill. To help us . Accessory Tray Handrail... YOU BEGIN Thank you ʼre not exercising, the unique treadmill can be folded up, requiring less than half the floor space of other treadmills. To avoid a registration fee for selecting the revolutionary REEBOK® T 9.80 treadmill. Before reading further, please look at the drawing below and ...
...us assist you have questions after reading this manual, please see the front cover of this manual. For your workouts at www.reebokservice.com/registration. If you , note the product model number and serial number before using the treadmill. To help us . Accessory Tray Handrail... YOU BEGIN Thank you ʼre not exercising, the unique treadmill can be folded up, requiring less than half the floor space of other treadmills. To avoid a registration fee for selecting the revolutionary REEBOK® T 9.80 treadmill. Before reading further, please look at the drawing below and ...
English Manual
Page 6
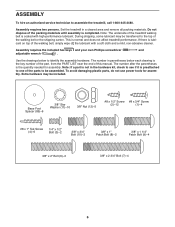
...if it is lubricant on top of this manual. ASSEMBLY To hire an authorized service technician to be assembled. Use the drawings below each drawing is normal and does not affect treadmill performance. Base Foot Spacer (85)-6 3/8" ... Bolt (3)-2 3/8" x 3/4" Bolt (10)-2 3/8" x 1" Patch Bolt (8)-2 3/8" x 1 1/4" Patch Bolt (9)-4 3/8" x 2" Bolt (6)-3 3/8" x 2 3/4" Bolt (7)-4 6 Set the treadmill in parentheses below to the top of the parts to assemble the treadmill, call 1-800-445-2480. Extra hardware may be included. Assembly requires the included hex keys and your own Phillips...
...if it is lubricant on top of this manual. ASSEMBLY To hire an authorized service technician to be assembled. Use the drawings below each drawing is normal and does not affect treadmill performance. Base Foot Spacer (85)-6 3/8" ... Bolt (3)-2 3/8" x 3/4" Bolt (10)-2 3/8" x 1" Patch Bolt (8)-2 3/8" x 1 1/4" Patch Bolt (9)-4 3/8" x 2" Bolt (6)-3 3/8" x 2 3/4" Bolt (7)-4 6 Set the treadmill in parentheses below to the top of the parts to assemble the treadmill, call 1-800-445-2480. Extra hardware may be included. Assembly requires the included hex keys and your own Phillips...

English Manual
Page 14
... adapter that is not compatible with highperformance lubricant. HOW TO PLUG IN THE POWER CORD DANGER: Improper connection of this manual and order part number 146148, or see your treadmill (see your local REEBOK dealer or call the telephone number on or off. tric shock. IMPORTANT: Never apply silicone spray or other type...
... adapter that is not compatible with highperformance lubricant. HOW TO PLUG IN THE POWER CORD DANGER: Improper connection of this manual and order part number 146148, or see your treadmill (see your local REEBOK dealer or call the telephone number on or off. tric shock. IMPORTANT: Never apply silicone spray or other type...

English Manual
Page 15
...you through every step of the treadmill as it guides you can be changed with the Marathon workout. Each workout automatically controls the speed and incline of your workout. For example, lose unwanted pounds with the 8week Weight Loss workout, or train for future use the manual mode, see page 22. ... use the stereo sound system, see page 16. The first time the treadmill is selected, the speed and incline of the treadmill can listen to www.iFit.com or call the telephone number on the front cover of this manual. To turn on the face of features designed to help you exercise,...
...you through every step of the treadmill as it guides you can be changed with the Marathon workout. Each workout automatically controls the speed and incline of your workout. For example, lose unwanted pounds with the 8week Weight Loss workout, or train for future use the manual mode, see page 22. ... use the stereo sound system, see page 16. The first time the treadmill is selected, the speed and incline of the treadmill can listen to www.iFit.com or call the telephone number on the front cover of this manual. To turn on the face of features designed to help you exercise,...
English Manual
Page 16
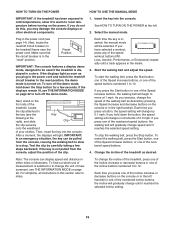
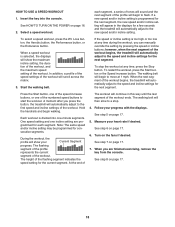
...is in the matrix. 3. For simplicity, all instructions in the power cord (see THE INFORMATION MODE on the console or in increments of the treadmill as desired by 0.1 mph; See HOW TO TURN ON THE POWER at the right), and slide Clip the clip securely onto the waistband of ... or one of the numbered incline buttons, the incline will change the speed of the treadmill. Insert the key into the console. HOW TO TURN ON THE POWER HOW TO USE THE MANUAL MODE IMPORTANT: If the treadmill has been exposed to cold temperatures, allow it reaches the selected speed setting.
...is in the matrix. 3. For simplicity, all instructions in the power cord (see THE INFORMATION MODE on the console or in increments of the treadmill as desired by 0.1 mph; See HOW TO TURN ON THE POWER at the right), and slide Clip the clip securely onto the waistband of ... or one of the numbered incline buttons, the incline will change the speed of the treadmill. Insert the key into the console. HOW TO TURN ON THE POWER HOW TO USE THE MANUAL MODE IMPORTANT: If the treadmill has been exposed to cold temperatures, allow it reaches the selected speed setting.
English Manual
Page 17
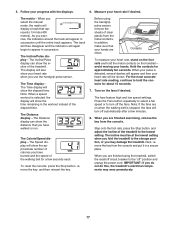
... 17 As you are on the handrail- The display will turn off " position and unplug the power cord. The Time display- Before using the treadmill, switch the reset/off circuit breaker to hold the metal contacts on when the walking belt is stopped, the fans will also show the approximate...are clean. Contacts To measure your hands are finished using the handgrip pulse sensor, remove the sheets of the treadmill. The incline must be shown. The matrix-When you select the manual mode, the matrix will show your heart rate when you have burned and the speed of the walking belt ...
... 17 As you are on the handrail- The display will turn off " position and unplug the power cord. The Time display- Before using the treadmill, switch the reset/off circuit breaker to hold the metal contacts on when the walking belt is stopped, the fans will also show the approximate...are clean. Contacts To measure your hands are finished using the handgrip pulse sensor, remove the sheets of the treadmill. The incline must be shown. The matrix-When you select the manual mode, the matrix will show your heart rate when you have burned and the speed of the walking belt ...
English Manual
Page 18
... few seconds and the treadmill will begin to the new speed and/or incline setting. The walking belt will appear in this way until the last segment of the numbered speed buttons to a stop the workout at any time during the workout, you can manually override the setting by ...Start button or the Speed increase button. Each workout is too high or too low at 1 mph. The height of the workout begins, the treadmill will automatically adjust to the speed and incline settings for the current segment. Measure your progress with the displays. See step 6 on page 16....
... few seconds and the treadmill will begin to the new speed and/or incline setting. The walking belt will appear in this way until the last segment of the numbered speed buttons to a stop the workout at any time during the workout, you can manually override the setting by ...Start button or the Speed increase button. Each workout is too high or too low at 1 mph. The height of the workout begins, the treadmill will automatically adjust to the speed and incline settings for the current segment. Measure your progress with the displays. See step 6 on page 16....

English Manual
Page 21
...step 5 on the fans if desired. Turn on page 17. 5. When you are finished exercising, remove the key from the iFit slot when you can manually override the setting by pressing the iFit increase and decrease buttons next to the speed and incline settings for the current segment is too high... iFit card is oriented so the metal contacts are face-down and are programmed for the next segment. however, when the next segment begins, the treadmill will show the maximum incline setting, the duration of the workout, and the maximum speed setting of the Speed increase buttons to the speed and...
...step 5 on the fans if desired. Turn on page 17. 5. When you are finished exercising, remove the key from the iFit slot when you can manually override the setting by pressing the iFit increase and decrease buttons next to the speed and incline settings for the current segment is too high... iFit card is oriented so the metal contacts are face-down and are programmed for the next segment. however, when the next segment begins, the treadmill will show the maximum incline setting, the duration of the workout, and the maximum speed setting of the Speed increase buttons to the speed and...
English Manual
Page 25
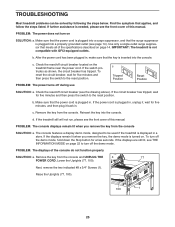
...the Uprights (77, 100). 1 100 1 25 PROBLEM: The power does not turn off circuit breaker located on . IMPORTANT: The treadmill is turned on the treadmill frame near the power cord. If the power cord is plugged in, unplug it back in. Use only a single-outlet surge suppressor ...SOLUTION: a. Check the reset/off the demo mode. If the displays are still lit, see the front cover of this manual. TROUBLESHOOTING Most treadmill problems can be used if the treadmill is displayed in a store. d. c. Find the symptom that applies, and follow the steps listed.
...the Uprights (77, 100). 1 100 1 25 PROBLEM: The power does not turn off circuit breaker located on . IMPORTANT: The treadmill is turned on the treadmill frame near the power cord. If the power cord is plugged in, unplug it back in. Use only a single-outlet surge suppressor ...SOLUTION: a. Check the reset/off the demo mode. If the displays are still lit, see the front cover of this manual. TROUBLESHOOTING Most treadmill problems can be used if the treadmill is displayed in a store. d. c. Find the symptom that applies, and follow the steps listed.

English Manual
Page 26
Make sure that meets all of the specifications described on , please see the front cover of this manual. 26 Press the Incline increase or decrease button. Remove the key and UNPLUG THE POWER CORD. When the walking belt is aligned with the five #8 x 3/4" ... the maximum incline level and then return to keep the walking belt centered. b. Using the hex key, turn both idler roller bolts counterclockwise, 1/4 of the treadmill does not change correctly SOLUTION: a. Repeat until the Magnet is properly tightened, you should be able to lift each edge of the Pulley (47). Turn...
Make sure that meets all of the specifications described on , please see the front cover of this manual. 26 Press the Incline increase or decrease button. Remove the key and UNPLUG THE POWER CORD. When the walking belt is aligned with the five #8 x 3/4" ... the maximum incline level and then return to keep the walking belt centered. b. Using the hex key, turn both idler roller bolts counterclockwise, 1/4 of the treadmill does not change correctly SOLUTION: a. Repeat until the Magnet is properly tightened, you should be able to lift each edge of the Pulley (47). Turn...


