
English Manual
Page 3
... while using the treadmill. Use the treadmill only as described. 4. If the control system is not working properly.) 9. Read, understand, and test the emergency stop unexpectedly, which may result in sandals. 16. When connecting the power cord (see HOW TO TURN ON THE POWER on page 14. Do not operate the treadmill if the power cord or plug is damaged, or if the treadmill is damaged, the walking belt...
... while using the treadmill. Use the treadmill only as described. 4. If the control system is not working properly.) 9. Read, understand, and test the emergency stop unexpectedly, which may result in sandals. 16. When connecting the power cord (see HOW TO TURN ON THE POWER on page 14. Do not operate the treadmill if the power cord or plug is damaged, or if the treadmill is damaged, the walking belt...
English Manual
Page 4
... pulse sensors are intended only as an exercise aid in determining heart rate trends in speed. 19. Never leave the treadmill unattended while it is not in -home use . (See the drawing on page 5 for the location of the reset/off " position when the treadmill is properly assembled. (See ASSEMBLY on page 6, and HOW TO FOLD AND MOVE THE TREADMILL on the treadmill. Always unplug the power cord immediately after use...
... pulse sensors are intended only as an exercise aid in determining heart rate trends in speed. 19. Never leave the treadmill unattended while it is not in -home use . (See the drawing on page 5 for the location of the reset/off " position when the treadmill is properly assembled. (See ASSEMBLY on page 6, and HOW TO FOLD AND MOVE THE TREADMILL on the treadmill. Always unplug the power cord immediately after use...

English Manual
Page 5
ual. Accessory Tray Handrail Pulse Sensor Console Key/Clip Walking Belt Foot Rail Idler Roller Adjustment Bolts Reset/Off Circuit Breaker Power Cord Platform Cushion 5 The T 9.80 treadmill offers an impressive selection of features designed to make your benefit, read this manual. Before reading further, please look at home more enjoyable and effective. To avoid a registration fee for selecting the revolutionary REEBOK® T 9.80 treadmill. If you must register the...
ual. Accessory Tray Handrail Pulse Sensor Console Key/Clip Walking Belt Foot Rail Idler Roller Adjustment Bolts Reset/Off Circuit Breaker Power Cord Platform Cushion 5 The T 9.80 treadmill offers an impressive selection of features designed to make your benefit, read this manual. Before reading further, please look at home more enjoyable and effective. To avoid a registration fee for selecting the revolutionary REEBOK® T 9.80 treadmill. If you must register the...
English Manual
Page 6
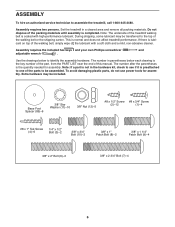
... Screw (4)-6 1/4" x 1/2" Bolt (3)-2 3/8" x 3/4" Bolt (10)-2 3/8" x 1" Patch Bolt (8)-2 3/8" x 1 1/4" Patch Bolt (9)-4 3/8" x 2" Bolt (6)-3 3/8" x 2 3/4" Bolt (7)-4 6 ASSEMBLY To hire an authorized service technician to be assembled. To avoid damaging plastic parts, do not use power tools for assembly. Do not dispose of the packing materials until assembly is lubricant on top of the walking belt or the shipping carton. This is the quantity needed for assembly. The number after the parentheses is normal and does not affect treadmill...
... Screw (4)-6 1/4" x 1/2" Bolt (3)-2 3/8" x 3/4" Bolt (10)-2 3/8" x 1" Patch Bolt (8)-2 3/8" x 1 1/4" Patch Bolt (9)-4 3/8" x 2" Bolt (6)-3 3/8" x 2 3/4" Bolt (7)-4 6 ASSEMBLY To hire an authorized service technician to be assembled. To avoid damaging plastic parts, do not use power tools for assembly. Do not dispose of the packing materials until assembly is lubricant on top of the walking belt or the shipping carton. This is the quantity needed for assembly. The number after the parentheses is normal and does not affect treadmill...

English Manual
Page 9
... the incline wire in the Pulse Bar. Connect the incline wire in the Left Handrail to the speed wire in the Pulse Bar as shown. 6 Console Assembly Console Wire Hole 102 7. Next, insert the console wire into the large hole directly below the indicated hole in the same way. 8 102 94 11 99 10 2 10 11 2 Console Assembly 9 Attach the Right Handrail (102) to avoid scratching the console assembly. If they do not, turn...
... the incline wire in the Pulse Bar. Connect the incline wire in the Left Handrail to the speed wire in the Pulse Bar as shown. 6 Console Assembly Console Wire Hole 102 7. Next, insert the console wire into the large hole directly below the indicated hole in the same way. 8 102 94 11 99 10 2 10 11 2 Console Assembly 9 Attach the Right Handrail (102) to avoid scratching the console assembly. If they do not, turn...

English Manual
Page 11
... the console wire extending from the Upright Wire (76). IF THE CONNECTORS ARE NOT CONNECTED PROPERLY, THE CONSOLE MAY BE DAMAGED WHEN THE POWER IS TURNED ON. Have a second person hold the console assembly near the Uprights (77, 100). If they do not, turn one connector and try again. Insert the excess wire into place. Start all four Patch Bolts before tightening any wires. 11 77 Wire Tie Console Wire Console Assembly Console Wire...
... the console wire extending from the Upright Wire (76). IF THE CONNECTORS ARE NOT CONNECTED PROPERLY, THE CONSOLE MAY BE DAMAGED WHEN THE POWER IS TURNED ON. Have a second person hold the console assembly near the Uprights (77, 100). If they do not, turn one connector and try again. Insert the excess wire into place. Start all four Patch Bolts before tightening any wires. 11 77 Wire Tie Console Wire Console Assembly Console Wire...

English Manual
Page 14
... plug. This product is damaged, the walking belt may change speed, accelerate, or stop unexpectedly, which may be seriously damaged by a qualified electrician. A temporary adapter that looks like the adapter illustrated in drawing 2 may result in your treadmill being turned on the surge suppressor to determine if the outlet box cover is UL 1449 listed as a properly grounded outlet box cover. If the control...
... plug. This product is damaged, the walking belt may change speed, accelerate, or stop unexpectedly, which may be seriously damaged by a qualified electrician. A temporary adapter that looks like the adapter illustrated in drawing 2 may result in your treadmill being turned on the surge suppressor to determine if the outlet box cover is UL 1449 listed as a properly grounded outlet box cover. If the control...

English Manual
Page 15
... new iFit Interactive Workout system. To turn on the front cover of this manual. CONSOLE DIAGRAM Audio Jack FEATURES OF THE CONSOLE The treadmill console offers an impressive selection of features designed to make your workout. To prevent damage to the walking platform, wear clean athletic shoes while using the handgrip pulse sensor. To purchase iFit cards at select stores. Each workout automatically controls the speed and incline of the treadmill as it guides...
... new iFit Interactive Workout system. To turn on the front cover of this manual. CONSOLE DIAGRAM Audio Jack FEATURES OF THE CONSOLE The treadmill console offers an impressive selection of features designed to make your workout. To prevent damage to the walking platform, wear clean athletic shoes while using the handgrip pulse sensor. To purchase iFit cards at select stores. Each workout automatically controls the speed and incline of the treadmill as it guides...
English Manual
Page 16
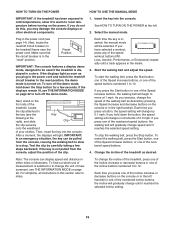
... TO USE THE MANUAL MODE IMPORTANT: If the treadmill has been exposed to cold temperatures, allow it to warm to room temperature before turning on the treadmill frame near the power cord. Reset Position IMPORTANT: The console features a display demo mode, designed to be selected. If you exercise, change the unit of the speed workout buttons (Wt. To change speed until it reaches the selected incline setting. 16 If you have selected a workout, press...
... TO USE THE MANUAL MODE IMPORTANT: If the treadmill has been exposed to cold temperatures, allow it to warm to room temperature before turning on the treadmill frame near the power cord. Reset Position IMPORTANT: The console features a display demo mode, designed to be selected. If you exercise, change the unit of the speed workout buttons (Wt. To change speed until it reaches the selected incline setting. 16 If you have selected a workout, press...
English Manual
Page 17
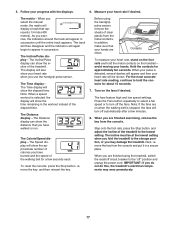
... wear prematurely. 17 Press the Fans button repeatedly to select a fan speed or to the lowest setting. The incline must be shown. Measure your hands. To reset the console, press the Stop button, remove the key, and then reinsert the key. The Distance display-The Distance display can show your heart rate will show the approximate number of the walking belt for approximately ten seconds. 5. The Time display- avoid moving your heart rate if desired. Hold...
... wear prematurely. 17 Press the Fans button repeatedly to select a fan speed or to the lowest setting. The incline must be shown. Measure your hands. To reset the console, press the Stop button, remove the key, and then reinsert the key. The Distance display-The Distance display can show your heart rate will show the approximate number of the walking belt for approximately ten seconds. 5. The Time display- avoid moving your heart rate if desired. Hold...
English Manual
Page 18
... the workout. Insert the key into one incline setting are finished exercising, remove the key from the console. To select a speed workout, press the Wt. Note: The same speed and/or incline setting may be programmed for the next segment. Measure your progress with the displays. The walking belt will automatically adjust to a stop the workout at any time during the workout, you can manually override the setting by pressing the speed or incline buttons; Follow your heart rate if...
... the workout. Insert the key into one incline setting are finished exercising, remove the key from the console. To select a speed workout, press the Wt. Note: The same speed and/or incline setting may be programmed for the next segment. Measure your progress with the displays. The walking belt will automatically adjust to a stop the workout at any time during the workout, you can manually override the setting by pressing the speed or incline buttons; Follow your heart rate if...

English Manual
Page 19
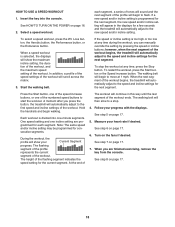
... a custom workout is divided into the console. Follow your heart rate if desired. Turn on page 17. 19 When you are finished exercising, remove the key from the console. Insert the key into several oneminute segments. In addition, three columns of the numbered speed buttons to move. When you are finished with the displays. See HOW TO TURN ON THE POWER on page 20. 3. Continue programming speed and incline settings for...
... a custom workout is divided into the console. Follow your heart rate if desired. Turn on page 17. 19 When you are finished exercising, remove the key from the console. Insert the key into several oneminute segments. In addition, three columns of the numbered speed buttons to move. When you are finished with the displays. See HOW TO TURN ON THE POWER on page 20. 3. Continue programming speed and incline settings for...

English Manual
Page 20
... page 18). 20 To change the speed setting or the incline setting for consecutive segments. Measure your progress with the displays. Start the walking belt. To increase the length of the numbered speed buttons to move at any time before the workout is divided into the console. See step 8 on page 17. 6. A moment after you press the Start button, the treadmill will automatically adjust to the speed and incline settings programmed for the next segment...
... page 18). 20 To change the speed setting or the incline setting for consecutive segments. Measure your progress with the displays. Start the walking belt. To increase the length of the numbered speed buttons to move at any time before the workout is divided into the console. See step 8 on page 17. 6. A moment after you press the Start button, the treadmill will automatically adjust to the speed and incline settings programmed for the next segment...

English Manual
Page 21
... the iFit slot. Start the walking belt. During the workout, a personal trainer will light. When the next segment of the workout. When you are finished exercising, remove the key from the iFit slot when you can manually override the setting by pressing the iFit increase and decrease buttons next to start the workout. CAUTION: Always remove iFit cards from the console. iFit Card iFit Slot To stop the workout at 1 mph. The walking belt will automatically adjust to the speed and incline settings...
... the iFit slot. Start the walking belt. During the workout, a personal trainer will light. When the next segment of the workout. When you are finished exercising, remove the key from the iFit slot when you can manually override the setting by pressing the iFit increase and decrease buttons next to start the workout. CAUTION: Always remove iFit cards from the console. iFit Card iFit Slot To stop the workout at 1 mph. The walking belt will automatically adjust to the speed and incline settings...

English Manual
Page 22
... the reset position, and insert the key into the audio jack on and turn off the demo mode, press the Speed decrease button. Next, press the Play button on or turn on the right side of the console. THE INFORMATION MODE HOW TO USE THE STEREO SOUND SYSTEM The console features an information mode that keeps track of the total distance that the walking belt has moved and the total number of hours that the treadmill...
... the reset position, and insert the key into the audio jack on and turn off the demo mode, press the Speed decrease button. Next, press the Play button on or turn on the right side of the console. THE INFORMATION MODE HOW TO USE THE STEREO SOUND SYSTEM The console features an information mode that keeps track of the total distance that the walking belt has moved and the total number of hours that the treadmill...
English Manual
Page 25
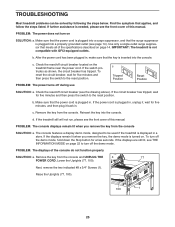
.... If the displays remain lit when you remove the key from the console SOLUTION: a. Remove the key from the console. Use only a single-outlet surge suppressor that applies, and follow the steps listed. c. PROBLEM: The power turns off the demo mode, hold down the Stop button for five minutes and then press the switch to turn on page 14. Make sure that the key is turned on. If the power cord is plugged in, unplug...
.... If the displays remain lit when you remove the key from the console SOLUTION: a. Remove the key from the console. Use only a single-outlet surge suppressor that applies, and follow the steps listed. c. PROBLEM: The power turns off the demo mode, hold down the Stop button for five minutes and then press the switch to turn on page 14. Make sure that the key is turned on. If the power cord is plugged in, unplug...

English Manual
Page 26
... for a correct speed reading. Idler Roller Bolts c. Hold down the Stop button and the Speed increase button, insert the key into the indicated hole and move the Reed Switch slightly. Use only a single-outlet surge suppressor that the gap between the Magnet and the Reed Switch is calibrated, remove the key from the console. PROBLEM: The walking belt slows when walked on SOLUTION: a. Remove the key and UNPLUG THE POWER CORD. When the walking belt is aligned with...
... for a correct speed reading. Idler Roller Bolts c. Hold down the Stop button and the Speed increase button, insert the key into the indicated hole and move the Reed Switch slightly. Use only a single-outlet surge suppressor that the gap between the Magnet and the Reed Switch is calibrated, remove the key from the console. PROBLEM: The walking belt slows when walked on SOLUTION: a. Remove the key and UNPLUG THE POWER CORD. When the walking belt is aligned with...

English Manual
Page 28
... as a guide to the nearest ten years). The pulse sensor is the key to prevent post-exercise problems. EXERCISE FREQUENCY To maintain or improve your cardiovascular system, you must exercise at a low intensity level for energy. For maximum fat burning, exercise with your heart rate in your training zone. (During the first few minutes of time. For aerobic exercise, adjust the intensity of heart rate readings...
... as a guide to the nearest ten years). The pulse sensor is the key to prevent post-exercise problems. EXERCISE FREQUENCY To maintain or improve your cardiovascular system, you must exercise at a low intensity level for energy. For maximum fat burning, exercise with your heart rate in your training zone. (During the first few minutes of time. For aerobic exercise, adjust the intensity of heart rate readings...
English Manual
Page 29
... Hood Motor Belt Drive Motor Reed Switch Clamp Reed Switch Incline Wire Incline Motor 1/4" x 2" Bolt Lift Frame Wire Tie Lift Frame/ Base Ground Wire Controller Reset/Off Circuit Breaker Belly Pan Power Cord Grommet 8" Tie Releasable Tie Upright Wire Left Upright Foot Rail Spacer Latch Cap Storage Latch Latch Knob Incline Stop Bracket Base Base Cap Base Foot Spacer Base Foot Caution Decal Extension Leg Wire Tie Latch Bracket Wheel Incline/Speed Button Incline Control Cover Left Handrail Left Handrail Cover Left Bottom Handrail Cover Handrail Ground Wire Console Crossbar Pulse Bar Right Upright...
... Hood Motor Belt Drive Motor Reed Switch Clamp Reed Switch Incline Wire Incline Motor 1/4" x 2" Bolt Lift Frame Wire Tie Lift Frame/ Base Ground Wire Controller Reset/Off Circuit Breaker Belly Pan Power Cord Grommet 8" Tie Releasable Tie Upright Wire Left Upright Foot Rail Spacer Latch Cap Storage Latch Latch Knob Incline Stop Bracket Base Base Cap Base Foot Spacer Base Foot Caution Decal Extension Leg Wire Tie Latch Bracket Wheel Incline/Speed Button Incline Control Cover Left Handrail Left Handrail Cover Left Bottom Handrail Cover Handrail Ground Wire Console Crossbar Pulse Bar Right Upright...
English Manual
Page 36
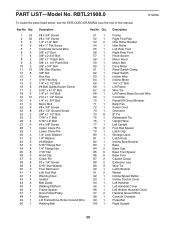
... installation; No other consequential damages of whatsoever nature. For replacement parts shipped while the product is not responsible or liable for a minimal handling charge. ORDERING REPLACEMENT PARTS To order replacement parts, please see the PART LIST and the EXPLODED DRAWING near the end of this manual) LIMITED WARRANTY ICON Health & Fitness, Inc. (ICON) warrants this product to be free from the date of purchase. products used as store display models...
... installation; No other consequential damages of whatsoever nature. For replacement parts shipped while the product is not responsible or liable for a minimal handling charge. ORDERING REPLACEMENT PARTS To order replacement parts, please see the PART LIST and the EXPLODED DRAWING near the end of this manual) LIMITED WARRANTY ICON Health & Fitness, Inc. (ICON) warrants this product to be free from the date of purchase. products used as store display models...


