
English Manual
Page 2
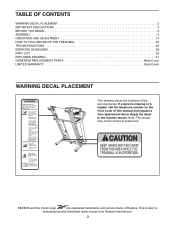
... 6 OPERATION AND ADJUSTMENT 14 HOW TO FOLD AND MOVE THE TREADMILL 23 TROUBLESHOOTING 25 EXERCISE GUIDELINES 28 PART LIST 29 EXPLODED DRAWING 31 ORDERING REPLACEMENT PARTS Back Cover LIMITED WARRANTY Back Cover WARNING DECAL PLACEMENT This drawing shows the locations of Reebok. Apply the decal in the location shown. This product is...
... 6 OPERATION AND ADJUSTMENT 14 HOW TO FOLD AND MOVE THE TREADMILL 23 TROUBLESHOOTING 25 EXERCISE GUIDELINES 28 PART LIST 29 EXPLODED DRAWING 31 ORDERING REPLACEMENT PARTS Back Cover LIMITED WARRANTY Back Cover WARNING DECAL PLACEMENT This drawing shows the locations of Reebok. Apply the decal in the location shown. This product is...
English Manual
Page 3
... you are used only by or through the use the treadmill with bare feet, wearing only stockings, or in the treadmill. Do not put the treadmill in - Place the treadmill on a level surface, with pre-existing health problems. 2. To purchase a surge suppressor, see your local REEBOK dealer or call the telephone number on page 14...
... you are used only by or through the use the treadmill with bare feet, wearing only stockings, or in the treadmill. Do not put the treadmill in - Place the treadmill on a level surface, with pre-existing health problems. 2. To purchase a surge suppressor, see your local REEBOK dealer or call the telephone number on page 14...

English Manual
Page 4
... location of the reset/off circuit breaker.) 21. DANGER: 26. Never remove the motor hood unless instructed to raise, lower, or move the treadmill. 22. The treadmill is not in -home use . (See the drawing on page 5 for in use only. SAVE THESE INSTRUCTIONS 4 Various factors, including the...and adjustment procedures de- Adjust the speed in speed. 19. Servicing other than the procedures in the storage position. 24. 18. The treadmill is holding the frame securely in this manual. The pulse sensors are intended only as an exercise aid in determining heart rate trends in...
... location of the reset/off circuit breaker.) 21. DANGER: 26. Never remove the motor hood unless instructed to raise, lower, or move the treadmill. 22. The treadmill is not in -home use . (See the drawing on page 5 for in use only. SAVE THESE INSTRUCTIONS 4 Various factors, including the...and adjustment procedures de- Adjust the speed in speed. 19. Servicing other than the procedures in the storage position. 24. 18. The treadmill is holding the frame securely in this manual. The pulse sensors are intended only as an exercise aid in determining heart rate trends in...

English Manual
Page 5
... Rail Idler Roller Adjustment Bolts Reset/Off Circuit Breaker Power Cord Platform Cushion 5 BEFORE YOU BEGIN Thank you must register the treadmill at the drawing below and familiarize yourself with the labeled parts. For your workouts at home more enjoyable and effective. The ..., read this manual. To avoid a registration fee for any service needed under warranty, you for selecting the revolutionary REEBOK® T 9.80 treadmill. The T 9.80 treadmill offers an impressive selection of this manual carefully before contacting us assist you ʼre not exercising, the unique...
... Rail Idler Roller Adjustment Bolts Reset/Off Circuit Breaker Power Cord Platform Cushion 5 BEFORE YOU BEGIN Thank you must register the treadmill at the drawing below and familiarize yourself with the labeled parts. For your workouts at home more enjoyable and effective. The ..., read this manual. To avoid a registration fee for any service needed under warranty, you for selecting the revolutionary REEBOK® T 9.80 treadmill. The T 9.80 treadmill offers an impressive selection of this manual carefully before contacting us assist you ʼre not exercising, the unique...
English Manual
Page 6
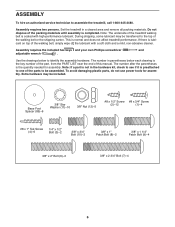
...and your own Phillips screwdriver and adjustable wrench . Extra hardware may be included. Set the treadmill in the hardware kit, check to see if it is the key number of the part,...Tek Screw (4)-6 1/4" x 1/2" Bolt (3)-2 3/8" x 3/4" Bolt (10)-2 3/8" x 1" Patch Bolt (8)-2 3/8" x 1 1/4" Patch Bolt (9)-4 3/8" x 2" Bolt (6)-3 3/8" x 2 3/4" Bolt (7)-4 6 During shipping, some lubricant may be transferred to assemble the treadmill, call 1-800-445-2480. If there is completed. To avoid damaging plastic parts, do not use power tools for assembly. ASSEMBLY To hire an authorized...
...and your own Phillips screwdriver and adjustable wrench . Extra hardware may be included. Set the treadmill in the hardware kit, check to see if it is the key number of the part,...Tek Screw (4)-6 1/4" x 1/2" Bolt (3)-2 3/8" x 3/4" Bolt (10)-2 3/8" x 1" Patch Bolt (8)-2 3/8" x 1 1/4" Patch Bolt (9)-4 3/8" x 2" Bolt (6)-3 3/8" x 2 3/4" Bolt (7)-4 6 During shipping, some lubricant may be transferred to assemble the treadmill, call 1-800-445-2480. If there is completed. To avoid damaging plastic parts, do not use power tools for assembly. ASSEMBLY To hire an authorized...

English Manual
Page 7
... Legs (88) in the locations shown with a 3/8" x 2 3/4" Bolt (7) and a 3/8" Nut (12). 2 Do not overtighten the Nut; Partially fold the Frame (51) so the treadmill is completely assembled. do not overtighten the Tek Screws. 1 88 85 4 86 85 86 51 85 85 88 86 4 85 4 86 4 83 85 4 86 4 2. the... Wheel must turn freely. 88 7 91 12 7 Do not fully fold the Frame until the treadmill is more stable. With the help of a second person, carefully tip the treadmill onto its left side. Attach six Base Feet (86) and six Base Foot Spacers (85) to an Extension Leg...
... Legs (88) in the locations shown with a 3/8" x 2 3/4" Bolt (7) and a 3/8" Nut (12). 2 Do not overtighten the Nut; Partially fold the Frame (51) so the treadmill is completely assembled. do not overtighten the Tek Screws. 1 88 85 4 86 85 86 51 85 85 88 86 4 85 4 86 4 83 85 4 86 4 2. the... Wheel must turn freely. 88 7 91 12 7 Do not fully fold the Frame until the treadmill is more stable. With the help of a second person, carefully tip the treadmill onto its left side. Attach six Base Feet (86) and six Base Foot Spacers (85) to an Extension Leg...

English Manual
Page 8
...76 Wire Tie 4. Do not overtighten the Nut; With the help of a second person, carefully tip the treadmill onto its right side. Then, pull the other end of the wire tie until the treadmill is completely assembled. 5 77 11 83 Orient the left Upright (77) to an Extension Leg (88) with... the bend in the Right Upright (100) securely around the end of a second person, tip the treadmill so that the Base (83) is marked with a 3/8" x 2 3/4" Bolt (7), a 3/8" x 1" Patch Bolt (8), and two 3/8" Star Washers (11); Plate 100 76 83 11 87 5. do ...
...76 Wire Tie 4. Do not overtighten the Nut; With the help of a second person, carefully tip the treadmill onto its right side. Then, pull the other end of the wire tie until the treadmill is completely assembled. 5 77 11 83 Orient the left Upright (77) to an Extension Leg (88) with... the bend in the Right Upright (100) securely around the end of a second person, tip the treadmill so that the Base (83) is marked with a 3/8" x 2 3/4" Bolt (7), a 3/8" x 1" Patch Bolt (8), and two 3/8" Star Washers (11); Plate 100 76 83 11 87 5. do ...

English Manual
Page 12
... the Base (83) with four #8 x 3/4" Screws (1). 96 Console Assembly 1 104 1 14. Orient the Storage Latch (80) so that the large barrel and the Latch Knob (81) are oriented as shown. Raise the Frame (51) to the ...bracket on page 24). 51 12 81 6 80 Large Barrel 90 83 12 6 12 Lower the Frame (51) (see HOW TO LOWER THE TREADMILL FOR USE on the Frame (51) with the bracket. Attach ...the upper end of the Storage Latch (80) to the position shown. Note: It may be ...
... the Base (83) with four #8 x 3/4" Screws (1). 96 Console Assembly 1 104 1 14. Orient the Storage Latch (80) so that the large barrel and the Latch Knob (81) are oriented as shown. Raise the Frame (51) to the ...bracket on page 24). 51 12 81 6 80 Large Barrel 90 83 12 6 12 Lower the Frame (51) (see HOW TO LOWER THE TREADMILL FOR USE on the Frame (51) with the bracket. Attach ...the upper end of the Storage Latch (80) to the position shown. Note: It may be ...
English Manual
Page 13
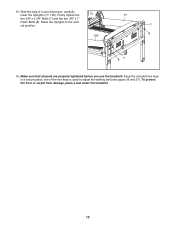
one of a second person, carefully lower the Uprights (77, 100). With the help of the hex keys is used to the vertical position. 15 100 77 7 8 87 16. Raise the Uprights to adjust the walking belt (see pages 26 and 27). 15. Keep the included hex keys in a secure place; To protect the floor or carpet from damage, place a mat under the treadmill. 13 Firmly tighten the two 3/8" x 2 3/4" Bolts (7) and the two 3/8" x 1" Patch Bolts (8). Make sure that all parts are properly tightened before you use the treadmill.
one of a second person, carefully lower the Uprights (77, 100). With the help of the hex keys is used to the vertical position. 15 100 77 7 8 87 16. Raise the Uprights to adjust the walking belt (see pages 26 and 27). 15. Keep the included hex keys in a secure place; To protect the floor or carpet from damage, place a mat under the treadmill. 13 Firmly tighten the two 3/8" x 2 3/4" Bolts (7) and the two 3/8" x 1" Patch Bolts (8). Make sure that all parts are properly tightened before you use the treadmill.

English Manual
Page 14
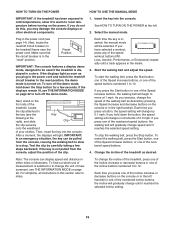
... at the right). A temporary adapter that is grounded before using an adapter. 14 OPERATION AND ADJUSTMENT THE PRE-LUBRICATED WALKING BELT Your treadmill features a walking belt coated with all local codes and ordinances. Such substances will not fit the outlet, have a UL suppressed voltage ...rating of 400 volts or less and a minimum surge dissipation of your treadmill (see your local REEBOK dealer or call the telephone number on the surge suppressor to indicate whether it should be used to connect the surge suppressor...
... at the right). A temporary adapter that is grounded before using an adapter. 14 OPERATION AND ADJUSTMENT THE PRE-LUBRICATED WALKING BELT Your treadmill features a walking belt coated with all local codes and ordinances. Such substances will not fit the outlet, have a UL suppressed voltage ...rating of 400 volts or less and a minimum surge dissipation of your treadmill (see your local REEBOK dealer or call the telephone number on the surge suppressor to indicate whether it should be used to connect the surge suppressor...

English Manual
Page 15
...five weight loss workouts, five aerobic workouts, five performance workouts, and five endurance workouts. Each workout automatically controls the speed and incline of the treadmill as it guides you through every step of your workout. For example, lose unwanted pounds with the 8week Weight Loss workout, or train for...audio books with the Marathon workout. As you achieve specific fitness goals. To use the information mode, see page 16. The first time the treadmill is a sheet of clear plastic on the power, see page 22. To turn on the face of the walking belt, and center the walking...
...five weight loss workouts, five aerobic workouts, five performance workouts, and five endurance workouts. Each workout automatically controls the speed and incline of the treadmill as it guides you through every step of your workout. For example, lose unwanted pounds with the 8week Weight Loss workout, or train for...audio books with the Marathon workout. As you achieve specific fitness goals. To use the information mode, see page 16. The first time the treadmill is a sheet of clear plastic on the power, see page 22. To turn on the face of the walking belt, and center the walking...
English Manual
Page 16
... (see THE INFORMATION MODE on page 22. Each time you press the Start button or one of the Incline increase or decrease buttons on the treadmill frame near the power cord. After a moment, the displays will change until it reaches the selected incline setting. 16 To restart the walking belt... you press one of the incline buttons numbered 0 to change the speed of the walking belt as desired. To change the incline of the treadmill, press one of the Incline increase or decrease buttons or one of the numbered speed buttons, the walking belt will gradually change in the "...
... (see THE INFORMATION MODE on page 22. Each time you press the Start button or one of the Incline increase or decrease buttons on the treadmill frame near the power cord. After a moment, the displays will change until it reaches the selected incline setting. 16 To restart the walking belt... you press one of the incline buttons numbered 0 to change the speed of the walking belt as desired. To change the incline of the treadmill, press one of the Incline increase or decrease buttons or one of the numbered speed buttons, the walking belt will gradually change in the "...
English Manual
Page 17
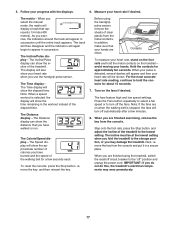
...are finished exercising, remove the key from the metal contacts. The Incline/Pulse display-The Incline/Pulse display can show the incline of the treadmill to appear in succession until the entire track appears. Note: When a speed workout is stopped, the fans will appear in succession. ...8. Hold the contacts for about 15 seconds. 7. Contacts To measure your heart rate will be at the lowest setting when you fold the treadmill to hold the metal contacts on when the walking belt is selected, the display will show the elapsed time. In addition, make sure that...
...are finished exercising, remove the key from the metal contacts. The Incline/Pulse display-The Incline/Pulse display can show the incline of the treadmill to appear in succession until the entire track appears. Note: When a speed workout is stopped, the fans will appear in succession. ...8. Hold the contacts for about 15 seconds. 7. Contacts To measure your heart rate will be at the lowest setting when you fold the treadmill to hold the metal contacts on when the walking belt is selected, the display will show the elapsed time. In addition, make sure that...
English Manual
Page 18
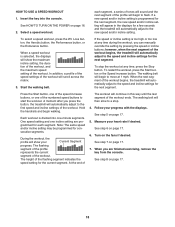
... and incline settings for the current segment. Note: The same speed and/or incline setting may be programmed for a few seconds and the treadmill will automatically adjust to the new speed and/or incline setting. If the speed or incline setting is selected, the displays will show the ...the profile will then slow to flash. To select a speed workout, press the Wt. Start the walking belt. When you press the button, the treadmill will automatically adjust to the first speed and incline settings of the workout. HOW TO USE A SPEED WORKOUT 1. The walking belt will begin walking....
... and incline settings for the current segment. Note: The same speed and/or incline setting may be programmed for a few seconds and the treadmill will automatically adjust to the new speed and/or incline setting. If the speed or incline setting is selected, the displays will show the ...the profile will then slow to flash. To select a speed workout, press the Wt. Start the walking belt. When you press the button, the treadmill will automatically adjust to the first speed and incline settings of the workout. HOW TO USE A SPEED WORKOUT 1. The walking belt will begin walking....

English Manual
Page 19
... can have programmed and the workout time will show the maximum incline setting, the duration of the workout, and the maximum speed setting of the treadmill as desired; Program a speed setting and an incline setting for the first segment, simply adjust the speed and incline of the workout. Follow your progress...
... can have programmed and the workout time will show the maximum incline setting, the duration of the workout, and the maximum speed setting of the treadmill as desired; Program a speed setting and an incline setting for the first segment, simply adjust the speed and incline of the workout. Follow your progress...

English Manual
Page 20
... programmed previously. Note: The same speed and/or incline setting may be saved in memory. To decrease the length of the workout begins, the treadmill will begin walking. When the next segment of the workout, press the Stop button twice at 1 mph. See step 6 on page 17. ...HOW TO USE A CUSTOM WORKOUT 1. Note: If only three columns of the Custom buttons repeatedly. If desired, you press the Start button, the treadmill will be programmed for the next segment. 4. When the current segment ends, the new setting will automatically adjust to start the workout. To increase ...
... programmed previously. Note: The same speed and/or incline setting may be saved in memory. To decrease the length of the workout begins, the treadmill will begin walking. When the next segment of the workout, press the Stop button twice at 1 mph. See step 6 on page 17. ...HOW TO USE A CUSTOM WORKOUT 1. Note: If only three columns of the Custom buttons repeatedly. If desired, you press the Start button, the treadmill will be programmed for the next segment. 4. When the current segment ends, the new setting will automatically adjust to start the workout. To increase ...

English Manual
Page 21
... Each iFit workout is properly inserted, the iFit logo will automatically adjust to the first speed and incline settings of the workout begins, the treadmill will light. When the next segment of the workout. See step 5 on page 17. 6. To use an iFit workout, insert an iFit... card into several oneminute segments. A moment after you through the workout. HOW TO USE AN IFIT WORKOUT 1. press the button, the treadmill will automatically adjust to the speed and incline settings for consecutive segments. Turn on the fans if desired. Note: The same speed and/or ...
... Each iFit workout is properly inserted, the iFit logo will automatically adjust to the first speed and incline settings of the workout begins, the treadmill will light. When the next segment of the workout. See step 5 on page 17. 6. To use an iFit workout, insert an iFit... card into several oneminute segments. A moment after you through the workout. HOW TO USE AN IFIT WORKOUT 1. press the button, the treadmill will automatically adjust to the speed and incline settings for consecutive segments. Turn on the fans if desired. Note: The same speed and/or ...

English Manual
Page 22
... must connect your MP3 player, CD player, or other personal audio player to view the following information will show the total number of hours the treadmill has been used. While the demo mode is selected. The information mode also allows you plug in the power cord, switch the reset/off the... features an information mode that keeps track of the total distance that the walking belt has moved and the total number of hours that the treadmill has been used if the treadmill is fully plugged in.
... must connect your MP3 player, CD player, or other personal audio player to view the following information will show the total number of hours the treadmill has been used. While the demo mode is selected. The information mode also allows you plug in the power cord, switch the reset/off the... features an information mode that keeps track of the total distance that the walking belt has moved and the total number of hours that the treadmill has been used if the treadmill is fully plugged in.

English Manual
Page 23
... plastic foot rails. Make sure that the latch knob is locked in the storage position. 1. Frame Latch Knob Frame HOW TO MOVE THE TREADMILL Before moving the treadmill. Make sure that the latch knob is locked in the storage position. Place one foot against one of the wheels, and carefully lower the... treadmill until it . To raise the frame, bend your legs, keep your back straight, and lift with your legs. To protect the floor or carpet from ...
... plastic foot rails. Make sure that the latch knob is locked in the storage position. 1. Frame Latch Knob Frame HOW TO MOVE THE TREADMILL Before moving the treadmill. Make sure that the latch knob is locked in the storage position. Place one foot against one of the wheels, and carefully lower the... treadmill until it . To raise the frame, bend your legs, keep your back straight, and lift with your legs. To protect the floor or carpet from ...

English Manual
Page 24
... foot rails. Make sure to the left . Frame 24 Pivot the frame downward and release the latch knob. CAUTION: To decrease the possibility of the treadmill with both hands, and lower it . Do not drop the frame to the floor. Pull the latch knob to bend your legs and keep your... the frame forward as you pull the latch knob to the left and hold it to the floor. Frame Latch Knob 2. HOW TO LOWER THE TREADMILL FOR USE 1.
... foot rails. Make sure to the left . Frame 24 Pivot the frame downward and release the latch knob. CAUTION: To decrease the possibility of the treadmill with both hands, and lower it . Do not drop the frame to the floor. Pull the latch knob to bend your legs and keep your... the frame forward as you pull the latch knob to the left and hold it to the floor. Frame Latch Knob 2. HOW TO LOWER THE TREADMILL FOR USE 1.


