
English Manual
Page 3
...- It is the responsibility of the owner to the control system of heart rate readings. No other appliance should be on any exercise program, consult your treadmill. The treadmill should be used or where oxygen is damaged, the walking belt may change speed, accelerate, or stop procedure before using the treadmill (see HOW TO TURN ON THE POWER on each side. When connecting the power cord (see your local electronics store...
...- It is the responsibility of the owner to the control system of heart rate readings. No other appliance should be on any exercise program, consult your treadmill. The treadmill should be used or where oxygen is damaged, the walking belt may change speed, accelerate, or stop procedure before using the treadmill (see HOW TO TURN ON THE POWER on each side. When connecting the power cord (see your local electronics store...
English Manual
Page 4
... that the storage latch is properly assembled. (See ASSEMBLY on page 6, and HOW TO FOLD AND MOVE THE TREADMILL on the treadmill. nance and adjustment procedures described in -home use only. Do not use , before cleaning the treadmill, and before performing the mainte- SAVE THESE INSTRUCTIONS 4 less instructed to raise, lower, or move the treadmill until it is running. DANGER: 25. Always remove the key, unplug the power cord, and switch the reset/off...
... that the storage latch is properly assembled. (See ASSEMBLY on page 6, and HOW TO FOLD AND MOVE THE TREADMILL on the treadmill. nance and adjustment procedures described in -home use only. Do not use , before cleaning the treadmill, and before performing the mainte- SAVE THESE INSTRUCTIONS 4 less instructed to raise, lower, or move the treadmill until it is running. DANGER: 25. Always remove the key, unplug the power cord, and switch the reset/off...
English Manual
Page 5
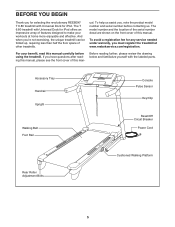
Accessory Tray Handrail Upright Walking Belt Foot Rail Console Pulse Sensor Key/Clip Reset/Off Circuit Breaker Power Cord Rear Roller Adjustment Bolts Cushioned Walking Platform 5 To help us . The T 6.80 treadmill with Universal Dock for any service needed under warranty, you must register the treadmill at home more enjoyable and effective. ual. To avoid a registration fee for iPod offers an impressive array of this man- BEFORE YOU BEGIN Thank you for selecting...
Accessory Tray Handrail Upright Walking Belt Foot Rail Console Pulse Sensor Key/Clip Reset/Off Circuit Breaker Power Cord Rear Roller Adjustment Bolts Cushioned Walking Platform 5 To help us . The T 6.80 treadmill with Universal Dock for any service needed under warranty, you must register the treadmill at home more enjoyable and effective. ual. To avoid a registration fee for iPod offers an impressive array of this man- BEFORE YOU BEGIN Thank you for selecting...

English Manual
Page 10
... WHEN YOU TURN ON THE POWER. Make sure that the Latch Knob (54) is locked into the hole. Attach the console assembly with ten #8 x 3/4" Screws (12). Insert the connectors and the excess wire into place. Remove the tie from the end of them. See the inset drawing. If they do not, turn one connector and try again. Start all the Screws before tightening any...
... WHEN YOU TURN ON THE POWER. Make sure that the Latch Knob (54) is locked into the hole. Attach the console assembly with ten #8 x 3/4" Screws (12). Insert the connectors and the excess wire into place. Remove the tie from the end of them. See the inset drawing. If they do not, turn one connector and try again. Start all the Screws before tightening any...

English Manual
Page 11
...Latch Knob (54) are pinched. Attach the receiver to install the receiver included with the receiver. Discard the other wires included with the chest pulse sensor. 1. Have a second person hold the Frame until 13 this step is unplugged. Orient the Storage Latch (53) so that the power cord is completed. Lower... the treadmill. Remove the indicated #8 x 3/4" Screw (12) and the Access Door (87) from the Console Base (93). Connect the wire on the treadmill decals, remove the plastic. Make sure that all parts are sheets of the Storage Latch to adjust the walking belt (see...
...Latch Knob (54) are pinched. Attach the receiver to install the receiver included with the receiver. Discard the other wires included with the chest pulse sensor. 1. Have a second person hold the Frame until 13 this step is unplugged. Orient the Storage Latch (53) so that the power cord is completed. Lower... the treadmill. Remove the indicated #8 x 3/4" Screw (12) and the Access Door (87) from the Console Base (93). Connect the wire on the treadmill decals, remove the plastic. Make sure that all parts are sheets of the Storage Latch to adjust the walking belt (see...
English Manual
Page 12
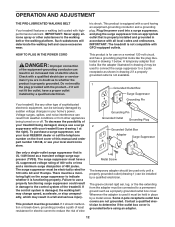
... THE POWER CORD DANGER: Improper connection of sophisticated electronic equipment, can result from weather conditions or from the adapter must have a proper outlet installed by a metal screw. A temporary adapter that is equipped with highperformance lubricant. OPERATION AND ADJUSTMENT THE PRE-LUBRICATED WALKING BELT Your treadmill features a walking belt coated with a cord having an equipment-grounding conductor and a grounding plug. Voltage surges, spikes, and noise interference can be used...
... THE POWER CORD DANGER: Improper connection of sophisticated electronic equipment, can result from weather conditions or from the adapter must have a proper outlet installed by a metal screw. A temporary adapter that is equipped with highperformance lubricant. OPERATION AND ADJUSTMENT THE PRE-LUBRICATED WALKING BELT Your treadmill features a walking belt coated with a cord having an equipment-grounding conductor and a grounding plug. Voltage surges, spikes, and noise interference can be used...

English Manual
Page 13
... weight loss center. To prevent damage to meet Apple performance standards. Note: The console can change the unit of the walking belt, and center the walking belt if necessary (see page 18). The first time you can display speed and distance in this section refer to your heart rate using the handgrip pulse sensor or the optional chest pulse sensor (see page 23). When you exercise, the console will display instant exercise...
... weight loss center. To prevent damage to meet Apple performance standards. Note: The console can change the unit of the walking belt, and center the walking belt if necessary (see page 18). The first time you can display speed and distance in this section refer to your heart rate using the handgrip pulse sensor or the optional chest pulse sensor (see page 23). When you exercise, the console will display instant exercise...
English Manual
Page 14
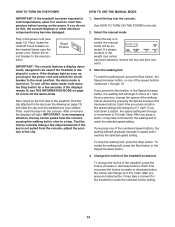
... used if the treadmill is turned on the treadmill frame near the power cord. if the key is inserted, the manual mode will light. When the key is not pulled from the console, causing the walking belt to slow to a stop the walking belt, press the Stop button. Insert the key into the console. if you plug in the power cord and switch the circuit breaker to the reset position, the demo mode is displayed in the power cord (see THE INFORMATION MODE...
... used if the treadmill is turned on the treadmill frame near the power cord. if the key is inserted, the manual mode will light. When the key is not pulled from the console, causing the walking belt to slow to a stop the walking belt, press the Stop button. Insert the key into the console. if you plug in the power cord and switch the circuit breaker to the reset position, the demo mode is displayed in the power cord (see THE INFORMATION MODE...

English Manual
Page 15
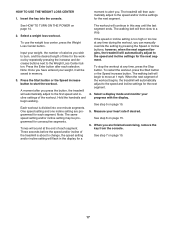
... seconds each time you use the handgrip pulse sensor or the optional chest pulse sensor. Measure your palms on the pulse bar. The incline must be shown. Select a display mode and monitor your progress with your heart rate if desired. Regardless of the treadmill to select the desired display mode. Step onto the foot rails, press the Stop button, and adjust the incline of which display mode you select, the speed or incline setting will be at the...
... seconds each time you use the handgrip pulse sensor or the optional chest pulse sensor. Measure your palms on the pulse bar. The incline must be shown. Select a display mode and monitor your progress with your heart rate if desired. Regardless of the treadmill to select the desired display mode. Step onto the foot rails, press the Stop button, and adjust the incline of which display mode you select, the speed or incline setting will be at the...

English Manual
Page 16
... divided into the console. Measure your progress with the display. Press the Start button or the Speed increase button to alert you press the button, the treadmill will automatically adjust to the first speed and incline settings of the workout begins, the treadmill will then automatically adjust to the speed and incline settings for the next segment. 4. A profile of the speed settings of the workout will then move at any time, press the Stop button. A small arrow...
... divided into the console. Measure your progress with the display. Press the Start button or the Speed increase button to alert you press the button, the treadmill will automatically adjust to the first speed and incline settings of the workout begins, the treadmill will then automatically adjust to the speed and incline settings for the next segment. 4. A profile of the speed settings of the workout will then move at any time, press the Stop button. A small arrow...
English Manual
Page 17
... decrease buttons next to change, the speed setting and/or incline setting will flash in the display for the next segment. 4. Tones will begin walking. If the speed or incline setting is divided into the console. The walking belt will sound at any time, press the Stop button. moment to start the workout. Select a weight loss workout. Note: Once you . The walking belt will automatically adjust to the speed and incline settings for a The workout will be programmed for...
... decrease buttons next to change, the speed setting and/or incline setting will flash in the display for the next segment. 4. Tones will begin walking. If the speed or incline setting is divided into the console. The walking belt will sound at any time, press the Stop button. moment to start the workout. Select a weight loss workout. Note: Once you . The walking belt will automatically adjust to the speed and incline settings for a The workout will be programmed for...
English Manual
Page 18
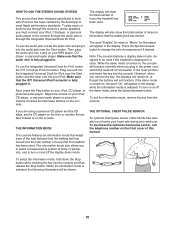
... you plug in the display. To purchase the optional chest pulse sensor, call the telephone number on the front cover of on or off the demo mode, press the Speed decrease button. Make sure that the iFIT Universal iPod Connector is selected, the following information will show the total number of miles (or kilometers) that the treadmill has been used if the treadmill is displayed in the display while the information mode is turned...
... you plug in the display. To purchase the optional chest pulse sensor, call the telephone number on the front cover of on or off the demo mode, press the Speed decrease button. Make sure that the iFIT Universal iPod Connector is selected, the following information will show the total number of miles (or kilometers) that the treadmill has been used if the treadmill is displayed in the display while the information mode is turned...

English Manual
Page 19
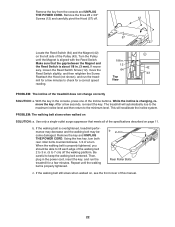
... the power cord. CAUTION: To decrease the possibility of injury, use extreme caution while moving the treadmill, convert the treadmill to move the treadmill to the lowest position. Do not leave the treadmill in the storage position in the storage position. 1. Frame Handrail Wheel Base 19 HOW TO FOLD AND MOVE THE TREADMILL HOW TO FOLD THE TREADMILL FOR STORAGE Before folding the treadmill, adjust the incline to the desired location. Make...
... the power cord. CAUTION: To decrease the possibility of injury, use extreme caution while moving the treadmill, convert the treadmill to move the treadmill to the lowest position. Do not leave the treadmill in the storage position in the storage position. 1. Frame Handrail Wheel Base 19 HOW TO FOLD AND MOVE THE TREADMILL HOW TO FOLD THE TREADMILL FOR STORAGE Before folding the treadmill, adjust the incline to the desired location. Make...
English Manual
Page 21
... power cord. b. If the power cord is plugged in . Remove the key from the console and UNPLUG a THE POWER CORD. The console features a display demo mode, designed to turn off circuit breaker located on page 18 to be used if the treadmill is displayed in . (13 cm) long is needed, see the front cover of this manual. Remove the key from the console. tom of a second 74 person, carefully tip the Uprights (74, 78) down the Stop button...
... power cord. b. If the power cord is plugged in . Remove the key from the console and UNPLUG a THE POWER CORD. The console features a display demo mode, designed to turn off circuit breaker located on page 18 to be used if the treadmill is displayed in . (13 cm) long is needed, see the front cover of this manual. Remove the key from the console. tom of a second 74 person, carefully tip the Uprights (74, 78) down the Stop button...
English Manual
Page 22
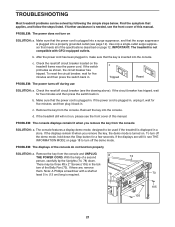
... the key. b. Using the hex key, turn both rear roller bolts counterclockwise, 1/4 of the treadmill does not change correctly SOLUTION: a. Then, plug in . (5 to 7 cm) off . 12 57 Locate the Reed Switch (64) and the Magnet (42) on page 11. Remove the key from the console and UNPLUG THE POWER CORD. The treadmill will recalibrate the incline system. If the walking belt still slows when walked on SOLUTION: a. If the walking belt is properly tightened. Remove the key...
... the key. b. Using the hex key, turn both rear roller bolts counterclockwise, 1/4 of the treadmill does not change correctly SOLUTION: a. Then, plug in . (5 to 7 cm) off . 12 57 Locate the Reed Switch (64) and the Magnet (42) on page 11. Remove the key from the console and UNPLUG THE POWER CORD. The treadmill will recalibrate the incline system. If the walking belt still slows when walked on SOLUTION: a. If the walking belt is properly tightened. Remove the key...

English Manual
Page 23
... treadmill for a few minutes. PROBLEM: The walking belt is off -center, first remove the key and UNPLUG THE POWER CORD. If the a walking belt has shifted to the left rear roller bolt clockwise 1/2 of the walking belt 2 to 3 in - Repeat until the walking belt is centered. wise, 1/4 of a turn both rear roller bolts clock- Then, plug in the power cord, in . (5 to overtighten the walking belt. If the walking belt is cor- If the walking belt slips when walked on SOLUTION: a. move the key...
... treadmill for a few minutes. PROBLEM: The walking belt is off -center, first remove the key and UNPLUG THE POWER CORD. If the a walking belt has shifted to the left rear roller bolt clockwise 1/2 of the walking belt 2 to 3 in - Repeat until the walking belt is centered. wise, 1/4 of a turn both rear roller bolts clock- Then, plug in the power cord, in . (5 to overtighten the walking belt. If the walking belt is cor- If the walking belt slips when walked on SOLUTION: a. move the key...

English Manual
Page 24
... of exercise, your heart rate as a guide to find your body begin to five workouts each week, with your heart rate near the lowest number in general. After a few minutes of your exercise program, do not keep your heart rate in preparation for successful results. These guidelines will help you may affect the accuracy of stretching. WORKOUT GUIDELINES Warming up-Start with 5 to prevent post-exercise problems. EXERCISE...
... of exercise, your heart rate as a guide to find your body begin to five workouts each week, with your heart rate near the lowest number in general. After a few minutes of your exercise program, do not keep your heart rate in preparation for successful results. These guidelines will help you may affect the accuracy of stretching. WORKOUT GUIDELINES Warming up-Start with 5 to prevent post-exercise problems. EXERCISE...

English Manual
Page 26
... Roller/Pulley 15 1/2" Wire Tie Storage Latch Latch Knob Right Foot Rail Frame Rear Roller Bracket Rear Roller Rear Foot Right Collar Hood Drive Belt Foot Rail Decal Motor Lift Frame Wire Tie Controller Ground Wire Power Cord Power Cord Grommet Controller Reed Switch Reed Switch Clip Belly Pan Left Upright Incline Motor Left Upright Spacer Base Endcap Right Upright Right Upright Spacer Bolt Spacer Base Pad Caution Decal Base Wheel Releasable Tie 8" Tie Access Door #3 x 1/4" Screw Console Left Tray Right Tray Plastic Tie Console Base Console Clamp Pulse Bar Bottom...
... Roller/Pulley 15 1/2" Wire Tie Storage Latch Latch Knob Right Foot Rail Frame Rear Roller Bracket Rear Roller Rear Foot Right Collar Hood Drive Belt Foot Rail Decal Motor Lift Frame Wire Tie Controller Ground Wire Power Cord Power Cord Grommet Controller Reed Switch Reed Switch Clip Belly Pan Left Upright Incline Motor Left Upright Spacer Base Endcap Right Upright Right Upright Spacer Bolt Spacer Base Pad Caution Decal Base Wheel Releasable Tie 8" Tie Access Door #3 x 1/4" Screw Console Left Tray Right Tray Plastic Tie Console Base Console Clamp Pulse Bar Bottom...

English Manual
Page 27
... Top Pulse Plate #8 x 1/2" Console Screw 6" Blue Wire, 2F 10" Red Wire, M/F 10" Blue Wire, M/F 12" Blue Wire, 2F 8" Black Wire, M/F Userʼs Manual *These parts are subject to change without notice. 27 Qty. 101 1 102 1 103 1 104 1 105 3 106 1 107 1 108 2 109 1 110 1 111 1 112 2 Description Pulse Bar Ground Wire iFIT Universal iPod Connector Filter Wire Lift Motor Spacer #8 x 2" Screw Key Board Frame/Roller Ground Wire 3/8" x 3/4" Bolt 3/8" x 4" Bolt 3/8" Motor Star Washer Motor Bracket 3/8" Flange Nut Key No. Specifications...
... Top Pulse Plate #8 x 1/2" Console Screw 6" Blue Wire, 2F 10" Red Wire, M/F 10" Blue Wire, M/F 12" Blue Wire, 2F 8" Black Wire, M/F Userʼs Manual *These parts are subject to change without notice. 27 Qty. 101 1 102 1 103 1 104 1 105 3 106 1 107 1 108 2 109 1 110 1 111 1 112 2 Description Pulse Bar Ground Wire iFIT Universal iPod Connector Filter Wire Lift Motor Spacer #8 x 2" Screw Key Board Frame/Roller Ground Wire 3/8" x 3/4" Bolt 3/8" x 4" Bolt 3/8" Motor Star Washer Motor Bracket 3/8" Flange Nut Key No. Specifications...
English Manual
Page 32
... specific legal rights. This warranty gives you . To help us assist you . If the product is under normal use and service conditions. You may not apply to freight damage, abuse, misuse, improper or abnormal usage, or repairs not provided by ICON. ORDERING REPLACEMENT PARTS To order replacement parts, please see the PART LIST and the EXPLODED DRAWING near the end of this manual) LIMITED WARRANTY ICON Health & Fitness...
... specific legal rights. This warranty gives you . To help us assist you . If the product is under normal use and service conditions. You may not apply to freight damage, abuse, misuse, improper or abnormal usage, or repairs not provided by ICON. ORDERING REPLACEMENT PARTS To order replacement parts, please see the PART LIST and the EXPLODED DRAWING near the end of this manual) LIMITED WARRANTY ICON Health & Fitness...


