
User Manual
Page 2
® TABLE OF CONTENTS IMPORTANT PRECAUTIONS 3 BEFORE YOU BEGIN 5 ASSEMBLY 6 TREADMILL OPERATION 7 HOW TO FOLD AND MOVE THE TREADMILL 23 TROUBLE-SHOOTING 24 REEBOK UNIVERSITY 26 EXERCISE GUIDELINES 28 PART LIST 30 HOW TO ORDER REPLACEMENT PARTS 31 LIMITED WARRANTY Back Cover Note: An EXPLODED DRAWING is manufactured and distributed under license from Reebok International. 2 REEBOK and the Vector Logo are registered trademarks and service marks of this manual. This product is attached in the center of Reebok.
® TABLE OF CONTENTS IMPORTANT PRECAUTIONS 3 BEFORE YOU BEGIN 5 ASSEMBLY 6 TREADMILL OPERATION 7 HOW TO FOLD AND MOVE THE TREADMILL 23 TROUBLE-SHOOTING 24 REEBOK UNIVERSITY 26 EXERCISE GUIDELINES 28 PART LIST 30 HOW TO ORDER REPLACEMENT PARTS 31 LIMITED WARRANTY Back Cover Note: An EXPLODED DRAWING is manufactured and distributed under license from Reebok International. 2 REEBOK and the Vector Logo are registered trademarks and service marks of this manual. This product is attached in the center of Reebok.
User Manual
Page 3
.... Use only a single-outlet surge suppressor that all users of this manual. 12. Do not place the treadmill on page 5 if the treadmill is not a medical device. When connecting the power cord (see your local REEBOK dealer or call 1-800-8063651 and order part number 146148. 11. No other appliance should be used...
.... Use only a single-outlet surge suppressor that all users of this manual. 12. Do not place the treadmill on page 5 if the treadmill is not a medical device. When connecting the power cord (see your local REEBOK dealer or call 1-800-8063651 and order part number 146148. 11. No other appliance should be used...

User Manual
Page 4
...setting. SAVE THESE INSTRUCTIONS The decals shown below have been placed on your physician. Always unplug the power cord immediately after use the treadmill in this manual should be prepared for the "chirp" and be performed by or through the use only. tenance and adjustment procedures ...de- scribed in any time by an authorized service representative. Never remove the motor hood unless instructed to the next settings of the treadmill every three months. 25. ICON assumes no responsibility for in the location shown. Note: The long decal is especially important for ...
...setting. SAVE THESE INSTRUCTIONS The decals shown below have been placed on your physician. Always unplug the power cord immediately after use the treadmill in this manual should be prepared for the "chirp" and be performed by or through the use only. tenance and adjustment procedures ...de- scribed in any time by an authorized service representative. Never remove the motor hood unless instructed to the next settings of the treadmill every three months. 25. ICON assumes no responsibility for in the location shown. Note: The long decal is especially important for ...
User Manual
Page 5
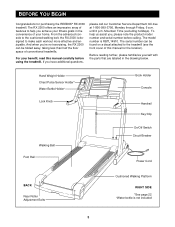
...product model number and serial number before using the treadmill. The serial number can be found on a decal attached to the treadmill (see the front cover of your benefit, read this manual for purchasing the REEBOK® RX 2000 treadmill. Before reading further, please familiarize yourself with ...Bolts Cushioned Walking Platform RIGHT SIDE *See page 22 †Water bottle is RBTL14910. The RX 2000 offers an impressive array of conventional treadmills. And when you achieve your fitness goals in the drawing below. The model number is not included 5 until 6 p.m. To help...
...product model number and serial number before using the treadmill. The serial number can be found on a decal attached to the treadmill (see the front cover of your benefit, read this manual for purchasing the REEBOK® RX 2000 treadmill. Before reading further, please familiarize yourself with ...Bolts Cushioned Walking Platform RIGHT SIDE *See page 22 †Water bottle is RBTL14910. The RX 2000 offers an impressive array of conventional treadmills. And when you achieve your fitness goals in the drawing below. The model number is not included 5 until 6 p.m. To help...
User Manual
Page 6
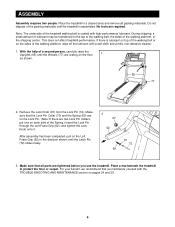
..., a small amount of the packing materials until the Latch Pin (72) slides freely. 2 67 62 70 72 69 3. This does not affect treadmill performance. Remove the Lock Knob (67) from the Lock Pin (72). After assembly has been completed, pull on each side of the walking platform,... the floor 1 as shown. 65 77 2. No tools are tightened before you familiarize yourself with high-performance lubricant. Make sure that you use the treadmill. If there is lubricant on top of the walking platform, wipe off the lubricant with a soft cloth and a mild, non-abrasive cleaner. 1. ...
..., a small amount of the packing materials until the Latch Pin (72) slides freely. 2 67 62 70 72 69 3. This does not affect treadmill performance. Remove the Lock Knob (67) from the Lock Pin (72). After assembly has been completed, pull on each side of the walking platform,... the floor 1 as shown. 65 77 2. No tools are tightened before you familiarize yourself with high-performance lubricant. Make sure that you use the treadmill. If there is lubricant on top of the walking platform, wipe off the lubricant with a soft cloth and a mild, non-abrasive cleaner. 1. ...
User Manual
Page 7
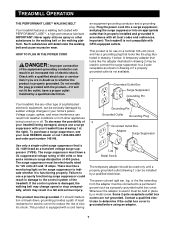
... screw. Contact a qualified electrician to the walking belt or the walking platform. TREADMILL OPERATION THE PERFORMANT LUBETM WALKING BELT Your treadmill features a walking belt coated with your treadmill (see your local REEBOK dealer or call 1-800-806-3651 and order part number 146148. This product ...grounded outlet (drawing 1) can be grounded. The green-colored rigid ear, lug, or the like the plug illustrated in your treadmill being turned on the surge suppressor to reduce the risk of sophisticated electronic equipment, can be held in place by sudden voltage...
... screw. Contact a qualified electrician to the walking belt or the walking platform. TREADMILL OPERATION THE PERFORMANT LUBETM WALKING BELT Your treadmill features a walking belt coated with your treadmill (see your local REEBOK dealer or call 1-800-806-3651 and order part number 146148. This product ...grounded outlet (drawing 1) can be grounded. The green-colored rigid ear, lug, or the like the plug illustrated in your treadmill being turned on the surge suppressor to reduce the risk of sophisticated electronic equipment, can be held in place by sudden voltage...
User Manual
Page 8
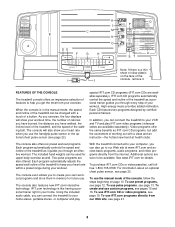
...pulse programs are available separately). The console also features new iFIT.com interactive technology. Using the included audio cable, you can connect the treadmill to your home stereo, portable stereo, or computer and play iFIT.com video programs (videocassettes are soon to create your own workout programs ...pulse sensor (see page 19. The console also offers six preset workout programs. Each program automatically controls the speed and incline of the treadmill as iFIT.com CD programs, but add the excitement of working out with a touch of features to our Web site at health clubs....
...pulse programs are available separately). The console also features new iFIT.com interactive technology. Using the included audio cable, you can connect the treadmill to your home stereo, portable stereo, or computer and play iFIT.com video programs (videocassettes are soon to create your own workout programs ...pulse sensor (see page 19. The console also offers six preset workout programs. Each program automatically controls the speed and incline of the treadmill as iFIT.com CD programs, but add the excitement of working out with a touch of features to our Web site at health clubs....
User Manual
Page 9
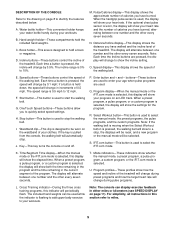
...flash. Cross Training indicator-During the three cross training programs, this display will show your heart rate and the number of the treadmill. C. Incline buttons-These buttons control the incline of the walking belt. Pulse/Calories display-This display shows the approximate number ..., the incline will change by 0.1 mph; D. M. N. The display will automatically stop. O. Speed display-This display shows the speed of the treadmill. E. Each time a button is used to 12 mph. The speed range is 0% to start the walking belt. F. Start button-This button ...
...flash. Cross Training indicator-During the three cross training programs, this display will show your heart rate and the number of the treadmill. C. Incline buttons-These buttons control the incline of the walking belt. Pulse/Calories display-This display shows the approximate number ..., the incline will change by 0.1 mph; D. M. N. The display will automatically stop. O. Speed display-This display shows the speed of the treadmill. E. Each time a button is used to 12 mph. The speed range is 0% to start the walking belt. F. Start button-This button ...
User Manual
Page 10
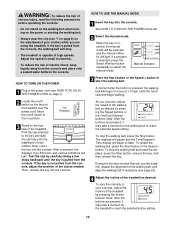
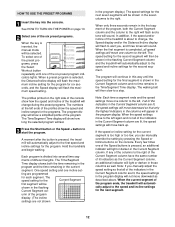
...moment, the displays, the LED track, and various indicators will light. Note: After the buttons are pressed, it may take a moment for the treadmill to reach the selected incline setting. 10 WARNING: To reduce the risk of serious injury, read the following precautions before operating the console. •...liquids away from the console, the walking belt will begin walking. When the key is pressed, the walking belt will stop. • The treadmill is selected, press the Select Workout button repeatedly to flash. HOW TO TURN ON THE POWER 1 Plug in small increments. • To ...
...moment, the displays, the LED track, and various indicators will light. Note: After the buttons are pressed, it may take a moment for the treadmill to reach the selected incline setting. 10 WARNING: To reduce the risk of serious injury, read the following precautions before operating the console. •...liquids away from the console, the walking belt will begin walking. When the key is pressed, the walking belt will stop. • The treadmill is selected, press the Select Workout button repeatedly to flash. HOW TO TURN ON THE POWER 1 Plug in small increments. • To ...
User Manual
Page 11
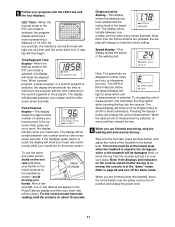
...measurement. When a preset program, a pulse program, or a custom program is worn, the display will alternate between one at the lowest level when the treadmill is used, the display will change to page 22 and turn off position and unplug the power cord. 11 grip pulse sensor, stand on the...moving your progress with the LED track and the four displays. If the handgrip pulse sensor is raised to the storage position or the treadmill will light to the off the demo mode. Pulse/Calories display-This display shows the approximate number of measurement is in either miles ...
...measurement. When a preset program, a pulse program, or a custom program is worn, the display will alternate between one at the lowest level when the treadmill is used, the display will change to page 22 and turn off position and unplug the power cord. 11 grip pulse sensor, stand on the...moving your progress with the LED track and the four displays. If the handgrip pulse sensor is raised to the storage position or the treadmill will light to the off the demo mode. Pulse/Calories display-This display shows the approximate number of measurement is in either miles ...
User Manual
Page 12
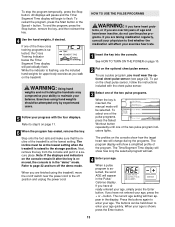
...The speed setting for six seconds, and the Speed display will automatically adjust to start the program. If any of the program ends, the treadmill will flash the maximum speed setting. To select one of the preset programs, press the Select Workout button repeatedly until the speed setting for ...the final segment is pressed, the treadmill will automatically adjust to the left ends of the profiles show how long the selected program will last. 3 Press the Start button or the...
...The speed setting for six seconds, and the Speed display will automatically adjust to start the program. If any of the program ends, the treadmill will flash the maximum speed setting. To select one of the preset programs, press the Select Workout button repeatedly until the speed setting for ...the final segment is pressed, the treadmill will automatically adjust to the left ends of the profiles show how long the selected program will last. 3 Press the Start button or the...
User Manual
Page 13
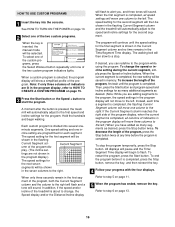
...a simplified profile of the two pulse program indicators lights. When your age quickly. Refer to enter your age is at the lowest setting when the treadmill is flashing, use the included hand weights for upper body exercise as you walk on page 11. 6 When the program has ended, remove the key...: If you have been inactive, do not use a pulse program, you are finished using hand weights should be held down to step 5 on the treadmill. To put it in the Pulse/ Calories display. To select one of the pulse programs, press the Select Workout button repeatedly until one of the...
...a simplified profile of the two pulse program indicators lights. When your age quickly. Refer to enter your age is at the lowest setting when the treadmill is flashing, use the included hand weights for upper body exercise as you walk on page 11. 6 When the program has ended, remove the key...: If you have been inactive, do not use a pulse program, you are finished using hand weights should be held down to step 5 on the treadmill. To put it in the Pulse/ Calories display. To select one of the pulse programs, press the Select Workout button repeatedly until one of the...
User Manual
Page 14
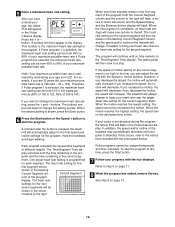
... begin walking. Current Segment umn of different lengths. However, if you increase the speed, the incline will always attempt to the left. The treadmill will decrease. If your maximum possible heart rate is not detected during the program, the letters PLS will decrease; 5 Enter a maximum heart rate... if Pulse program 1 is 161). When only three seconds remain in the current seg- When the first segment is 123; 85% of the treadmill will change, if needed, to the instructions included with the chest pulse sensor. Press the + or - play will show both the Current Segment ...
... begin walking. Current Segment umn of different lengths. However, if you increase the speed, the incline will always attempt to the left. The treadmill will decrease. If your maximum possible heart rate is not detected during the program, the letters PLS will decrease; 5 Enter a maximum heart rate... if Pulse program 1 is 161). When only three seconds remain in the current seg- When the first segment is 123; 85% of the treadmill will change, if needed, to the instructions included with the chest pulse sensor. Press the + or - play will show both the Current Segment ...
User Manual
Page 15
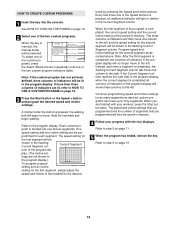
... not shown in the flashing Current Segment col- Program speed and incline settings for the first segment, simply adjust the speed and incline of the treadmill to the desired levels by pressing the Speed and Incline buttons. custom programs can be shown in the program display.) To program a speed setting and...
... not shown in the flashing Current Segment col- Program speed and incline settings for the first segment, simply adjust the speed and incline of the treadmill to the desired levels by pressing the Speed and Incline buttons. custom programs can be shown in the program display.) To program a speed setting and...
User Manual
Page 16
...to HOW TO CREATE A CUSTOM PROGRAM on page 11. 5 When the program has ended, remove the key. Note: If only three columns of the treadmill is divided into the console. Each custom program is about to a stop the program temporarily, press the Stop button. In addition, if the speed ... move three columns to flash. tings are adding segments to the program, the speed settings in memory. When the current segment is pressed, the treadmill will not move one of the program dis- Instead, each segment. One speed setting and one - To stop . Hold the handrails and begin...
...to HOW TO CREATE A CUSTOM PROGRAM on page 11. 5 When the program has ended, remove the key. Note: If only three columns of the treadmill is divided into the console. Each custom program is about to a stop the program temporarily, press the Stop button. In addition, if the speed ... move three columns to flash. tings are adding segments to the program, the speed settings in memory. When the current segment is pressed, the treadmill will not move one of the program dis- Instead, each segment. One speed setting and one - To stop . Hold the handrails and begin...
User Manual
Page 17
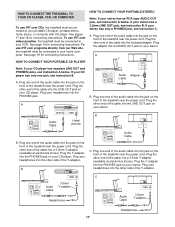
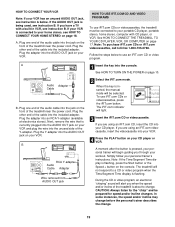
...5mm Y-adapter (available at electronics stores). C Audio Cable 3.5mm Y-adapter Headphones Audio Cable PHONES 3.5mm Y-adapter Headphones 17 To use iFIT.com CDs, the treadmill must be connected to your portable CD player, portable stereo, home stereo, or computer with CD player. See page 19 for connecting instructions. HOW TO...Note: If your stereo has a 3.5mm LINE OUT jack, see instruction A below . Plug one end of the treadmill near the power cord. Plug one end of the treadmill near the power cord. Plug one end of the audio cable into the jack on the front of the audio cable...
...5mm Y-adapter (available at electronics stores). C Audio Cable 3.5mm Y-adapter Headphones Audio Cable PHONES 3.5mm Y-adapter Headphones 17 To use iFIT.com CDs, the treadmill must be connected to your portable CD player, portable stereo, home stereo, or computer with CD player. See page 19 for connecting instructions. HOW TO...Note: If your stereo has a 3.5mm LINE OUT jack, see instruction A below . Plug one end of the treadmill near the power cord. Plug one end of the treadmill near the power cord. Plug one end of the audio cable into the jack on the front of the audio cable...
User Manual
Page 18
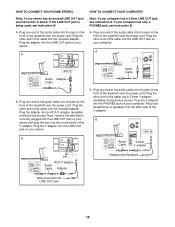
... audio cable into the jack on the front of the cable into an RCA Y-adapter (available at electronics stores). Plug the other end of the treadmill near the power cord. Note: If your computer. A. If the LINE OUT jack is currently plugged into the jack on the front of the... treadmill near the power cord. Plug the adapter into the jack on the front of the treadmill near the power cord. Plug one end of the Y-adapter. Plug the other side of the audio...
... audio cable into the jack on the front of the cable into an RCA Y-adapter (available at electronics stores). Plug the other end of the treadmill near the power cord. Note: If your computer. A. If the LINE OUT jack is currently plugged into the jack on the front of the... treadmill near the power cord. Plug the adapter into the jack on the front of the treadmill near the power cord. Plug one end of the Y-adapter. Plug the other side of the audio...
User Manual
Page 19
... the cable into the AUDIO OUT jack on your personal trainer's instructions. Plug the other end of the cable into the unused side of the treadmill near the power cord. Note: If the Time/Segment Time display is being used, see instruction B. Plug the Y-adapter into the included adapter. ...To use an iFIT.com CD or video program. 1 Insert the key into the jack on the console. The treadmill will light. 3 Insert the iFIT.com CD or videocassette. B ANT. If the AUDIO OUT jack is flashing, press the Start button or the Speed ...
... the cable into the AUDIO OUT jack on your personal trainer's instructions. Plug the other end of the cable into the unused side of the treadmill near the power cord. Note: If the Time/Segment Time display is being used, see instruction B. Plug the Y-adapter into the included adapter. ...To use an iFIT.com CD or video program. 1 Insert the key into the jack on the console. The treadmill will light. 3 Insert the iFIT.com CD or videocassette. B ANT. If the AUDIO OUT jack is flashing, press the Start button or the Speed ...
User Manual
Page 20
When the CD or video program is completed, remove the key. Note: If the speed or incline of the treadmill does not change to flash. See step 6 on page 11. 6 When the program is completed, the walking belt will change when a "chirp" is heard: • ...
When the CD or video program is completed, remove the key. Note: If the speed or incline of the treadmill does not change to flash. See step 6 on page 11. 6 When the program is completed, the walking belt will change when a "chirp" is heard: • ...
User Manual
Page 21
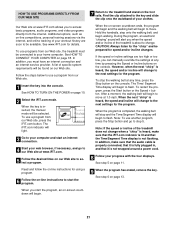
...from our Web site. 1 Insert the key into the console. Follow the steps below to step 5. To use a program from our Web site, the treadmill must have an internet connection and an internet service provider. To stop and the Time/Segment Time display will light. 3 Go to your clothes. Hold... belt, and begin and the walking belt will be found on -line competitions, personal training sessions via the internet, and online tracking of the treadmill is heard, the speed and incline will begin to flash. Note: To use another program, press the Stop button and go to our Web ...
...from our Web site. 1 Insert the key into the console. Follow the steps below to step 5. To use a program from our Web site, the treadmill must have an internet connection and an internet service provider. To stop and the Time/Segment Time display will light. 3 Go to your clothes. Hold... belt, and begin and the walking belt will be found on -line competitions, personal training sessions via the internet, and online tracking of the treadmill is heard, the speed and incline will begin to flash. Note: To use another program, press the Stop button and go to our Web ...


