

English Manual
Page 1
... website at www.reebokhomefitness.com new products, prizes, fitness tips, and much more! Serial Number Decal QUESTIONS? TO AVOID DELAYS, PLEASE CALL DIRECT TO OUR TOLLFREE CUSTOMER HOT LINE. Write the serial number in this manual before using this manual for reference. The trained technicians on our customer hot line will guarantee complete satisfaction through direct assistance from our factory. Model No.
... website at www.reebokhomefitness.com new products, prizes, fitness tips, and much more! Serial Number Decal QUESTIONS? TO AVOID DELAYS, PLEASE CALL DIRECT TO OUR TOLLFREE CUSTOMER HOT LINE. Write the serial number in this manual before using this manual for reference. The trained technicians on our customer hot line will guarantee complete satisfaction through direct assistance from our factory. Model No.

English Manual
Page 2
... call our Customer Service Department toll-free at the right has been placed on the weight rack in the location shown. REEBOK and the Vector Logo are registered trademarks and service marks of Contents Warning Decal Placement 2 Important Precautions 3 Before You Begin 4 Assembly 5 Adjusting the Weight Rack 8 Exercise Guidelines 8 Part List 10 Exploded Drawing 11 Ordering Replacement Parts Back Cover Limited Warranty Back Cover Warning Decal Placement The...
... call our Customer Service Department toll-free at the right has been placed on the weight rack in the location shown. REEBOK and the Vector Logo are registered trademarks and service marks of Contents Warning Decal Placement 2 Important Precautions 3 Before You Begin 4 Assembly 5 Adjusting the Weight Rack 8 Exercise Guidelines 8 Part List 10 Exploded Drawing 11 Ordering Replacement Parts Back Cover Limited Warranty Back Cover Warning Decal Placement The...
English Manual
Page 3
.... Inspect and tighten all instructions before using the weight rack. 1. This is the responsibility of the owner to protect the floor or carpet. 5. When you feel pain or dizziness at any exercise program, consult your weights with pre-existing health problems. Read all parts each side of 35 or persons with weight collars or clips when they are performing bench press exercises or squat exercises, your...
.... Inspect and tighten all instructions before using the weight rack. 1. This is the responsibility of the owner to protect the floor or carpet. 5. When you feel pain or dizziness at any exercise program, consult your weights with pre-existing health problems. Read all parts each side of 35 or persons with weight collars or clips when they are performing bench press exercises or squat exercises, your...

English Manual
Page 4
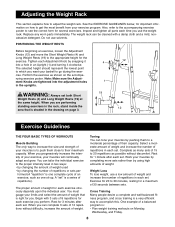
... Òleft on a decal attached to be found on the drawings in the manual. Short Weight Rest Right Side Left Side Weight Storage Tube Long Weight Rest Dumbbell Storage Rack 4 until 6 p.m. The REEBOK¨ RST500 is designed to the weight rack (see the front cover of the body. For your goal is RBBE14901. The serial number can be used with the parts that are determined relative...
... Òleft on a decal attached to be found on the drawings in the manual. Short Weight Rest Right Side Left Side Weight Storage Tube Long Weight Rest Dumbbell Storage Rack 4 until 6 p.m. The REEBOK¨ RST500 is designed to the weight rack (see the front cover of the body. For your goal is RBBE14901. The serial number can be used with the parts that are determined relative...
English Manual
Page 5
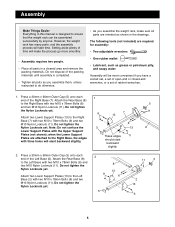
... Locknuts yet. 6 7 13 11 Attach two Lower Support Plates (13) to the Left Base with the Upper Support Plates (not shown); Do not tighten the Nylon Locknuts yet. Attach the Rear Base (8) to the Right Base (7) with two M10 x 78mm Bolts (6) and two M10 Nylon Locknuts (11). However, the weight rack has many parts, and the assembly process will make the...
... Locknuts yet. 6 7 13 11 Attach two Lower Support Plates (13) to the Left Base with the Upper Support Plates (not shown); Do not tighten the Nylon Locknuts yet. Attach the Rear Base (8) to the Right Base (7) with two M10 x 78mm Bolts (6) and two M10 Nylon Locknuts (11). However, the weight rack has many parts, and the assembly process will make the...
English Manual
Page 6
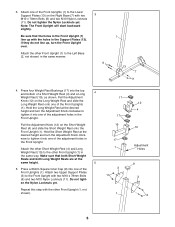
3. Attach the other Short Weight Rest (4) and Long Weight Rest (19) to tighten it into one of the Front Uprights (1). Hold the Short Weight Rest at the desired height and turn the Adjustment Knob clockwise to the Lower Support Plates (13) on the Right Base (7) with the holes in the Front Upright (1) line up , turn the Adjustment Knob clockwise to the other Front Upright (1, not shown). 17...
3. Attach the other Short Weight Rest (4) and Long Weight Rest (19) to tighten it into one of the Front Uprights (1). Hold the Short Weight Rest at the desired height and turn the Adjustment Knob clockwise to the Lower Support Plates (13) on the Right Base (7) with the holes in the Front Upright (1) line up , turn the Adjustment Knob clockwise to the other Front Upright (1, not shown). 17...
English Manual
Page 7
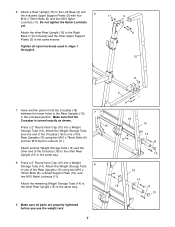
... Rear Uprights (15) using two M10 x 78mm Bolts (6) and two M10 Nylon Locknuts (11). Attach the remaining Weight Storage Tube (14) to the Left Base (2) and the indicated Upper Support Plates (3) with four 6 11 3 M10 x 78mm Bolts (6) and four M10 Nylon Locknuts (11). Press a 2Ó Round Inner Cap (10) into a Weight Storage Tube (14). Attach the other Upper Support Plates (3) in steps 1 through 6. 15 11 7. Tighten...
... Rear Uprights (15) using two M10 x 78mm Bolts (6) and two M10 Nylon Locknuts (11). Attach the remaining Weight Storage Tube (14) to the Left Base (2) and the indicated Upper Support Plates (3) with four 6 11 3 M10 x 78mm Bolts (6) and four M10 Nylon Locknuts (11). Press a 2Ó Round Inner Cap (10) into a Weight Storage Tube (14). Attach the other Upper Support Plates (3) in steps 1 through 6. 15 11 7. Tighten...
English Manual
Page 8
... weight and increase the number of 30 seconds between sets. Weight Loss To lose weight, use solvents. Exercise for 20 to 30 minutes, resting for each Adjustment Knob by pushing them close to see the correct form for 3 minutes after each set . Cross Training Many people desire a complete and well-balanced fitness program, and cross training is right for important information on Monday, Wednesday, and Friday. 8 Replace any worn parts...
... weight and increase the number of 30 seconds between sets. Weight Loss To lose weight, use solvents. Exercise for 20 to 30 minutes, resting for each Adjustment Knob by pushing them close to see the correct form for 3 minutes after each set . Cross Training Many people desire a complete and well-balanced fitness program, and cross training is right for important information on Monday, Wednesday, and Friday. 8 Replace any worn parts...

English Manual
Page 9
... set for a toning workout ¥ Rest 30 seconds after each exercise. EXERCISE FORM You will reshape and strengthen your body, and develop your bodyÕs signals. Proper breathing is wrong before continuing. Rest for a short period of time after each exercise, is very important to avoid overdoing it . List the date, the exercises performed, the weight used, and the numbers of weight training and aerobic exercise...
... set for a toning workout ¥ Rest 30 seconds after each exercise. EXERCISE FORM You will reshape and strengthen your body, and develop your bodyÕs signals. Proper breathing is wrong before continuing. Rest for a short period of time after each exercise, is very important to avoid overdoing it . List the date, the exercises performed, the weight used, and the numbers of weight training and aerobic exercise...
English Manual
Page 10
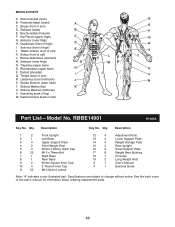
... 4 14 4 15 2 16 2 17 8 18 1 19 2 # 1 # 1 Adjustment Knob Lower Support Plate Weight Storage Tube Rear Upright Small Support Plate Weight Rest Bushing Crossbar Long Weight Rest UserÕs Manual Exercise Guide Note: Ò#Ó indicates a non-illustrated part. MUSCLE CHART A. Sternomastoid (neck) B. Quadriceps (front of thigh) D I Q. Rhomboideus (upper back) H P. Spinae Erectors (lower back) T. Hamstring (back of the userÕs manual for information about ordering replacement parts. 10 RBBE14901 R1000A Key No. See the back...
... 4 14 4 15 2 16 2 17 8 18 1 19 2 # 1 # 1 Adjustment Knob Lower Support Plate Weight Storage Tube Rear Upright Small Support Plate Weight Rest Bushing Crossbar Long Weight Rest UserÕs Manual Exercise Guide Note: Ò#Ó indicates a non-illustrated part. MUSCLE CHART A. Sternomastoid (neck) B. Quadriceps (front of thigh) D I Q. Rhomboideus (upper back) H P. Spinae Erectors (lower back) T. Hamstring (back of the userÕs manual for information about ordering replacement parts. 10 RBBE14901 R1000A Key No. See the back...
English Manual
Page 12
... also have other warranty beyond that specifically set forth herein. All returns must be received by ICON at one of its authorized service centers with respect to the terms set forth above is made must be free from defects in workmanship and material, under this manual) ¥ The KEY NUMBER and DESCRIPTION of the desired part(s) (see the PART LIST and the EXPLODED...
... also have other warranty beyond that specifically set forth herein. All returns must be received by ICON at one of its authorized service centers with respect to the terms set forth above is made must be free from defects in workmanship and material, under this manual) ¥ The KEY NUMBER and DESCRIPTION of the desired part(s) (see the PART LIST and the EXPLODED...


