
English Manual
Page 1
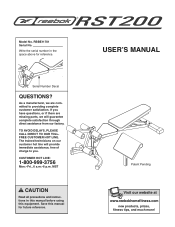
.... Write the serial number in this manual before using this manual for reference. MST CAUTION Read all precautions and instructions in the space above for future reference. If you have questions, or if there are committed to you. TO AVOID DELAYS, PLEASE CALL DIRECT TO OUR TOLLFREE CUSTOMER HOT LINE. Save this equipment. Model No. USERÕS MANUAL Patent Pending Visit...
.... Write the serial number in this manual before using this manual for reference. MST CAUTION Read all precautions and instructions in the space above for future reference. If you have questions, or if there are committed to you. TO AVOID DELAYS, PLEASE CALL DIRECT TO OUR TOLLFREE CUSTOMER HOT LINE. Save this equipment. Model No. USERÕS MANUAL Patent Pending Visit...
English Manual
Page 2
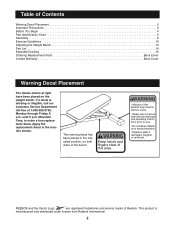
... operating instructions prior to order a free replacement decal. Mountain Time, to use. ¥ Do not allow children on or around machine. ¥ Replace label if damaged, illegible, or removed. Keep hands and fingers clear of Contents Warning Decal Placement 2 Important Precautions 3 Before You Begin 4 Part Identification Chart 5 Assembly 6 Exercise Guidelines 10 Adjusting the Weight Bench 13 Part List 14 Exploded Drawing 15 Ordering Replacement Parts Back Cover Limited Warranty Back Cover Warning...
... operating instructions prior to order a free replacement decal. Mountain Time, to use. ¥ Do not allow children on or around machine. ¥ Replace label if damaged, illegible, or removed. Keep hands and fingers clear of Contents Warning Decal Placement 2 Important Precautions 3 Before You Begin 4 Part Identification Chart 5 Assembly 6 Exercise Guidelines 10 Adjusting the Weight Bench 13 Part List 14 Exploded Drawing 15 Ordering Replacement Parts Back Cover Limited Warranty Back Cover Warning...
English Manual
Page 3
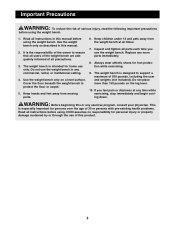
... weight bench are adequately informed of 550 pounds, including the user and weights (not included). Always wear athletic shoes for home use the weight bench. WARNING: Before beginning this manual. 2. Keep hands and feet away from the weight bench at any exercise program, consult your physician. Replace any commercial, rental, or institutional setting. 4. If you use only. Read all instructions before using the weight bench. 1. Do not use of this manual before using the weight bench...
... weight bench are adequately informed of 550 pounds, including the user and weights (not included). Always wear athletic shoes for home use the weight bench. WARNING: Before beginning this manual. 2. Keep hands and feet away from the weight bench at any exercise program, consult your physician. Replace any commercial, rental, or institutional setting. 4. If you use only. Read all instructions before using the weight bench. 1. Do not use of this manual before using the weight bench...
English Manual
Page 4
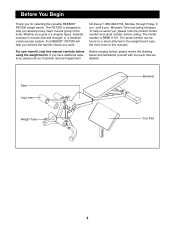
... reading further, please review the drawing below and familiarize yourself with the parts that are labeled. Whether your benefit, read this manual). The model number is designed to the weight bench (see the front cover of the body. Seat Leg Lever Backrest Weight Tube Curl Pad 4 Before You Begin Thank you , please note the product model number and serial number before using the weight bench. toll-free at 1-800-999...
... reading further, please review the drawing below and familiarize yourself with the parts that are labeled. Whether your benefit, read this manual). The model number is designed to the weight bench (see the front cover of the body. Seat Leg Lever Backrest Weight Tube Curl Pad 4 Before You Begin Thank you , please note the product model number and serial number before using the weight bench. toll-free at 1-800-999...
English Manual
Page 5
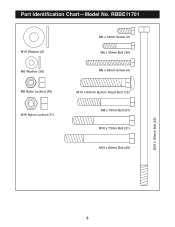
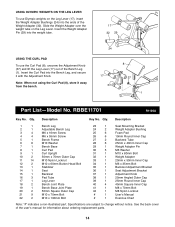
RBBE11701 M10 Washer (6) M6 Washer (30) M8 Nylon Locknut (42) M10 Nylon Locknut (11) M6 x 16mm Screw (3) M6 x 35mm Bolt (34) M6 x 55mm Screw (4) M10 x 60mm Button Head Bolt (12) M8 x 70mm Bolt (41) M10 x 70mm Bolt (21) M10 x 80mm Bolt (43) M10 x 190mm Bolt (22) 5 Part Identification ChartÑModel No.
RBBE11701 M10 Washer (6) M6 Washer (30) M8 Nylon Locknut (42) M10 Nylon Locknut (11) M6 x 16mm Screw (3) M6 x 35mm Bolt (34) M6 x 55mm Screw (4) M10 x 60mm Button Head Bolt (12) M8 x 70mm Bolt (41) M10 x 70mm Bolt (21) M10 x 80mm Bolt (43) M10 x 190mm Bolt (22) 5 Part Identification ChartÑModel No.
English Manual
Page 6
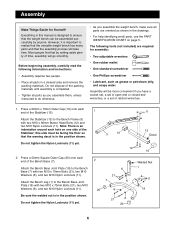
.... The following information and instructions: ¥ Assembly requires two people. ¥ Place all parts are required for Yourself! Note: There is completed. ¥ Tighten all parts as you assemble them, unless instructed to the Bench Base Joint Plate (19) with two M10 x 60mm Button Head Bolts (12) and two M10 Nylon Locknuts (11). this manual is in a cleared area and remove the packing...
.... The following information and instructions: ¥ Assembly requires two people. ¥ Place all parts are required for Yourself! Note: There is completed. ¥ Tighten all parts as you assemble them, unless instructed to the Bench Base Joint Plate (19) with two M10 x 60mm Button Head Bolts (12) and two M10 Nylon Locknuts (11). this manual is in a cleared area and remove the packing...

English Manual
Page 7
... Bolt (22). Attach the Bench Leg (1) to the welded tube on the Bench Frame (5) with the Bolt, two M10 Washers (6), and an M10 Nylon Locknut (11). Lubricate an M10 x 190mm Bolt (22). Press two 25mm x 40mm Inner Caps (28) into the Backrest Adjustment Bracket (35). Make sure that the Backrest Tubes are not centered in steps 1Ð3. 3 21 18 5 18 1 11 4. Tighten...
... Bolt (22). Attach the Bench Leg (1) to the welded tube on the Bench Frame (5) with the Bolt, two M10 Washers (6), and an M10 Nylon Locknut (11). Lubricate an M10 x 190mm Bolt (22). Press two 25mm x 40mm Inner Caps (28) into the Backrest Adjustment Bracket (35). Make sure that the Backrest Tubes are not centered in steps 1Ð3. 3 21 18 5 18 1 11 4. Tighten...

English Manual
Page 8
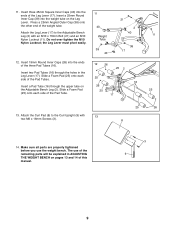
... Square Inner Cap (40) into the open end of the Seat Mounting Bracket (23). the Seat Adjustment Bracket must pivot easily. 9. Do not over the welded pin on the Bench Frame (5) so that the Seat Adjustment Bracket (36) fits over tighten the Nylon Locknut; Attach the Adjustable Bench Leg (2) to the Bench Leg (1) with the Bolt and an M10 Nylon Locknut (11). Press the 20mm x 50mm Inner Cap...
... Square Inner Cap (40) into the open end of the Seat Mounting Bracket (23). the Seat Adjustment Bracket must pivot easily. 9. Do not over the welded pin on the Bench Frame (5) so that the Seat Adjustment Bracket (36) fits over tighten the Nylon Locknut; Attach the Adjustable Bench Leg (2) to the Bench Leg (1) with the Bolt and an M10 Nylon Locknut (11). Press the 20mm x 50mm Inner Cap...
English Manual
Page 9
... the holes in ADJUSTING THE WEIGHT BENCH on the Leg Lever. Attach the Curl Pad (8) to the Adjustable Bench Leg (2) with 13 two M6 x 16mm Screws (3). 25 26 8 14. Insert a 25mm Round Inner Cap (39) into the weight tube on pages 13 and 14 of the three Pad Tubes (16). The use the weight bench. Attach the Leg Lever (17) to the Curl Upright (9) with an...
... the holes in ADJUSTING THE WEIGHT BENCH on the Leg Lever. Attach the Curl Pad (8) to the Adjustable Bench Leg (2) with 13 two M6 x 16mm Screws (3). 25 26 8 14. Insert a 25mm Round Inner Cap (39) into the weight tube on pages 13 and 14 of the three Pad Tubes (16). The use the weight bench. Attach the Leg Lever (17) to the Curl Upright (9) with an...
English Manual
Page 10
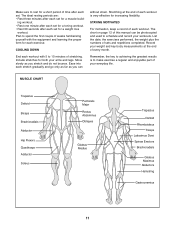
... highest. EXERCISE FORM You will gain the greatest benefits from exercising by using high amounts of weight. The exertion stage of each set . Never hold your breath. 10 Rest for 1 minute after each exercise and moving only the appropriate parts of the body. Cross Training Many people desire a complete and balanced fitness program. You should include 6 to your muscles. Refer to the muscle chart on...
... highest. EXERCISE FORM You will gain the greatest benefits from exercising by using high amounts of weight. The exertion stage of each set . Never hold your breath. 10 Rest for 1 minute after each exercise and moving only the appropriate parts of the body. Cross Training Many people desire a complete and balanced fitness program. You should include 6 to your muscles. Refer to the muscle chart on...
English Manual
Page 11
... each set for a weight loss workout. The chart on page 12 of this manual can without strain. Plan to spend the first couple of weeks familiarizing yourself with 5 to 10 minutes of your arms and legs. Ease into each stretch gradually and go only as far as you can be photocopied and used to make exercise a regular and enjoyable part...
... each set for a weight loss workout. The chart on page 12 of this manual can without strain. Plan to spend the first couple of weeks familiarizing yourself with 5 to 10 minutes of your arms and legs. Ease into each stretch gradually and go only as far as you can be photocopied and used to make exercise a regular and enjoyable part...
English Manual
Page 12
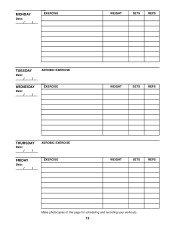
MONDAY Date: / / EXERCISE WEIGHT SETS REPS TUESDAY Date: / / WEDNESDAY Date: / / AEROBIC EXERCISE EXERCISE WEIGHT SETS REPS THURSDAY Date: / / FRIDAY Date: / / AEROBIC EXERCISE EXERCISE WEIGHT SETS REPS Make photocopies of this page for scheduling and recording your workouts. 12
MONDAY Date: / / EXERCISE WEIGHT SETS REPS TUESDAY Date: / / WEDNESDAY Date: / / AEROBIC EXERCISE EXERCISE WEIGHT SETS REPS THURSDAY Date: / / FRIDAY Date: / / AEROBIC EXERCISE EXERCISE WEIGHT SETS REPS Make photocopies of this page for scheduling and recording your workouts. 12
English Manual
Page 13
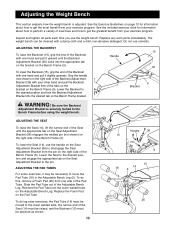
... the Adjustable Bench Leg (2). Lower the Seat to the desired position and engage the appropriate tab on the Pad Tube. See the included exercise chart for information about how to perform a variety of exercises and how to get the most benefit from the pin on the Seat Adjustment Bracket (36) to disengage the Seat Adjustment Bracket from your exercise program. Replace any worn parts immediately. Do not use the weight bench. Lower...
... the Adjustable Bench Leg (2). Lower the Seat to the desired position and engage the appropriate tab on the Pad Tube. See the included exercise chart for information about how to perform a variety of exercises and how to get the most benefit from the pin on the Seat Adjustment Bracket (36) to disengage the Seat Adjustment Bracket from your exercise program. Replace any worn parts immediately. Do not use the weight bench. Lower...
English Manual
Page 14
... (8), unscrew the Adjustment Knob (37) and lift the Leg Lever (17) out of the Bench Leg (1). USING OLYMPIC WEIGHTS ON THE LEG LEVER To use Olympic weights on the Leg Lever. Insert the Weight Adapter Pin (29) into the ends of the userÕs manual for information about ordering replacement parts. 14 Insert the Curl Pad into the Bench Leg, and secure it away from the bench. 24 8 17 37 1 Part ListÑModel No.
... (8), unscrew the Adjustment Knob (37) and lift the Leg Lever (17) out of the Bench Leg (1). USING OLYMPIC WEIGHTS ON THE LEG LEVER To use Olympic weights on the Leg Lever. Insert the Weight Adapter Pin (29) into the ends of the userÕs manual for information about ordering replacement parts. 14 Insert the Curl Pad into the Bench Leg, and secure it away from the bench. 24 8 17 37 1 Part ListÑModel No.
English Manual
Page 16
... desired part(s) (see the PART LIST and the EXPLODED DRAWING on how long an implied warranty lasts. Limited Warranty ICON Health & Fitness, Inc. (ICON), warrants this product to give the following information when calling: ¥ The MODEL NUMBER of the product (RBBE11701) ¥ The NAME of the product (REEBOK¨ RST200 weight bench) ¥ The SERIAL NUMBER of the product (see the front cover of this warranty is limited to replacing or repairing, at ICON...
... desired part(s) (see the PART LIST and the EXPLODED DRAWING on how long an implied warranty lasts. Limited Warranty ICON Health & Fitness, Inc. (ICON), warrants this product to give the following information when calling: ¥ The MODEL NUMBER of the product (RBBE11701) ¥ The NAME of the product (REEBOK¨ RST200 weight bench) ¥ The SERIAL NUMBER of the product (see the front cover of this warranty is limited to replacing or repairing, at ICON...


