
Uk Manual
Page 1
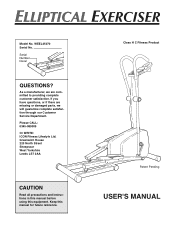
...: ICON Fitness Lifestyle Ltd. Class H C Fitness Product Patent Pending USER'S MANUAL Keep this equipment. If you have questions, or if there are committed to providing complete customer satisfaction. WEEL45070 Serial No. Greenwich House 223 North Street Sheepscar West Yorkshire Leeds LS7 2AA CAUTION Read all precautions and instructions in this manual before using this manual for future reference. Model No. Serial Number Decal...
...: ICON Fitness Lifestyle Ltd. Class H C Fitness Product Patent Pending USER'S MANUAL Keep this equipment. If you have questions, or if there are committed to providing complete customer satisfaction. WEEL45070 Serial No. Greenwich House 223 North Street Sheepscar West Yorkshire Leeds LS7 2AA CAUTION Read all precautions and instructions in this manual before using this manual for future reference. Model No. Serial Number Decal...
Uk Manual
Page 2
TABLE OF CONTENTS IMPORTANT PRECAUTIONS 3 BEFORE YOU BEGIN 4 PART IDENTIFICATION CHART 5 ASSEMBLY 6 MAINTENANCE 8 HOW TO USE THE ELLIPTICAL EXERCISER 10 CONDITIONING GUIDELINES 12 PART LIST 14 EXPLODED DRAWING 15 HOW TO ORDER REPLACEMENT PARTS Back Cover 2
TABLE OF CONTENTS IMPORTANT PRECAUTIONS 3 BEFORE YOU BEGIN 4 PART IDENTIFICATION CHART 5 ASSEMBLY 6 MAINTENANCE 8 HOW TO USE THE ELLIPTICAL EXERCISER 10 CONDITIONING GUIDELINES 12 PART LIST 14 EXPLODED DRAWING 15 HOW TO ORDER REPLACEMENT PARTS Back Cover 2
Uk Manual
Page 3
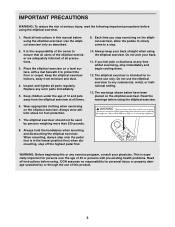
... dizziness at all precautions. 3. If you stop immediately and begin cooling down. 12. Do not use of this or any time whilst exercising, stop exercising on the elliptical exerciser. The warnings shown below have been placed on a level surface, with pre-existing health problems. Read all parts regularly. Inspect and tighten all instructions before using the elliptical exerciser. ICON assumes no responsibility for foot protection. 7. Always...
... dizziness at all precautions. 3. If you stop immediately and begin cooling down. 12. Do not use of this or any time whilst exercising, stop exercising on the elliptical exerciser. The warnings shown below have been placed on a level surface, with pre-existing health problems. Read all parts regularly. Inspect and tighten all instructions before using the elliptical exerciser. ICON assumes no responsibility for foot protection. 7. Always...
Uk Manual
Page 4
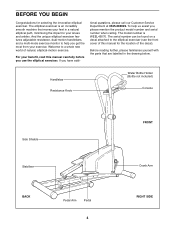
... model number and serial number when calling. The serial number can be found on a decal attached to help us assist you get the most from your feet in the drawing below. Before reading further, please familiarise yourself with the parts that moves your exercise. And the unique elliptical exerciser features adjustable resistance, dual-motion handlebars, and a multi-mode exercise monitor to the elliptical exerciser (see the front cover of this manual...
... model number and serial number when calling. The serial number can be found on a decal attached to help us assist you get the most from your feet in the drawing below. Before reading further, please familiarise yourself with the parts that moves your exercise. And the unique elliptical exerciser features adjustable resistance, dual-motion handlebars, and a multi-mode exercise monitor to the elliptical exerciser (see the front cover of this manual...
Uk Manual
Page 5
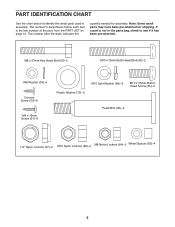
... assembly. PART IDENTIFICATION CHART Use the chart below each part is not in the parts bag, check to identify the small parts used in parenthesis below to see if it has been pre-attached. If a part is the key number of the part, from the PART LIST on page 14. The number after the dash indicates the quantity needed for shipping. M8 x 57mm Hex Head Bolt (63)-2 M10 x 75mm Button...
... assembly. PART IDENTIFICATION CHART Use the chart below each part is not in the parts bag, check to identify the small parts used in parenthesis below to see if it has been pre-attached. If a part is the key number of the part, from the PART LIST on page 14. The number after the dash indicates the quantity needed for shipping. M8 x 57mm Hex Head Bolt (63)-2 M10 x 75mm Button...
Uk Manual
Page 6
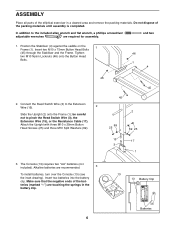
... two 1. Insert two batteries into the battery clip. In addition to pinch the Reed Switch Wire (3), the Extension Wire (15), or the Resistance Cable (17). Connect the Reed Switch Wire (3) to the Extension Wire (15). 2 Slide the Upright (2) onto the Frame (1); Insert two M10 x 75mm Button Head Bolts 1 (45) through the Stabiliser and the Frame. Do not dispose of the elliptical exerciser in the battery clip. 13 13 Battery Clip Batteries 6
... two 1. Insert two batteries into the battery clip. In addition to pinch the Reed Switch Wire (3), the Extension Wire (15), or the Resistance Cable (17). Connect the Reed Switch Wire (3) to the Extension Wire (15). 2 Slide the Upright (2) onto the Frame (1); Insert two M10 x 75mm Button Head Bolts 1 (45) through the Stabiliser and the Frame. Do not dispose of the elliptical exerciser in the battery clip. 13 13 Battery Clip Batteries 6

Uk Manual
Page 7
... 6. Press the Pedal Resistance Knob (16) firmly onto the Resistance Control (17). 4 Hole 17 13 13 17 15 2 5. Repeat this step to the inset drawing. Insert an M8 x 57mm Hex Head Bolt (63) with three M4 x 16mm Screws (51). Assemble the Right Pedal Arm (not shown) in the following way: Hold a Wheel (60) inside of the Console (13). Make sure that it will fit...
... 6. Press the Pedal Resistance Knob (16) firmly onto the Resistance Control (17). 4 Hole 17 13 13 17 15 2 5. Repeat this step to the inset drawing. Insert an M8 x 57mm Hex Head Bolt (63) with three M4 x 16mm Screws (51). Assemble the Right Pedal Arm (not shown) in the following way: Hold a Wheel (60) inside of the Console (13). Make sure that it will fit...

Uk Manual
Page 8
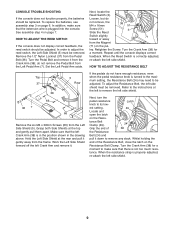
... worn parts immediately. Next, tighten the Pedal Bolt (36) into the Left Handlebar (10). Insert the Handlebar Upright into the left Crank Arm (38) and tighten a 1/2" Nylon Locknut (37) onto the Pedal Bolt. Make sure that may build up where the Wheels (60) move on the Stabiliser. To prevent damage to one of direct sunlight. 8 7. Using a paper towel, apply lubricant to 60 the console, keep...
... worn parts immediately. Next, tighten the Pedal Bolt (36) into the Left Handlebar (10). Insert the Handlebar Upright into the left Crank Arm (38) and tighten a 1/2" Nylon Locknut (37) onto the Pedal Bolt. Make sure that may build up where the Wheels (60) move on the Stabiliser. To prevent damage to one of direct sunlight. 8 7. Using a paper towel, apply lubricant to 60 the console, keep...
Uk Manual
Page 9
... pedal resistance Latch knob to remove the left side shield. tance. Remove the 1/2" Nylon Locknut (37) from the Left Side Shield (5). Make sure that the left side shield. 9 To replace the batteries, see assembly step 3 on page 7. In order to remove any slack. Next, locate the Reed Switch (3). Grasp both Side Shields at the rear and pull it from the frame. Turn the Crank Arm (38) for a moment. CONSOLE TROUBLE...
... pedal resistance Latch knob to remove the left side shield. tance. Remove the 1/2" Nylon Locknut (37) from the Left Side Shield (5). Make sure that the left side shield. 9 To replace the batteries, see assembly step 3 on page 7. In order to remove any slack. Next, locate the Reed Switch (3). Grasp both Side Shields at the rear and pull it from the frame. Turn the Crank Arm (38) for a moment. CONSOLE TROUBLE...
Uk Manual
Page 10
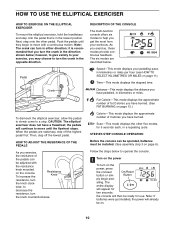
.... STEP-BY-STEP CONSOLE OPERATION Before the console can turn the knob clock- it is in either direction; Speed-This mode displays your workouts. Scan-This mode displays the other pedal. Push the pedals until the flywheel stops. Pedal Crank To dismount the elliptical exerciser, allow the pedals to slowly come to move until they begin ped- The six modes are stationary, step off the lowest pedal. The entire display will continue to decrease the resistance, turn the crank...
.... STEP-BY-STEP CONSOLE OPERATION Before the console can turn the knob clock- it is in either direction; Speed-This mode displays your workouts. Scan-This mode displays the other pedal. Push the pedals until the flywheel stops. Pedal Crank To dismount the elliptical exerciser, allow the pedals to slowly come to move until they begin ped- The six modes are stationary, step off the lowest pedal. The entire display will continue to decrease the resistance, turn the crank...

Uk Manual
Page 11
... or down to reset the display. 3 Turn off the power To turn it over; Re-attach the console with the six screws; If the pedals are not turned and the buttons are not pressed for 5 seconds each, in either kilometres or miles. 2 Select the desired mode The scan mode- Next, locate the small switch on /reset button to change the unit of measurement, first remove the six screws attaching the console (refer to pinch...
... or down to reset the display. 3 Turn off the power To turn it over; Re-attach the console with the six screws; If the pedals are not turned and the buttons are not pressed for 5 seconds each, in either kilometres or miles. 2 Select the desired mode The scan mode- Next, locate the small switch on /reset button to change the unit of measurement, first remove the six screws attaching the console (refer to pinch...
Uk Manual
Page 12
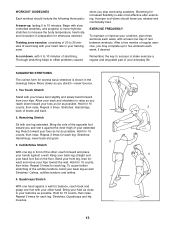
... can adjust the intensity of your exercise by adjusting the resistance or by changing your body begin to find your training zone as you exercise. For aerobic exercise, adjust your pace or the resistance until your heart rate is the recommended heart rate for energy. To measure your heart rate as shown. Then, stop exercising.) Fat Burning To burn fat effectively, you must be found by 10 to use stored...
... can adjust the intensity of your exercise by adjusting the resistance or by changing your body begin to find your training zone as you exercise. For aerobic exercise, adjust your pace or the resistance until your heart rate is the recommended heart rate for energy. To measure your heart rate as shown. Then, stop exercising.) Fat Burning To burn fat effectively, you must be found by 10 to use stored...
Uk Manual
Page 13
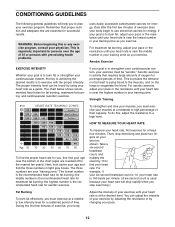
... back leg as you stop exercising suddenly. To cause further stretching of your condition, plan three workouts each leg. EXERCISE FREQUENCY To maintain or improve your everyday life. Thorough stretching helps to offset problems caused Remember, the key to success is make exercise a regular and enjoyable part of the achilles tendons, bend your back foot flat on the floor. Move slowly...
... back leg as you stop exercising suddenly. To cause further stretching of your condition, plan three workouts each leg. EXERCISE FREQUENCY To maintain or improve your everyday life. Thorough stretching helps to offset problems caused Remember, the key to success is make exercise a regular and enjoyable part of the achilles tendons, bend your back foot flat on the floor. Move slowly...
Uk Manual
Page 14
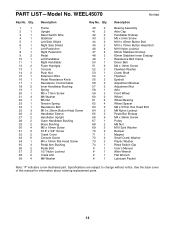
... Side Shield Left Pedal Arm Right Pedal Arm Pedal Left Handlebar Right Handlebar Foam Handgrip Console Push Nut Extension Wire Pedal Resistance Knob Resistance Control/Cable Inner Handlebar Bushing Spring M5 x 11mm Screw M6 Washer M5 Nut Tension Spring Resistance Belt M10 x 25mm Button Head Screw Handlebar Sleeve Handlebar Upright Outer Handlebar Bushing Brass Bushing M5 x 16mm Screw 5/16" x 3/4" Screw Crank Cover Console Screw M4 x 16mm Flat Head Screw Pedal Arm Bushing Pedal Bolt 1/2" Nylon Locknut Crank Arm M8 Washer Key No. PART LIST-Model No.
... Side Shield Left Pedal Arm Right Pedal Arm Pedal Left Handlebar Right Handlebar Foam Handgrip Console Push Nut Extension Wire Pedal Resistance Knob Resistance Control/Cable Inner Handlebar Bushing Spring M5 x 11mm Screw M6 Washer M5 Nut Tension Spring Resistance Belt M10 x 25mm Button Head Screw Handlebar Sleeve Handlebar Upright Outer Handlebar Bushing Brass Bushing M5 x 16mm Screw 5/16" x 3/4" Screw Crank Cover Console Screw M4 x 16mm Flat Head Screw Pedal Arm Bushing Pedal Bolt 1/2" Nylon Locknut Crank Arm M8 Washer Key No. PART LIST-Model No.
Uk Manual
Page 15
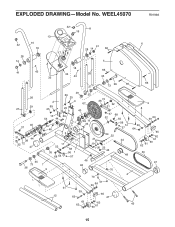
EXPLODED DRAWING-Model No. WEEL45070 R0199A 42 11 16 13 10 42 6 41 18 30 28 14 66 17 28 14 5 18 41 43 66 33 26 33 43 35 27 73 36 66 66 26 29 27 40 37 31 44 38 32 72 47 35 73 36 2 69 25 15 53 44 59 46 29 69 25 3 35 67 25 40 69 74 49 71 34 47 72 38 32 31 37 52 68 55 56 51 57 3 51 54 22 21 24 17 19 52 35 58 56 1 20 23 46 68 55 57 48 46 7 48 9 70 4 70 51 39 12 63 39 64 51 65 47 61 62 62 60 61 9 8 39 63 39 64 65 62 61 60 62 61 50 47 45 15
EXPLODED DRAWING-Model No. WEEL45070 R0199A 42 11 16 13 10 42 6 41 18 30 28 14 66 17 28 14 5 18 41 43 66 33 26 33 43 35 27 73 36 66 66 26 29 27 40 37 31 44 38 32 72 47 35 73 36 2 69 25 15 53 44 59 46 29 69 25 3 35 67 25 40 69 74 49 71 34 47 72 38 32 31 37 52 68 55 56 51 57 3 51 54 22 21 24 17 19 52 35 58 56 1 20 23 46 68 55 57 48 46 7 48 9 70 4 70 51 39 12 63 39 64 51 65 47 61 62 62 60 61 9 8 39 63 39 64 65 62 61 60 62 61 50 47 45 15
Uk Manual
Page 16
...; The MODEL NUMBER of the product (WEEL45070). • The NAME of the product (ELLIPTICAL EXERCISER). • The SERIAL NUMBER of the product (see the front cover of this manual). • The KEY NUMBER and DESCRIPTION of the part(s) (see the PART LIST on page 14 of this product, or if you need to order replacement parts, write or call the ICON Fitness Lifestyle Ltd. HOW TO ORDER REPLACEMENT PARTS If...
...; The MODEL NUMBER of the product (WEEL45070). • The NAME of the product (ELLIPTICAL EXERCISER). • The SERIAL NUMBER of the product (see the front cover of this manual). • The KEY NUMBER and DESCRIPTION of the part(s) (see the PART LIST on page 14 of this product, or if you need to order replacement parts, write or call the ICON Fitness Lifestyle Ltd. HOW TO ORDER REPLACEMENT PARTS If...


