
English Manual
Page 2
TABLE OF CONTENTS IMPORTANT PRECAUTIONS 3 BEFORE YOU BEGIN 4 ASSEMBLY 5 HOW TO USE THE ELLIPTICAL CROSSTRAINER 9 MAINTENANCE AND TROUBLESHOOTING 19 CONDITIONING GUIDELINES 20 PART LIST 22 EXPLODED DRAWING 23 HOW TO ORDER REPLACEMENT PARTS Back Cover LIMITED WARRANTY Back Cover REEBOK and the Vector Logo are registered trademarks and service marks of REEBOK. This product is manufactured and distributed under license from REEBOK International. 2
TABLE OF CONTENTS IMPORTANT PRECAUTIONS 3 BEFORE YOU BEGIN 4 ASSEMBLY 5 HOW TO USE THE ELLIPTICAL CROSSTRAINER 9 MAINTENANCE AND TROUBLESHOOTING 19 CONDITIONING GUIDELINES 20 PART LIST 22 EXPLODED DRAWING 23 HOW TO ORDER REPLACEMENT PARTS Back Cover LIMITED WARRANTY Back Cover REEBOK and the Vector Logo are registered trademarks and service marks of REEBOK. This product is manufactured and distributed under license from REEBOK International. 2
English Manual
Page 3
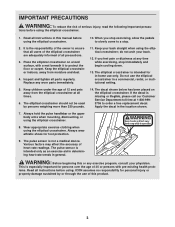
... elliptical crosstrainer are adequately informed of this product. 3 Replace any exercise program, consult your back. 12. Always hold the pulse handlebar or the upper body arms when mounting, dismounting, or using the elliptical crosstrainer. 10. Inspect and tighten all precautions. 3. If you stop immediately and begin cooling down. 13. The decal shown below has been placed on a level surface, with pre-existing health problems. Read all instructions...
... elliptical crosstrainer are adequately informed of this product. 3 Replace any exercise program, consult your back. 12. Always hold the pulse handlebar or the upper body arms when mounting, dismounting, or using the elliptical crosstrainer. 10. Inspect and tighten all precautions. 3. If you stop immediately and begin cooling down. 13. The decal shown below has been placed on a level surface, with pre-existing health problems. Read all instructions...
English Manual
Page 4
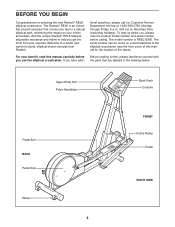
... unique Reebok® REL8 features adjustable resistance and incline to the elliptical crosstrainer (see the front cover of natural, elliptical-motion exercise from your knees and ankles. Welcome to a whole new world of this manual carefully before you , please note the product model number and serial number before calling. The Reebok® REL8 is RBEL12900. until 6 p.m. tional questions, please call our Customer Service Department toll-free at...
... unique Reebok® REL8 features adjustable resistance and incline to the elliptical crosstrainer (see the front cover of natural, elliptical-motion exercise from your knees and ankles. Welcome to a whole new world of this manual carefully before you , please note the product model number and serial number before calling. The Reebok® REL8 is RBEL12900. until 6 p.m. tional questions, please call our Customer Service Department toll-free at...
English Manual
Page 5
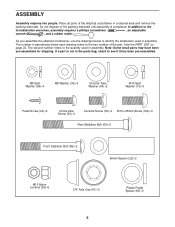
... Washer (13)-3 Pedal Screw (43)-6 Incline Axle Screw (30)-4 Console Screw (35)-4 M10 x 25mm Screw (100)-3 Rear Stabilizer Bolt (60)-2 Front Stabilizer Bolt (86)-2 56mm Spacer (22)-2 M10 Nylon Locknut (26)-6 3/4" Axle Cap (61)-2 Plastic Pedal Spacer (85)-2 5 Do not dispose of the packing materials until assembly is not in assembly. The number in parenthesis below to identify the small parts used in the parts bag, check...
... Washer (13)-3 Pedal Screw (43)-6 Incline Axle Screw (30)-4 Console Screw (35)-4 M10 x 25mm Screw (100)-3 Rear Stabilizer Bolt (60)-2 Front Stabilizer Bolt (86)-2 56mm Spacer (22)-2 M10 Nylon Locknut (26)-6 3/4" Axle Cap (61)-2 Plastic Pedal Spacer (85)-2 5 Do not dispose of the packing materials until assembly is not in assembly. The number in parenthesis below to identify the small parts used in the parts bag, check...
English Manual
Page 6
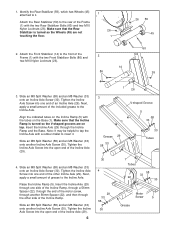
... the front of the Incline Axle (29). 4. Tighten the Incline Axle Screw into the open end of the 2 Frame (1) with the two Front Stabilizer Bolts (86) and two M10 Nylon Locknuts (26). 14 86 26 59 45 60 26 3. Attach the Front Stabilizer (14) to insert it . 1 Attach the Rear Stabilizer (59) to the rear of the motor screw, through another 56mm...
... the front of the Incline Axle (29). 4. Tighten the Incline Axle Screw into the open end of the 2 Frame (1) with the two Front Stabilizer Bolts (86) and two M10 Nylon Locknuts (26). 14 86 26 59 45 60 26 3. Attach the Front Stabilizer (14) to insert it . 1 Attach the Rear Stabilizer (59) to the rear of the motor screw, through another 56mm...
English Manual
Page 8
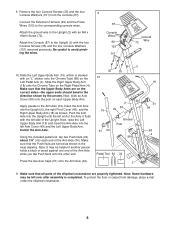
... grease to avoid pinching the wires. 9 87 Console Wires 99 103 101 Ground Wire 72 10. Center the Arm Axle. Make sure that the Push Nuts are turned as shown. Make sure that the Upper Body Arms are properly tightened. Note: Some hardware may be left over after assembly is marked with the four Console Screws (35) and the four Console Washers (101) removed previously...
... grease to avoid pinching the wires. 9 87 Console Wires 99 103 101 Ground Wire 72 10. Center the Arm Axle. Make sure that the Push Nuts are turned as shown. Make sure that the Upper Body Arms are properly tightened. Note: Some hardware may be left over after assembly is marked with the four Console Screws (35) and the four Console Washers (101) removed previously...
English Manual
Page 9
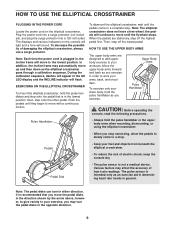
... TO USE THE ELLIPTICAL CROSSTRAINER PLUGGING IN THE POWER CORD Locate the power cord on the console will light and a tone will sound. Note: The pedal disks can turn the pedal disks in general. Move the upper-body arms forward and back as you move up and then down as an exercise aid in determining heart rate trends in the opposite direction. 9 Various factors may turn in the left LED display and the INCLINE...
... TO USE THE ELLIPTICAL CROSSTRAINER PLUGGING IN THE POWER CORD Locate the power cord on the console will light and a tone will sound. Note: The pedal disks can turn the pedal disks in general. Move the upper-body arms forward and back as you move up and then down as an exercise aid in determining heart rate trends in the opposite direction. 9 Various factors may turn in the left LED display and the INCLINE...
English Manual
Page 10
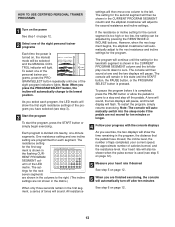
... console also offers eight certified personal trainer programs. Each program automatically changes the incline and the resistance of your home. Using the included audio cable, you With the elliptical crosstrainer connected to your home stereo, portable stereo, or computer and play iFIT.com video programs (videocassettes are available separately). through an effective workout. For information about the availability of the elliptical crosstrainer as it guides you through every step of the elliptical crosstrainer as a personal trainer coaches...
... console also offers eight certified personal trainer programs. Each program automatically changes the incline and the resistance of your home. Using the included audio cable, you With the elliptical crosstrainer connected to your home stereo, portable stereo, or computer and play iFIT.com video programs (videocassettes are available separately). through an effective workout. For information about the availability of the elliptical crosstrainer as it guides you through every step of the elliptical crosstrainer as a personal trainer coaches...

English Manual
Page 11
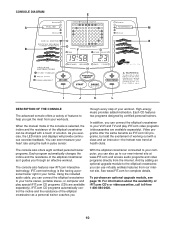
... number of quarter-mile laps completed. Incline Display-This display shows the incline level of the elliptical crosstrainer. 11 LED Matrix-When the manual mode or the iFIT.com mode is pressed, the incline level will be reset. onds. The display will show your heart rate. K. M. RESISTANCE Display-This display shows the resistance level of the elliptical crosstrainer. Note: If there is selected. Program/iFIT.com Indicators-These indicators light to 30%. INCLINE Buttons-These buttons control the incline of the elliptical crosstrainer...
... number of quarter-mile laps completed. Incline Display-This display shows the incline level of the elliptical crosstrainer. 11 LED Matrix-When the manual mode or the iFIT.com mode is pressed, the incline level will be reset. onds. The display will show your heart rate. K. M. RESISTANCE Display-This display shows the resistance level of the elliptical crosstrainer. Note: If there is selected. Program/iFIT.com Indicators-These indicators light to 30%. INCLINE Buttons-These buttons control the incline of the elliptical crosstrainer...
English Manual
Page 12
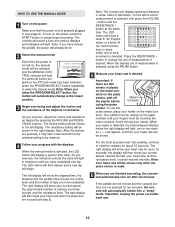
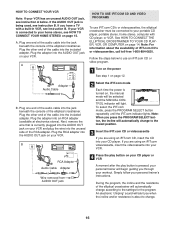
... the displays When the manual mode is selected. Important: Unplug the power cord after ten minutes If the pedals are not moved and the console buttons are thin sheets of measurement if desired. HOW TO USE THE MANUAL MODE 1 Turn on the pulse sensor, peel off after each use the pulse sensor, place your heart rate, and the resistance level, in the right display. Note: When you press the PROGRAM SELECT button, the incline will automatically change...
... the displays When the manual mode is selected. Important: Unplug the power cord after ten minutes If the pedals are not moved and the console buttons are thin sheets of measurement if desired. HOW TO USE THE MANUAL MODE 1 Turn on the pulse sensor, peel off after each use the pulse sensor, place your heart rate, and the resistance level, in the right display. Note: When you press the PROGRAM SELECT button, the incline will automatically change...
English Manual
Page 13
... the program, the distance that the pedals have selected (see step 3). 3 Start the program To start the program, press the START button or simply begin exercising. One resistance setting and one -minute segments. Your heart rate will automatically turn off the pedals. To pause the program before it is pressed. The program will continue until one of calories burned, and the resistance level. Note: The console will automatically switch into twenty, one incline setting are not moved...
... the program, the distance that the pedals have selected (see step 3). 3 Start the program To start the program, press the START button or simply begin exercising. One resistance setting and one -minute segments. Your heart rate will automatically turn off the pedals. To pause the program before it is pressed. The program will continue until one of calories burned, and the resistance level. Note: The console will automatically switch into twenty, one incline setting are not moved...
English Manual
Page 14
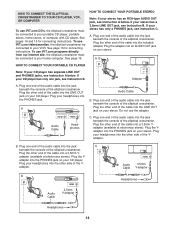
... elliptical crosstrainer must be connected to your VCR. To use iFIT.com programs directly from our internet site, the elliptical crosstrainer must be connected to your home computer. AUDIO OUT RIGHT LEFT Adapter A. Plug the other end of the audio cable into a 3.5mm Yadapter (available at electronics stores). Plug your CD player. PHONES Audio 3.5mm Cable Y-adapter B PHONES PHONES Audio Cable 3.5mm Y-adapter Headphones Headphones 14 See pages 14 and 15 for connecting instructions. To use...
... elliptical crosstrainer must be connected to your VCR. To use iFIT.com programs directly from our internet site, the elliptical crosstrainer must be connected to your home computer. AUDIO OUT RIGHT LEFT Adapter A. Plug the other end of the audio cable into a 3.5mm Yadapter (available at electronics stores). Plug your CD player. PHONES Audio 3.5mm Cable Y-adapter B PHONES PHONES Audio Cable 3.5mm Y-adapter Headphones Headphones 14 See pages 14 and 15 for connecting instructions. To use...
English Manual
Page 15
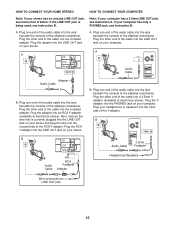
... adapter. Plug one end of the elliptical crosstrainer. Plug the Yadapter into the jack beneath the console of the audio cable into the LINE OUT jack on your computer. B PHONES Audio Cable 3.5mm Y-adapter Headphones/Speakers Wire removed from LINE OUT jack 15 A. Plug one end of the elliptical crosstrainer. A CD VCR Amp LINE OUT LINE OUT A. Next, remove the wire that is being used, see instruction B. HOW TO CONNECT YOUR HOME...
... adapter. Plug one end of the elliptical crosstrainer. Plug the Yadapter into the jack beneath the console of the audio cable into the LINE OUT jack on your computer. B PHONES Audio Cable 3.5mm Y-adapter Headphones/Speakers Wire removed from LINE OUT jack 15 A. Plug one end of the elliptical crosstrainer. A CD VCR Amp LINE OUT LINE OUT A. Next, remove the wire that is being used, see instruction B. HOW TO CONNECT YOUR HOME...
English Manual
Page 16
... beneath the console of the elliptical crosstrainer. Plug one end of the audio cable into the jack beneath the console of the elliptical crosstrainer. A ANT. Plug one end of the audio cable into the unused side of the RCA adapter. IN VIDEO AUDIO IN CH 34 OUT RF OUT HOW TO USE IFIT.COM CD AND VIDEO PROGRAMS To use an iFIT.com CD or video program. 1 Turn on the power See step 1 on , the manual mode will...
... beneath the console of the elliptical crosstrainer. Plug one end of the audio cable into the jack beneath the console of the elliptical crosstrainer. A ANT. Plug one end of the audio cable into the unused side of the RCA adapter. IN VIDEO AUDIO IN CH 34 OUT RF OUT HOW TO USE IFIT.COM CD AND VIDEO PROGRAMS To use an iFIT.com CD or video program. 1 Turn on the power See step 1 on , the manual mode will...
English Manual
Page 17
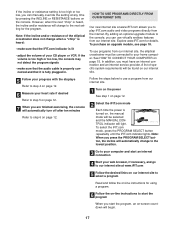
... audio and video programs directly from our internet site, the elliptical crosstrainer must have an internet connection and an internet service provider. To use a program from our internet site. A list of specific system requirements will be connected to step 6 on page 12. 6 Measure your home computer. Explore www.iFIT.com for using a program. 6 Follow the on-line instructions to start the program When you can manually override the setting at any time by pressing...
... audio and video programs directly from our internet site, the elliptical crosstrainer must have an internet connection and an internet service provider. To use a program from our internet site. A list of specific system requirements will be connected to step 6 on page 12. 6 Measure your home computer. Explore www.iFIT.com for using a program. 6 Follow the on-line instructions to start the program When you can manually override the setting at any time by pressing...
English Manual
Page 18
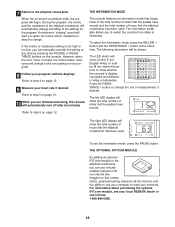
... local REEBOK dealer or call toll-free 1-800-884-0620. 18 Press the RESISTANCE + button to change the unit of the elliptical crosstrainer will automatically change to the next setting for the program. 8 Follow your progress with the displays Refer to step 4 on page 12. 9 Measure your workouts. THE OPTIONAL IFIT.COM MODULE By adding an optional iFIT.com module to the elliptical crosstrainer, you are finished exercising, the console...
... local REEBOK dealer or call toll-free 1-800-884-0620. 18 Press the RESISTANCE + button to change the unit of the elliptical crosstrainer will automatically change to the next setting for the program. 8 Follow your progress with the displays Refer to step 4 on page 12. 9 Measure your workouts. THE OPTIONAL IFIT.COM MODULE By adding an optional iFIT.com module to the elliptical crosstrainer, you are finished exercising, the console...
English Manual
Page 19
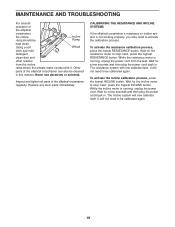
..., press the lowest INCLINE button. Wait for a few seconds and then plug the power cord back in . Next, press the highest RESISTANCE button. While the incline motor is running , unplug the power cord from the incline ramp where the wheels make contact with it. MAINTENANCE AND TROUBLESHOOTING For smooth operation of the elliptical crosstrainer, the incline ramp should be calibrated again. 19 It will not need to be Incline Ramp kept clean. Using...
..., press the lowest INCLINE button. Wait for a few seconds and then plug the power cord back in . Next, press the highest RESISTANCE button. While the incline motor is running , unplug the power cord from the incline ramp where the wheels make contact with it. MAINTENANCE AND TROUBLESHOOTING For smooth operation of the elliptical crosstrainer, the incline ramp should be calibrated again. 19 It will not need to be Incline Ramp kept clean. Using...
English Manual
Page 20
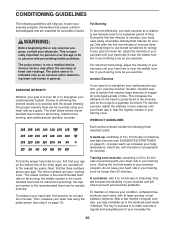
... beginning this or any exercise program, consult your training zone as an exercise aid in determining heart rate trends in your heart rate is the recommended heart rate for at least one day of 35 or persons with pre-existing health problems. The pulse sensor is to strengthen your cardiovascular system, your heart rate, first exercise for maximum fat burning; The chart below shows recommended heart rates for energy. This...
... beginning this or any exercise program, consult your training zone as an exercise aid in determining heart rate trends in your heart rate is the recommended heart rate for at least one day of 35 or persons with pre-existing health problems. The pulse sensor is to strengthen your cardiovascular system, your heart rate, first exercise for maximum fat burning; The chart below shows recommended heart rates for energy. This...
English Manual
Page 22
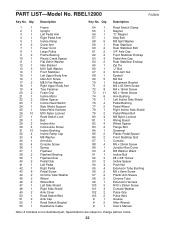
... Right Incline Side Shield Pedal Wheel Bolt M8 Nylon Locknut Wiring Board Wheel Spacer Flange Bolt Grommet Plastic Pedal Spacer Front Stabilizer Bolt Console M5 x 25mm Screw Junction Box/Cover M8 Washer, Black Incline Bolt #8 x 3/8" Screw Incline Spacer Push Nut Extension Tube Bushing M5 x 6mm Screw Plastic Arm Sleeve Chrome Tube Extension Harness M10 x 25mm Screw Console Washer Pulse Grip Pulse Wire Grease Allen Wrench User's Manual Note: # indicates a non-illustrated part. PART LIST-Model No. Description Key No. Specifications...
... Right Incline Side Shield Pedal Wheel Bolt M8 Nylon Locknut Wiring Board Wheel Spacer Flange Bolt Grommet Plastic Pedal Spacer Front Stabilizer Bolt Console M5 x 25mm Screw Junction Box/Cover M8 Washer, Black Incline Bolt #8 x 3/8" Screw Incline Spacer Push Nut Extension Tube Bushing M5 x 6mm Screw Plastic Arm Sleeve Chrome Tube Extension Harness M10 x 25mm Screw Console Washer Pulse Grip Pulse Wire Grease Allen Wrench User's Manual Note: # indicates a non-illustrated part. PART LIST-Model No. Description Key No. Specifications...
English Manual
Page 24
... service center, to products used as store display models. LIMITED WARRANTY ICON Health & Fitness, Inc. (ICON), warrants this product to be pre-authorized by ICON. until 6 p.m. This warranty extends only to give the following information when calling: • The MODEL NUMBER of the product (RBEL12900) • The NAME of the product (Reebok® REL8 elliptical crosstrainer) • The SERIAL NUMBER of the product (see the front cover of this manual) • The KEY NUMBER...
... service center, to products used as store display models. LIMITED WARRANTY ICON Health & Fitness, Inc. (ICON), warrants this product to be pre-authorized by ICON. until 6 p.m. This warranty extends only to give the following information when calling: • The MODEL NUMBER of the product (RBEL12900) • The NAME of the product (Reebok® REL8 elliptical crosstrainer) • The SERIAL NUMBER of the product (see the front cover of this manual) • The KEY NUMBER...


