
Uk Manual
Page 1
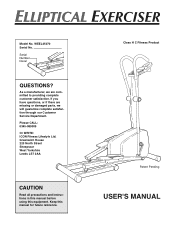
... Service Department. Keep this equipment. Please CALL: 0345-089009 Or WRITE: ICON Fitness Lifestyle Ltd. Model No. Serial Number Decal QUESTIONS? WEEL45070 Serial No. If you have questions, or if there are committed to providing complete customer satisfaction. Greenwich House 223 North Street Sheepscar West Yorkshire Leeds LS7 2AA CAUTION Read all precautions and instructions in this manual before using...
... Service Department. Keep this equipment. Please CALL: 0345-089009 Or WRITE: ICON Fitness Lifestyle Ltd. Model No. Serial Number Decal QUESTIONS? WEEL45070 Serial No. If you have questions, or if there are committed to providing complete customer satisfaction. Greenwich House 223 North Street Sheepscar West Yorkshire Leeds LS7 2AA CAUTION Read all precautions and instructions in this manual before using...
Uk Manual
Page 2
TABLE OF CONTENTS IMPORTANT PRECAUTIONS 3 BEFORE YOU BEGIN 4 PART IDENTIFICATION CHART 5 ASSEMBLY 6 MAINTENANCE 8 HOW TO USE THE ELLIPTICAL EXERCISER 10 CONDITIONING GUIDELINES 12 PART LIST 14 EXPLODED DRAWING 15 HOW TO ORDER REPLACEMENT PARTS Back Cover 2
TABLE OF CONTENTS IMPORTANT PRECAUTIONS 3 BEFORE YOU BEGIN 4 PART IDENTIFICATION CHART 5 ASSEMBLY 6 MAINTENANCE 8 HOW TO USE THE ELLIPTICAL EXERCISER 10 CONDITIONING GUIDELINES 12 PART LIST 14 EXPLODED DRAWING 15 HOW TO ORDER REPLACEMENT PARTS Back Cover 2
Uk Manual
Page 3
... elliptical exerciser at any exercise program, consult your physician. Wear appropriate clothing when exercising on the elliptical exerciser. when dismounting, step off the highest pedal first. 9. Read all instructions before using the elliptical exerciser. Keep children under the age of serious injury, read the following important precautions before using . Always keep your back. 11. If you stop exercising on a level surface, with pre-existing health problems. Read all instructions...
... elliptical exerciser at any exercise program, consult your physician. Wear appropriate clothing when exercising on the elliptical exerciser. when dismounting, step off the highest pedal first. 9. Read all instructions before using the elliptical exerciser. Keep children under the age of serious injury, read the following important precautions before using . Always keep your back. 11. If you stop exercising on a level surface, with pre-existing health problems. Read all instructions...
Uk Manual
Page 4
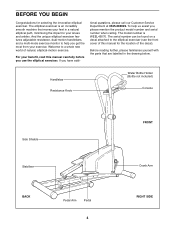
... adjustable resistance, dual-motion handlebars, and a multi-mode exercise monitor to your feet in the drawing below. Welcome to the elliptical exerciser (see the front cover of this manual carefully before you have addi- The serial number can be found on a decal attached to a whole new world of the decal). Handlebar Resistance Knob Water Bottle Holder (Bottle not included) Console Side Shields Stabiliser BACK Pedal Arm Pedal 4 FRONT Crank Arm...
... adjustable resistance, dual-motion handlebars, and a multi-mode exercise monitor to your feet in the drawing below. Welcome to the elliptical exerciser (see the front cover of this manual carefully before you have addi- The serial number can be found on a decal attached to a whole new world of the decal). Handlebar Resistance Knob Water Bottle Holder (Bottle not included) Console Side Shields Stabiliser BACK Pedal Arm Pedal 4 FRONT Crank Arm...
Uk Manual
Page 5
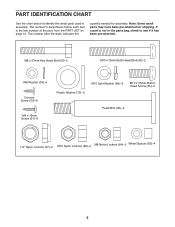
... assembly. If a part is the key number of the part, from the PART LIST on page 14. The number in parenthesis below to identify the small parts used in the parts bag, check to see if it has been pre-attached. The number after the dash indicates the quantity needed for shipping. M8 x 57mm Hex Head Bolt (63)-2 M10 x 75mm Button Head Bolt (45)-2 M8 Washer (39)-4 Console Screw...
... assembly. If a part is the key number of the part, from the PART LIST on page 14. The number in parenthesis below to identify the small parts used in the parts bag, check to see if it has been pre-attached. The number after the dash indicates the quantity needed for shipping. M8 x 57mm Hex Head Bolt (63)-2 M10 x 75mm Button Head Bolt (45)-2 M8 Washer (39)-4 Console Screw...
Uk Manual
Page 6
... two "AA" batteries (not included). Do not dispose of the batteries (marked "-") are touching the springs in a cleared area and remove the packing materials. ASSEMBLY Place all parts of the elliptical exerciser in the battery clip. 13 13 Battery Clip Batteries 6 Connect the Reed Switch Wire (3) to pinch the Reed Switch Wire (3), the Extension Wire (15), or the Resistance Cable (17). Tighten two M10 Nylon Locknuts (46) onto the Button Head Bolts. 46...
... two "AA" batteries (not included). Do not dispose of the batteries (marked "-") are touching the springs in a cleared area and remove the packing materials. ASSEMBLY Place all parts of the elliptical exerciser in the battery clip. 13 13 Battery Clip Batteries 6 Connect the Reed Switch Wire (3) to pinch the Reed Switch Wire (3), the Extension Wire (15), or the Resistance Cable (17). Tighten two M10 Nylon Locknuts (46) onto the Button Head Bolts. 46...

Uk Manual
Page 7
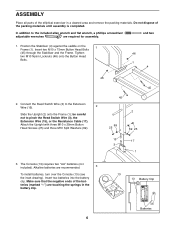
.... Attach the Console with three M4 x 16mm Screws (51). Press the Pedal Resistance Knob (16) firmly onto the Resistance Control (17). 4 Hole 17 13 13 17 15 2 5. Locate the Left Handlebar (10); Make sure that it does not block the indicated hole. Next, slide a Wheel Spacer (62), the Wheel (60), and another Wheel Spacer (62) onto the Bolt. Plug the Extension Wire into...
.... Attach the Console with three M4 x 16mm Screws (51). Press the Pedal Resistance Knob (16) firmly onto the Resistance Control (17). 4 Hole 17 13 13 17 15 2 5. Locate the Left Handlebar (10); Make sure that it does not block the indicated hole. Next, slide a Wheel Spacer (62), the Wheel (60), and another Wheel Spacer (62) onto the Bolt. Plug the Extension Wire into...

Uk Manual
Page 8
... Upright into the left Crank Arm (38) and tighten a 1/2" Nylon Locknut (37) onto the Pedal Bolt. IMPORTANT: Never use abrasives or solvents to one of direct sunlight. 8 Next, slide a Plastic Washer (73) onto a Pedal Bolt (36). Other components of the elliptical exerciser are properly tightened. Make sure that may build up where the Wheels (60) move on the Stabiliser. MAINTENANCE Inspect and tighten all parts of the elliptical exerciser...
... Upright into the left Crank Arm (38) and tighten a 1/2" Nylon Locknut (37) onto the Pedal Bolt. IMPORTANT: Never use abrasives or solvents to one of direct sunlight. 8 Next, slide a Plastic Washer (73) onto a Pedal Bolt (36). Other components of the elliptical exerciser are properly tightened. Make sure that may build up where the Wheels (60) move on the Stabiliser. MAINTENANCE Inspect and tighten all parts of the elliptical exerciser...
Uk Manual
Page 9
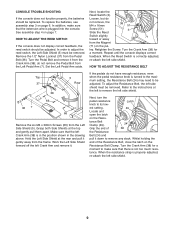
.... To replace the batteries, see assembly step 3 on the Resis- Turn the Crank Arm (38) for a moment to the instructions at the top and gently pull them apart. HOW TO ADJUST THE RESISTANCE BELT Top 37 36 7 66 38 66 5 Rear 66 Remove the six M4 x 38mm Screws (66) from the Pedal Bolt (36). tance. est setting. 49 Locate and open the latch on page 6. When the resistance strap is plugged into the console...
.... To replace the batteries, see assembly step 3 on the Resis- Turn the Crank Arm (38) for a moment to the instructions at the top and gently pull them apart. HOW TO ADJUST THE RESISTANCE BELT Top 37 36 7 66 38 66 5 Rear 66 Remove the six M4 x 38mm Screws (66) from the Pedal Bolt (36). tance. est setting. 49 Locate and open the latch on page 6. When the resistance strap is plugged into the console...
Uk Manual
Page 10
... miles. HOW TO USE THE ELLIPTICAL EXERCISER HOW TO EXERCISE ON THE ELLIPTICAL EXERCISER To mount the elliptical exerciser, hold the handlebars and step onto the pedal that you turn the crank in the direction shown below . Push the pedals until the flywheel stops. To increase the Resistance Knob resistance, turn on the power, press the on page 6). Follow the steps below to move with the resistance knob mounted on page 11). Note: If batteries were just installed...
... miles. HOW TO USE THE ELLIPTICAL EXERCISER HOW TO EXERCISE ON THE ELLIPTICAL EXERCISER To mount the elliptical exerciser, hold the handlebars and step onto the pedal that you turn the crank in the direction shown below . Push the pedals until the flywheel stops. To increase the Resistance Knob resistance, turn on the power, press the on page 6). Follow the steps below to move with the resistance knob mounted on page 11). Note: If batteries were just installed...

Uk Manual
Page 11
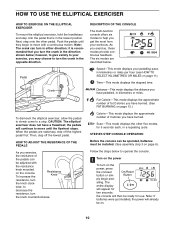
... drawing below or above the desired mode sym- If the pedals are not turned and the buttons are not pressed for six minutes, the power will display the speed, time, distance, and calorie modes, for about six minutes. Re-attach the console with the six screws; Switch If desired, press the on/reset button to change the unit of the wires. Repeatedly press the Mode Button mode button until an arrow appears below ). When...
... drawing below or above the desired mode sym- If the pedals are not turned and the buttons are not pressed for six minutes, the power will display the speed, time, distance, and calorie modes, for about six minutes. Re-attach the console with the six screws; Switch If desired, press the on/reset button to change the unit of the wires. Repeatedly press the Mode Button mode button until an arrow appears below ). When...
Uk Manual
Page 12
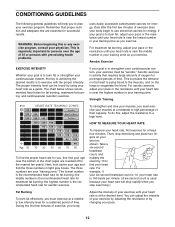
... "aerobic." Only after the first few minutes of exercise, your body Adjust the intensity of time. For aerobic exercise, adjust your pace or the resistance until your heart rate. Next, look above your age and find your heart rate is to exercise with pre-existing health problems. uses easily accessible carbohydrate calories for maximum fat burning; Then, stop exercising.) Fat Burning To burn fat effectively, you...
... "aerobic." Only after the first few minutes of exercise, your body Adjust the intensity of time. For aerobic exercise, adjust your pace or the resistance until your heart rate. Next, look above your age and find your heart rate is to exercise with pre-existing health problems. uses easily accessible carbohydrate calories for maximum fat burning; Then, stop exercising.) Fat Burning To burn fat effectively, you...
Uk Manual
Page 13
..., then relax. Move slowly as possible. Allow your extended leg. Repeat 3 times for increased flexibility is make exercise a regular and enjoyable part of exercising with slow, controlled stretches, and progress to more rhythmic stretches to 30 minutes of your training zone. Stretches: Quadriceps and hip muscles. 1 2 4 13 Training zone exercise, consisting of 20 to increase the body temperature, heart rate, and circulation...
..., then relax. Move slowly as possible. Allow your extended leg. Repeat 3 times for increased flexibility is make exercise a regular and enjoyable part of exercising with slow, controlled stretches, and progress to more rhythmic stretches to 30 minutes of your training zone. Stretches: Quadriceps and hip muscles. 1 2 4 13 Training zone exercise, consisting of 20 to increase the body temperature, heart rate, and circulation...
Uk Manual
Page 14
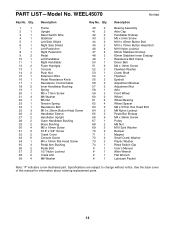
... Side Shield Left Pedal Arm Right Pedal Arm Pedal Left Handlebar Right Handlebar Foam Handgrip Console Push Nut Extension Wire Pedal Resistance Knob Resistance Control/Cable Inner Handlebar Bushing Spring M5 x 11mm Screw M6 Washer M5 Nut Tension Spring Resistance Belt M10 x 25mm Button Head Screw Handlebar Sleeve Handlebar Upright Outer Handlebar Bushing Brass Bushing M5 x 16mm Screw 5/16" x 3/4" Screw Crank Cover Console Screw M4 x 16mm Flat Head Screw Pedal Arm Bushing Pedal Bolt 1/2" Nylon Locknut Crank Arm M8 Washer Key No. PART LIST-Model No.
... Side Shield Left Pedal Arm Right Pedal Arm Pedal Left Handlebar Right Handlebar Foam Handgrip Console Push Nut Extension Wire Pedal Resistance Knob Resistance Control/Cable Inner Handlebar Bushing Spring M5 x 11mm Screw M6 Washer M5 Nut Tension Spring Resistance Belt M10 x 25mm Button Head Screw Handlebar Sleeve Handlebar Upright Outer Handlebar Bushing Brass Bushing M5 x 16mm Screw 5/16" x 3/4" Screw Crank Cover Console Screw M4 x 16mm Flat Head Screw Pedal Arm Bushing Pedal Bolt 1/2" Nylon Locknut Crank Arm M8 Washer Key No. PART LIST-Model No.
Uk Manual
Page 15
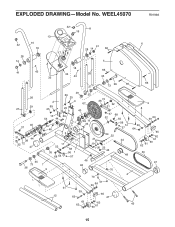
WEEL45070 R0199A 42 11 16 13 10 42 6 41 18 30 28 14 66 17 28 14 5 18 41 43 66 33 26 33 43 35 27 73 36 66 66 26 29 27 40 37 31 44 38 32 72 47 35 73 36 2 69 25 15 53 44 59 46 29 69 25 3 35 67 25 40 69 74 49 71 34 47 72 38 32 31 37 52 68 55 56 51 57 3 51 54 22 21 24 17 19 52 35 58 56 1 20 23 46 68 55 57 48 46 7 48 9 70 4 70 51 39 12 63 39 64 51 65 47 61 62 62 60 61 9 8 39 63 39 64 65 62 61 60 62 61 50 47 45 15 EXPLODED DRAWING-Model No.
WEEL45070 R0199A 42 11 16 13 10 42 6 41 18 30 28 14 66 17 28 14 5 18 41 43 66 33 26 33 43 35 27 73 36 66 66 26 29 27 40 37 31 44 38 32 72 47 35 73 36 2 69 25 15 53 44 59 46 29 69 25 3 35 67 25 40 69 74 49 71 34 47 72 38 32 31 37 52 68 55 56 51 57 3 51 54 22 21 24 17 19 52 35 58 56 1 20 23 46 68 55 57 48 46 7 48 9 70 4 70 51 39 12 63 39 64 51 65 47 61 62 62 60 61 9 8 39 63 39 64 65 62 61 60 62 61 50 47 45 15 EXPLODED DRAWING-Model No.
Uk Manual
Page 16
...; The MODEL NUMBER of the product (WEEL45070). • The NAME of the product (ELLIPTICAL EXERCISER). • The SERIAL NUMBER of the product (see the front cover of this manual). • The KEY NUMBER and DESCRIPTION of the part(s) (see the PART LIST on page 14 of this product, or if you need to order replacement parts, write or call the ICON Fitness Lifestyle Ltd. HOW TO ORDER REPLACEMENT PARTS If...
...; The MODEL NUMBER of the product (WEEL45070). • The NAME of the product (ELLIPTICAL EXERCISER). • The SERIAL NUMBER of the product (see the front cover of this manual). • The KEY NUMBER and DESCRIPTION of the part(s) (see the PART LIST on page 14 of this product, or if you need to order replacement parts, write or call the ICON Fitness Lifestyle Ltd. HOW TO ORDER REPLACEMENT PARTS If...


