
English Manual
Page 1
... you . Keep this equipment. Model No. MST CAUTION Read all precautions and instructions in this manual before using this manual for future reference. The trained technicians on our customer hot line will guarantee complete satisfaction through direct assistance from our factory. RBEX33180 Serial No. TO AVOID UNNECESSARY DELAYS, PLEASE CALL DIRECT TO OUR TOLL-FREE CUSTOMER HOT LINE. As a manufacturer...
... you . Keep this equipment. Model No. MST CAUTION Read all precautions and instructions in this manual before using this manual for future reference. The trained technicians on our customer hot line will guarantee complete satisfaction through direct assistance from our factory. RBEX33180 Serial No. TO AVOID UNNECESSARY DELAYS, PLEASE CALL DIRECT TO OUR TOLL-FREE CUSTOMER HOT LINE. As a manufacturer...

English Manual
Page 2
... OPERATE THE EXERCISE CYCLE 8 MAINTENANCE AND TROUBLE-SHOOTING 12 EXERCISE GUIDELINES 13 PART LIST 14 EXPLODED DRAWING 15 HOW TO ORDER REPLACEMENT PARTS Back Cover LIMITED WARRANTY Back Cover IMPORTANT PRECAUTIONS WARNING: To reduce the risk of serious injury, read the following important precautions before using the CYC6. 2. Keep hands and feet away from moisture and dust. Keep the CYC6 away from moving parts and...
... OPERATE THE EXERCISE CYCLE 8 MAINTENANCE AND TROUBLE-SHOOTING 12 EXERCISE GUIDELINES 13 PART LIST 14 EXPLODED DRAWING 15 HOW TO ORDER REPLACEMENT PARTS Back Cover LIMITED WARRANTY Back Cover IMPORTANT PRECAUTIONS WARNING: To reduce the risk of serious injury, read the following important precautions before using the CYC6. 2. Keep hands and feet away from moisture and dust. Keep the CYC6 away from moving parts and...

English Manual
Page 3
... home. Backrest Seat Seat Knob Seat Handle BACK Water Bottle Holder (Bottle not included) Pulse Sensor Handlebar Book Holder Console Handlebar Post FRONT Side Shield Pedal Strap Roller Leveling Pad RIGHT SIDE Pedal 3 To help us assist you have additional questions, please call our Customer Service Department toll-free at 1-800-999-3756, Monday through Friday, 6 a.m. Before reading further, please familiarize yourself with the parts...
... home. Backrest Seat Seat Knob Seat Handle BACK Water Bottle Holder (Bottle not included) Pulse Sensor Handlebar Book Holder Console Handlebar Post FRONT Side Shield Pedal Strap Roller Leveling Pad RIGHT SIDE Pedal 3 To help us assist you have additional questions, please call our Customer Service Department toll-free at 1-800-999-3756, Monday through Friday, 6 a.m. Before reading further, please familiarize yourself with the parts...

English Manual
Page 4
PART CHART Use the part drawings below each drawing refers to the key number of the part, from the PART LIST on page 14. The second number refers to the quantity used in the parts bag, check to identify the small parts used in a cleared area and remove the packing materials. The number in parenthesis below to see if it has been pre-assembled. If a part is completed. ASSEMBLY Assembly requires...
PART CHART Use the part drawings below each drawing refers to the key number of the part, from the PART LIST on page 14. The second number refers to the quantity used in the parts bag, check to identify the small parts used in a cleared area and remove the packing materials. The number in parenthesis below to see if it has been pre-assembled. If a part is completed. ASSEMBLY Assembly requires...
English Manual
Page 5
... (56). Attach the Rear Stabilizer (3) to the front of the Console. Attach the Handlebar Post to the Lower Wire Harness (87). The Console (9) requires two ÒAAÓ batteries (not included); Press two batteries into the Handlebar Post (6). Next, connect the Upper Wire Harness (16) to avoid pinching the Wire Harnesses (16, 87). 1. Make sure that the Front Stabilizer is turned so the Roller (75...
... (56). Attach the Rear Stabilizer (3) to the front of the Console. Attach the Handlebar Post to the Lower Wire Harness (87). The Console (9) requires two ÒAAÓ batteries (not included); Press two batteries into the Handlebar Post (6). Next, connect the Upper Wire Harness (16) to avoid pinching the Wire Harnesses (16, 87). 1. Make sure that the Front Stabilizer is turned so the Roller (75...

English Manual
Page 6
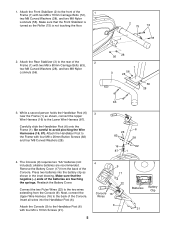
... Nylon Locknuts (56). Refer to the Seat Carriage (11) 6 with four M6 x 38mm Hex Screws (88) and four M8 Flat Washers (18). 11 18 29 14 18 27 13 8. Attach a Seat Handle (14) to the inset drawing. Pull the seat knob and slide the Seat Carriage (11) onto the Seat Rail (7). Press the Seat Rail Endcap (23) into the end...
... Nylon Locknuts (56). Refer to the Seat Carriage (11) 6 with four M6 x 38mm Hex Screws (88) and four M8 Flat Washers (18). 11 18 29 14 18 27 13 8. Attach a Seat Handle (14) to the inset drawing. Pull the seat knob and slide the Seat Carriage (11) onto the Seat Rail (7). Press the Seat Rail Endcap (23) into the end...

English Manual
Page 7
... Crank Arm (34). Adjust the Pedal Strap (38) on the Left Pedal in the Seat Carriage (11). 9. Firmly tighten the four 5/16Ó x 1Ó Button Screws (80) 9 in the same manner (not shown). 80 Knob 34 38 37 Tab 11. Pull the seat knob and slide the Seat Carriage (11) to the desired position. Make sure that all parts are tightened before you use the exercise cycle. Using an adjustable...
... Crank Arm (34). Adjust the Pedal Strap (38) on the Left Pedal in the Seat Carriage (11). 9. Firmly tighten the four 5/16Ó x 1Ó Button Screws (80) 9 in the same manner (not shown). 80 Knob 34 38 37 Tab 11. Pull the seat knob and slide the Seat Carriage (11) to the desired position. Make sure that all parts are tightened before you use the exercise cycle. Using an adjustable...

English Manual
Page 8
... you exercise, the console will display your pedaling speed, the number of the straps off the tabs on page 5. 8 Note: Before the console can even measure your heart rate using different holes in the straps. You can be operated, two ÒAAÓ batteries must be installed. The console also offers ten preset workout programs. Five programs automatically change the pedaling resistance as they guide you through effective workouts, and five programs automatically adjust the pedaling resistance...
... you exercise, the console will display your pedaling speed, the number of the straps off the tabs on page 5. 8 Note: Before the console can even measure your heart rate using different holes in the straps. You can be operated, two ÒAAÓ batteries must be installed. The console also offers ten preset workout programs. Five programs automatically change the pedaling resistance as they guide you through effective workouts, and five programs automatically adjust the pedaling resistance...

English Manual
Page 9
... reset the pulse sensor. HOW TO USE THE MANUAL PROGRAM 1 Turn on the power To turn off the power, simply wait for the selected resistance setting to be reached. 4 Follow your heart rate will flash; If the pedals are not moved and the console buttons are finished exercising, turn off the power To turn on the power, press any button on the console or simply begin to flash and your progress with the console display As you exercise, press the resistance...
... reset the pulse sensor. HOW TO USE THE MANUAL PROGRAM 1 Turn on the power To turn off the power, simply wait for the selected resistance setting to be reached. 4 Follow your heart rate will flash; If the pedals are not moved and the console buttons are finished exercising, turn off the power To turn on the power, press any button on the console or simply begin to flash and your progress with the console display As you exercise, press the resistance...

English Manual
Page 10
... the console or simply begin pedaling. Note: If the program is used (see step 4). 4 Measure your pedaling speed, the number of Calories you have pedaled. Next, press the resistance + or Ð button repeatedly to adjust the intensity level of the display. ually decrease during the first half of the display. The display will already be . Note: If batteries were just installed, the power will also show your heart rate when the pulse sensor...
... the console or simply begin pedaling. Note: If the program is used (see step 4). 4 Measure your pedaling speed, the number of Calories you have pedaled. Next, press the resistance + or Ð button repeatedly to adjust the intensity level of the display. ually decrease during the first half of the display. The display will already be . Note: If batteries were just installed, the power will also show your heart rate when the pulse sensor...

English Manual
Page 11
.... Distance goalÑPress the select button repeatedly to select the maximum or minimum heart rate mode. After ten seconds, the column will move to the right. In addition, the resistance of the pedals will change the goal by 0.5 miles or kilometers. gram will not function. If your heart rate is used, the resistance buttons will be reset. 11 SOR TROUBLE-SHOOTING on the pulse sensor. Note: When a heart rate program is not displayed...
.... Distance goalÑPress the select button repeatedly to select the maximum or minimum heart rate mode. After ten seconds, the column will move to the right. In addition, the resistance of the pedals will change the goal by 0.5 miles or kilometers. gram will not function. If your heart rate is used, the resistance buttons will be reset. 11 SOR TROUBLE-SHOOTING on the pulse sensor. Note: When a heart rate program is not displayed...

English Manual
Page 12
... until the exercise cycle is used, press the resistance Ð button to reset the pulse sensor. ¥ Do not hold the metal contacts for about 15 seconds. ¥ For optimal performance of the pulse sensor, keep the console out of the exercise cycle regularly. PULSE SENSOR TROUBLE-SHOOTING ¥ Avoid moving your heart rate is not shown when the pulse sensor is level. The contacts can be replaced. BATTERY REPLACEMENT If the console does...
... until the exercise cycle is used, press the resistance Ð button to reset the pulse sensor. ¥ Do not hold the metal contacts for about 15 seconds. ¥ For optimal performance of the pulse sensor, keep the console out of the exercise cycle regularly. PULSE SENSOR TROUBLE-SHOOTING ¥ Avoid moving your heart rate is not shown when the pulse sensor is level. The contacts can be replaced. BATTERY REPLACEMENT If the console does...

English Manual
Page 13
... of your exercise program, keep your heart rate in injury to 10 minutes of exercising with 5 to your exercise. Various factors may complete up , consisting of 35 or individuals with preexisting health problems. WARNING: The pulse sensor is important to exercise with the proper intensity. EXERCISE INTENSITY To maximize the benefits of your training zone in pulse sensor. You can be found by using your training zone...
... of your exercise program, keep your heart rate in injury to 10 minutes of exercising with 5 to your exercise. Various factors may complete up , consisting of 35 or individuals with preexisting health problems. WARNING: The pulse sensor is important to exercise with the proper intensity. EXERCISE INTENSITY To maximize the benefits of your training zone in pulse sensor. You can be found by using your training zone...

English Manual
Page 14
... Axle Generator Axle Long Belt Short Belt Control Board Pulse Handle Assembly M8 x 70mm Carriage Bolt Generator Bushing Reduction Pulley Roller Roller Axle M10 Black Nylon Locknut Armature Bolt Seat Carriage Bushing 5/16Ó x 1Ó Button Screw Magnet M8 x 20mm Button Screw Spacer Plate Bumper Screw Bumper Bumper Axle Lower Wire Harness M6 x 38mm Hex Screw UserÕs Manual Allen Wrench Note: Ò#Ó indicates a non-illustrated part. Qty. 33 1 34 2 35...
... Axle Generator Axle Long Belt Short Belt Control Board Pulse Handle Assembly M8 x 70mm Carriage Bolt Generator Bushing Reduction Pulley Roller Roller Axle M10 Black Nylon Locknut Armature Bolt Seat Carriage Bushing 5/16Ó x 1Ó Button Screw Magnet M8 x 20mm Button Screw Spacer Plate Bumper Screw Bumper Bumper Axle Lower Wire Harness M6 x 38mm Hex Screw UserÕs Manual Allen Wrench Note: Ò#Ó indicates a non-illustrated part. Qty. 33 1 34 2 35...

English Manual
Page 16
..., improper or abnormal usage or repairs not provided by ICON. To help us assist you specific legal rights. LIMITED WARRANTY ICON Health & Fitness, Inc. (ICON), warrants this product to give the following information: ¥ The MODEL NUMBER of the product (RBEX33180). ¥ The NAME of the product (REEBOK¨ CYC6 exercise cycle). ¥ The SERIAL NUMBER of the product (see the PART LIST on how long an implied...
..., improper or abnormal usage or repairs not provided by ICON. To help us assist you specific legal rights. LIMITED WARRANTY ICON Health & Fitness, Inc. (ICON), warrants this product to give the following information: ¥ The MODEL NUMBER of the product (RBEX33180). ¥ The NAME of the product (REEBOK¨ CYC6 exercise cycle). ¥ The SERIAL NUMBER of the product (see the PART LIST on how long an implied...


