
Uk Manual
Page 1
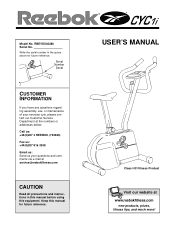
... assembly, use, or maintenance of your exercise cyle, please contact our Customer Service Department at the numbers or addresses below: Call us: +44(0)207 4 REEBOK (733265) Fax us: +44(0)207 816 3308 Email us: Send us your questions and comments via e-mail at www.reebokfitness.com new products, prizes, fitness tips, and much more! Write the serial number in this manual...
... assembly, use, or maintenance of your exercise cyle, please contact our Customer Service Department at the numbers or addresses below: Call us: +44(0)207 4 REEBOK (733265) Fax us: +44(0)207 816 3308 Email us: Send us your questions and comments via e-mail at www.reebokfitness.com new products, prizes, fitness tips, and much more! Write the serial number in this manual...
Uk Manual
Page 2
... the serial number of your continued satisfaction. TABLE OF CONTENTS IMPORTANT PRECAUTIONS 3 BEFORE YOU BEGIN 4 PART IDENTIFICATION CHART 5 ASSEMBLY 6 HOW TO OPERATE THE EXERCISE CYCLE 8 EXERCISE GUIDELINES 10 MAINTENANCE AND TROUBLE-SHOOTING 12 PART LIST 14 EXPLODED DRAWING 15 HOW TO ORDER REPLACEMENT PARTS Back Cover LIMITED WARRANTY WHAT IS COVERED-The entire REEBOK® CYC1i Exercise Cycle ("Product") is warranted to change, modify or extend the terms of this limited warranty. Before...
... the serial number of your continued satisfaction. TABLE OF CONTENTS IMPORTANT PRECAUTIONS 3 BEFORE YOU BEGIN 4 PART IDENTIFICATION CHART 5 ASSEMBLY 6 HOW TO OPERATE THE EXERCISE CYCLE 8 EXERCISE GUIDELINES 10 MAINTENANCE AND TROUBLE-SHOOTING 12 PART LIST 14 EXPLODED DRAWING 15 HOW TO ORDER REPLACEMENT PARTS Back Cover LIMITED WARRANTY WHAT IS COVERED-The entire REEBOK® CYC1i Exercise Cycle ("Product") is warranted to change, modify or extend the terms of this limited warranty. Before...
Uk Manual
Page 3
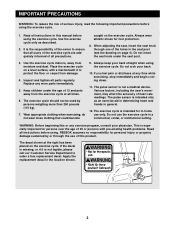
... heart rate readings. Keep children under the seat post. 3. If the decal is missing, or if it is intended for persons over the age of 35 or persons with a mat beneath it to order a free replacement decal. Use the exercise cycle indoors, away from damage. 4. Inspect and tighten all instructions before using the exercise cycle. 1. Always keep your back. 10. The pulse sensor...
... heart rate readings. Keep children under the seat post. 3. If the decal is missing, or if it is intended for persons over the age of 35 or persons with a mat beneath it to order a free replacement decal. Use the exercise cycle indoors, away from damage. 4. Inspect and tighten all instructions before using the exercise cycle. 1. Always keep your back. 10. The pulse sensor...
Uk Manual
Page 4
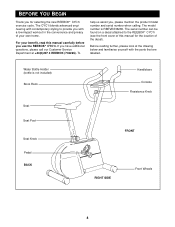
... the REEBOK® CYC1i (see the front cover of this manual carefully before you with the parts that are labelled. The model number is not included) Book Rack Seat Seat Post Seat Knob Pedal BACK Handlebars Console Resistance Knob FRONT RIGHT SIDE Front Wheels 4 For your benefit, read this manual for selecting the new REEBOK® CYC1i exercise cycle. If you , please mention the product model number and serial number when calling. The serial number...
... the REEBOK® CYC1i (see the front cover of this manual carefully before you with the parts that are labelled. The model number is not included) Book Rack Seat Seat Post Seat Knob Pedal BACK Handlebars Console Resistance Knob FRONT RIGHT SIDE Front Wheels 4 For your benefit, read this manual for selecting the new REEBOK® CYC1i exercise cycle. If you , please mention the product model number and serial number when calling. The serial number...

Uk Manual
Page 5
...)-5 M10 x 25mm Button Screw (8)-5 M10 x 70mm Carraige Bolt (30)-4 5 The second number refers to the quantity used in assembly. PART IDENTIFICATION CHART Use the chart below each part refers to the key number of the part. If a part is not found in parenthesis below for shipping purposes. Note: Some parts may have been preattached for help identifying the small parts used in assembly. The number in the parts bag, check to...
...)-5 M10 x 25mm Button Screw (8)-5 M10 x 70mm Carraige Bolt (30)-4 5 The second number refers to the quantity used in assembly. PART IDENTIFICATION CHART Use the chart below each part refers to the key number of the part. If a part is not found in parenthesis below for shipping purposes. Note: Some parts may have been preattached for help identifying the small parts used in assembly. The number in the parts bag, check to...
Uk Manual
Page 6
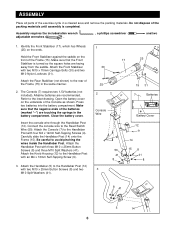
...) onto the Frame (15). Attach the Handlebar (5) to the Handlebar Post with three M10 x 25mm Button Screws (8) and three M10 Split Washers (41). Close the battery cover. Connect the console wire to the rear of the Frame (15) in the same manner. 2. Press two batteries into the battery compartment. Do not dispose of the packing materials until assembly is turned so the square holes...
...) onto the Frame (15). Attach the Handlebar (5) to the Handlebar Post with three M10 x 25mm Button Screws (8) and three M10 Split Washers (41). Close the battery cover. Connect the console wire to the rear of the Frame (15) in the same manner. 2. Press two batteries into the battery compartment. Do not dispose of the packing materials until assembly is turned so the square holes...

Uk Manual
Page 7
... Seat Post; Using an adjustable 6 wrench, tighten the Left Pedal counterclockwise into the Frame. Next, tighten the two 4 M4 x 12mm Self-Tapping Screws in the Left Side Shield (1). do not insert the Seat Knob under the Seat Post. Tighten the two M4 x 12mm Self-Tapping Screws (4) in the Right Side Shield (2). Insert the Seat Knob (29) into the Frame and the Seat Post, and tighten the Seat Knob...
... Seat Post; Using an adjustable 6 wrench, tighten the Left Pedal counterclockwise into the Frame. Next, tighten the two 4 M4 x 12mm Self-Tapping Screws in the Left Side Shield (1). do not insert the Seat Knob under the Seat Post. Tighten the two M4 x 12mm Self-Tapping Screws (4) in the Right Side Shield (2). Insert the Seat Knob (29) into the Frame and the Seat Post, and tighten the Seat Knob...
Uk Manual
Page 8
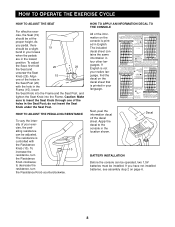
... have not installed batteries, see assembly step 2 on the decal sheet that is printed in four other languages. Align 15 one of the information on the console is controlled with the hole in the lowest position. do not insert the Seat Knob under the Seat Post. cise, the ped- To 10 increase the resistance, turn the Resistance Knob counterclockwise. Decal BATTERY INSTALLATION Before the console can be...
... have not installed batteries, see assembly step 2 on the decal sheet that is printed in four other languages. Align 15 one of the information on the console is controlled with the hole in the lowest position. do not insert the Seat Knob under the Seat Post. cise, the ped- To 10 increase the resistance, turn the Resistance Knob counterclockwise. Decal BATTERY INSTALLATION Before the console can be...

Uk Manual
Page 9
... exercise feedback. The modes are described below ). When the power is not displayed, lift your thumb on the pulse sensor as described above the battery door on /reset button. 5. The console will then be shown in a repeating cycle (except for the most accurate reading. To measure your pulse, stop pedalling and place your thumb until you have pedalled during your heart rate when the pulse sensor is used. The pulse sensor...
... exercise feedback. The modes are described below ). When the power is not displayed, lift your thumb on the pulse sensor as described above the battery door on /reset button. 5. The console will then be shown in a repeating cycle (except for the most accurate reading. To measure your pulse, stop pedalling and place your thumb until you have pedalled during your heart rate when the pulse sensor is used. The pulse sensor...
Uk Manual
Page 10
... exercise program. Aerobic Exercise If your goal is intended only as you , first find the three numbers to the right of your cardiovascular system, the key to achieving the desired results is near the lowest number in preparation for you exercise. HOW TO MEASURE YOUR HEART RATE To measure your heart rate using your condition, plan three workouts each week, if desired. Then, stop pedalling...
... exercise program. Aerobic Exercise If your goal is intended only as you , first find the three numbers to the right of your cardiovascular system, the key to achieving the desired results is near the lowest number in preparation for you exercise. HOW TO MEASURE YOUR HEART RATE To measure your heart rate using your condition, plan three workouts each week, if desired. Then, stop pedalling...

Uk Manual
Page 11
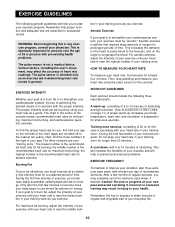
... hands against the inner thigh of knees and back. 2. Repeat 3 times for each leg. Stretches: Hamstrings, lower back and groin. 3. Quadriceps Stretch With one hand against a wall for each leg. Hold for 15 counts, then relax. Stretches: Hamstrings, back of your toes as far... STRETCHES The correct form for 15 counts, then relax. Allow your back leg as possible. Calf/Achilles Stretch With one leg extended. Keep your back leg straight and your 1 hips. Bend your front leg, lean forward and move your hips toward your extended leg. Hold for several...
... hands against the inner thigh of knees and back. 2. Repeat 3 times for each leg. Stretches: Hamstrings, lower back and groin. 3. Quadriceps Stretch With one hand against a wall for each leg. Hold for 15 counts, then relax. Stretches: Hamstrings, back of your toes as far... STRETCHES The correct form for 15 counts, then relax. Allow your back leg as possible. Calf/Achilles Stretch With one leg extended. Keep your back leg straight and your 1 hips. Bend your front leg, lean forward and move your hips toward your extended leg. Hold for several...
Uk Manual
Page 12
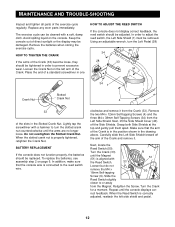
...-tapping Screw (9). clockwise and remove it . Grasp both Side Shields at the top and gently pull them apart. Next, locate the Reed Switch (50). Slide the Reed Switch slightly closer to the reed switch wire. Turn the Crank for a moment. Remove the batteries when storing the exercise cycle. BATTERY REPLACEMENT If the console does not function properly, the batteries should be removed. Replace any worn parts immediately. The exercise cycle can be replaced. Carefully...
...-tapping Screw (9). clockwise and remove it . Grasp both Side Shields at the top and gently pull them apart. Next, locate the Reed Switch (50). Slide the Reed Switch slightly closer to the reed switch wire. Turn the Crank for a moment. Remove the batteries when storing the exercise cycle. BATTERY REPLACEMENT If the console does not function properly, the batteries should be removed. Replace any worn parts immediately. The exercise cycle can be replaced. Carefully...

Uk Manual
Page 13
sive noise or slips as you pedal, the belt should be removed. To tighten the Belt, turn the Nuts 32 counterclock- Make sure that must first be from 1/4" to 1" of vertical movement in the centre of the Belt. HOW TO ADJUST THE BELT The exercise cycle features a precision belt that the Flywheel is properly adjusted, reattach the side shields and pedals. There should be kept...
sive noise or slips as you pedal, the belt should be removed. To tighten the Belt, turn the Nuts 32 counterclock- Make sure that must first be from 1/4" to 1" of vertical movement in the centre of the Belt. HOW TO ADJUST THE BELT The exercise cycle features a precision belt that the Flywheel is properly adjusted, reattach the side shields and pedals. There should be kept...
Uk Manual
Page 14
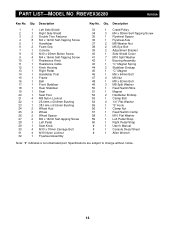
... 1 Reed Switch Clamp 58 1 M10 Flat Washer 59 1 Left Pedal Strap 60 1 Right Pedal Strap # 1 User's Manual # 1 Console Decal Sheet # 1 Allen Wrench Note: "#" indicates a non-illustrated part. Specifications are subject to change without notice. 14 Qty. PART LIST-MODEL NO. Description 1 1 Left Side Shield 2 1 Right Side Shield 3 2 Double Tree Fastener 4 8 M4 x 12mm Self-Tapping Screw 5 1 Handlebar 6 2 Foam Grip 7 1 Console 8 5 M10 x 25mm Button Screw 9 4 M4 x 16mm Self-Tapping Screw 10 1 Resistance Knob 11 1 Resistance Cable...
... 1 Reed Switch Clamp 58 1 M10 Flat Washer 59 1 Left Pedal Strap 60 1 Right Pedal Strap # 1 User's Manual # 1 Console Decal Sheet # 1 Allen Wrench Note: "#" indicates a non-illustrated part. Specifications are subject to change without notice. 14 Qty. PART LIST-MODEL NO. Description 1 1 Left Side Shield 2 1 Right Side Shield 3 2 Double Tree Fastener 4 8 M4 x 12mm Self-Tapping Screw 5 1 Handlebar 6 2 Foam Grip 7 1 Console 8 5 M10 x 25mm Button Screw 9 4 M4 x 16mm Self-Tapping Screw 10 1 Resistance Knob 11 1 Resistance Cable...
Uk Manual
Page 15
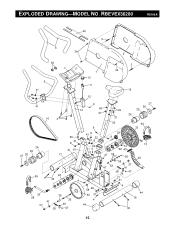
RBEVEX36280 R0100A 40 3 6 34 2 52 7 5 41 1 10 11 3 34 19 8 12 41 16 4 9 49 14 21 49 21 27 26 25 24 20 9 60 33 24 25 27 26 59 50 41 8 31 15 17 42 30 4 41 8 22 41 8 29 9 23 31 9 57 50 4 51 42 43 47 54 56 47 46 55 53 37 41 38 47 39 21 31 13 45 33 28 37 35 41 36 39 38 47 58 48 32 31 4 44 4 44 18 30 15 EXPLODED DRAWING-MODEL NO.
RBEVEX36280 R0100A 40 3 6 34 2 52 7 5 41 1 10 11 3 34 19 8 12 41 16 4 9 49 14 21 49 21 27 26 25 24 20 9 60 33 24 25 27 26 59 50 41 8 31 15 17 42 30 4 41 8 22 41 8 29 9 23 31 9 57 50 4 51 42 43 47 54 56 47 46 55 53 37 41 38 47 39 21 31 13 45 33 28 37 35 41 36 39 38 47 58 48 32 31 4 44 4 44 18 30 15 EXPLODED DRAWING-MODEL NO.
Uk Manual
Page 16
... the Vector Logo are registered trademarks and service marks of this manual) • The KEY NUMBER and DESCRIPTION of the part(s) (see the PART LIST on page 14 of Reebok. HOW TO ORDER REPLACEMENT PARTS If you encounter any problems with this product, or if you need to order replacement parts, contact REEBOK Fitness Equipment at: Tel: +44 (0)207 4 REEBOK (733265), Fax: +44(0)207 816 3308, e-mail...
... the Vector Logo are registered trademarks and service marks of this manual) • The KEY NUMBER and DESCRIPTION of the part(s) (see the PART LIST on page 14 of Reebok. HOW TO ORDER REPLACEMENT PARTS If you encounter any problems with this product, or if you need to order replacement parts, contact REEBOK Fitness Equipment at: Tel: +44 (0)207 4 REEBOK (733265), Fax: +44(0)207 816 3308, e-mail...


