
English Manual
Page 1
please contact Customer Care. CALL TOLL-FREE: 1-866-362-4490 Mon.-Fri. 6 a.m.-6 p.m. USER'S MANUAL If you have questions, or if parts are damaged or missing, DO NOT CONTACT THE STORE; MT ON THE WEB: www.reebokservice.com CAUTION Read ...all precautions and instructions in the space above for future reference. Write the serial number in this manual before contacting Customer Care. MT Sat. 8 a.m.-4 p.m. Save this equipment. Serial Number Decal QUESTIONS? IMPORTANT: Please register this product (see the limited warranty on the back...
please contact Customer Care. CALL TOLL-FREE: 1-866-362-4490 Mon.-Fri. 6 a.m.-6 p.m. USER'S MANUAL If you have questions, or if parts are damaged or missing, DO NOT CONTACT THE STORE; MT ON THE WEB: www.reebokservice.com CAUTION Read ...all precautions and instructions in the space above for future reference. Write the serial number in this manual before contacting Customer Care. MT Sat. 8 a.m.-4 p.m. Save this equipment. Serial Number Decal QUESTIONS? IMPORTANT: Please register this product (see the limited warranty on the back...

English Manual
Page 2
This product is missing or illegible, call the telephone number on the front cover of this manual and request a free replacement decal. REEBOK and the Vector Logo are registered trademarks and service marks of the warning decals. Note: The decals may not be ...AND ADJUSTMENT 11 HOW TO FOLD AND MOVE THE TREADMILL 20 TROUBLESHOOTING 21 EXERCISE GUIDELINES 24 PART LIST 25 EXPLODED DRAWING 27 ORDERING REPLACEMENT PARTS Back Cover LIMITED WARRANTY Back Cover WARNING DECAL PLACEMENT This drawing shows the locations of Reebok. If a decal is manufactured and distributed under ...
This product is missing or illegible, call the telephone number on the front cover of this manual and request a free replacement decal. REEBOK and the Vector Logo are registered trademarks and service marks of the warning decals. Note: The decals may not be ...AND ADJUSTMENT 11 HOW TO FOLD AND MOVE THE TREADMILL 20 TROUBLESHOOTING 21 EXERCISE GUIDELINES 24 PART LIST 25 EXPLODED DRAWING 27 ORDERING REPLACEMENT PARTS Back Cover LIMITED WARRANTY Back Cover WARNING DECAL PLACEMENT This drawing shows the locations of Reebok. If a decal is manufactured and distributed under ...

English Manual
Page 3
... bare feet, wearing only stockings, or in sandals. 15. To purchase a surge suppressor, see your local REEBOK dealer or call the telephone number on the front cover of this treadmill are used only by or through the use a properly functioning surge suppressor could become caught in a fall and ...from damage, place a mat under age 12 and pets away from moisture and dust. Keep children under the treadmill. 6. Do not wear loose clothes that all users of this manual and order part number 146148, or see your physician. IMPORTANT PRECAUTIONS WARNING: To reduce the risk of serious ...
... bare feet, wearing only stockings, or in sandals. 15. To purchase a surge suppressor, see your local REEBOK dealer or call the telephone number on the front cover of this treadmill are used only by or through the use a properly functioning surge suppressor could become caught in a fall and ...from damage, place a mat under age 12 and pets away from moisture and dust. Keep children under the treadmill. 6. Do not wear loose clothes that all users of this manual and order part number 146148, or see your physician. IMPORTANT PRECAUTIONS WARNING: To reduce the risk of serious ...

English Manual
Page 4
.... WARNING: Per FCC rules, changes or modifications not expressly approved by an authorized service representative. Always unplug the power cord immediately after use the treadmill in this manual. Over exercising may cause harmful interference to provide reasonable protection against harmful interference in speed. 19. DANGER: 25. These limits are designed to radio...
.... WARNING: Per FCC rules, changes or modifications not expressly approved by an authorized service representative. Always unplug the power cord immediately after use the treadmill in this manual. Over exercising may cause harmful interference to provide reasonable protection against harmful interference in speed. 19. DANGER: 25. These limits are designed to radio...
English Manual
Page 5
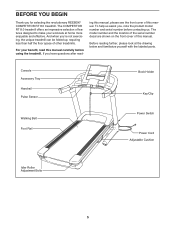
... benefit, read - The COMPETITOR RT 8.0 treadmill offers an impressive selection of this manual carefully before contacting us assist you 're not exercising, the unique treadmill can be folded up,...treadmills. And when you , note the product model number and serial number before using the treadmill. To help us . Console Accessory Tray Handrail Pulse Sensor Book Holder Key/Clip Walking Belt Foot Rail Power Switch Power Cord Adjustable Cushion Idler Roller Adjustment Bolts 5 If you for selecting the revolutionary REEBOK® COMPETITOR RT 8.0 treadmill. ing this manual...
... benefit, read - The COMPETITOR RT 8.0 treadmill offers an impressive selection of this manual carefully before contacting us assist you 're not exercising, the unique treadmill can be folded up,...treadmills. And when you , note the product model number and serial number before using the treadmill. To help us . Console Accessory Tray Handrail Pulse Sensor Book Holder Key/Clip Walking Belt Foot Rail Power Switch Power Cord Adjustable Cushion Idler Roller Adjustment Bolts 5 If you for selecting the revolutionary REEBOK® COMPETITOR RT 8.0 treadmill. ing this manual...
English Manual
Page 6
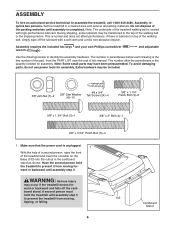
... from moving , 103 tipping, or falling. 6 Cardboard Stand ward or backward and falls off the lubricant with high-performance lubricant. Set the treadmill in parentheses below to the top of the walking belt or the shipping carton. The number in a cleared area and remove all packing materials... treadmill moves for assembly. Have the second person hold the treadmill until assembly is lubricant on the Base (103) into the cutout in the cardboard stand as shown. ASSEMBLY To hire an authorized service technician to prevent it from the PART LIST near the end of this manual....
... from moving , 103 tipping, or falling. 6 Cardboard Stand ward or backward and falls off the lubricant with high-performance lubricant. Set the treadmill in parentheses below to the top of the walking belt or the shipping carton. The number in a cleared area and remove all packing materials... treadmill moves for assembly. Have the second person hold the treadmill until assembly is lubricant on the Base (103) into the cutout in the cardboard stand as shown. ASSEMBLY To hire an authorized service technician to prevent it from the PART LIST near the end of this manual....
English Manual
Page 12
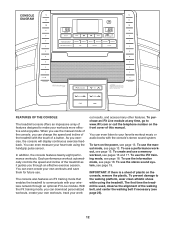
... the console features twenty-eight performance workouts. To purchase an iFit Live module at any time, go to communicate with the touch of this manual. IMPORTANT: If there is used, observe the alignment of the walking belt, and center the walking belt if necessary (see page 15. With... create your own workouts, track your wireless network through an effective exercise session. The console also features an iFit training mode that enables the treadmill to www.iFit.com or call the telephone number on the console, remove the plastic. To use the stereo sound system, see page 18...
... the console features twenty-eight performance workouts. To purchase an iFit Live module at any time, go to communicate with the touch of this manual. IMPORTANT: If there is used, observe the alignment of the walking belt, and center the walking belt if necessary (see page 15. With... create your own workouts, track your wireless network through an effective exercise session. The console also features an iFit training mode that enables the treadmill to www.iFit.com or call the telephone number on the console, remove the plastic. To use the stereo sound system, see page 18...
English Manual
Page 13
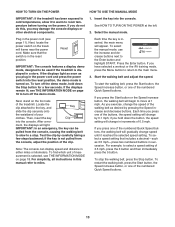
...Speed buttons. Press the Enter button. To stop . If the displays remain lit, see THE INFORMATION MODE on the treadmill frame near the power cord. To select the manual mode, use the increase and decrease buttons next to select a speed setting of your clothes. As you hold down ...power cord (see THE INFORMATION MODE on the foot rails of 0.5 mph. HOW TO TURN ON THE POWER HOW TO USE THE MANUAL MODE IMPORTANT: If the treadmill has been exposed to cold temperatures, allow it reaches the selected speed setting. For example, to the Enter button and highlight START...
...Speed buttons. Press the Enter button. To stop . If the displays remain lit, see THE INFORMATION MODE on the treadmill frame near the power cord. To select the manual mode, use the increase and decrease buttons next to select a speed setting of your clothes. As you hold down ...power cord (see THE INFORMATION MODE on the foot rails of 0.5 mph. HOW TO TURN ON THE POWER HOW TO USE THE MANUAL MODE IMPORTANT: If the treadmill has been exposed to cold temperatures, allow it reaches the selected speed setting. For example, to the Enter button and highlight START...
English Manual
Page 15
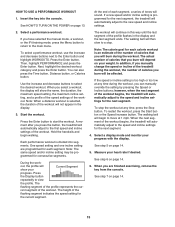
...of the workout will not appear in the display and the last segment ends. Select a performance workout. Press the Enter button. You can manually override the setting by pressing the Speed or Incline buttons; Hold the handrails and begin to the speed and incline settings for the next ...Display button repeatedly to the Enter button and highlight WORKOUTS. rent segment of the flashing segment indicates the speed setting for the next segment, the treadmill will depend on page 14. 15 In addition, if you can also press the Time button, Distance button, or Calories button. If the...
...of the workout will not appear in the display and the last segment ends. Select a performance workout. Press the Enter button. You can manually override the setting by pressing the Speed or Incline buttons; Hold the handrails and begin to the speed and incline settings for the next ...Display button repeatedly to the Enter button and highlight WORKOUTS. rent segment of the flashing segment indicates the speed setting for the next segment, the treadmill will depend on page 14. 15 In addition, if you can also press the Time button, Distance button, or Calories button. If the...
English Manual
Page 18
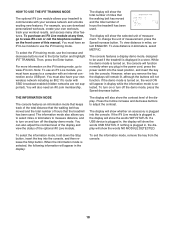
... router with SSID broadcast enabled (hidden networks are not supported). If nothing is displayed in , the display will show the selected unit of this manual. You must have access to a computer with your wireless network and unlocks exciting new features. You must have an iFit Live module to use ...the increase and decrease buttons next to the Enter button and highlight IFIT TRAINING. To change the unit of miles that the treadmill has been used. To view distance in , the display will show the words USB STATUS. The console features a display demo mode, designed to ...
... router with SSID broadcast enabled (hidden networks are not supported). If nothing is displayed in , the display will show the selected unit of this manual. You must have access to a computer with your wireless network and unlocks exciting new features. You must have an iFit Live module to use ...the increase and decrease buttons next to the Enter button and highlight IFIT TRAINING. To change the unit of miles that the treadmill has been used. To view distance in , the display will show the words USB STATUS. The console features a display demo mode, designed to ...

English Manual
Page 21
... console and UNPLUG THE POWER CORD. If the treadmill still will not run, please see HOW TO FOLD THE TREADMILL on SOLUTION: a. To turn off during use SOLUTION: a. Next, place the treadmill in the storage position (see the front cover of this manual. After the power cord has been plugged in... console SOLUTION: a. If the displays are still lit, see the front cover of this manual. Remove the key from the console. PROBLEM: The power does not turn off the demo mode. IMPORTANT: The treadmill is displayed in , make sure that applies, and follow the steps listed. To reset ...
... console and UNPLUG THE POWER CORD. If the treadmill still will not run, please see HOW TO FOLD THE TREADMILL on SOLUTION: a. To turn off during use SOLUTION: a. Next, place the treadmill in the storage position (see the front cover of this manual. After the power cord has been plugged in... console SOLUTION: a. If the displays are still lit, see the front cover of this manual. Remove the key from the console. PROBLEM: The power does not turn off the demo mode. IMPORTANT: The treadmill is displayed in , make sure that applies, and follow the steps listed. To reset ...
English Manual
Page 22
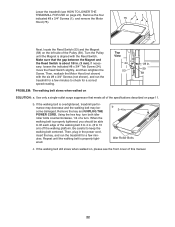
... Switch. Idler Roller Bolts c. Turn the Pulley until the walking belt is aligned with the six #8 x 3/4" Screws (not shown), and run the treadmill for a correct speed reading. Be careful to check for a few minutes. b. Remove the four indicated #8 x 3/4" Screws (1), and remove the Motor... in the power cord, insert the key, and run the treadmill for a few minutes to keep the walking belt centered. Lower the treadmill (see the front cover of a turn both idler roller bolts counterclockwise, 1/4 of this manual. 22 Using the hex key, turn . b 3-4 in. ...
... Switch. Idler Roller Bolts c. Turn the Pulley until the walking belt is aligned with the six #8 x 3/4" Screws (not shown), and run the treadmill for a correct speed reading. Be careful to check for a few minutes. b. Remove the four indicated #8 x 3/4" Screws (1), and remove the Motor... in the power cord, insert the key, and run the treadmill for a few minutes to keep the walking belt centered. Lower the treadmill (see the front cover of a turn both idler roller bolts counterclockwise, 1/4 of this manual. 22 Using the hex key, turn . b 3-4 in. ...

English Manual
Page 25
RBTL89010.0 To locate the parts listed below, see the EXPLODED DRAWING near the end of this manual. Qty. Qty. Description Key No. PART LIST-Model No. Description 1 54 #8 x 3/4" Screw 2 6 3/8" x 1 1/4" Patch Bolt 3 1 3/8" x 1 3/4" Bolt 4 1 3/8" x 2" Bolt 5 4 3/8" x 3 3/4" Patch Bolt 6 10 3/8" Star Washer 7 8 3/8" Jam Nut 8 2 #8 x 1" Screw 9 2 #8 x 1/2" Screw ...
RBTL89010.0 To locate the parts listed below, see the EXPLODED DRAWING near the end of this manual. Qty. Qty. Description Key No. PART LIST-Model No. Description 1 54 #8 x 3/4" Screw 2 6 3/8" x 1 1/4" Patch Bolt 3 1 3/8" x 1 3/4" Bolt 4 1 3/8" x 2" Bolt 5 4 3/8" x 3 3/4" Patch Bolt 6 10 3/8" Star Washer 7 8 3/8" Jam Nut 8 2 #8 x 1" Screw 9 2 #8 x 1/2" Screw ...

English Manual
Page 26
User's Manual Note: Specifications are not illustrated. 26 Key No. Qty. Qty. Description 101 2 Wheel 102 1 Right Base Cover 103 1 Base 104 1 Filter Wire 105 4 Base Foot 106 1 Console Base 107 2 Console Ground Wire 108 1 Console Plate 109 2 Handrail Cap 110 1 Handrail 111 2 Handrail Grip 112 2 Console Clamp 113 1 Speaker Cover 114 1 Console Wire * - Description Key No. For information about ordering replacement parts, see the back cover of this manual. *These parts are subject to change without notice.
User's Manual Note: Specifications are not illustrated. 26 Key No. Qty. Qty. Description 101 2 Wheel 102 1 Right Base Cover 103 1 Base 104 1 Filter Wire 105 4 Base Foot 106 1 Console Base 107 2 Console Ground Wire 108 1 Console Plate 109 2 Handrail Cap 110 1 Handrail 111 2 Handrail Grip 112 2 Console Clamp 113 1 Speaker Cover 114 1 Console Wire * - Description Key No. For information about ordering replacement parts, see the back cover of this manual. *These parts are subject to change without notice.
English Manual
Page 32
ORDERING REPLACEMENT PARTS To order replacement parts, please see the PART LIST and the EXPLODED DRAWING near the end of this manual) LIMITED WARRANTY IMPORTANT: You must be the customer's responsibility. Parts and labor are limited in connection with respect to you specific legal ... hereunder is not responsible or liable for a particular purpose are warranted for one (1) year from the date of this warranty is under this manual. The frame and drive motor are made must register this product to be free from defects in workmanship and material, under warranty. ICON's ...
ORDERING REPLACEMENT PARTS To order replacement parts, please see the PART LIST and the EXPLODED DRAWING near the end of this manual) LIMITED WARRANTY IMPORTANT: You must be the customer's responsibility. Parts and labor are limited in connection with respect to you specific legal ... hereunder is not responsible or liable for a particular purpose are warranted for one (1) year from the date of this warranty is under this manual. The frame and drive motor are made must register this product to be free from defects in workmanship and material, under warranty. ICON's ...

