
Uk Manual
Page 1
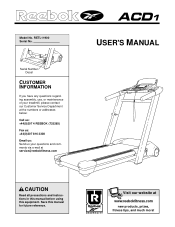
.... Serial Number Decal CUSTOMER INFORMATION If you have any questions regarding assembly, use, or maintenance of your treadmill, please contact our Customer Service Department at the numbers or addresses below: Call us: +44(0)207 4 REEBOK (733265) Fax us: +44(0)207 816 3308 Email us: Send us your questions and comments via e-mail...
.... Serial Number Decal CUSTOMER INFORMATION If you have any questions regarding assembly, use, or maintenance of your treadmill, please contact our Customer Service Department at the numbers or addresses below: Call us: +44(0)207 4 REEBOK (733265) Fax us: +44(0)207 816 3308 Email us: Send us your questions and comments via e-mail...
Uk Manual
Page 2
TABLE OF CONTENTS IMPORTANT PRECAUTIONS 3 BEFORE YOU BEGIN 5 HOW TO SET UP THE TREADMILL 6 OPERATION AND ADJUSTMENT 7 HOW TO FOLD AND MOVE THE TREADMILL 19 TROUBLE-SHOOTING 20 REEBOK UNIVERSITY 22 EXERCISE GUIDELINES 24 PART LIST 26 HOW TO ORDER REPLACEMENT PARTS Back Cover Note: An... or consequential damages arising out of or in your receipt; REEBOK FITNESS EQUIPMENT: Tel: +44(0)207 4 REEBOK (733265), Fax: +44(0)207 816 3308, e-mail: [email protected] 2 LIMITED WARRANTY WHAT IS COVERED-The entire REEBOK® ACD1 ("Product") is not responsible or liable for repair. WHO ...
TABLE OF CONTENTS IMPORTANT PRECAUTIONS 3 BEFORE YOU BEGIN 5 HOW TO SET UP THE TREADMILL 6 OPERATION AND ADJUSTMENT 7 HOW TO FOLD AND MOVE THE TREADMILL 19 TROUBLE-SHOOTING 20 REEBOK UNIVERSITY 22 EXERCISE GUIDELINES 24 PART LIST 26 HOW TO ORDER REPLACEMENT PARTS Back Cover Note: An... or consequential damages arising out of or in your receipt; REEBOK FITNESS EQUIPMENT: Tel: +44(0)207 4 REEBOK (733265), Fax: +44(0)207 816 3308, e-mail: [email protected] 2 LIMITED WARRANTY WHAT IS COVERED-The entire REEBOK® ACD1 ("Product") is not responsible or liable for repair. WHO ...

Uk Manual
Page 3
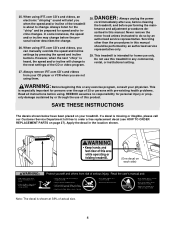
... Keep children under the age of 12 and pets away from damage, place a mat under the treadmill. 22. Always wear athletic shoes when using the treadmill. 18. When folding or moving the treadmill, make sure that is the responsibility of the owner to raise, lower, or move the on/off... 2. No other appliance should be able to safely lift 20 kg to ensure that blocks air openings. Wear appropriate exercise clothing when using the treadmill. When connecting the power cord (see page 7), plug the power cord into any surface that all parts of high speeds. If an extension cord...
... Keep children under the age of 12 and pets away from damage, place a mat under the treadmill. 22. Always wear athletic shoes when using the treadmill. 18. When folding or moving the treadmill, make sure that is the responsibility of the owner to raise, lower, or move the on/off... 2. No other appliance should be able to safely lift 20 kg to ensure that blocks air openings. Wear appropriate exercise clothing when using the treadmill. When connecting the power cord (see page 7), plug the power cord into any surface that all parts of high speeds. If an extension cord...
Uk Manual
Page 4
...change before the personal trainer describes the change to order a free replacement decal (see HOW TO ORDER REPLACEMENT PARTS on your physician. This treadmill is missing or illegible, please call our Customer Service Department toll-free to the next settings of the CD or video program. Always ...CD's and videos from your CD player or VCR when you are not using . REEBOK assumes no responsibility for speed and/or incline changes. If a decal is intended for home use , before cleaning the treadmill, and before using them. Apply the decal in this manual should be prepared for...
...change before the personal trainer describes the change to order a free replacement decal (see HOW TO ORDER REPLACEMENT PARTS on your physician. This treadmill is missing or illegible, please call our Customer Service Department toll-free to the next settings of the CD or video program. Always ...CD's and videos from your CD player or VCR when you are not using . REEBOK assumes no responsibility for speed and/or incline changes. If a decal is intended for home use , before cleaning the treadmill, and before using them. Apply the decal in this manual should be prepared for...
Uk Manual
Page 5
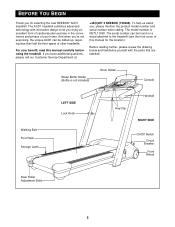
...decal attached to let you 're not exercising, the unique ACD1 can be folded up, requiring less than half the floor space of other treadmills. BEFORE YOU BEGIN Thank you for the location). The ACD1 treadmill combines advanced technology with the parts that are labelled. And when... further, please review the drawing below and familiarise yourself with innovative design to the treadmill (see the front cover of your benefit, read this manual for selecting the new REEBOK® ACD1 treadmill. Water Bottle Holder (Bottle is RETL11990. The model number is not included) Book...
...decal attached to let you 're not exercising, the unique ACD1 can be folded up, requiring less than half the floor space of other treadmills. BEFORE YOU BEGIN Thank you for the location). The ACD1 treadmill combines advanced technology with the parts that are labelled. And when... further, please review the drawing below and familiarise yourself with innovative design to the treadmill (see the front cover of your benefit, read this manual for selecting the new REEBOK® ACD1 treadmill. Water Bottle Holder (Bottle is RETL11990. The model number is not included) Book...
Uk Manual
Page 6
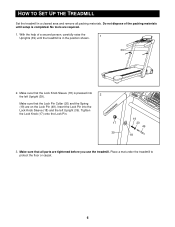
With the help of the packing materials until the treadmill is in a cleared area and remove all parts are required. 1. Make sure that the Lock Pin... (17) onto the Lock Pin. 17 39 19 20 49 18 3. Place a mat under the treadmill to protect the floor or carpet. 6 Insert the Lock Pin into the left Upright (39). HOW TO SET UP THE... TREADMILL Set the treadmill in the position shown. 1 39 2. No tools are tightened before you use the treadmill. Do not dispose of a second person, carefully raise the Uprights (39) until...
With the help of the packing materials until the treadmill is in a cleared area and remove all parts are required. 1. Make sure that the Lock Pin... (17) onto the Lock Pin. 17 39 19 20 49 18 3. Place a mat under the treadmill to protect the floor or carpet. 6 Insert the Lock Pin into the left Upright (39). HOW TO SET UP THE... TREADMILL Set the treadmill in the position shown. 1 39 2. No tools are tightened before you use the treadmill. Do not dispose of a second person, carefully raise the Uprights (39) until...
Uk Manual
Page 7
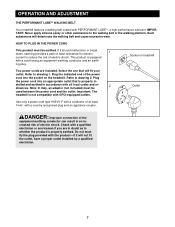
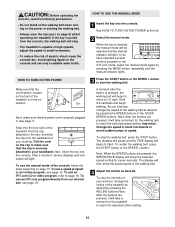
...Do not modify the plug provided with a country recognised plug and an appliance coupler. OPERATION AND ADJUSTMENT THE PERFORMANT LUBETM WALKING BELT Your treadmill features a walking belt coated with a conductor of electric shock. IMPORTANT: Never apply silicone spray or other substances to drawing 2. Select ...the one that is not compatible with all local codes and or- 2 dinances. Plug the power cord into the socket on treadmill Two power cords are in accordance with GFCI-equipped outlets. This product is properly earthed. Note: In Italy, an adaptor (not ...
...Do not modify the plug provided with a country recognised plug and an appliance coupler. OPERATION AND ADJUSTMENT THE PERFORMANT LUBETM WALKING BELT Your treadmill features a walking belt coated with a conductor of electric shock. IMPORTANT: Never apply silicone spray or other substances to drawing 2. Select ...the one that is not compatible with all local codes and or- 2 dinances. Plug the power cord into the socket on treadmill Two power cords are in accordance with GFCI-equipped outlets. This product is properly earthed. Note: In Italy, an adaptor (not ...
Uk Manual
Page 8
...with a touch of your home stereo, portable stereo, or computer and play iFIT.com video programs (videocassettes are available separately). With the treadmill connected to your computer, you through every step of a button. The console also offers six preset workout programs: three programs that automatically ... special iFIT.com CD programs (CD's are available separately). iFIT.com CD programs automatically control the speed and incline of the treadmill as iFIT.com CD programs, but add the excitement of working out with an optional heart rate monitor that automatically control the ...
...with a touch of your home stereo, portable stereo, or computer and play iFIT.com video programs (videocassettes are available separately). With the treadmill connected to your computer, you through every step of a button. The console also offers six preset workout programs: three programs that automatically ... special iFIT.com CD programs (CD's are available separately). iFIT.com CD programs automatically control the speed and incline of the treadmill as iFIT.com CD programs, but add the excitement of working out with an optional heart rate monitor that automatically control the ...
Uk Manual
Page 9
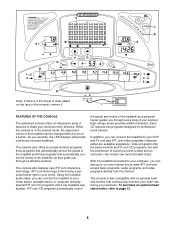
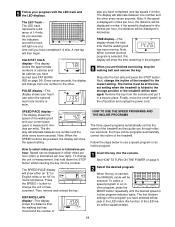
... is designed to 10 mph. I. INCLINE Buttons-These buttons control the incline of the walking belt. SPEED Buttons-These buttons control the speed of the treadmill. B. MODE Button-This button is at 3% or 3.5%, and so forth. 9 E. If the key is 0.5 mph to be worn on an LED track. ...your progress on your current pace, the distance you to miles. Note: The console can display speed and distance in increments of the treadmill. D. START Button-This button starts the walking belt. The attached clip is selected, the matrix will change by 0.1 mph; K.
... is designed to 10 mph. I. INCLINE Buttons-These buttons control the incline of the walking belt. SPEED Buttons-These buttons control the speed of the treadmill. B. MODE Button-This button is at 3% or 3.5%, and so forth. 9 E. If the key is 0.5 mph to be worn on an LED track. ...your progress on your current pace, the distance you to miles. Note: The console can display speed and distance in increments of the treadmill. D. START Button-This button starts the walking belt. The attached clip is selected, the matrix will change by 0.1 mph; K.
Uk Manual
Page 10
... walking belt will take a moment for the walking belt to your waistband. The display will then show the selected speed setting for the treadmill to start the walking belt. HOW TO TURN ON THE POWER Make sure that the clip is securely attached to reach the selected speed ...MODE 1 Insert the key into the console. A moment after the button is pulled from our internet site, see I on page 8) whilst operating the treadmill. To restart the walking belt, press the START button or the SPEED + button. To vary the intensity of your clothing. Hold the handrails and ...
... walking belt will take a moment for the walking belt to your waistband. The display will then show the selected speed setting for the treadmill to start the walking belt. HOW TO TURN ON THE POWER Make sure that the clip is securely attached to reach the selected speed ...MODE 1 Insert the key into the console. A moment after the button is pulled from our internet site, see I on page 8) whilst operating the treadmill. To restart the walking belt, press the START button or the SPEED + button. To vary the intensity of your clothing. Hold the handrails and ...
Uk Manual
Page 11
...This display shows the distance that the walking belt has been moving. CALS/FAT CALS display-This display shows the approximate numbers of the treadmill as they guide you are pressed, the display will appear in kilometres per hour (kph). TIME display-This display shows the total time..., press the MODE button repeatedly until you have completed 1/4 mile. Then, remove and reinsert the key. The LED track represents a distance of the treadmill. laps you have completed (one number to the off switch to the other every seven seconds. Finally, move the on page 9. 2 Select the ...
...This display shows the distance that the walking belt has been moving. CALS/FAT CALS display-This display shows the approximate numbers of the treadmill as they guide you are pressed, the display will appear in kilometres per hour (kph). TIME display-This display shows the total time..., press the MODE button repeatedly until you have completed 1/4 mile. Then, remove and reinsert the key. The LED track represents a distance of the treadmill. laps you have completed (one number to the off switch to the other every seven seconds. Finally, move the on page 9. 2 Select the ...
Uk Manual
Page 12
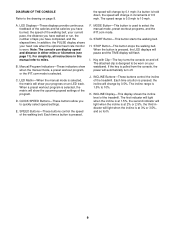
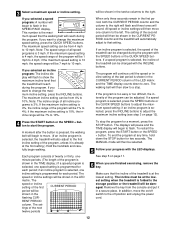
...will then move the on/off position and unplug the power cord. 12 if an incline program is selected, one speed setting is selected, the treadmill will be changed with the INCLINE buttons. RENT PERIOD column. This number is programmed for a moment, press the STOP button. All speed or... incline settings will begin walking. The walking belt will flash to 10%. Make sure that the treadmill will continue until the speed or incline setting of the LED matrix and the TIME display counts down the STOP button for each period. In...
...will then move the on/off position and unplug the power cord. 12 if an incline program is selected, one speed setting is selected, the treadmill will be changed with the INCLINE buttons. RENT PERIOD column. This number is programmed for a moment, press the STOP button. All speed or... incline settings will begin walking. The walking belt will flash to 10%. Make sure that the treadmill will continue until the speed or incline setting of the LED matrix and the TIME display counts down the STOP button for each period. In...
Uk Manual
Page 13
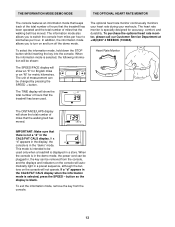
.../DEMO MODE THE OPTIONAL HEART RATE MONITOR The console features an information mode that keeps track of the total number of hours that the treadmill has been operated and the total number of measurement can be removed from the console, and the displays and indicators on the console will... can be plugged in, the key can be used . To purchase the optional heart rate monitor, please call our Customer Service Department at +44(0)207 4 REEBOK (733265). If a "d" appears in the display, the console is selected, press the SPEED - The TIME display will show an "E" for English miles or an...
.../DEMO MODE THE OPTIONAL HEART RATE MONITOR The console features an information mode that keeps track of the total number of hours that the treadmill has been operated and the total number of measurement can be removed from the console, and the displays and indicators on the console will... can be plugged in, the key can be used . To purchase the optional heart rate monitor, please call our Customer Service Department at +44(0)207 4 REEBOK (733265). If a "d" appears in the display, the console is selected, press the SPEED - The TIME display will show an "E" for English miles or an...
Uk Manual
Page 14
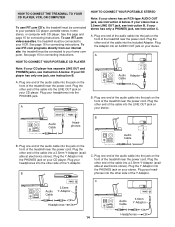
... of the Y-Adaptor. C Audio Cable 3.5mm Y-Adaptor Headphones Audio Cable PHONES 3.5mm Y-Adaptor Headphones 14 To use iFIT.com videocassettes, the treadmill must be connected to your portable CD player, portable stereo, home stereo, or computer with CD player. See page 16 for connecting instructions....Adaptor (available at electronics stores). A HOW TO CONNECT YOUR PORTABLE CD PLAYER Note: If your CD player. Plug the other end of the treadmill near the power cord. Plug the other end of the audio cable into the included Adaptor. Plug one end of the cable into a 3....
... of the Y-Adaptor. C Audio Cable 3.5mm Y-Adaptor Headphones Audio Cable PHONES 3.5mm Y-Adaptor Headphones 14 To use iFIT.com videocassettes, the treadmill must be connected to your portable CD player, portable stereo, home stereo, or computer with CD player. See page 16 for connecting instructions....Adaptor (available at electronics stores). A HOW TO CONNECT YOUR PORTABLE CD PLAYER Note: If your CD player. Plug the other end of the treadmill near the power cord. Plug the other end of the audio cable into the included Adaptor. Plug one end of the cable into a 3....

Uk Manual
Page 15
...). Plug the Adaptor into the jack on your stereo. Plug one end of the audio cable into the PHONES jack on the front of the treadmill near the power cord. Plug the RCA Y-Adaptor into the LINE OUT jack on your stereo. If the LINE OUT jack is currently plugged into... stores). Plug the other side of the Y-Adaptor. Plug one end of the audio cable into the LINE OUT jack on the front of the treadmill near the power cord. If your computer has a 3.5mm LINE OUT jack, see instruction B. Next, remove the wire that is being used, see instruction A below...
...). Plug the Adaptor into the jack on your stereo. Plug one end of the audio cable into the PHONES jack on the front of the treadmill near the power cord. Plug the RCA Y-Adaptor into the LINE OUT jack on your stereo. If the LINE OUT jack is currently plugged into... stores). Plug the other side of the Y-Adaptor. Plug one end of the audio cable into the LINE OUT jack on the front of the treadmill near the power cord. If your computer has a 3.5mm LINE OUT jack, see instruction B. Next, remove the wire that is being used, see instruction A below...
Uk Manual
Page 16
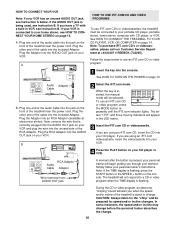
...com CD's or videocassettes, please call our Customer Service Department at electronics stores). Audio Adaptor Cable B. To use iFIT.com CD's or videocassettes, the treadmill must be connected to your portable CD player, portable stereo, home stereo, computer with a built-in the LED matrix. 3 Insert the iFIT.com CD...Plug one end of the cable into the console. Plug the other end of the audio cable into an RCA Adaptor (available at +44(0)207 4 REEBOK (733265). A ANT. See HOW TO TURN ON THE POWER on the front of the audio cable into the included Adaptor. B ANT. IN VIDEO ...
...com CD's or videocassettes, please call our Customer Service Department at electronics stores). Audio Adaptor Cable B. To use iFIT.com CD's or videocassettes, the treadmill must be connected to your portable CD player, portable stereo, home stereo, computer with a built-in the LED matrix. 3 Insert the iFIT.com CD...Plug one end of the cable into the console. Plug the other end of the audio cable into an RCA Adaptor (available at +44(0)207 4 REEBOK (733265). A ANT. See HOW TO TURN ON THE POWER on the front of the audio cable into the included Adaptor. B ANT. IN VIDEO ...
Uk Manual
Page 17
... your CD player or VCR. To restart the program, press the START button or the SPEED + button. Note: If the speed or incline of the treadmill does not change when a "chirp" is heard: • make sure that the audio cable is properly connected, that it is not flashing. If the TIME...
... your CD player or VCR. To restart the program, press the START button or the SPEED + button. Note: If the speed or incline of the treadmill does not change when a "chirp" is heard: • make sure that the audio cable is properly connected, that it is not flashing. If the TIME...
Uk Manual
Page 18
... However, when the next "chirp" is heard, the speed and incline will change to the next settings of specific system requirements will change to the treadmill and stand on our internet site. To restart the program, press the START button or the SPEED + button. When the next "chirp" is heard... The letters "iFIT" and three moving indicators will alert you can play iFIT.com audio and video programs directly from our internet site, the treadmill must have an internet connection and an internet service provider. If the speed or incline settings are too high or too low, you when the...
... However, when the next "chirp" is heard, the speed and incline will change to the next settings of specific system requirements will change to the treadmill and stand on our internet site. To restart the program, press the START button or the SPEED + button. When the next "chirp" is heard... The letters "iFIT" and three moving indicators will alert you can play iFIT.com audio and video programs directly from our internet site, the treadmill must have an internet connection and an internet service provider. If the speed or incline settings are too high or too low, you when the...
Uk Manual
Page 19
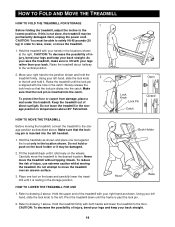
.... CAUTION: You must be able to safely lift 45 pounds (20 kg) in temperatures above 85° Fahrenheit. Raise the treadmill about halfway to raise, lower, or move the treadmill to lift with your legs rather than your right hand to the left and hold it may be damaged. 2. Move your... possibility of injury, bend your legs and keep your back straight. 19 Make sure that the lock pin slides into the left . Never move the treadmill over an uneven surface. 3. CAUTION: To decrease the possibility of injury, bend your legs and keep your back straight. Next, unplug the power cord....
.... CAUTION: You must be able to safely lift 45 pounds (20 kg) in temperatures above 85° Fahrenheit. Raise the treadmill about halfway to raise, lower, or move the treadmill to lift with your legs rather than your right hand to the left and hold it may be damaged. 2. Move your... possibility of injury, bend your legs and keep your back straight. 19 Make sure that the lock pin slides into the left . Never move the treadmill over an uneven surface. 3. CAUTION: To decrease the possibility of injury, bend your legs and keep your back straight. Next, unplug the power cord....
Uk Manual
Page 20
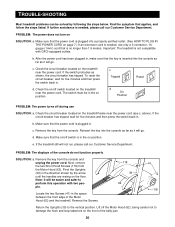
...two Screws (41) in the on position. Lift off during use only a 3-conductor, 14gauge (1mm2) cord that the on/off switch located on the treadmill near the power cord. c Tripped Reset Tripped d On Position Reset PROBLEM: The power turns off the Motor Hood (62), being careful not to the vertical... position. Check the circuit breaker located on the treadmill frame near the power cord. above). Remove the key from the console and unplug the power cord. Remove the key from the console. Next,...
...two Screws (41) in the on position. Lift off during use only a 3-conductor, 14gauge (1mm2) cord that the on/off switch located on the treadmill near the power cord. c Tripped Reset Tripped d On Position Reset PROBLEM: The power turns off the Motor Hood (62), being careful not to the vertical... position. Check the circuit breaker located on the treadmill frame near the power cord. above). Remove the key from the console and unplug the power cord. Remove the key from the console. Next,...


