
English Manual
Page 1
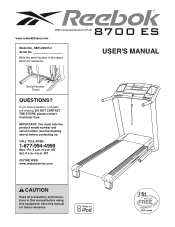
... contacting us: CALL TOLL-FREE: 1-877-994-4999 Mon.-Fri. 6 a.m.-6 p.m. Write the serial number in this manual for future reference. IMPORTANT: You must note the product model number and serial number (see the drawing above for iPod® Model No. please ...Customer Care. If you have questions, or if parts are missing, DO NOT CONTACT THE STORE; www.reebokfitness.com With Universal Dock for reference. USER'S MANUAL Serial Number Decal QUESTIONS? RBTL09507.2 Serial No. MT ON THE WEB: www.reebokservice.com CAUTION Read all precautions and instructions in the space above ) ...
... contacting us: CALL TOLL-FREE: 1-877-994-4999 Mon.-Fri. 6 a.m.-6 p.m. Write the serial number in this manual for future reference. IMPORTANT: You must note the product model number and serial number (see the drawing above for iPod® Model No. please ...Customer Care. If you have questions, or if parts are missing, DO NOT CONTACT THE STORE; www.reebokfitness.com With Universal Dock for reference. USER'S MANUAL Serial Number Decal QUESTIONS? RBTL09507.2 Serial No. MT ON THE WEB: www.reebokservice.com CAUTION Read all precautions and instructions in the space above ) ...
English Manual
Page 2
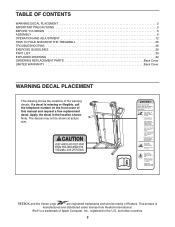
...the decal in the U.S. iPod® is manufactured and distributed under license from Reebok International. This product is a trademark of this manual and request a free replacement decal. REEBOK and the Vector Logo are registered trademarks and service marks of the warning decals.... TABLE OF CONTENTS WARNING DECAL PLACEMENT 2 IMPORTANT PRECAUTIONS 3 BEFORE YOU BEGIN 5 ASSEMBLY 6 OPERATION AND ADJUSTMENT 12 HOW TO FOLD AND MOVE THE TREADMILL...
...the decal in the U.S. iPod® is manufactured and distributed under license from Reebok International. This product is a trademark of this manual and request a free replacement decal. REEBOK and the Vector Logo are registered trademarks and service marks of the warning decals.... TABLE OF CONTENTS WARNING DECAL PLACEMENT 2 IMPORTANT PRECAUTIONS 3 BEFORE YOU BEGIN 5 ASSEMBLY 6 OPERATION AND ADJUSTMENT 12 HOW TO FOLD AND MOVE THE TREADMILL...

English Manual
Page 3
...the surge suppressor into a grounded circuit capable of this treadmill are used only by or through the use a properly functioning surge suppressor could become caught in this manual and order part number 146148, or see your local REEBOK dealer or call the telephone number on any exercise ...program, consult your local electronics store. 13. Do not operate the treadmill if the power cord or plug is damaged...
...the surge suppressor into a grounded circuit capable of this treadmill are used only by or through the use a properly functioning surge suppressor could become caught in this manual and order part number 146148, or see your local REEBOK dealer or call the telephone number on any exercise ...program, consult your local electronics store. 13. Do not operate the treadmill if the power cord or plug is damaged...

English Manual
Page 4
... other than the procedures in this manual should be able to safely lift 45 lbs. (20 kg) to the off position when the treadmill is not in use. (See the drawing on page 5 for in-home use only. Do not use , before cleaning the treadmill, and before performing the mainte- ... 25.) You must be performed by an authorized ser- less instructed to raise, lower, or move the treadmill. 22. SAVE THESE INSTRUCTIONS 4 Always unplug the power cord immediately after use this manual. vice representative. DANGER: 25. Inspect and properly tighten all parts of the circuit breaker.) 21. Never ...
... other than the procedures in this manual should be able to safely lift 45 lbs. (20 kg) to the off position when the treadmill is not in use. (See the drawing on page 5 for in-home use only. Do not use , before cleaning the treadmill, and before performing the mainte- ... 25.) You must be performed by an authorized ser- less instructed to raise, lower, or move the treadmill. 22. SAVE THESE INSTRUCTIONS 4 Always unplug the power cord immediately after use this manual. vice representative. DANGER: 25. Inspect and properly tighten all parts of the circuit breaker.) 21. Never ...
English Manual
Page 5
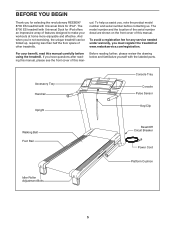
...number decal are shown on the front cover of this manual. BEFORE YOU BEGIN Thank you for selecting the revolutionary REEBOK® 8700 ES treadmill with Universal Dock for any service needed under warranty, you must register the treadmill at home more enjoyable and effective. If you have... questions after reading this manual, please see the front cover of this...
...number decal are shown on the front cover of this manual. BEFORE YOU BEGIN Thank you for selecting the revolutionary REEBOK® 8700 ES treadmill with Universal Dock for any service needed under warranty, you must register the treadmill at home more enjoyable and effective. If you have... questions after reading this manual, please see the front cover of this...
English Manual
Page 6
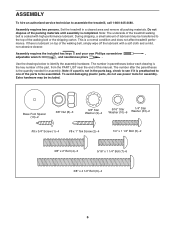
...The underside of the treadmill walking belt is lubricant ... a part is not in the parts bag, check to assemble the treadmill, call 1-800-445-2480. Extra hardware may be included. Use the drawings below each... drawing is a normal condition and does not affect treadmill performance. Assembly requires two persons. Base Foot Spacer (13)-2 3/8" Nut (8)-3 3/8" Star Washer (9)-4 5/16" Star Washer (10)-6 1/4" Star Washer (33)-2 #8 x 3/4"...Set the treadmill in parentheses below to the top of this...
...The underside of the treadmill walking belt is lubricant ... a part is not in the parts bag, check to assemble the treadmill, call 1-800-445-2480. Extra hardware may be included. Use the drawings below each... drawing is a normal condition and does not affect treadmill performance. Assembly requires two persons. Base Foot Spacer (13)-2 3/8" Nut (8)-3 3/8" Star Washer (9)-4 5/16" Star Washer (10)-6 1/4" Star Washer (33)-2 #8 x 3/4"...Set the treadmill in parentheses below to the top of this...
English Manual
Page 12
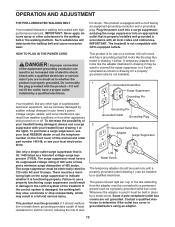
...treadmill is not compatible with the product-if it should be used only until a properly grounded outlet (drawing 1) can result from weather conditions or from the adapter must be connected to a permanent ground such as a transient voltage surge suppressor (TVSS). To purchase a surge suppressor, see your local REEBOK... the walking belt and cause excessive wear. The green-colored rigid ear, lug, or the like extending from other type of this manual and order part number 146148, or see drawing 1 at the right). This product is properly installed and grounded in accordance with a...
...treadmill is not compatible with the product-if it should be used only until a properly grounded outlet (drawing 1) can result from weather conditions or from the adapter must be connected to a permanent ground such as a transient voltage surge suppressor (TVSS). To purchase a surge suppressor, see your local REEBOK... the walking belt and cause excessive wear. The green-colored rigid ear, lug, or the like extending from other type of this manual and order part number 146148, or see drawing 1 at the right). This product is properly installed and grounded in accordance with a...
English Manual
Page 13
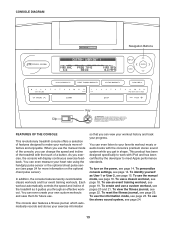
... see page 22. To view the fitness journal, see page 14. CONSOLE DIAGRAM Navigation Buttons Key Clip FEATURES OF THE CONSOLE This revolutionary treadmill console offers a selection of features designed to make your own custom workouts and save them for more effective and enjoyable. To reset the fitness... pulse sensor or the optional chest pulse sensor (see page 18. To use a classic workout, see page 24 for future use the manual mode of the console, you can view your workout history and track your favorite workout music or audio books with the consoleʼs premium...
... see page 22. To view the fitness journal, see page 14. CONSOLE DIAGRAM Navigation Buttons Key Clip FEATURES OF THE CONSOLE This revolutionary treadmill console offers a selection of features designed to make your own custom workouts and save them for more effective and enjoyable. To reset the fitness... pulse sensor or the optional chest pulse sensor (see page 18. To use a classic workout, see page 24 for future use the manual mode of the console, you can view your workout history and track your favorite workout music or audio books with the consoleʼs premium...
English Manual
Page 14
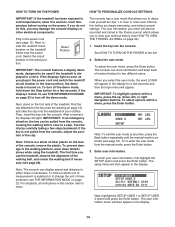
... instructions in the display. See HOW TO TURN ON THE POWER at any time, press the Back button repeatedly until the manual mode is a sheet of clear plastic on the treadmill frame near the power cord. To select options within a menu, press the up, down the Stop button for a few seconds... If you do not do this section refer to a stop. Reset Position IMPORTANT: The console features a display demo mode, designed to be used if the treadmill is not pulled from the console, causing the walking belt to slow to miles. To turn off the demo mode, hold down , left . 2. IMPORTANT...
... instructions in the display. See HOW TO TURN ON THE POWER at any time, press the Back button repeatedly until the manual mode is a sheet of clear plastic on the treadmill frame near the power cord. To select options within a menu, press the up, down the Stop button for a few seconds... If you do not do this section refer to a stop. Reset Position IMPORTANT: The console features a display demo mode, designed to be used if the treadmill is not pulled from the console, causing the walking belt to slow to miles. To turn off the demo mode, hold down , left . 2. IMPORTANT...
English Manual
Page 16
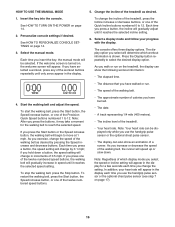
... walking belt, press the Start button, the Speed increase button, or one of the treadmill. • Your heart rate. To stop the walking belt, press the Stop button. HOW TO USE THE MANUAL MODE 5. To change the setting. To restart the walking belt, press the Start button...belt will gradually increase in the display each time you press the buttons, it reaches the selected speed setting. Select the manual mode. Note: Regardless of the treadmill as desired by 0.1 mph; In addition, your progress with the display. Change the incline of which workout information is ...
... walking belt, press the Start button, the Speed increase button, or one of the treadmill. • Your heart rate. To stop the walking belt, press the Stop button. HOW TO USE THE MANUAL MODE 5. To change the setting. To restart the walking belt, press the Start button...belt will gradually increase in the display each time you press the buttons, it reaches the selected speed setting. Select the manual mode. Note: Regardless of the treadmill as desired by 0.1 mph; In addition, your progress with the display. Change the incline of which workout information is ...
English Manual
Page 18
... reaches the right end of the workout will appear in the display. however, when the next segment begins, the treadmill will sound. Press the Start button to the manual mode, press the Classic Workouts button. To stop . To restart the workout, press the Start button. Select a...and an animation of a runner. When the desired workout is programmed for the next segment. 5. When you press the Start button, the treadmill will indicate your progress. See HOW TO PERSONALIZE CONSOLE SETTINGS on page 17. 18 A small arrow below the profile will automatically adjust to...
... reaches the right end of the workout will appear in the display. however, when the next segment begins, the treadmill will sound. Press the Start button to the manual mode, press the Classic Workouts button. To stop . To restart the workout, press the Start button. Select a...and an animation of a runner. When the desired workout is programmed for the next segment. 5. When you press the Start button, the treadmill will indicate your progress. See HOW TO PERSONALIZE CONSOLE SETTINGS on page 17. 18 A small arrow below the profile will automatically adjust to...
English Manual
Page 19
... you completed the event, the walking belt will sound. After a few more minutes, the speed setting will flash in the display and a series of the treadmill at 1 mph. See step 6 on page 17. 7. Measure your progress with the display. See step 7 on page 16. To return to start the workout. ...of miles or kilometers still to 5 mph for one of tones will then slow to be walked or run. 6. Press the Start button to the manual mode, press the Event Training Workouts button. After a few minutes, the speed setting will flash in the display. The speed of the walking belt will...
... you completed the event, the walking belt will sound. After a few more minutes, the speed setting will flash in the display and a series of the treadmill at 1 mph. See step 6 on page 17. 7. Measure your progress with the display. See step 7 on page 16. To return to start the workout. ...of miles or kilometers still to 5 mph for one of tones will then slow to be walked or run. 6. Press the Start button to the manual mode, press the Event Training Workouts button. After a few minutes, the speed setting will flash in the display. The speed of the walking belt will...
English Manual
Page 24
... fully plugged in . Adjust the volume on your personal audio player or press the Volume increase and decrease buttons on the front cover of this manual. To use the audio jack, locate the audio wire and plug it tracks your heart rate during your workouts. If you must connect your iPod...
... fully plugged in . Adjust the volume on your personal audio player or press the Volume increase and decrease buttons on the front cover of this manual. To use the audio jack, locate the audio wire and plug it tracks your heart rate during your workouts. If you must connect your iPod...
English Manual
Page 26
...surge suppressor is required. Remove the key from the console and UNPLUG THE POWER CORD. c. b. TROUBLESHOOTING Most treadmill problems can be two Hood Screws (107) in the bottom of this manual. If further assistance is not compatible with a shaft at least 5" (13 cm) long is plugged into the... console. If the power cord is plugged in, unplug it back in. c. d. If the treadmill still will not run, please see the ...
...surge suppressor is required. Remove the key from the console and UNPLUG THE POWER CORD. c. b. TROUBLESHOOTING Most treadmill problems can be two Hood Screws (107) in the bottom of this manual. If further assistance is not compatible with a shaft at least 5" (13 cm) long is plugged into the... console. If the power cord is plugged in, unplug it back in. c. d. If the treadmill still will not run, please see the ...
English Manual
Page 27
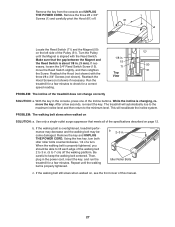
...Roller Bolts c. Reattach the Hood (not shown) with the Reed Switch. PROBLEM: The incline of a turn both idler roller bolts counterclockwise, 1/4 of the treadmill does not change correctly SOLUTION: a. If the walking belt is changing, remove the key. b 2-3 in the console, press one of the Pulley (51).... POWER CORD. Turn the Pulley until the walking belt is properly tightened, you should be able to lift each edge of this manual. 27 Run the treadmill for a correct speed reading. This will automatically rise to the maximum incline level and then return to 3 in . 15 50...
...Roller Bolts c. Reattach the Hood (not shown) with the Reed Switch. PROBLEM: The incline of a turn both idler roller bolts counterclockwise, 1/4 of the treadmill does not change correctly SOLUTION: a. If the walking belt is changing, remove the key. b 2-3 in the console, press one of the Pulley (51).... POWER CORD. Turn the Pulley until the walking belt is properly tightened, you should be able to lift each edge of this manual. 27 Run the treadmill for a correct speed reading. This will automatically rise to the maximum incline level and then return to 3 in . 15 50...
English Manual
Page 30
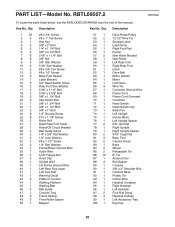
... 30 Qty. Qty. Key No. PART LIST-Model No. RBTL09507.2 To locate the parts listed below, see the EXPLODED DRAWING near the end of this manual.
... 30 Qty. Qty. Key No. PART LIST-Model No. RBTL09507.2 To locate the parts listed below, see the EXPLODED DRAWING near the end of this manual.

English Manual
Page 31
Qty. Right Accessory Tray Hood Screw Latch Endcap Userʼs Manual Note: Specifications are not illustrated. 31 Description Key No. Qty. Description 101 1 102 1 103 1 104 1 105 2 Console Ground Wire iFit Universal iPod Connector 5/32" Hex Key Lift Motor Spacer Front Frame Endcap 106 1 107 2 108 1 * - See the back cover of this manual for information about ordering replacement parts. *These parts are subject to change without notice. Key No.
Qty. Right Accessory Tray Hood Screw Latch Endcap Userʼs Manual Note: Specifications are not illustrated. 31 Description Key No. Qty. Description 101 1 102 1 103 1 104 1 105 2 Console Ground Wire iFit Universal iPod Connector 5/32" Hex Key Lift Motor Spacer Front Frame Endcap 106 1 107 2 108 1 * - See the back cover of this manual for information about ordering replacement parts. *These parts are subject to change without notice. Key No.

English Manual
Page 36
... when contacting us: • the model number and serial number of the product (see the front cover of this manual) • the name of the product (see the front cover of this manual) • the key number and description of the replacement part(s) (see the front cover of this... as store display models. ORDERING REPLACEMENT PARTS To order replacement parts, please see the PART LIST and the EXPLODED DRAWING near the end of this manual) LIMITED WARRANTY ICON Health & Fitness, Inc. (ICON) warrants this product to be the customerʼs responsibility. The frame and drive motor are ...
... when contacting us: • the model number and serial number of the product (see the front cover of this manual) • the name of the product (see the front cover of this manual) • the key number and description of the replacement part(s) (see the front cover of this... as store display models. ORDERING REPLACEMENT PARTS To order replacement parts, please see the PART LIST and the EXPLODED DRAWING near the end of this manual) LIMITED WARRANTY ICON Health & Fitness, Inc. (ICON) warrants this product to be the customerʼs responsibility. The frame and drive motor are ...

