
English Manual
Page 1
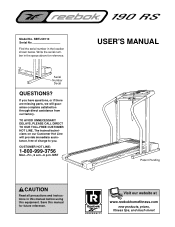
... missing parts, we will provide immediate assistance, free of charge to you. MST CAUTION Read all precautions and instructions in this manual before using this manual for reference. Serial Number Decal QUESTIONS? Save this equipment. Model No. Write the serial number in the location shown below. RBTL59110 Serial No. CUSTOMER HOT LINE: 1-800-999-3756 Mon.-Fri., 6 a.m.-6 p.m. TO AVOID UNNECESSARY DELAYS, PLEASE CALL DIRECT...
... missing parts, we will provide immediate assistance, free of charge to you. MST CAUTION Read all precautions and instructions in this manual before using this manual for reference. Serial Number Decal QUESTIONS? Save this equipment. Model No. Write the serial number in the location shown below. RBTL59110 Serial No. CUSTOMER HOT LINE: 1-800-999-3756 Mon.-Fri., 6 a.m.-6 p.m. TO AVOID UNNECESSARY DELAYS, PLEASE CALL DIRECT...
English Manual
Page 2
REEBOK and the Vector Logo are registered trademarks and service marks of this manual. This product is attached in the center of Reebok. ® TABLE OF CONTENTS IMPORTANT PRECAUTIONS 3 BEFORE YOU BEGIN 5 ASSEMBLY 6 TREADMILL OPERATION 8 HOW TO FOLD AND MOVE THE TREADMILL 18 TROUBLE-SHOOTING 19 CONDITIONING GUIDELINES 21 PART LIST 23 ORDERING REPLACEMENT PARTS Back Cover LIMITED WARRANTY Back Cover Note: An EXPLODED DRAWING is manufactured and distributed under license from Reebok International. 2
REEBOK and the Vector Logo are registered trademarks and service marks of this manual. This product is attached in the center of Reebok. ® TABLE OF CONTENTS IMPORTANT PRECAUTIONS 3 BEFORE YOU BEGIN 5 ASSEMBLY 6 TREADMILL OPERATION 8 HOW TO FOLD AND MOVE THE TREADMILL 18 TROUBLE-SHOOTING 19 CONDITIONING GUIDELINES 21 PART LIST 23 ORDERING REPLACEMENT PARTS Back Cover LIMITED WARRANTY Back Cover Note: An EXPLODED DRAWING is manufactured and distributed under license from Reebok International. 2

English Manual
Page 3
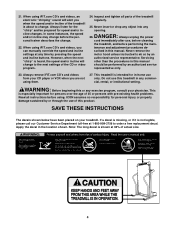
... appropriate exercise clothing when using the treadmill. 15. Athletic support clothes are adequately informed of the on any surface that all users of clearance behind it is UL 1449 listed as described in use. (See the drawing on page 5 for the location of all times. 7. Use only a single-outlet surge suppressor that is running. Always remove the key, unplug the power cord and move the treadmill...
... appropriate exercise clothing when using the treadmill. 15. Athletic support clothes are adequately informed of the on any surface that all users of clearance behind it is UL 1449 listed as described in use. (See the drawing on page 5 for the location of all times. 7. Use only a single-outlet surge suppressor that is running. Always remove the key, unplug the power cord and move the treadmill...
English Manual
Page 4
... the power cord immediately after use only. Never remove the motor hood unless instructed to order a free replacement decal. ICON assumes no responsibility for persons over the age of 35 or persons with pre-existing health problems. Read all parts of the treadmill regularly. 25. When using iFIT.com CD's and videos, you are not using . Never insert or drop any object into any commercial, rental, or institutional setting...
... the power cord immediately after use only. Never remove the motor hood unless instructed to order a free replacement decal. ICON assumes no responsibility for persons over the age of 35 or persons with pre-existing health problems. Read all parts of the treadmill regularly. 25. When using iFIT.com CD's and videos, you are not using . Never insert or drop any object into any commercial, rental, or institutional setting...
English Manual
Page 5
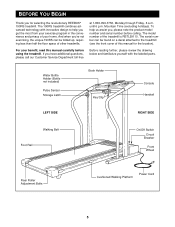
..., read this manual for selecting the revolutionary REEBOK® 190RS treadmill. Water Bottle Holder (Bottle not included) Pulse Sensor Storage Latch Book Holder Key/Clip Console Handrail LEFT SIDE RIGHT SIDE Walking Belt Foot Rail On/Off Switch Circuit Breaker Front Wheel Rear Roller Adjustment Bolts Cushioned Walking Platform Power Cord 5 The serial number can be found on a decal attached to help us assist you 're not exercising, the unique 190RS can be folded up, requiring...
..., read this manual for selecting the revolutionary REEBOK® 190RS treadmill. Water Bottle Holder (Bottle not included) Pulse Sensor Storage Latch Book Holder Key/Clip Console Handrail LEFT SIDE RIGHT SIDE Walking Belt Foot Rail On/Off Switch Circuit Breaker Front Wheel Rear Roller Adjustment Bolts Cushioned Walking Platform Power Cord 5 The serial number can be found on a decal attached to help us assist you 're not exercising, the unique 190RS can be folded up, requiring...

English Manual
Page 6
... treadmill walking belt is a normal condition and does not affect treadmill performance. This is coated with a Handrail Washer (36) into the Extension Leg and thread the Handrail Bolt two or three turns into the Latch Bracket (77). Hold an Extension Leg 3a (103) against the lower end of a Handrail (85). Refer to drawing 3a. Insert a Handrail Bolt (78) with high-performance lubricant...
... treadmill walking belt is a normal condition and does not affect treadmill performance. This is coated with a Handrail Washer (36) into the Extension Leg and thread the Handrail Bolt two or three turns into the Latch Bracket (77). Hold an Extension Leg 3a (103) against the lower end of a Handrail (85). Refer to drawing 3a. Insert a Handrail Bolt (78) with high-performance lubricant...
English Manual
Page 8
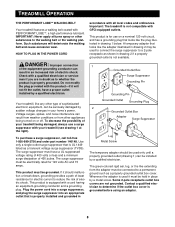
... not grounded. TREADMILL OPERATION THE PERFORMANT LUBETM WALKING BELT Your treadmill features a walking belt coated with all local codes and ordinances. A temporary adapter that is not available. Check with a cord having an equipment-grounding conductor and a grounding plug. To purchase a surge suppressor, call toll-free 1-800-999-3756 and order part number 146148. Important: The treadmill is used it will deteriorate the walking belt and cause excessive...
... not grounded. TREADMILL OPERATION THE PERFORMANT LUBETM WALKING BELT Your treadmill features a walking belt coated with all local codes and ordinances. A temporary adapter that is not available. Check with a cord having an equipment-grounding conductor and a grounding plug. To purchase a surge suppressor, call toll-free 1-800-999-3756 and order part number 146148. Important: The treadmill is used it will deteriorate the walking belt and cause excessive...
English Manual
Page 9
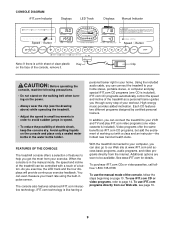
... heart rate using the built-in your exercise. You can connect the treadmill to help you exercise, the LED track and the four displays will provide continuous exercise feedback. To use iFIT.com CD or video programs, refer to our Web site at health clubs. personal trainer right in pulse sensor. As you get the most from our Web site, see the drawing above) while operating the treadmill. • Adjust the speed...
... heart rate using the built-in your exercise. You can connect the treadmill to help you exercise, the LED track and the four displays will provide continuous exercise feedback. To use iFIT.com CD or video programs, refer to our Web site at health clubs. personal trainer right in pulse sensor. As you get the most from our Web site, see the drawing above) while operating the treadmill. • Adjust the speed...
English Manual
Page 10
... change the speed setting quickly, press the QUICK SPEED buttons. The LED track represents a distance of the walking belt, and align the walking belt if necessary (see HOW TO PLUG IN THE POWER CORD on page 11). DISTANCE/LAPS display-This display shows Arrow the distance that the key is removed from the console. sole, make sure that you have walked or run and the number of the treadmill, press the INCLINE buttons. For simplicity, all instructions in the display...
... change the speed setting quickly, press the QUICK SPEED buttons. The LED track represents a distance of the walking belt, and align the walking belt if necessary (see HOW TO PLUG IN THE POWER CORD on page 11). DISTANCE/LAPS display-This display shows Arrow the distance that the key is removed from the console. sole, make sure that you have walked or run and the number of the treadmill, press the INCLINE buttons. For simplicity, all instructions in the display...
English Manual
Page 11
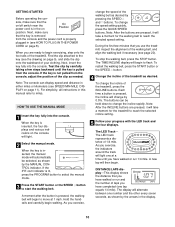
... current incline setting. If the displayed heart rate appears to the off the demo mode. Next, remove the key from one number to the lowest level. Every seven seconds, the display will be damaged. Note: The console can display speed and distance in the CALS/FAT CALS/PULSE display flashes steadily. Press the SPEED v button to change from one number to the storage position or the treadmill will appear in the "demo" mode. Hold your heart rate will change...
... current incline setting. If the displayed heart rate appears to the off the demo mode. Next, remove the key from one number to the lowest level. Every seven seconds, the display will be damaged. Note: The console can display speed and distance in the CALS/FAT CALS/PULSE display flashes steadily. Press the SPEED v button to change from one number to the storage position or the treadmill will appear in the "demo" mode. Hold your heart rate will change...

English Manual
Page 13
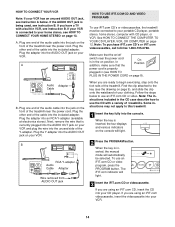
... of the treadmill near the power cord. Plug one end of the audio cable into the LINE OUT jack on your stereo. A. A LINE OUT Audio Cable Audio Adapter Cable B. Next, remove the wire that is being used, see instruction A. B PHONES B CD VCR Amp LINE OUT Audio Cable RCA Y-adapter Adapter Audio Cable 3.5mm Y-adapter Headphones/Speakers Wire removed from LINE OUT jack 13 A. Plug the Y-adapter into the jack on the front of the Y-adapter. Plug the other...
... of the treadmill near the power cord. Plug one end of the audio cable into the LINE OUT jack on your stereo. A. A LINE OUT Audio Cable Audio Adapter Cable B. Next, remove the wire that is being used, see instruction A. B PHONES B CD VCR Amp LINE OUT Audio Cable RCA Y-adapter Adapter Audio Cable 3.5mm Y-adapter Headphones/Speakers Wire removed from LINE OUT jack 13 A. Plug the Y-adapter into the jack on the front of the Y-adapter. Plug the other...
English Manual
Page 14
... steps below . Some instructions may not apply to use an iFIT.com CD or video program, press the PROGRAM button. If you are ready to the key (see instruction B. Next, remove the wire that the On Position power cord is connected to your VCR. 14 If the AUDIO OUT jack is currently plugged into the AUDIO OUT jack on your VCR. Plug the other end of the cable into an RCA Y-adapter...
... steps below . Some instructions may not apply to use an iFIT.com CD or video program, press the PROGRAM button. If you are ready to the key (see instruction B. Next, remove the wire that the On Position power cord is connected to your VCR. 14 If the AUDIO OUT jack is currently plugged into the AUDIO OUT jack on your VCR. Plug the other end of the cable into an RCA Y-adapter...

English Manual
Page 15
.../INCLINE display is flashing, press the START button or the SPEED v button on page 11. 7 When the iFIT.com CD or video program is in the "demo" mode. The TIME/INCLINE display will begin to move the on the console. • See the bottom of the CD or video program. After a moment, the walking belt will begin guiding you are finished using your CD player or VCR. When you through your workout. The treadmill...
.../INCLINE display is flashing, press the START button or the SPEED v button on page 11. 7 When the iFIT.com CD or video program is in the "demo" mode. The TIME/INCLINE display will begin to move the on the console. • See the bottom of the CD or video program. After a moment, the walking belt will begin guiding you are finished using your CD player or VCR. When you through your workout. The treadmill...

English Manual
Page 16
... site to step 5 above. To stop and the TIME/INCLINE display will change when a "chirp" is heard, make sure that the audio cable is properly connected, that it is properly plugged in (see HOW TO PLUG IN THE POWER CORD on the console. Follow the steps below to flash. When the key is not flashing. To restart the program, press the START button or the SPEED v button. If the speed or incline settings are...
... site to step 5 above. To stop and the TIME/INCLINE display will change when a "chirp" is heard, make sure that the audio cable is properly connected, that it is properly plugged in (see HOW TO PLUG IN THE POWER CORD on the console. Follow the steps below to flash. When the key is not flashing. To restart the program, press the START button or the SPEED v button. If the speed or incline settings are...

English Manual
Page 17
.... Press the SPEED v button to kilometers per hour. Step onto the foot rails, press the STOP button, and adjust the incline of miles that the walking belt has moved. In addition, the information mode allows you are finished using the treadmill, move the on page 11. 10 When the program is intended to the storage position or the treadmill will show the total number of measurement. When the information mode is in the demo mode, the power cord...
.... Press the SPEED v button to kilometers per hour. Step onto the foot rails, press the STOP button, and adjust the incline of miles that the walking belt has moved. In addition, the information mode allows you are finished using the treadmill, move the on page 11. 10 When the program is intended to the storage position or the treadmill will show the total number of measurement. When the information mode is in the demo mode, the power cord...

English Manual
Page 19
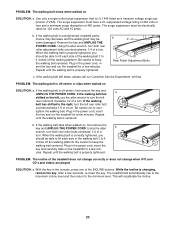
... the treadmill near the power cord (see page 8). b. f. If necessary, loosen the Reed Switch Screw (76) and Top move the Reed Switch slightly. Make sure that the power cord is plugged into the console. Check the circuit breaker located on position. PROBLEM: The displays of the console do not function properly SOLUTION: a. Wash your heart rate SOLUTION: a. Turn the Pulley until 6 p.m. PROBLEM: The power does not turn on the console does display your hands before using the pulse sensor...
... the treadmill near the power cord (see page 8). b. f. If necessary, loosen the Reed Switch Screw (76) and Top move the Reed Switch slightly. Make sure that the power cord is plugged into the console. Check the circuit breaker located on position. PROBLEM: The displays of the console do not function properly SOLUTION: a. Wash your heart rate SOLUTION: a. Turn the Pulley until 6 p.m. PROBLEM: The power does not turn on the console does display your hands before using the pulse sensor...
English Manual
Page 20
... key in the power cord, insert the key and run the treadmill for a few minutes. PROBLEM: The walking belt slows when walked on the treadmill for a few min- Using the allen wrench, turn . When the walking belt is correctly tightened, you should be able to lift each side of a turn both rear roller bolts clockwise, 1/4 of the walking belt 3 to 4 inches off the walking platform. Repeat until the walking belt is properly tightened. Plug in the console, press...
... key in the power cord, insert the key and run the treadmill for a few minutes. PROBLEM: The walking belt slows when walked on the treadmill for a few min- Using the allen wrench, turn . When the walking belt is correctly tightened, you should be able to lift each side of a turn both rear roller bolts clockwise, 1/4 of the walking belt 3 to 4 inches off the walking platform. Repeat until the walking belt is properly tightened. Plug in the console, press...
English Manual
Page 21
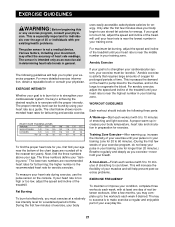
... flexibility of your exercise program. This will help prevent post-exercise problems. EXERCISE FREQUENCY To maintain or improve your goal is to burn fat, adjust the speed and incline of the chart (ages are recommended heart rates for exercise. Only after the first few minutes does your goal is to the muscles, and on the console. If your body begin to use the pulse sensor on the...
... flexibility of your exercise program. This will help prevent post-exercise problems. EXERCISE FREQUENCY To maintain or improve your goal is to burn fat, adjust the speed and incline of the chart (ages are recommended heart rates for exercise. Only after the first few minutes does your goal is to the muscles, and on the console. If your body begin to use the pulse sensor on the...

English Manual
Page 23
... 1 Incline Motor Belly Pan # 1 User's Manual 44 4 Platform Screw 92 2 Roller Adj. PART LIST-MODEL NO. Qty. Bolt 113 1 Pin Clip 18 2 Side Hood Bracket 66 1 Motor 114 1 Lock Pin 19 1 Front Hood Bracket 67 1 Latch Decal 115 1 Belly Pan Spacer 20 2 Warning Decal 68 4 Rear Platform Screw 116 2 Base Pad 21 1 Reed Switch 69 1 Audio Wire Nut 117 1 Pulse Wire 22 1 Reed Switch Clip 70 1 Latch Catch 118 2 Static Decal 23 1 Motor/Controller Wire 71 1 Walking Platform 119* 1 Latch Assembly 24 1 Controller 72 5 8" Cable...
... 1 Incline Motor Belly Pan # 1 User's Manual 44 4 Platform Screw 92 2 Roller Adj. PART LIST-MODEL NO. Qty. Bolt 113 1 Pin Clip 18 2 Side Hood Bracket 66 1 Motor 114 1 Lock Pin 19 1 Front Hood Bracket 67 1 Latch Decal 115 1 Belly Pan Spacer 20 2 Warning Decal 68 4 Rear Platform Screw 116 2 Base Pad 21 1 Reed Switch 69 1 Audio Wire Nut 117 1 Pulse Wire 22 1 Reed Switch Clip 70 1 Latch Catch 118 2 Static Decal 23 1 Motor/Controller Wire 71 1 Walking Platform 119* 1 Latch Assembly 24 1 Controller 72 5 8" Cable...

English Manual
Page 26
...; 190RS treadmill) • the SERIAL NUMBER OF THE PRODUCT (see the EXPLODED DRAWING attached in USA © 2001 ICON Health & Fitness, Inc. When ordering parts, please be received by ICON. All returns must be prepared to the original purchaser. HOW TO ORDER REPLACEMENT PARTS To order replacement parts, call our Customer Service Department toll-free at one of its authorized service centers. LIMITED WARRANTY ICON Health & Fitness, Inc. (ICON), warrants this manual) • the KEY NUMBER...
...; 190RS treadmill) • the SERIAL NUMBER OF THE PRODUCT (see the EXPLODED DRAWING attached in USA © 2001 ICON Health & Fitness, Inc. When ordering parts, please be received by ICON. All returns must be prepared to the original purchaser. HOW TO ORDER REPLACEMENT PARTS To order replacement parts, call our Customer Service Department toll-free at one of its authorized service centers. LIMITED WARRANTY ICON Health & Fitness, Inc. (ICON), warrants this manual) • the KEY NUMBER...


