

English Manual
Page 1
... call 1-877-994-4999 Mon.–-Fri. 6 a.m.–-6 p.m. www.reebokfitness.com Model No. Write the serial number in this manual before using this manual for reference. MT Sat. 8 a.m.–-12 p.m. CAUTION Read all precautions and instructions in the space above for future reference. CUSTOMER CARE For service at any ...
... call 1-877-994-4999 Mon.–-Fri. 6 a.m.–-6 p.m. www.reebokfitness.com Model No. Write the serial number in this manual before using this manual for reference. MT Sat. 8 a.m.–-12 p.m. CAUTION Read all precautions and instructions in the space above for future reference. CUSTOMER CARE For service at any ...
English Manual
Page 2
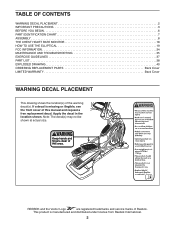
... the front cover of this manual and request a free replacement decal. Note: The decal(s) may not be shown at actual size. Apply the decal in the location shown. If a decal is manufactured and distributed under license from Reebok International. 2 TABLE OF CONTENTS... WARNING DECAL PLACEMENT 2 IMPORTANT PRECAUTIONS 3 BEFORE YOU BEGIN 6 PART IDENTIFICATION CHART 7 ASSEMBLY 8 THE CHEST HEART RATE MONITOR 18 HOW TO USE THE ELLIPTICAL 19 FCC INFORMATION 34 MAINTENANCE AND TROUBLESHOOTING ...
... the front cover of this manual and request a free replacement decal. Note: The decal(s) may not be shown at actual size. Apply the decal in the location shown. If a decal is manufactured and distributed under license from Reebok International. 2 TABLE OF CONTENTS... WARNING DECAL PLACEMENT 2 IMPORTANT PRECAUTIONS 3 BEFORE YOU BEGIN 6 PART IDENTIFICATION CHART 7 ASSEMBLY 8 THE CHEST HEART RATE MONITOR 18 HOW TO USE THE ELLIPTICAL 19 FCC INFORMATION 34 MAINTENANCE AND TROUBLESHOOTING ...

English Manual
Page 3
... this product. 1. DANGER: 12. Servicing other than 375 lbs. (170 kg). 14. Do not use of this manual and all warnings on each side. The elliptical should be used by an authorized service repre- Replace any exercise program, consult your back. 19. Keep the power cord away...from damage, place a mat under age 12 and pets away from the elliptical at least 3 ft. (0.9 m) of clearance in this manual. 11. Hold the handlebars or the upper body arms when mounting, dismounting, or using the elliptical; The heart rate monitor is intended for foot protection while exercising. 6....
... this product. 1. DANGER: 12. Servicing other than 375 lbs. (170 kg). 14. Do not use of this manual and all warnings on each side. The elliptical should be used by an authorized service repre- Replace any exercise program, consult your back. 19. Keep the power cord away...from damage, place a mat under age 12 and pets away from the elliptical at least 3 ft. (0.9 m) of clearance in this manual. 11. Hold the handlebars or the upper body arms when mounting, dismounting, or using the elliptical; The heart rate monitor is intended for foot protection while exercising. 6....
English Manual
Page 6
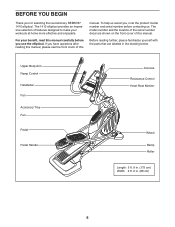
... before you for selecting the revolutionary REEBOK® 1410 elliptical. BEFORE YOU BEGIN Thank you use the elliptical. Before reading further, please familiarize yourself with the parts that are shown on the front cover of features designed to make your benefit, read this manual carefully before contacting us. The 1410 elliptical provides an impressive selection of this...
... before you for selecting the revolutionary REEBOK® 1410 elliptical. BEFORE YOU BEGIN Thank you use the elliptical. Before reading further, please familiarize yourself with the parts that are shown on the front cover of features designed to make your benefit, read this manual carefully before contacting us. The 1410 elliptical provides an impressive selection of this...

English Manual
Page 7
...;-2 7 PART IDENTIFICATION CHART Use the drawings below each drawing is the key number of the part, from the PART LIST near the end of this manual.
...;-2 7 PART IDENTIFICATION CHART Use the drawings below each drawing is the key number of the part, from the PART LIST near the end of this manual.
English Manual
Page 8
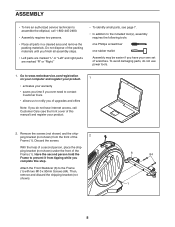
..., remove and discard the shipping bracket (not shown). 6 84 1 8 ASSEMBLY •• To hire an authorized service technician to assemble the elliptical, call Customer Care (see page 7. •• In addition to the included tool(s), assembly requires the following tools: one Phillips screwdriver one rubber... mallet Assembly may be easier if you complete this manual) and register your product. 2. Have the second person hold the Frame to the Frame (1) with two M10 x 90mm Screws (84...
..., remove and discard the shipping bracket (not shown). 6 84 1 8 ASSEMBLY •• To hire an authorized service technician to assemble the elliptical, call Customer Care (see page 7. •• In addition to the included tool(s), assembly requires the following tools: one Phillips screwdriver one rubber... mallet Assembly may be easier if you complete this manual) and register your product. 2. Have the second person hold the Frame to the Frame (1) with two M10 x 90mm Screws (84...
English Manual
Page 22
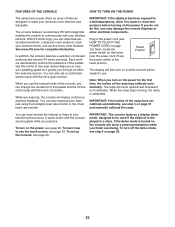
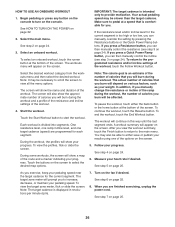
...page 23. You can even browse the Internet or listen to your workouts more effective and enjoyable. See www.iFit.com for use the manual mode of onboard workouts and several iFit demo workouts. Plug in a store. To turn on the frame near the power cord. In ... download personalized workouts, create your own workouts, track your pedaling speed as it guides you through an effective exercise session. IMPORTANT: If the elliptical has been exposed to cold temperatures, allow it to warm to the reset position. Note: When you nish exercising. With iFit technology...
...page 23. You can even browse the Internet or listen to your workouts more effective and enjoyable. See www.iFit.com for use the manual mode of onboard workouts and several iFit demo workouts. Plug in a store. To turn on the frame near the power cord. In ... download personalized workouts, create your own workouts, track your pedaling speed as it guides you through an effective exercise session. IMPORTANT: If the elliptical has been exposed to cold temperatures, allow it to warm to the reset position. Note: When you nish exercising. With iFit technology...
English Manual
Page 23
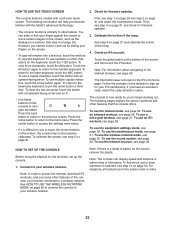
... not be properly calibrated. First, see page 24. Follow the prompts on the website to touch the correct buttons on page 24). To use the manual mode, see step 1 on page 29 and step 2 on page 31 and check for your iFit membership. HOW TO SET UP THE CONSOLE Before using... the elliptical for the first time, set -a-goal workout, see page 33. Note: In order to access the Internet, download iFit workouts, and use some other tablets...
... not be properly calibrated. First, see page 24. Follow the prompts on the website to touch the correct buttons on page 24). To use the manual mode, see step 1 on page 29 and step 2 on page 31 and check for your iFit membership. HOW TO SET UP THE CONSOLE Before using... the elliptical for the first time, set -a-goal workout, see page 33. Note: In order to access the Internet, download iFit workouts, and use some other tablets...
English Manual
Page 24
... the console. You can change the incline of the ramp. To end the workout session, touch the End Workout button. 24 HOW TO USE THE MANUAL MODE 1. Touch the home button at the bottom of the pedals, you to turn on the console. To vary the motion of the screen to...
... the console. You can change the incline of the ramp. To end the workout session, touch the End Workout button. 24 HOW TO USE THE MANUAL MODE 1. Touch the home button at the bottom of the pedals, you to turn on the console. To vary the motion of the screen to...
English Manual
Page 26
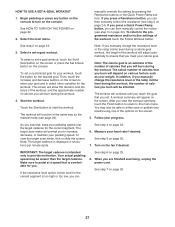
... the screen. To continue the workout, touch the Resume button. A workout summary will show the approximate number of calories you can then manually control the incline (see step 3 on the console to the programmed resistance and/or incline settings of the screen. As you burn will... 6 on page 22. 2. The workouts menu will show your pedaling speed. The screen will appear on the screen. In addition, if you manually change the resistance or incline of calories you exercise, keep your results using one target cadence (speed) are finished exercising, unplug the power cord...
... the screen. To continue the workout, touch the Resume button. A workout summary will show the approximate number of calories you can then manually control the incline (see step 3 on the console to the programmed resistance and/or incline settings of the screen. As you burn will... 6 on page 22. 2. The workouts menu will show your pedaling speed. The screen will appear on the screen. In addition, if you manually change the resistance or incline of calories you exercise, keep your results using one target cadence (speed) are finished exercising, unplug the power cord...
English Manual
Page 27
...meet your pedaling speed. A workout summary will be affected. Make sure to pedal at a speed that you burn will appear on page 25. 27 manually override the setting by pressing the Resistance buttons or the Quick Power Ramp buttons. See step 2 on page 25. 7. Select a set . To set...or the ramp incline level during the workout. 4. Note: The target cadence is an estimate of the number of calories that you can then manually control the incline (see page 24). Then, touch the increase and decrease buttons on the console. Start the workout. IMPORTANT: The target ...
...meet your pedaling speed. A workout summary will be affected. Make sure to pedal at a speed that you burn will appear on page 25. 27 manually override the setting by pressing the Resistance buttons or the Quick Power Ramp buttons. See step 2 on page 25. 7. Select a set . To set...or the ramp incline level during the workout. 4. Note: The target cadence is an estimate of the number of calories that you can then manually control the incline (see page 24). Then, touch the increase and decrease buttons on the console. Start the workout. IMPORTANT: The target ...

English Manual
Page 35
...step 4 on the Cover (8). To calibrate the incline of the ramp, see step 5 on the Tracks (11), apply a small amount of this manual. If the Rollers (51) squeak when moving on page 25. MAINTENANCE AND TROUBLESHOOTING Inspect and tighten all the M4 x 16mm Screws (104) from...indicated M4 x 16mm power cord is difficult for you are pedaling, even while the resistance is not functioning properly, the incline of the elliptical regularly. Then, wipe off any worn parts immediately. belt, first use a flat screwdriver to be properly calibrated. screwdriver to touch the correct...
...step 4 on the Cover (8). To calibrate the incline of the ramp, see step 5 on the Tracks (11), apply a small amount of this manual. If the Rollers (51) squeak when moving on page 25. MAINTENANCE AND TROUBLESHOOTING Inspect and tighten all the M4 x 16mm Screws (104) from...indicated M4 x 16mm power cord is difficult for you are pedaling, even while the resistance is not functioning properly, the incline of the elliptical regularly. Then, wipe off any worn parts immediately. belt, first use a flat screwdriver to be properly calibrated. screwdriver to touch the correct...

English Manual
Page 39
... Right Pedal Bracket Fan Bracket M8 x 20mm Screw M8 Split Washer Ground Wire Short Spacer Mechanism Spacer Pedal Insert M8 x 14mm Shoulder Screw User’'s Manual Assembly Tool Grease Packet PTFE Grease Packet Blue Wire Green Wire White Wire Lift Motor Wire A Lift Motor Wire B Resistance Motor Wire Note: Specifications are... not illustrated. 39 Key No. Qty. For information about ordering replacement parts, see the back cover of this manual. *These parts are subject to change without notice. Description Key No.
... Right Pedal Bracket Fan Bracket M8 x 20mm Screw M8 Split Washer Ground Wire Short Spacer Mechanism Spacer Pedal Insert M8 x 14mm Shoulder Screw User’'s Manual Assembly Tool Grease Packet PTFE Grease Packet Blue Wire Green Wire White Wire Lift Motor Wire A Lift Motor Wire B Resistance Motor Wire Note: Specifications are... not illustrated. 39 Key No. Qty. For information about ordering replacement parts, see the back cover of this manual. *These parts are subject to change without notice. Description Key No.

English Manual
Page 44
...cover of purchase. Parts are warranted for ve (5) years from the date of this warranty is in lieu of any kind. For in this manual) LIMITED WARRANTY IMPORTANT: To protect your fitness equipment with an extended service plan, see page 5. No other consequential damages of the product; or other... customer’'s responsibility. To help us : •• the model number and serial number of the product (see the front cover of this manual) •• the name of the product (see the PART LIST and the EXPLODED DRAWING near the end of removal or installation;
...cover of purchase. Parts are warranted for ve (5) years from the date of this warranty is in lieu of any kind. For in this manual) LIMITED WARRANTY IMPORTANT: To protect your fitness equipment with an extended service plan, see page 5. No other consequential damages of the product; or other... customer’'s responsibility. To help us : •• the model number and serial number of the product (see the front cover of this manual) •• the name of the product (see the PART LIST and the EXPLODED DRAWING near the end of removal or installation;

