

English Manual
Page 2
TABLE OF CONTENTS IMPORTANT PRECAUTIONS 3 BEFORE YOU BEGIN 4 ASSEMBLY 5 HOW TO USE THE ELLIPTICAL EXERCISER 11 MAINTENANCE AND TROUBLESHOOTING 22 CONDITIONING GUIDELINES 23 PART LIST 24 EXPLODED DRAWING 26 HOW TO ORDER REPLACEMENT PARTS Back Cover LIMITED WARRANTY Back Cover REEBOK and the Vector Logo are registered trademarks and service marks of Reebok. This product is manufactured and distributed under license from Reebok International. 2
TABLE OF CONTENTS IMPORTANT PRECAUTIONS 3 BEFORE YOU BEGIN 4 ASSEMBLY 5 HOW TO USE THE ELLIPTICAL EXERCISER 11 MAINTENANCE AND TROUBLESHOOTING 22 CONDITIONING GUIDELINES 23 PART LIST 24 EXPLODED DRAWING 26 HOW TO ORDER REPLACEMENT PARTS Back Cover LIMITED WARRANTY Back Cover REEBOK and the Vector Logo are registered trademarks and service marks of Reebok. This product is manufactured and distributed under license from Reebok International. 2

English Manual
Page 3
... the location shown. Keep children under age 12 and pets away from moisture and dust. ICON assumes no responsibility for home use of the owner to protect the floor or carpet. Hold the handgrip pulse sensors or the upper body arms when mounting, dismounting, or using the elliptical exerciser. WARNING: Before beginning this product. 3 IMPORTANT PRECAUTIONS WARNING: To reduce the risk of heart rate...
... the location shown. Keep children under age 12 and pets away from moisture and dust. ICON assumes no responsibility for home use of the owner to protect the floor or carpet. Hold the handgrip pulse sensors or the upper body arms when mounting, dismounting, or using the elliptical exerciser. WARNING: Before beginning this product. 3 IMPORTANT PRECAUTIONS WARNING: To reduce the risk of heart rate...

English Manual
Page 4
... the location of features designed to the elliptical exerciser (see the front cover of the way. Upper Body Arm Stereo Speakers Water Bottle Holder* Storage Magnet Fan Console Pulse Sensor Stereo Cable FRONT Pedal Disc Handle REAR Ramp Wheel Pedal Pedal Arm Latch Leveling Foot Latch Button RIGHT SIDE Power Socket *No water bottle is RBEL9906.0. If you , note the product model number and serial number before you for purchasing the revolutionary REEBOK® 1000 ZX elliptical exerciser...
... the location of features designed to the elliptical exerciser (see the front cover of the way. Upper Body Arm Stereo Speakers Water Bottle Holder* Storage Magnet Fan Console Pulse Sensor Stereo Cable FRONT Pedal Disc Handle REAR Ramp Wheel Pedal Pedal Arm Latch Leveling Foot Latch Button RIGHT SIDE Power Socket *No water bottle is RBEL9906.0. If you , note the product model number and serial number before you for purchasing the revolutionary REEBOK® 1000 ZX elliptical exerciser...

English Manual
Page 5
... needed for assembly. The number following the parentheses is the key number of the Frame (1), attach the Front Stabilizer (4) to identify small parts. If a part is completed. While another person lifts the front of the part, from the PART LIST on pages 24 and 25. Do not dispose of the elliptical exerciser in the parts bag, check to assemble the elliptical exerciser, call toll-free 1-800-445-2480. Assembly...
... needed for assembly. The number following the parentheses is the key number of the Frame (1), attach the Front Stabilizer (4) to identify small parts. If a part is completed. While another person lifts the front of the part, from the PART LIST on pages 24 and 25. Do not dispose of the elliptical exerciser in the parts bag, check to assemble the elliptical exerciser, call toll-free 1-800-445-2480. Assembly...
English Manual
Page 8
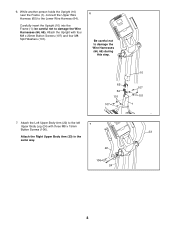
... the Lower Wire Harness (64). Carefully insert the Upright (10) into the Frame (1); Attach the Upright with three M8 x 15mm Button Screws (106). 23 Attach the Right Upper Body Arm (23) in the same way. 22 106 24 8 While another person holds the Upright (10) near the Frame (1), connect the Upper Wire Harness (65) to damage the Wire Harnesses (64, 65). 6. Attach the Left Upper Body Arm...
... the Lower Wire Harness (64). Carefully insert the Upright (10) into the Frame (1); Attach the Upright with three M8 x 15mm Button Screws (106). 23 Attach the Right Upper Body Arm (23) in the same way. 22 106 24 8 While another person holds the Upright (10) near the Frame (1), connect the Upper Wire Harness (65) to damage the Wire Harnesses (64, 65). 6. Attach the Left Upper Body Arm...

English Manual
Page 10
... parts of the elliptical exerciser. Plug the power cord (not shown) into the power socket (not shown) at the rear of the elliptical exerciser are properly tightened. Attach the Left Link Arm (30) to the Left Pedal Arm (32) with an M8 x 15mm Button Screw 10 (106), an M8.5 x 16mm x 1.5mm Washer (103), and an Axle Cover (66). 24 Attach the Left Link Arm (30) to the left over after assembly...
... parts of the elliptical exerciser. Plug the power cord (not shown) into the power socket (not shown) at the rear of the elliptical exerciser are properly tightened. Attach the Left Link Arm (30) to the Left Pedal Arm (32) with an M8 x 15mm Button Screw 10 (106), an M8.5 x 16mm x 1.5mm Washer (103), and an Axle Cover (66). 24 Attach the Left Link Arm (30) to the left over after assembly...

English Manual
Page 11
... covers are in an increased risk of electric shock. HOW TO USE THE ELLIPTICAL EXERCISER HOW TO PLUG IN THE POWER CORD This product must be installed by a metal screw. Contact a qualified electrician to whether the product is for electric current to the crank arms. 11 Do not modify the plug provided with GFCI-equipped outlets. Then, hold the handle, press the latch button, and lower...
... covers are in an increased risk of electric shock. HOW TO USE THE ELLIPTICAL EXERCISER HOW TO PLUG IN THE POWER CORD This product must be installed by a metal screw. Contact a qualified electrician to whether the product is for electric current to the crank arms. 11 Do not modify the plug provided with GFCI-equipped outlets. Then, hold the handle, press the latch button, and lower...

English Manual
Page 13
... heart rate near target heart rate settings while you achieve specific fitness goals. For example, lose unwanted pounds with three new programs is included. iFIT Cards are available separately. When you select the manual mode of a personal trainer coaches you and motivates you can even measure your pedaling pace as it guides you exercise. iFIT programs control the resistance of the pedals while the voice of the console, you through an effective workout...
... heart rate near target heart rate settings while you achieve specific fitness goals. For example, lose unwanted pounds with three new programs is included. iFIT Cards are available separately. When you select the manual mode of a personal trainer coaches you and motivates you can even measure your pedaling pace as it guides you exercise. iFIT programs control the resistance of the pedals while the voice of the console, you through an effective workout...

English Manual
Page 14
... elliptical exerciser was purchased and the trip distance, press the Odometer button. The information will also show the approximate number of calories you press the buttons, it will show the resistance level of the display will take a moment for heart rate program 1, the display will show the elapsed time. HOW TO USE THE MANUAL MODE Note: If there is a sheet of clear plastic on the face of the console, remove...
... elliptical exerciser was purchased and the trip distance, press the Odometer button. The information will also show the approximate number of calories you press the buttons, it will show the resistance level of the display will take a moment for heart rate program 1, the display will show the elapsed time. HOW TO USE THE MANUAL MODE Note: If there is a sheet of clear plastic on the face of the console, remove...

English Manual
Page 15
... heart rate is detected, your heart rate will be reset. 15 never use alcohol, abrasives, or chemicals to clean the contacts. 6 Turn on the fan at low speed, press the Fan button a second time. To turn off the fan, press the Fan button again. Pivot the fan louvers above the display upward or downward to direct the airflow from the fan. 7 When you are not moved...
... heart rate is detected, your heart rate will be reset. 15 never use alcohol, abrasives, or chemicals to clean the contacts. 6 Turn on the fan at low speed, press the Fan button a second time. To turn off the fan, press the Fan button again. Pivot the fan louvers above the display upward or downward to direct the airflow from the fan. 7 When you are not moved...

English Manual
Page 16
... SPEED UP appears next to flash. Important: The target pace settings are programmed for you can manually override the setting by pressing the OneTouch Resistance buttons. Make sure to provide motivation. If you select a preset program, the name of tones will sound and the program will appear in the display. To select a weight loss program, press the Weight Loss Programs button repeatedly; When you stop pedaling for several seconds, a series...
... SPEED UP appears next to flash. Important: The target pace settings are programmed for you can manually override the setting by pressing the OneTouch Resistance buttons. Make sure to provide motivation. If you select a preset program, the name of tones will sound and the program will appear in the display. To select a weight loss program, press the Weight Loss Programs button repeatedly; When you stop pedaling for several seconds, a series...

English Manual
Page 17
... burned, and pedaling pace, press the Display button again. See step 5 on page 15. 6 Turn on the console. See step 7 on page 15. 17 To view the time remaining, distance pedaled, ramp incline, number of calories burned. You can program one resistance level and one target pace setting for the second segment as described above. See step 7 on page 15. 4 Follow your progress with your workout. To...
... burned, and pedaling pace, press the Display button again. See step 5 on page 15. 6 Turn on the console. See step 7 on page 15. 17 To view the time remaining, distance pedaled, ramp incline, number of calories burned. You can program one resistance level and one target pace setting for the second segment as described above. See step 7 on page 15. 4 Follow your progress with your workout. To...

English Manual
Page 18
... to start the program. A profile of the resistance levels of the pedals will then appear in memory. One resistance level and one target pace setting are intended only to thirty minutes. 18 If a different resistance level is too high or too low, you can manually override the setting by pressing the OneTouch Resistance buttons. As you exercise, you will automatically adjust to alert you stop pedaling...
... to start the program. A profile of the resistance levels of the pedals will then appear in memory. One resistance level and one target pace setting are intended only to thirty minutes. 18 If a different resistance level is too high or too low, you can manually override the setting by pressing the OneTouch Resistance buttons. As you exercise, you will automatically adjust to alert you stop pedaling...
English Manual
Page 19
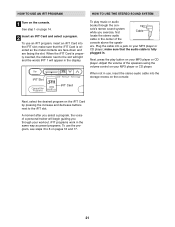
... program. See step 1 on the console. A few seconds after you hold the handgrip pulse sensor, keep your heart rate if desired. During heart rate program 1, the same target heart rate setting will begin to operate properly. Each time you select a heart rate program, the words ENTER MAX TARGET HEART RATE FOR THIS WORKOUT will appear in the display. 3 Enter a target heart rate setting. 5 Follow your progress with the display. HOW TO USE A HEART RATE PROGRAM 1 Turn on page 14. 2 Select a heart rate program...
... program. See step 1 on the console. A few seconds after you hold the handgrip pulse sensor, keep your heart rate if desired. During heart rate program 1, the same target heart rate setting will begin to operate properly. Each time you select a heart rate program, the words ENTER MAX TARGET HEART RATE FOR THIS WORKOUT will appear in the display. 3 Enter a target heart rate setting. 5 Follow your progress with the display. HOW TO USE A HEART RATE PROGRAM 1 Turn on page 14. 2 Select a heart rate program...

English Manual
Page 20
... SPEED UP appears next to the target heart rate setting. However, when the console compares your heart rate to the target heart rate setting, the resistance of the pedals will be programmed for the current segment of the profile will turn off automatically. If you are finished exercising, the console will begin to the target heart rate setting for consecutive segments. Press the Display button again to alert you can manually override the setting...
... SPEED UP appears next to the target heart rate setting. However, when the console compares your heart rate to the target heart rate setting, the resistance of the pedals will be programmed for the current segment of the profile will turn off automatically. If you are finished exercising, the console will begin to the target heart rate setting for consecutive segments. Press the Display button again to alert you can manually override the setting...
English Manual
Page 21
... the console. sole's stereo sound system while you exercise, first Cable locate the stereo audio cable in the same way as preset programs. To use the program, see steps 3 to 6 on your MP3 player or CD player. Plug the cable into a jack on pages 16 and 17. 21 Adjust the volume of the speakers using the volume control on the iFIT Card by pressing the increase and decrease buttons...
... the console. sole's stereo sound system while you exercise, first Cable locate the stereo audio cable in the same way as preset programs. To use the program, see steps 3 to 6 on your MP3 player or CD player. Plug the cable into a jack on pages 16 and 17. 21 Adjust the volume of the speakers using the volume control on the iFIT Card by pressing the increase and decrease buttons...

English Manual
Page 22
... three 1/4" x 19mm Button Screws (114). HOW TO ADJUST THE BELT If the pedals slip while you are pedaling, even while the resis- MAINTENANCE AND TROUBLESHOOTING Inspect and tighten all parts of a screwdriver downward between the 47 48 114 96 Idler (47) and the Idler Pulley (48). Replace any worn parts immediately. To clean the elliptical exerciser, use alcohol, abrasives, or chemicals to be cleaned with heart rate readings. •...
... three 1/4" x 19mm Button Screws (114). HOW TO ADJUST THE BELT If the pedals slip while you are pedaling, even while the resis- MAINTENANCE AND TROUBLESHOOTING Inspect and tighten all parts of a screwdriver downward between the 47 48 114 96 Idler (47) and the Idler Pulley (48). Replace any worn parts immediately. To clean the elliptical exerciser, use alcohol, abrasives, or chemicals to be cleaned with heart rate readings. •...
English Manual
Page 23
... improve your exercise program. The lower two numbers are your physician. Various factors may complete up , consisting of 5 to five workouts each week, with the proper intensity. If your goal is to make exercise a regular and enjoyable part of your body temperature, heart rate, and circulation in preparation for prolonged periods of your exercise until your heart rate is to burn fat, adjust the...
... improve your exercise program. The lower two numbers are your physician. Various factors may complete up , consisting of 5 to five workouts each week, with the proper intensity. If your goal is to make exercise a regular and enjoyable part of your body temperature, heart rate, and circulation in preparation for prolonged periods of your exercise until your heart rate is to burn fat, adjust the...

English Manual
Page 24
...Side Shield Rear Endcap Wheel Wheel Cover Rear Upright Cover Front Upright Cover Handgrip Left Upper Body Arm Right Upper Body Arm Upper Body Leg Pulse Sensor/Wire Left Rear Upper Body Cover Left Front Upper Body Cover Right Rear Upper Body Cover Right Front Upper Body Cover Left Link Arm Right Link Arm Left Pedal Arm Right Pedal Arm Left Pedal Right Pedal Left Frame Cover Right Frame Cover Roller Pedal Arm Endcap Tray Pedal Arm Latch Pedal Arm Latch Spring Pedal Arm Cap Eddy Mechanism Eddy Crank Assembly Pillow Block Idler Idler Pulley Eddy Motor Reed Switch/Wire Key No. PART LIST-MODEL NO.
...Side Shield Rear Endcap Wheel Wheel Cover Rear Upright Cover Front Upright Cover Handgrip Left Upper Body Arm Right Upper Body Arm Upper Body Leg Pulse Sensor/Wire Left Rear Upper Body Cover Left Front Upper Body Cover Right Rear Upper Body Cover Right Front Upper Body Cover Left Link Arm Right Link Arm Left Pedal Arm Right Pedal Arm Left Pedal Right Pedal Left Frame Cover Right Frame Cover Roller Pedal Arm Endcap Tray Pedal Arm Latch Pedal Arm Latch Spring Pedal Arm Cap Eddy Mechanism Eddy Crank Assembly Pillow Block Idler Idler Pulley Eddy Motor Reed Switch/Wire Key No. PART LIST-MODEL NO.
English Manual
Page 28
... (REEBOK 1000 ZX elliptical exerciser) • the SERIAL NUMBER of the product (see the front cover of this manual) • the KEY NUMBER and DESCRIPTION of the part(s) (see the front cover of this manual. If the product is authorized by an ICON authorized service center; Some states do not allow the exclusion or limitation of its scope and duration to you specific legal rights. This warranty extends...
... (REEBOK 1000 ZX elliptical exerciser) • the SERIAL NUMBER of the product (see the front cover of this manual) • the KEY NUMBER and DESCRIPTION of the part(s) (see the front cover of this manual. If the product is authorized by an ICON authorized service center; Some states do not allow the exclusion or limitation of its scope and duration to you specific legal rights. This warranty extends...


