Quick Start Guide
Page 1
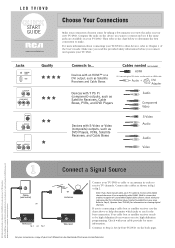
... User's Manual can be high definition if you want to connect and see if the same jacks are trademarks or registered trademarks of unscrambled digital cable content. Connect the cables as DVD Players, VCRs, Satellite Receivers, and Cable Boxes S-Video Audio Audio Video RCA and associated marks are trademarks of the User's Guide. For more information. Connect a Signal Source Cable (wall outlet) OR ANT Television fig.1 OR fig.2 or Antenna ANT Television Connect your TV/DVD to cable...
... User's Manual can be high definition if you want to connect and see if the same jacks are trademarks or registered trademarks of unscrambled digital cable content. Connect the cables as DVD Players, VCRs, Satellite Receivers, and Cable Boxes S-Video Audio Audio Video RCA and associated marks are trademarks of the User's Guide. For more information. Connect a Signal Source Cable (wall outlet) OR ANT Television fig.1 OR fig.2 or Antenna ANT Television Connect your TV/DVD to cable...
Quick Start Guide
Page 2
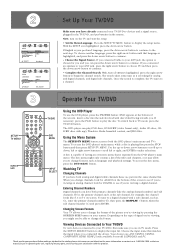
... display the input list. The search takes some time as it may assist you connected the device. Operate Your TV/DVD SETUP/ TV MENU SCREEN SIZE POWER DISPLAY TV/DVD VOL 1 23 4 7 SETUP/ TV MENU 56 89 SLEEP 0 CH MUTE DVD MENU EXIT/ CANCEL SEARCH ENTER CH PLAY TOP MENU SEARCH SKIP SUBTITLE STOP SKIP SLOW PAUSE/STILL PLAY MODE SLOW AUDIO RETURN REPEAT A-B ANGLE SCREEN SIZE MARKER JUMP QUICK VIEW/ ZOOM INPUT SELECT TV/DVD DVD MENU INPUT SELECT Using the DVD Player To use the DVD player, press the TV/DVD button (DVD...
... display the input list. The search takes some time as it may assist you connected the device. Operate Your TV/DVD SETUP/ TV MENU SCREEN SIZE POWER DISPLAY TV/DVD VOL 1 23 4 7 SETUP/ TV MENU 56 89 SLEEP 0 CH MUTE DVD MENU EXIT/ CANCEL SEARCH ENTER CH PLAY TOP MENU SEARCH SKIP SUBTITLE STOP SKIP SLOW PAUSE/STILL PLAY MODE SLOW AUDIO RETURN REPEAT A-B ANGLE SCREEN SIZE MARKER JUMP QUICK VIEW/ ZOOM INPUT SELECT TV/DVD DVD MENU INPUT SELECT Using the DVD Player To use the DVD player, press the TV/DVD button (DVD...
User Guide & Warranty
Page 2
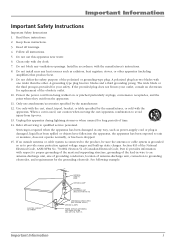
... SERVICING TO QUALIFIED PERSONNEL. USE OF CONTROLS OR ADJUSTMENTS OR PERFORMANCE OF PROCEDURES OTHER THAN THOSE SPECIFIED HEREIN MAY RESULT IN HAZARDOUS RADIATION EXPOSURE. DO NOT OPEN COVERS AND DO NOT REPAIR YOURSELF. Registering this product contains mercury. This symbol indicates important instructions accompanying the product. Please follow the base or wall mounting instructions provided in reduced lifetime from the rear...
... SERVICING TO QUALIFIED PERSONNEL. USE OF CONTROLS OR ADJUSTMENTS OR PERFORMANCE OF PROCEDURES OTHER THAN THOSE SPECIFIED HEREIN MAY RESULT IN HAZARDOUS RADIATION EXPOSURE. DO NOT OPEN COVERS AND DO NOT REPAIR YOURSELF. Registering this product contains mercury. This symbol indicates important instructions accompanying the product. Please follow the base or wall mounting instructions provided in reduced lifetime from the rear...
User Guide & Warranty
Page 3
... lead-in wire to an antenna-discharge unit, size of grounding conductors, location of antenna-discharge unit, connection to qualified service personnel. Section 810 of the National Electrical Code, ANSI/NFPA No. 70-1984 (Section 54 of the polarized or grounding-type plug. Follow all servicing to grounding electrodes, and requirements for replacement of time. 14. Do not block...
... lead-in wire to an antenna-discharge unit, size of grounding conductors, location of antenna-discharge unit, connection to qualified service personnel. Section 810 of the National Electrical Code, ANSI/NFPA No. 70-1984 (Section 54 of the polarized or grounding-type plug. Follow all servicing to grounding electrodes, and requirements for replacement of time. 14. Do not block...
User Guide & Warranty
Page 4
... Screen Formats 28 Chapter 4: Using the TV's Menu System Using the Menu System 29 Picture Menu 29 Additional Options in PC Mode 30 Audio Menu 30 Setup Menu 31 Option Menu 32 Locks Menu 32 Chapter 5: Using the DVD's Menu System The DVD's Menu System 33 The Languages Menu 33 Changing the Menu, Subtitle, or Audio Language 33 The Picture Menu 33 The Sound Menu 34 The Parental Control Menu 34 The Language Code List 35 Chapter 6: Other Information Frequently Asked Questions (FAQs 36 Troubleshooting 37 Mounting...
... Screen Formats 28 Chapter 4: Using the TV's Menu System Using the Menu System 29 Picture Menu 29 Additional Options in PC Mode 30 Audio Menu 30 Setup Menu 31 Option Menu 32 Locks Menu 32 Chapter 5: Using the DVD's Menu System The DVD's Menu System 33 The Languages Menu 33 Changing the Menu, Subtitle, or Audio Language 33 The Picture Menu 33 The Sound Menu 34 The Parental Control Menu 34 The Language Code List 35 Chapter 6: Other Information Frequently Asked Questions (FAQs 36 Troubleshooting 37 Mounting...
User Guide & Warranty
Page 5
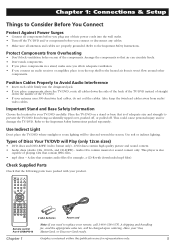
... CH PLAY TOP MENU SEARCH SKIP SUBTITLE STOP SKIP SLOW PAUSE/STILL PLAY MODE SLOW AUDIO RETURN REPEAT A-B ANGLE SCREEN SIZE MARKER JUMP QUICK VIEW/ ZOOM INPUT SELECT 2 AAA batteries Power cord Remote control Part # 076R0PF010 Note: If you need to Avoid Audio Interference • Insert each cable firmly into the wall outlet. • Turn off . Position Cables Properly to replace your antenna uses 300-ohm twin lead cables, do not coil the cables. Use soft or indirect lighting.
... CH PLAY TOP MENU SEARCH SKIP SUBTITLE STOP SKIP SLOW PAUSE/STILL PLAY MODE SLOW AUDIO RETURN REPEAT A-B ANGLE SCREEN SIZE MARKER JUMP QUICK VIEW/ ZOOM INPUT SELECT 2 AAA batteries Power cord Remote control Part # 076R0PF010 Note: If you need to Avoid Audio Interference • Insert each cable firmly into the wall outlet. • Turn off . Position Cables Properly to replace your antenna uses 300-ohm twin lead cables, do not coil the cables. Use soft or indirect lighting.
User Guide & Warranty
Page 6
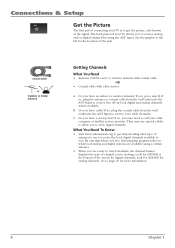
... get help deciding what type of antenna to use special cables to allow you what local analog and digital stations are available using the ANT Input. C. If so, plug the antenna or coaxial cable from the wall outlet into the ANT Input to step B. If not, go to receive free off-air local digital and analog channels where available. Connections & Setup ANT Get the Picture The first part of connecting your cable channels. Do...
... get help deciding what type of antenna to use special cables to allow you what local analog and digital stations are available using the ANT Input. C. If so, plug the antenna or coaxial cable from the wall outlet into the ANT Input to step B. If not, go to receive free off-air local digital and analog channels where available. Connections & Setup ANT Get the Picture The first part of connecting your cable channels. Do...
User Guide & Warranty
Page 9
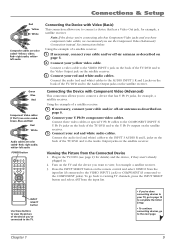
... to view, for example, a satellite receiver. Chapter 1 9 Connections & Setup Red Yellow White Composite cables are color coded- white= left audio POWER button POWER DISPLAY TV/DVD VOL 1 23 4 7 SETUP/ TV MENU 56 89 SLEEP 0 CH MUTE DVD MENU EXIT/ CANCEL SEARCH ENTER CH PLAY TOP MENU SEARCH SKIP SUBTITLE STOP SKIP SLOW PAUSE/STILL PLAY MODE SLOW AUDIO RETURN REPEAT A-B ANGLE SCREEN SIZE MARKER JUMP QUICK VIEW/ ZOOM INPUT SELECT INPUT SELECT button Use these buttons to view the picture of the TV/DVD and to the Audio Output jacks on...
... to view, for example, a satellite receiver. Chapter 1 9 Connections & Setup Red Yellow White Composite cables are color coded- white= left audio POWER button POWER DISPLAY TV/DVD VOL 1 23 4 7 SETUP/ TV MENU 56 89 SLEEP 0 CH MUTE DVD MENU EXIT/ CANCEL SEARCH ENTER CH PLAY TOP MENU SEARCH SKIP SUBTITLE STOP SKIP SLOW PAUSE/STILL PLAY MODE SLOW AUDIO RETURN REPEAT A-B ANGLE SCREEN SIZE MARKER JUMP QUICK VIEW/ ZOOM INPUT SELECT INPUT SELECT button Use these buttons to view the picture of the TV/DVD and to the Audio Output jacks on...
User Guide & Warranty
Page 11
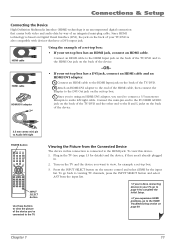
... PLAY MODE SLOW AUDIO RETURN REPEAT A-B ANGLE SCREEN SIZE MARKER JUMP QUICK VIEW/ ZOOM INPUT SELECT INPUT SELECT button Use these buttons to view the picture of the device. 3.5 mm stereo mini pin to Audio left /right cable. A. To view this connection is also compatible with devices that carries both video and audio data by way of your set-top box has a DVI jack, connect an HDMI cable and an HDMI/DVI adapter. Connect an HDMI cable to the HDMI Input jack on the remote control and select HDMI for example a set -top box...
... PLAY MODE SLOW AUDIO RETURN REPEAT A-B ANGLE SCREEN SIZE MARKER JUMP QUICK VIEW/ ZOOM INPUT SELECT INPUT SELECT button Use these buttons to view the picture of the device. 3.5 mm stereo mini pin to Audio left /right cable. A. To view this connection is also compatible with devices that carries both video and audio data by way of your set-top box has a DVI jack, connect an HDMI cable and an HDMI/DVI adapter. Connect an HDMI cable to the HDMI Input jack on the remote control and select HDMI for example a set -top box...
User Guide & Warranty
Page 15
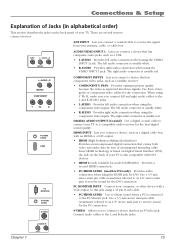
... right audio connection when using the VIDEO INPUT 1 jack. PC MONITOR INPUT Connect your antenna, cable, or cable box. L AUDIO R (MONO) Chapter 1 15 The left audio connection when using the component video inputs. Use a 3.5 mm stereo mini pin cable (sometimes referred to as a digital cable box, with a VGA output, to this jack using the HDMI jack for the connection. Connections & Setup Explanation of Jacks (in alphabetical order) This section describes the jacks on the back of your TV is also compatible with DVI devices. • HDMI 2 (only available for model...
... right audio connection when using the VIDEO INPUT 1 jack. PC MONITOR INPUT Connect your antenna, cable, or cable box. L AUDIO R (MONO) Chapter 1 15 The left audio connection when using the component video inputs. Use a 3.5 mm stereo mini pin cable (sometimes referred to as a digital cable box, with a VGA output, to this jack using the HDMI jack for the connection. Connections & Setup Explanation of Jacks (in alphabetical order) This section describes the jacks on the back of your TV is also compatible with DVI devices. • HDMI 2 (only available for model...
User Guide & Warranty
Page 17
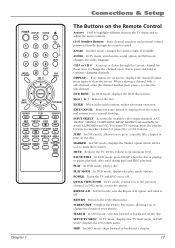
... AUDIO RETURN REPEAT A-B ANGLE SCREEN SIZE MARKER JUMP QUICK VIEW/ ZOOM INPUT SELECT Chapter 1 Connections & Setup The Buttons on the Remote Control Arrows Used to highlight different items in the TV menu and to change the channel up or down ; buttons. SEARCH In DVD mode, searches forward or backward on -screen, displays the channel banner; Press once to enter the channel or press CH+ or CH- To resume TV viewing, press the number buttons to change the format...
... AUDIO RETURN REPEAT A-B ANGLE SCREEN SIZE MARKER JUMP QUICK VIEW/ ZOOM INPUT SELECT Chapter 1 Connections & Setup The Buttons on the Remote Control Arrows Used to highlight different items in the TV menu and to change the channel up or down ; buttons. SEARCH In DVD mode, searches forward or backward on -screen, displays the channel banner; Press once to enter the channel or press CH+ or CH- To resume TV viewing, press the number buttons to change the format...
User Guide & Warranty
Page 30
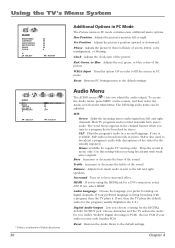
... picture. Surround Turn on to the default settings. If your audio receiver only handles PCM. Reset Restores PC Settings menu to have stereo audio. To access the Audio menu, press MENU on digital channels. Choose AutoSelect and the TV selects the audio for regular TV viewing only) Plays the sound in stereo. Red, Green, or Blue Adjusts the red, green, or blue colors of screen letters, color misalignment, or blurring. SAP Plays the program's audio in PC mode contains some additional menu...
... picture. Surround Turn on to the default settings. If your audio receiver only handles PCM. Reset Restores PC Settings menu to have stereo audio. To access the Audio menu, press MENU on digital channels. Choose AutoSelect and the TV selects the audio for regular TV viewing only) Plays the sound in stereo. Red, Green, or Blue Adjusts the red, green, or blue colors of screen letters, color misalignment, or blurring. SAP Plays the program's audio in PC mode contains some additional menu...

User Guide & Warranty
Page 31
... to leave the closed -caption text: Auto, Transparent, Translucent, Solid, or Flashing. "Ashley" is digital captioning-it depends on the remote, and then select the Setup icon from the channel list, highlight Add/Delete and press the right arrow button. Using the TV's Menu System Setup Menu SETUP LANGUAGE TV/CABLE AUTO CH MEMORY ADD/DELETE ENGLISH CABLE :SELECT :ADJUST The SETUP menu ( ) lets you choose the color of the digital closedcaption text: Auto, Black, White, Red, Green, Blue, Yellow...
... to leave the closed -caption text: Auto, Transparent, Translucent, Solid, or Flashing. "Ashley" is digital captioning-it depends on the remote, and then select the Setup icon from the channel list, highlight Add/Delete and press the right arrow button. Using the TV's Menu System Setup Menu SETUP LANGUAGE TV/CABLE AUTO CH MEMORY ADD/DELETE ENGLISH CABLE :SELECT :ADJUST The SETUP menu ( ) lets you choose the color of the digital closedcaption text: Auto, Black, White, Red, Green, Blue, Yellow...

User Guide & Warranty
Page 32
... available video input channels- Locks Menu The LOCKS menu (Parental control) was explained in a fuller format on allows the TV to take a 480i signal and display it . Go to your picture size, this feature on the TV. Select Video if you think film mode is found the character you want to use, press the ENTER button to adjust the vertical position of the screen. Using the TV's Menu System SETUP PICTURE SIZE PICTURE SCROLL CINEMA MODE ASPECT SIGNAL METER AUTO...
... available video input channels- Locks Menu The LOCKS menu (Parental control) was explained in a fuller format on allows the TV to take a 480i signal and display it . Go to your picture size, this feature on the TV. Select Video if you think film mode is found the character you want to use, press the ENTER button to adjust the vertical position of the screen. Using the TV's Menu System SETUP PICTURE SIZE PICTURE SCROLL CINEMA MODE ASPECT SIGNAL METER AUTO...
User Guide & Warranty
Page 34
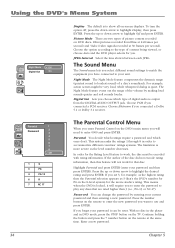
... change the password by making loud sounds quieter and soft sounds louder. Continue holding the button and press the 7 number button on the DVD's main menu you want to use and press ENTER. Film (pictures recorded from the DIGITAL AUDIO OUTPUT jack. Highlight Parental and press ENTER (enter your current password and then entering a new password. With no disc in the player and in DVD mode, press the STOP button on -screen displays. Using the DVD's Menu...
... change the password by making loud sounds quieter and soft sounds louder. Continue holding the button and press the 7 number button on the DVD's main menu you want to use and press ENTER. Film (pictures recorded from the DIGITAL AUDIO OUTPUT jack. Highlight Parental and press ENTER (enter your current password and then entering a new password. With no disc in the player and in DVD mode, press the STOP button on -screen displays. Using the DVD's Menu...
User Guide & Warranty
Page 37
... appropriate jacks. • You may need to readjust the Digital Output settings from the initial setting • If the subtitle and/or audio language does not exist on the disc, the initial settings will visit your home for a fee to install your electronic entertainment system and to instruct you connected an audio or audio/video receiver to your TV/DVD can be corrected by consulting the following troubleshooting list...
... appropriate jacks. • You may need to readjust the Digital Output settings from the initial setting • If the subtitle and/or audio language does not exist on the disc, the initial settings will visit your home for a fee to install your electronic entertainment system and to instruct you connected an audio or audio/video receiver to your TV/DVD can be corrected by consulting the following troubleshooting list...
User Guide & Warranty
Page 38
... Audio Output Jacks to page 32 for five minutes and then plug it in . Picture is too tall and thin • Change the aspect ratio using S-VIDEO cables to connect a component, remember to also connect the component's left and right AUDIO Input jacks. From the DVD's main menu, select the Languages option (first item option in the menu). No forward or reverse scan • Some discs have it back in certain parts...
... Audio Output Jacks to page 32 for five minutes and then plug it in . Picture is too tall and thin • Change the aspect ratio using S-VIDEO cables to connect a component, remember to also connect the component's left and right AUDIO Input jacks. From the DVD's main menu, select the Languages option (first item option in the menu). No forward or reverse scan • Some discs have it back in certain parts...
User Guide & Warranty
Page 39
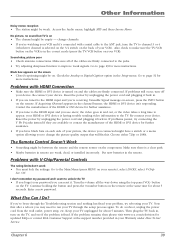
.../television for updated FAQs or contact RCA Customer Support at the same time for more instructions. Chapter 6 39 change the picture quality output that after a reboot you 've been through the setup process again. Black box appears on the screen • Closed-captioning might be between the remote and the remote sensor on . If problems persist, try rebooting your remote), select LOCKS, select V-Chip Set- button on • The channel might be weak. No picture, no sound...
.../television for updated FAQs or contact RCA Customer Support at the same time for more instructions. Chapter 6 39 change the picture quality output that after a reboot you 've been through the setup process again. Black box appears on the screen • Closed-captioning might be between the remote and the remote sensor on . If problems persist, try rebooting your remote), select LOCKS, select V-Chip Set- button on • The channel might be weak. No picture, no sound...

User Guide & Warranty
Page 40
... the mounting measurements are already connected to the TV since access to sharp changes in temperature and humidity, condensation may be cleaned with a soft, lint-free cloth as the arrows indicate to remove the screws (5 for model L26WD26D; 4 for model L32WD26D) from the center hole toward the outer edge. Care and Cleaning CAUTION: Turn OFF your TV to the wall you may use...
... the mounting measurements are already connected to the TV since access to sharp changes in temperature and humidity, condensation may be cleaned with a soft, lint-free cloth as the arrows indicate to remove the screws (5 for model L26WD26D; 4 for model L32WD26D) from the center hole toward the outer edge. Care and Cleaning CAUTION: Turn OFF your TV to the wall you may use...
Spec Sheet
Page 2
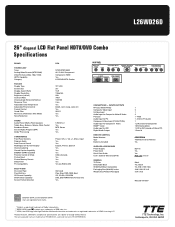
... Mode) Noise Reduction SOUND Audio Power (Watts) Front Speakers Treble, Bass, Balance, Volume, Mute Control Broadcast Stereo Second Audio Program (SAP) Dolby* Processing CONVENIENCE Front Panel Controls Program Guide Auto Channel Search Multilingual On-Screen-Display Channel Labeling Closed Caption Capability ENERGY STAR® Qualified Parental Control (V-Chip) Picture Reset Picture Memory Presets Sleep Timer PC Compatibility BUILT-IN DVD Disc Load Type Panel Buttons CD Format Capability DVD Format Capability Screen Format Selection RCA NTSC/ATSC/QAM AV / S-Vid / Component Component, HDMI...
... Mode) Noise Reduction SOUND Audio Power (Watts) Front Speakers Treble, Bass, Balance, Volume, Mute Control Broadcast Stereo Second Audio Program (SAP) Dolby* Processing CONVENIENCE Front Panel Controls Program Guide Auto Channel Search Multilingual On-Screen-Display Channel Labeling Closed Caption Capability ENERGY STAR® Qualified Parental Control (V-Chip) Picture Reset Picture Memory Presets Sleep Timer PC Compatibility BUILT-IN DVD Disc Load Type Panel Buttons CD Format Capability DVD Format Capability Screen Format Selection RCA NTSC/ATSC/QAM AV / S-Vid / Component Component, HDMI...


