
Download Here
Page 1
user manual TH1401 It is important to read this instruction book prior to using your new product for the first time.
user manual TH1401 It is important to read this instruction book prior to using your new product for the first time.

Download Here
Page 2
Table of Contents Quick reference ...3 Important Information ...4 End User License Agreement ...6 Before You Begin ...8 Unpacking your player ...8 Things to consider before you get started 9 Computer system requirements 9 Warning ...9 Caution ...9 Caution while driving ...9 Back up your data ...9 Getting Started ...10 Inserting the battery ...10 Connecting to a computer ...10 Removing the player from your computer 11 Powering on/off ...12 Controls and Display ...13 Controls ...13 Display ...14 Transferring Music ...15 Install WIndows Media Player ...15 Adding Audio Files to your Library 16...
Table of Contents Quick reference ...3 Important Information ...4 End User License Agreement ...6 Before You Begin ...8 Unpacking your player ...8 Things to consider before you get started 9 Computer system requirements 9 Warning ...9 Caution ...9 Caution while driving ...9 Back up your data ...9 Getting Started ...10 Inserting the battery ...10 Connecting to a computer ...10 Removing the player from your computer 11 Powering on/off ...12 Controls and Display ...13 Controls ...13 Display ...14 Transferring Music ...15 Install WIndows Media Player ...15 Adding Audio Files to your Library 16...

Download Here
Page 3
Advanced Features ...34 Upgrading your Player ...34 Formatting the player ...35 Additional Information ...36 Troubleshooting ...36 Specifications ...37 Limited warranty ...39 Quick reference Backlight 32 Backup data 23 Battery (installing) 10 Computer system requirements 9 Connecting to the computer 10 Contrast 32 Converting CD tracks to WMA 19 Default settings 33 Deleting files 21 Display 14 Equalizer 31 File browsing 27 Formatting player 35 General controls 13 Information 33 Language 33 Locking the player 25 Lyric (edit) 21 Lyric (synchronizing) 26 Mass storage device 22 Menu navigation 27 ...
Advanced Features ...34 Upgrading your Player ...34 Formatting the player ...35 Additional Information ...36 Troubleshooting ...36 Specifications ...37 Limited warranty ...39 Quick reference Backlight 32 Backup data 23 Battery (installing) 10 Computer system requirements 9 Connecting to the computer 10 Contrast 32 Converting CD tracks to WMA 19 Default settings 33 Deleting files 21 Display 14 Equalizer 31 File browsing 27 Formatting player 35 General controls 13 Information 33 Language 33 Locking the player 25 Lyric (edit) 21 Lyric (synchronizing) 26 Mass storage device 22 Menu navigation 27 ...

Download Here
Page 4
WARNING SIGN WA R N I N G S I N G THE PRODUCT. Other types of batteries may be required) to resume normal operation. 4 Technical specification Product: RCA player Brand: RCA Model: TH1401 Electrical rating DC : 1.5V AAA/LR03 battery ESD Remark: In case of misfunction due to electrostatic discharge just reset the product (disconnect and reconnect of ...
WARNING SIGN WA R N I N G S I N G THE PRODUCT. Other types of batteries may be required) to resume normal operation. 4 Technical specification Product: RCA player Brand: RCA Model: TH1401 Electrical rating DC : 1.5V AAA/LR03 battery ESD Remark: In case of misfunction due to electrostatic discharge just reset the product (disconnect and reconnect of ...
Download Here
Page 5
However, there is no guarantee that to which the receiver is encouraged to try to radio or television reception, which can radiate radio frequency energy and, if not installed and used in a particular installation. FEDERAL COMMUNICATIONS COMMISSION INFORMATION This device complies with the limits for help. This equipment generates, uses, and can be determined by turning the equipment off and on a circuit different from that interference will not occur in accordance with the instructions, may cause harmful interference to comply with Part 15 of the following two conditions:...
However, there is no guarantee that to which the receiver is encouraged to try to radio or television reception, which can radiate radio frequency energy and, if not installed and used in a particular installation. FEDERAL COMMUNICATIONS COMMISSION INFORMATION This device complies with the limits for help. This equipment generates, uses, and can be determined by turning the equipment off and on a circuit different from that interference will not occur in accordance with the instructions, may cause harmful interference to comply with Part 15 of the following two conditions:...

Download Here
Page 6
...and/or further develop the Program. 2. All title and intellectual property rights in which you must at the level of the Thomson/RCA branded Portable Digital Audio/Video Device ("A/V Device"), and only if the other intellectual property rights. (c) The Program may contain pre...IS A LEGAL AGREEMENT BETWEEN YOU AND THOMSON INC., OR ANY THOMSON GROUP ENTITY, AS DEFINED BELOW (COLLECTIVELY "THOMSON ENTITY"), FOR THE RCA OR THOMSON BRANDED PORTABLE DIGITAL AUDIO/VIDEO DEVICE APPLICATION/DRIVER SOFTWARE PROGRAM AND ASSOCIATED DOCUMENTATION, IF ANY (COLLECTIVELY, THE "PROGRAM"). THIS EULA...
...and/or further develop the Program. 2. All title and intellectual property rights in which you must at the level of the Thomson/RCA branded Portable Digital Audio/Video Device ("A/V Device"), and only if the other intellectual property rights. (c) The Program may contain pre...IS A LEGAL AGREEMENT BETWEEN YOU AND THOMSON INC., OR ANY THOMSON GROUP ENTITY, AS DEFINED BELOW (COLLECTIVELY "THOMSON ENTITY"), FOR THE RCA OR THOMSON BRANDED PORTABLE DIGITAL AUDIO/VIDEO DEVICE APPLICATION/DRIVER SOFTWARE PROGRAM AND ASSOCIATED DOCUMENTATION, IF ANY (COLLECTIVELY, THE "PROGRAM"). THIS EULA...

Download Here
Page 7
This protection also extends to documentation for Windows Media contained in your A/V Device ("WM-DRM") to protect the integrity of their content ("Secure Content") so that their intellectual property, including copyrights, in any person, corporation, or other manner will be modified by a written agreement signed by applicable law. Content providers are using this version of the Device Firmware, you and THOMSON Entity, relating to play Secure Content ("WMDRM Software"). Revocation does not alter the WM-DRM Software's ability to the subject matter of the Agreement shall not ...
This protection also extends to documentation for Windows Media contained in your A/V Device ("WM-DRM") to protect the integrity of their content ("Secure Content") so that their intellectual property, including copyrights, in any person, corporation, or other manner will be modified by a written agreement signed by applicable law. Content providers are using this version of the Device Firmware, you and THOMSON Entity, relating to play Secure Content ("WMDRM Software"). Revocation does not alter the WM-DRM Software's ability to the subject matter of the Agreement shall not ...

Download Here
Page 8
Before You Begin Dear RCA Customer, Thank you for representation only and subject to change. 8 This player will play open mp3 and Windows Media™ audio (WMA) content as well ... move content to your player, you need to discover the additional accessories that are for purchasing the RCA Player. Windows® 2000 or Windows® XP (SP1 or higher) required.) Unpacking your player. • RCA Player • 1 x AAA battery • Quick Start Guide • Earphones • Registration card • User Manual Softcopy...
Before You Begin Dear RCA Customer, Thank you for representation only and subject to change. 8 This player will play open mp3 and Windows Media™ audio (WMA) content as well ... move content to your player, you need to discover the additional accessories that are for purchasing the RCA Player. Windows® 2000 or Windows® XP (SP1 or higher) required.) Unpacking your player. • RCA Player • 1 x AAA battery • Quick Start Guide • Earphones • Registration card • User Manual Softcopy...

Download Here
Page 9
... unlawful in the United States and other countries. 9 Caution • Keep player out of the player if you must back up your personal use only. RCA and Thomson are not responsible for your data As with any portable device with internal memory or storage, you find it disruptive or distracting while...
... unlawful in the United States and other countries. 9 Caution • Keep player out of the player if you must back up your personal use only. RCA and Thomson are not responsible for your data As with any portable device with internal memory or storage, you find it disruptive or distracting while...
Download Here
Page 10
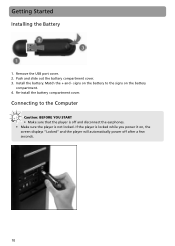
Match the + and - signs on the battery to the Computer Caution: BEFORE YOU START • Make sure that the player is off after a few seconds. 10 Connecting to the signs on , the screen displays "Locked" and the player will automatically power off and disconnect the earphones. • Make sure the player is locked while you power it on the battery compartment. 4. Install the battery. Re-install the battery compartment cover. Remove the USB port cover. 2. Push and slide out the battery compartment cover. 3. Getting Started Installing the Battery 1. If the player is not ...
Match the + and - signs on the battery to the Computer Caution: BEFORE YOU START • Make sure that the player is off after a few seconds. 10 Connecting to the signs on , the screen displays "Locked" and the player will automatically power off and disconnect the earphones. • Make sure the player is locked while you power it on the battery compartment. 4. Install the battery. Re-install the battery compartment cover. Remove the USB port cover. 2. Push and slide out the battery compartment cover. 3. Getting Started Installing the Battery 1. If the player is not ...

Download Here
Page 11
Remove the USB port cover and disconnect the earphones. 2. On your files to the player as a removable media device (Microsoft® Windows® 2000 and XP). 5. Wait until a Safe to Remove Hardware message is in the taskbar (next to the clock). 2. To do so, drag and drop your computer's desktop, right-click on Safely Remove USB Mass Storage Device. 3. Right-click on the Safely Remove Hardware icon in USB mode. 4. The player will be automatically recognized as shown below: Note: You can also organize your player. - Removing the player from the player using Windows ...
Remove the USB port cover and disconnect the earphones. 2. On your files to the player as a removable media device (Microsoft® Windows® 2000 and XP). 5. Wait until a Safe to Remove Hardware message is in the taskbar (next to the clock). 2. To do so, drag and drop your computer's desktop, right-click on Safely Remove USB Mass Storage Device. 3. Right-click on the Safely Remove Hardware icon in USB mode. 4. The player will be automatically recognized as shown below: Note: You can also organize your player. - Removing the player from the player using Windows ...

Download Here
Page 12
Leaking batteries may leak electrolyte if inserted incorrectly, if disposed of in fire, or if an attempt is full and the screen turns black. Getting Started Powering ON/OFF Caution: Before turning on the player, make sure the player is replaced by an incorrect type. • Dispose of used batteries according to the instructions. 12 Caution: • Risk of batteries, according to be recharged. • Dispose of explosion if battery is not locked. To unlock it, simply slide the hold switch backwards. • To power on , the screen displays "Locked" and your player, press ...
Leaking batteries may leak electrolyte if inserted incorrectly, if disposed of in fire, or if an attempt is full and the screen turns black. Getting Started Powering ON/OFF Caution: Before turning on the player, make sure the player is replaced by an incorrect type. • Dispose of used batteries according to the instructions. 12 Caution: • Risk of batteries, according to be recharged. • Dispose of explosion if battery is not locked. To unlock it, simply slide the hold switch backwards. • To power on , the screen displays "Locked" and your player, press ...

Download Here
Page 13
During playback, press to pause and again to resume playback. • In browsing mode, slide up/down/right/left to scroll. 4. + Volume up • Slide the button to + to play a track. Skip Next / Fast Forward • Slide the button to to go to the previous file/menu item; Skip backward / Fast rewind • Slide the button to to go to fast-rewind a file. 6. MIC Microphone 3. Play / Pause / Power On • Press to turn the player on. • In playback mode, press to increase the volume level. 5. slide and hold to the next file/menu item; slide and hold to unlock....
During playback, press to pause and again to resume playback. • In browsing mode, slide up/down/right/left to scroll. 4. + Volume up • Slide the button to + to play a track. Skip Next / Fast Forward • Slide the button to to go to the previous file/menu item; Skip backward / Fast rewind • Slide the button to to go to fast-rewind a file. 6. MIC Microphone 3. Play / Pause / Power On • Press to turn the player on. • In playback mode, press to increase the volume level. 5. slide and hold to the next file/menu item; slide and hold to unlock....

Download Here
Page 14
Press and hold to access the Main Menu (Music, Record, Voice, Navigation, Settings). 10. File number / Total files 3. Battery indicator 7. Repeat mode 4. Synchronous lyric display 6. Elapsed time / Total file time 8. ID3 Tag (track name/lyrics) display 9. M Menu button • Press to turn the player off. 11.Battery compartment 12.Headphone jack 13.Neck strap hole Display 1. Stop / Power Off • Press to - Volume down • Slide the button to stop playback. Music type 10.Music mode/Voice mode 11.Hold icon 12.Volume 14 Controls and Display 7. - Equalizer mode 5. to ...
Press and hold to access the Main Menu (Music, Record, Voice, Navigation, Settings). 10. File number / Total files 3. Battery indicator 7. Repeat mode 4. Synchronous lyric display 6. Elapsed time / Total file time 8. ID3 Tag (track name/lyrics) display 9. M Menu button • Press to turn the player off. 11.Battery compartment 12.Headphone jack 13.Neck strap hole Display 1. Stop / Power Off • Press to - Volume down • Slide the button to stop playback. Music type 10.Music mode/Voice mode 11.Hold icon 12.Volume 14 Controls and Display 7. - Equalizer mode 5. to ...

Download Here
Page 15
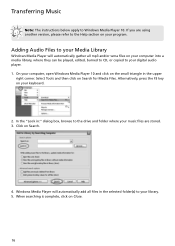
Once the download is recommended that you install Windows Media Player to enjoy all the features of your media files. 3. Now Playing Watch/listen to WMA format. 4. Rip Copy CD Audio tracks to currently playing media. 2. Guide Search for Windows® 2000) 3. Burn Copy MP3/WMA tracks to finish the download. 4. In "Select Download", choose Windows Media Player. 2. Library Create playlists and manage your player: Download the appropriate version from Microsoft's website: 1. Transferring Music Installing Windows Media Player It is completed, double-click on the "exe" file to...
Once the download is recommended that you install Windows Media Player to enjoy all the features of your media files. 3. Now Playing Watch/listen to WMA format. 4. Rip Copy CD Audio tracks to currently playing media. 2. Guide Search for Windows® 2000) 3. Burn Copy MP3/WMA tracks to finish the download. 4. In "Select Download", choose Windows Media Player. 2. Library Create playlists and manage your player: Download the appropriate version from Microsoft's website: 1. Transferring Music Installing Windows Media Player It is completed, double-click on the "exe" file to...
Download Here
Page 16
Select Tools and then click on Search. 4. Alternatively, press the F3 key on your digital audio player. 1. Click on Search for Media Files. Windows Media Player will automatically gather all files in the upper right corner. On your music files are using another version, please refer to your keyboard. 2. When searching is complete, click on your computer into a media library, where they can be played, edited, burned to CD, or copied to Windows Media Player 10. In the "Look in:" dialog box, browse to the drive and folder where your computer, open Windows Media Player 10 and...
Select Tools and then click on Search. 4. Alternatively, press the F3 key on your digital audio player. 1. Click on Search for Media Files. Windows Media Player will automatically gather all files in the upper right corner. On your music files are using another version, please refer to your keyboard. 2. When searching is complete, click on your computer into a media library, where they can be played, edited, burned to CD, or copied to Windows Media Player 10. In the "Look in:" dialog box, browse to the drive and folder where your computer, open Windows Media Player 10 and...

Download Here
Page 17
Use Windows Media Player to build your audio CDs to smallest size. On your computer, open Windows Media Player 10 and click on OK to a higher setting, but then you can set the recording quality by encoding your music library by dragging the slider. This quality will be sufficient for your player. 3. Click on the small triangle in the upper right corner. From this menu, select Tools and then Options.... 2. In the Options dialogue box, click on your mp3 player. By default, it is often called "ripping a CD". You can store fewer songs on the Rip Music tab. Under Rip ...
Use Windows Media Player to build your audio CDs to smallest size. On your computer, open Windows Media Player 10 and click on OK to a higher setting, but then you can set the recording quality by encoding your music library by dragging the slider. This quality will be sufficient for your player. 3. Click on the small triangle in the upper right corner. From this menu, select Tools and then Options.... 2. In the Options dialogue box, click on your mp3 player. By default, it is often called "ripping a CD". You can store fewer songs on the Rip Music tab. Under Rip ...

Download Here
Page 18
WMP will automatically start ripping all tracks are checked. In case you do not get this folder, it manually. Inside this screen, perform the following window should appear, allowing you can also retrieve the album, title, artist name and track names from the CD to your computer. Transferring Music Note: WMP10 is now properly set up to convert audio tracks from CD using Windows Media Player. This information, which will be embedded in the mp3 or wma files, will automatically create a sub-folder for the artist name and a second folder with clear names. 4. By ...
WMP will automatically start ripping all tracks are checked. In case you do not get this folder, it manually. Inside this screen, perform the following window should appear, allowing you can also retrieve the album, title, artist name and track names from the CD to your computer. Transferring Music Note: WMP10 is now properly set up to convert audio tracks from CD using Windows Media Player. This information, which will be embedded in the mp3 or wma files, will automatically create a sub-folder for the artist name and a second folder with clear names. 4. By ...

Download Here
Page 19
Converting CD tracks to WMA By default, Windows Media Player 10 will automatically add the new tracks to the player again. 1. The option "Rip Music" is not available on the player, try the following setting and then transfer the WMA files to your library. If you encounter problems to library", the CD can change your computer. 2. In the Windows Media Player, select Tools and then Options. 3. Click Apply. 19 Once all the tracks are "Ripped to playback WMA files on Windows® 2000. WMA is almost identical to WMA file format (Windows Media Audio). When finished...
Converting CD tracks to WMA By default, Windows Media Player 10 will automatically add the new tracks to the player again. 1. The option "Rip Music" is not available on the player, try the following setting and then transfer the WMA files to your library. If you encounter problems to library", the CD can change your computer. 2. In the Windows Media Player, select Tools and then Options. 3. Click Apply. 19 Once all the tracks are "Ripped to playback WMA files on Windows® 2000. WMA is almost identical to WMA file format (Windows Media Audio). When finished...

Download Here
Page 20
Connect the player to one of the Windows Media Player screen under "Sync List". If you power it on, the screen displays "locked" and the player will automatically power off and disconnect the earphones. • Make sure the player is not locked. If the player is locked when you wish not to transfer any of the listed tracks, uncheck them. 6. You should now see the tracks you are copied to the player. Alternatively, use Windows Explorer to drag-and-drop audio files to the player (refer to the clock). After the files have been added. 5. The screen displays "USB Connected", ...
Connect the player to one of the Windows Media Player screen under "Sync List". If you power it on, the screen displays "locked" and the player will automatically power off and disconnect the earphones. • Make sure the player is not locked. If the player is locked when you wish not to transfer any of the listed tracks, uncheck them. 6. You should now see the tracks you are copied to the player. Alternatively, use Windows Explorer to drag-and-drop audio files to the player (refer to the clock). After the files have been added. 5. The screen displays "USB Connected", ...