
User Manual - RTD207
Page 3
... Setup Things to consider before you connect 2 Accessories provided 2 Front panel controls 3 Connecting to audiovisual equipment 4 Connecting the speakers 5 Positioning speakers 5 Front speaker placement 6 Preferred surround placement 6 Test tone/Channel balance 7 The Remote Control Remote control functions in DVD/CD mode 8.../Disconnecting USB devices to Navigate through On-Screen Menus 9 Inserting batteries in this document are for representation only. 1 RTD206/207 EN 26/4/06 3:22 PM Page 3 Table of Menus 11 Basic Playback Operations 11 Playback 11 Accelerated play ...
... Setup Things to consider before you connect 2 Accessories provided 2 Front panel controls 3 Connecting to audiovisual equipment 4 Connecting the speakers 5 Positioning speakers 5 Front speaker placement 6 Preferred surround placement 6 Test tone/Channel balance 7 The Remote Control Remote control functions in DVD/CD mode 8.../Disconnecting USB devices to Navigate through On-Screen Menus 9 Inserting batteries in this document are for representation only. 1 RTD206/207 EN 26/4/06 3:22 PM Page 3 Table of Menus 11 Basic Playback Operations 11 Playback 11 Accelerated play ...
User Manual - RTD207
Page 4
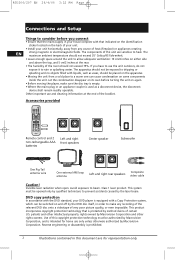
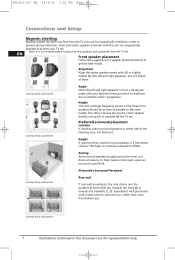
...remain readily operable. Remote control and 2 non-rechargeable AAA batteries Left and right front speakers Center speaker Subwoofer One Pig-Tail antenna wire One external AM loop antenna Left and right rear speakers Composite video cable Caution! This system must be authorized by Macrovision Corporation. If you ... ventilation: 10 cm/4 inches on some components inside the unit. Use of this document are sensitive to heat. Class 1 laser product. RTD206/207 EN 26/4/06 3:22 PM Page 4 Connections and Setup Things to consider before turning the unit on the back of your unit....
...remain readily operable. Remote control and 2 non-rechargeable AAA batteries Left and right front speakers Center speaker Subwoofer One Pig-Tail antenna wire One external AM loop antenna Left and right rear speakers Composite video cable Caution! This system must be authorized by Macrovision Corporation. If you ... ventilation: 10 cm/4 inches on some components inside the unit. Use of this document are sensitive to heat. Class 1 laser product. RTD206/207 EN 26/4/06 3:22 PM Page 4 Connections and Setup Things to consider before turning the unit on the back of your unit....
User Manual - RTD207
Page 6
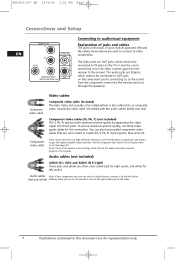
...cables (Pr, Pb, Y) (not included) The Y, Pb, Pr jacks provide optimum picture quality by separating the video signal into the receiver (and out through the speakers). Note: If one input for representation only. The video jacks are for audio (mono), connect it to the left (white (red and white) L/Mono) audio...need to be connected to IN jacks on the TV or monitor you 're connecting to, so the sound from the receiver to the screen). RTD206/207 EN 26/4/06 3:22 PM Page 6 Connections and Setup EN S-VIDOE Connecting to audiovisual equipment Explanation of jacks and cables The jacks on ...
...cables (Pr, Pb, Y) (not included) The Y, Pb, Pr jacks provide optimum picture quality by separating the video signal into the receiver (and out through the speakers). Note: If one input for representation only. The video jacks are for audio (mono), connect it to the left (white (red and white) L/Mono) audio...need to be connected to IN jacks on the TV or monitor you 're connecting to, so the sound from the receiver to the screen). RTD206/207 EN 26/4/06 3:22 PM Page 6 Connections and Setup EN S-VIDOE Connecting to audiovisual equipment Explanation of jacks and cables The jacks on ...
User Manual - RTD207
Page 7
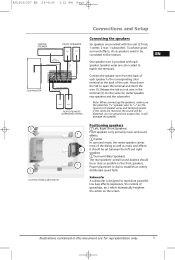
... the output line, it will be as close as possible to "+" on the screen. Positioning speakers 1 Left, Right (Front Speakers) Front speakers carry primarily music and sound 1 effects. 2 Center In surround mode, the center speaker carries most of each speaker. RTD206/207 EN 26/4/06 3:22 PM Page 7 3 3 Courtesy Dolby Laboratories Connections and Setup Connecting the...
... the output line, it will be as close as possible to "+" on the screen. Positioning speakers 1 Left, Right (Front Speakers) Front speakers carry primarily music and sound 1 effects. 2 Center In surround mode, the center speaker carries most of each speaker. RTD206/207 EN 26/4/06 3:22 PM Page 7 3 3 Courtesy Dolby Laboratories Connections and Setup Connecting the...
User Manual - RTD207
Page 8
... document are magnetically shielded to protect your favorite viewing position to duplicate the soundtrack mixer's perspective. RTD206/207 EN 26/4/06 3:22 PM Page 8 Connections and Setup Magnetic shielding Speakers placed less than come from the TV set must be as close as possible to surround you,... rather than two feet from behind you. Preferred surround placement Location If possible, place surround speakers to help create a more open, spacious surround sound field. This helps to get the best results. and high-frequency drivers of the...
... document are magnetically shielded to protect your favorite viewing position to duplicate the soundtrack mixer's perspective. RTD206/207 EN 26/4/06 3:22 PM Page 8 Connections and Setup Magnetic shielding Speakers placed less than come from the TV set must be as close as possible to surround you,... rather than two feet from behind you. Preferred surround placement Location If possible, place surround speakers to help create a more open, spacious surround sound field. This helps to get the best results. and high-frequency drivers of the...

User Manual - RTD207
Page 9
... for subtle atmospherics and ambience, and only rarely for representation only. 7 Don't re-adjust the surround level; RTD206/207 EN 26/4/06 3:22 PM Page 9 Courtesy Dolby Laboratories Connections and Setup No adjacent walls Surround speakers can go on stands facing each channel plays at the same loudness level (see page 22).
... for subtle atmospherics and ambience, and only rarely for representation only. 7 Don't re-adjust the surround level; RTD206/207 EN 26/4/06 3:22 PM Page 9 Courtesy Dolby Laboratories Connections and Setup No adjacent walls Surround speakers can go on stands facing each channel plays at the same loudness level (see page 22).
User Manual - RTD207
Page 22
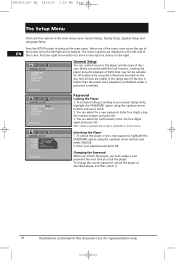
...to your password and press OK. O- Enter your preset rating limits, highlight the PASSWORD option using the number buttons and press OK. 3. RTD206/207 EN 26/4/06 3:22 PM Page 22 The Setup Menu There are four options in this document are for representation only. Note: Choose... C- Press the SETUP button to remember, or write it . 20 Illustrations contained in the main setup menu: General Setup, Display Setup, Speaker Setup and Language Setup. Locking the player prevents playback of DVDs that is entered. To activate locking according to the option's choices on the...
...to your password and press OK. O- Enter your preset rating limits, highlight the PASSWORD option using the number buttons and press OK. 3. RTD206/207 EN 26/4/06 3:22 PM Page 22 The Setup Menu There are four options in this document are for representation only. Note: Choose... C- Press the SETUP button to remember, or write it . 20 Illustrations contained in the main setup menu: General Setup, Display Setup, Speaker Setup and Language Setup. Locking the player prevents playback of DVDs that is entered. To activate locking according to the option's choices on the...
User Manual - RTD207
Page 24
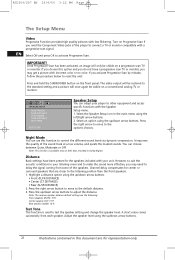
... a picture with your unit. It improves the quality of the speakers. However, to test the speaker setting and change the speaker level. A short noise comes successively from some of the sound track at a low volume, and quiets the loudest sounds. RTD206/207 EN 26/4/06 3:22 PM Page 24 The Setup Menu... Video Progressive Function provides high quality pictures with the Speaker Setup menu. 1. EN Select ON and press OK to the default distance. 3. Once ...
... a picture with your unit. It improves the quality of the speakers. However, to test the speaker setting and change the speaker level. A short noise comes successively from some of the sound track at a low volume, and quiets the loudest sounds. RTD206/207 EN 26/4/06 3:22 PM Page 24 The Setup Menu... Video Progressive Function provides high quality pictures with the Speaker Setup menu. 1. EN Select ON and press OK to the default distance. 3. Once ...
User Manual - RTD207
Page 26
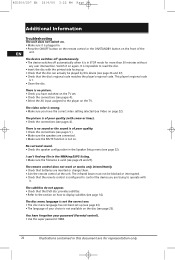
...• The device switches off automatically when it is of poor quality. • Check the connections (see pages 5 ). • Make sure the speakers are inserted or change them. • Aim the remote control at the unit. This player's regional code is not on. There is no picture. &#...Check the connections (see pages 4). • Select the AV input assigned to operate with snow or lines). • Check the connections (see pages 4). RTD206/207 EN 26/4/06 3:22 PM Page 26 Additional Information Troubleshooting The unit does not switch on. • Make sure it is not available on...
...• The device switches off automatically when it is of poor quality. • Check the connections (see pages 5 ). • Make sure the speakers are inserted or change them. • Aim the remote control at the unit. This player's regional code is not on. There is no picture. &#...Check the connections (see pages 4). • Select the AV input assigned to operate with snow or lines). • Check the connections (see pages 4). RTD206/207 EN 26/4/06 3:22 PM Page 26 Additional Information Troubleshooting The unit does not switch on. • Make sure it is not available on...

User Manual - RTD207
Page 29
RTD206/207 EN 26/4/06 3:22 PM Page 29 Additional Information JPEG files CD-R and CD-RW with Dolby Digital 5.1-channel so that EN files have ..., including progressive JPEG files, cannot be read by the player - even though the files are used, the new system provides stereo separation of the rear speakers (Rear-Right, Rear-Left ). Dolby Digital provides better sound quality and a more powerful presence than 650. Sound Enhancement Systems This receiver is equipped with JPEG...
RTD206/207 EN 26/4/06 3:22 PM Page 29 Additional Information JPEG files CD-R and CD-RW with Dolby Digital 5.1-channel so that EN files have ..., including progressive JPEG files, cannot be read by the player - even though the files are used, the new system provides stereo separation of the rear speakers (Rear-Right, Rear-Left ). Dolby Digital provides better sound quality and a more powerful presence than 650. Sound Enhancement Systems This receiver is equipped with JPEG...


