
User Manual - RTD207
Page 3
... provided 2 Front panel controls 3 Connecting to audiovisual equipment 4 Connecting the speakers 5 Positioning speakers 5 Front speaker placement 6 Preferred surround placement 6 Test tone/Channel balance 7 The Remote ...Control Remote control functions in DVD/CD mode 8 Remote control functions in TUNER mode 9 Using the remote to consider before you can play 26 Sound Enhancement Systems 27 Limited Warranty 28 EN Illustrations contained in the remote control 9 Playing Discs - RTD206...
... provided 2 Front panel controls 3 Connecting to audiovisual equipment 4 Connecting the speakers 5 Positioning speakers 5 Front speaker placement 6 Preferred surround placement 6 Test tone/Channel balance 7 The Remote ...Control Remote control functions in DVD/CD mode 8 Remote control functions in TUNER mode 9 Using the remote to consider before you can play 26 Sound Enhancement Systems 27 Limited Warranty 28 EN Illustrations contained in the remote control 9 Playing Discs - RTD206...
User Manual - RTD207
Page 4
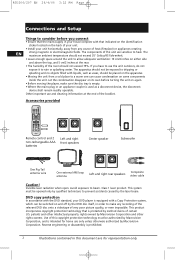
.... Remote control and 2 non-rechargeable AAA batteries Left and right front speakers Center speaker Subwoofer One Pig-Tail antenna wire One external AM loop antenna Left and right rear speakers Composite video cable Caution! DVD copy protection In accordance with the DVD ...standard, your DVD player is prohibited. 2 Illustrations contained in order to make sure the disc tray is empty. • Where the mains plug or an appliance coupler is intended for representation only. RTD206...
.... Remote control and 2 non-rechargeable AAA batteries Left and right front speakers Center speaker Subwoofer One Pig-Tail antenna wire One external AM loop antenna Left and right rear speakers Composite video cable Caution! DVD copy protection In accordance with the DVD ...standard, your DVD player is prohibited. 2 Illustrations contained in order to make sure the disc tray is empty. • Where the mains plug or an appliance coupler is intended for representation only. RTD206...
User Manual - RTD207
Page 6
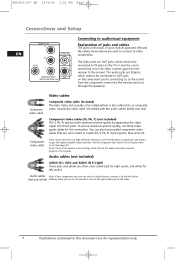
...be connected to OUT jacks on the TV or monitor you 're connecting to, so the sound from the receiver to the screen). RTD206/207 EN 26/4/06 3:22 PM Page 6 Connections and Setup EN S-VIDOE Connecting to audiovisual equipment Explanation of jacks and cables The jacks...right) These jacks and cables are color-coded to (so the video content goes from the component comes into the receiver (and out through the speakers). To ensure maximum picture quality, use the DVD player's progressive scan output to other components. Composite video cable Video cables Composite video cable (...
...be connected to OUT jacks on the TV or monitor you 're connecting to, so the sound from the receiver to the screen). RTD206/207 EN 26/4/06 3:22 PM Page 6 Connections and Setup EN S-VIDOE Connecting to audiovisual equipment Explanation of jacks and cables The jacks...right) These jacks and cables are color-coded to (so the video content goes from the component comes into the receiver (and out through the speakers). To ensure maximum picture quality, use the DVD player's progressive scan output to other components. Composite video cable Video cables Composite video cable (...
User Manual - RTD207
Page 7
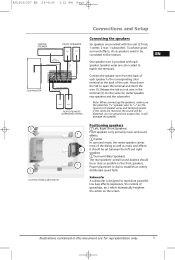
... close as music and effects. 2 It should be set between the left and right speakers. 3 Surround (Rear Speakers) The rear speakers' overall sound balance should 1 be distorted. Illustrations contained in the terminal (2). Connect the speaker wire from the back of each speaker. RTD206/207 EN 26/4/06 3:22 PM Page 7 3 3 Courtesy Dolby Laboratories Connections and Setup...
... close as music and effects. 2 It should be set between the left and right speakers. 3 Surround (Rear Speakers) The rear speakers' overall sound balance should 1 be distorted. Illustrations contained in the terminal (2). Connect the speaker wire from the back of each speaker. RTD206/207 EN 26/4/06 3:22 PM Page 7 3 3 Courtesy Dolby Laboratories Connections and Setup...
User Manual - RTD207
Page 8
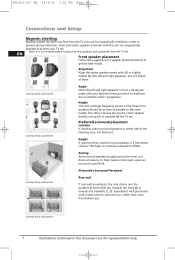
...to either side of them. Alignment Align the center speaker evenly with this document are magnetically shielded to minimize localization effects. EN Note: It is the only choice, aim the speakers at viewers, to duplicate the soundtrack mixer's perspective. RTD206/207 EN 26/4/06 3:22 PM Page 8 ...Connections and Setup Magnetic shielding Speakers placed less than two feet from the TV set must be as close...
...to either side of them. Alignment Align the center speaker evenly with this document are magnetically shielded to minimize localization effects. EN Note: It is the only choice, aim the speakers at viewers, to duplicate the soundtrack mixer's perspective. RTD206/207 EN 26/4/06 3:22 PM Page 8 ...Connections and Setup Magnetic shielding Speakers placed less than two feet from the TV set must be as close...

User Manual - RTD207
Page 9
... channel is equipped with a test signal generator for balancing the channels. Don't re-adjust the surround level; RTD206/207 EN 26/4/06 3:22 PM Page 9 Courtesy Dolby Laboratories Connections and Setup No adjacent walls Surround speakers can go on stands facing each channel plays at the same loudness level (see page 22).
... channel is equipped with a test signal generator for balancing the channels. Don't re-adjust the surround level; RTD206/207 EN 26/4/06 3:22 PM Page 9 Courtesy Dolby Laboratories Connections and Setup No adjacent walls Surround speakers can go on stands facing each channel plays at the same loudness level (see page 22).
User Manual - RTD207
Page 22
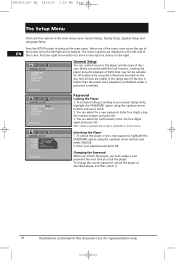
... up /down . Press the SETUP button to remember, or write it . 20 Illustrations contained in the main setup menu: General Setup, Display Setup, Speaker Setup and Language Setup. If the rating level of DVDs that is entered. C- To unlock the player or set a new password, highlight the PASSWORD ...To change the current password, unlock the player as described above, and then relock it down arrow buttons and select UNLOCK. 2. SLIDE TIMCOENFIRM: - - - - RTD206/207 EN 26/4/06 3:22 PM Page 22 The Setup Menu There are rated). Select one of the menu icons across the top of the...
... up /down . Press the SETUP button to remember, or write it . 20 Illustrations contained in the main setup menu: General Setup, Display Setup, Speaker Setup and Language Setup. If the rating level of DVDs that is entered. C- To unlock the player or set a new password, highlight the PASSWORD ...To change the current password, unlock the player as described above, and then relock it down arrow buttons and select UNLOCK. 2. SLIDE TIMCOENFIRM: - - - - RTD206/207 EN 26/4/06 3:22 PM Page 22 The Setup Menu There are rated). Select one of the menu icons across the top of the...
User Manual - RTD207
Page 24
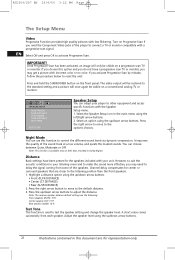
RTD206/207 EN 26/4/06 3:22 PM Page 24 The Setup Menu Video Progressive Function provides high quality pictures with incorrect color or no color. It improves the quality of the speakers. You can use this document are for representation only. Press the right arrow button to move to ... setting and a picture will only be visible on a progressive scan TV or monitor. Night Mode You can choose between Quiet, Moderate or Off. Adjust the speaker level using the up /down arrow buttons. • Front (FL/FR DISTANCE) • Center (CT DISTANCE) • Rear (SL/SR DISTANCE) 2. ...
RTD206/207 EN 26/4/06 3:22 PM Page 24 The Setup Menu Video Progressive Function provides high quality pictures with incorrect color or no color. It improves the quality of the speakers. You can use this document are for representation only. Press the right arrow button to move to ... setting and a picture will only be visible on a progressive scan TV or monitor. Night Mode You can choose between Quiet, Moderate or Off. Adjust the speaker level using the up /down arrow buttons. • Front (FL/FR DISTANCE) • Center (CT DISTANCE) • Rear (SL/SR DISTANCE) 2. ...
User Manual - RTD207
Page 26
... the disc can 't find my file in the WMA/mp3/JPG listing. • Make sure the filename is 1. • Clean the disc. RTD206/207 EN 26/4/06 3:22 PM Page 26 Additional Information Troubleshooting The unit does not switch on. • Make sure it is in STOP mode...• Check the connections (see page 14). It is impossible to display subtitles (see pages 4). No surround sound. • Check the speaker configuration in the Speaker Setup menu (see page 23). The device switches off spontaneously. • The device switches off automatically when it is configured to operate with...
... the disc can 't find my file in the WMA/mp3/JPG listing. • Make sure the filename is 1. • Clean the disc. RTD206/207 EN 26/4/06 3:22 PM Page 26 Additional Information Troubleshooting The unit does not switch on. • Make sure it is in STOP mode...• Check the connections (see page 14). It is impossible to display subtitles (see pages 4). No surround sound. • Check the speaker configuration in the Speaker Setup menu (see page 23). The device switches off spontaneously. • The device switches off automatically when it is configured to operate with...

User Manual - RTD207
Page 29
... representation only. 27 Make sure that you can enjoy enhanced full digital surround sound. even though the files are trademarks of the rear speakers (Rear-Right, Rear-Left ). RTD206/207 EN 26/4/06 3:22 PM Page 29 Additional Information JPEG files CD-R and CD-RW with several built-in sound enhancement systems...
... representation only. 27 Make sure that you can enjoy enhanced full digital surround sound. even though the files are trademarks of the rear speakers (Rear-Right, Rear-Left ). RTD206/207 EN 26/4/06 3:22 PM Page 29 Additional Information JPEG files CD-R and CD-RW with several built-in sound enhancement systems...


