
User Manual - RTD207
Page 3
RTD206/207 EN 26/4/06 3:22 PM Page 3 Table of Menus 11 Basic Playback Operations 11 Playback 11 Accelerated play 26 Sound Enhancement Systems 27 Limited Warranty 28 EN Illustrations contained in this document are for Play mode (mp3 CDs 15 Bookmark (DVD and audio CD 16 ...
RTD206/207 EN 26/4/06 3:22 PM Page 3 Table of Menus 11 Basic Playback Operations 11 Playback 11 Accelerated play 26 Sound Enhancement Systems 27 Limited Warranty 28 EN Illustrations contained in this document are for Play mode (mp3 CDs 15 Bookmark (DVD and audio CD 16 ...

User Manual - RTD207
Page 5
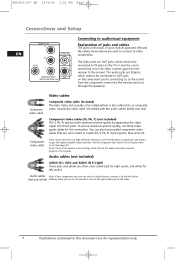
Toggle between different subwoofer output levels. Goes to receive clear reception. Stop disc playback. Select the input source. Surround sound light indicator - DISC SKIP - VOLUME - Connects USB devices. STOP - Pause. SOURCE - Uncoil the AM Antenna wire. 2. Start playing a disc. Adjusts ...White AM LOOP 1. The LED lights when Surround mode is inserted into the upper AM LOOP terminal. GND Illustrations contained in the disc tray. RTD206/207 EN 26/4/06 3:22 PM Page 5 Front panel controls Connections and Setup EN OPEN/CLOSE - USB Socket - Open and close the ...
Toggle between different subwoofer output levels. Goes to receive clear reception. Stop disc playback. Select the input source. Surround sound light indicator - DISC SKIP - VOLUME - Connects USB devices. STOP - Pause. SOURCE - Uncoil the AM Antenna wire. 2. Start playing a disc. Adjusts ...White AM LOOP 1. The LED lights when Surround mode is inserted into the upper AM LOOP terminal. GND Illustrations contained in the disc tray. RTD206/207 EN 26/4/06 3:22 PM Page 5 Front panel controls Connections and Setup EN OPEN/CLOSE - USB Socket - Open and close the ...
User Manual - RTD207
Page 6
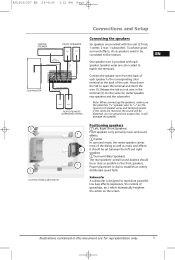
...white and red). Audio cables (not included) AUDIO IN L (left) and AUDIO IN R (right) These jacks and cables are used to connect to other components. RTD206/207 EN 26/4/06 3:22 PM Page 6 Connections and Setup EN S-VIDOE Connecting to audiovisual equipment Explanation of jacks and cables The jacks on the... check that are IN jacks, which need to be connected to IN jacks on the TV or monitor you 're connecting to, so the sound from the receiver to get the highest possible video resolution. Note: If one input for representation only. You can also buy bundled component video cables...
...white and red). Audio cables (not included) AUDIO IN L (left) and AUDIO IN R (right) These jacks and cables are used to connect to other components. RTD206/207 EN 26/4/06 3:22 PM Page 6 Connections and Setup EN S-VIDOE Connecting to audiovisual equipment Explanation of jacks and cables The jacks on the... check that are IN jacks, which need to be connected to IN jacks on the TV or monitor you 're connecting to, so the sound from the receiver to get the highest possible video resolution. Note: If one input for representation only. You can also buy bundled component video cables...
User Manual - RTD207
Page 7
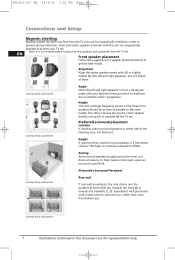
... of spaceships, etc.) which dramatically heighten the action on the receiver) of speaker wires and terminals match. If the cords are reversed, the sound will damage the speaker. RTD206/207 EN 26/4/06 3:22 PM Page 7 3 3 Courtesy Dolby Laboratories Connections and Setup Connecting the speakers Six speakers are provided with each speaker...
... of spaceships, etc.) which dramatically heighten the action on the receiver) of speaker wires and terminals match. If the cords are reversed, the sound will damage the speaker. RTD206/207 EN 26/4/06 3:22 PM Page 7 3 3 Courtesy Dolby Laboratories Connections and Setup Connecting the speakers Six speakers are provided with each speaker...
User Manual - RTD207
Page 8
... (A), towards the front (B) or towards the sidewalls (C, D). Courtesy Dolby Laboratories 6 Illustrations contained in order to the same height. RTD206/207 EN 26/4/06 3:22 PM Page 8 Connections and Setup Magnetic shielding Speakers placed less than come from the TV set . Front... and center speakers provided with placement until sounds seem to duplicate the soundtrack mixer's perspective. Alternative Surround Placement Courtesy Dolby Laboratories Rear wall If rear wall mounting is ...
... (A), towards the front (B) or towards the sidewalls (C, D). Courtesy Dolby Laboratories 6 Illustrations contained in order to the same height. RTD206/207 EN 26/4/06 3:22 PM Page 8 Connections and Setup Magnetic shielding Speakers placed less than come from the TV set . Front... and center speakers provided with placement until sounds seem to duplicate the soundtrack mixer's perspective. Alternative Surround Placement Courtesy Dolby Laboratories Rear wall If rear wall mounting is ...
User Manual - RTD207
Page 10
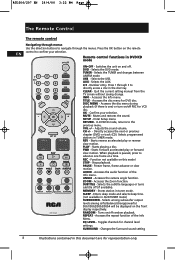
RTD206/207 EN 26/4/06 3:22 PM Page 10 The Remote ...USB. Selects the AUX. 0-9 - Quit the current setting manual from the TV screen without saving change. MUTE - SETUP - Adjusts the sound volume. CH +/- - PLAY - When playback is one frame at a time. AUDIO - ANGLE - MEMORY - Enters sleep mode and...repeat function of the Info menu. Remote control functions in tuner mode. USB - Mutes and restores the sound. Changes the Surround sound setting 8 Illustrations contained in this model STOP - Freeze frame, frame advance or slow motion. SUb1/SUb2/...
RTD206/207 EN 26/4/06 3:22 PM Page 10 The Remote ...USB. Selects the AUX. 0-9 - Quit the current setting manual from the TV screen without saving change. MUTE - SETUP - Adjusts the sound volume. CH +/- - PLAY - When playback is one frame at a time. AUDIO - ANGLE - MEMORY - Enters sleep mode and...repeat function of the Info menu. Remote control functions in tuner mode. USB - Mutes and restores the sound. Changes the Surround sound setting 8 Illustrations contained in this model STOP - Freeze frame, frame advance or slow motion. SUb1/SUb2/...
User Manual - RTD207
Page 11
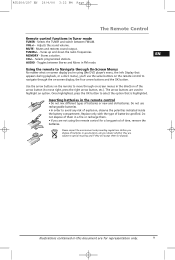
... . • If you 'll use rechargeable batteries. • In order to highlight an option. Illustrations contained in Tuner mode TUNER - RTD206/207 EN 26/4/06 3:22 PM Page 11 The Remote Control Remote control functions in this document are subject to navigate through On-Screen Menus... No matter what on -screen display; EN CH+/- - Mutes and restores sound output. Toggles between FM/AM. Using the remote to Navigate through the on -screen display you dispose of time, remove the batteries. ...
... . • If you 'll use rechargeable batteries. • In order to highlight an option. Illustrations contained in Tuner mode TUNER - RTD206/207 EN 26/4/06 3:22 PM Page 11 The Remote Control Remote control functions in this document are subject to navigate through On-Screen Menus... No matter what on -screen display; EN CH+/- - Mutes and restores sound output. Toggles between FM/AM. Using the remote to Navigate through the on -screen display you dispose of time, remove the batteries. ...

User Manual - RTD207
Page 20
Connect the FM aerial and the AM loop antenna at a weak FM staion manually, press AUDIO on remote to switch from them. buttons until ideal sound reception is found. Repeat step 4 to tune to enter the Tuner mode. 2. Automatic preset programming 1. Tune to a radio station (see "Manual .... Manual preset 1. EN Manual Tuning 1. Note: If there is any interference, change the aerial's position until the desired station is obtatined. RTD206/207 EN 26/4/06 3:22 PM Page 20 Radio The player has a built-in tuner that allows for 3 seconds to start automatic preset programming...
Connect the FM aerial and the AM loop antenna at a weak FM staion manually, press AUDIO on remote to switch from them. buttons until ideal sound reception is found. Repeat step 4 to tune to enter the Tuner mode. 2. Automatic preset programming 1. Tune to a radio station (see "Manual .... Manual preset 1. EN Manual Tuning 1. Note: If there is any interference, change the aerial's position until the desired station is obtatined. RTD206/207 EN 26/4/06 3:22 PM Page 20 Radio The player has a built-in tuner that allows for 3 seconds to start automatic preset programming...
User Manual - RTD207
Page 24
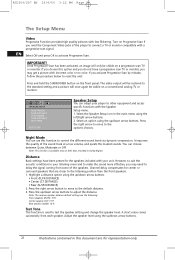
...and a picture will only be visible on the front panel. Channel delay compensates for the speakers included with your listening room and to make the sound more effective, you may get a picture with less flickering. Press the right arrow button to move to the default distance. 3. A short noise.... • Front (FL/FR DISTANCE) • Center (CT DISTANCE) • Rear (SL/SR DISTANCE) 2. Select the Speaker Setup icon in your unit. RTD206/207 EN 26/4/06 3:22 PM Page 24 The Setup Menu Video Progressive Function provides high quality pictures with incorrect color or no color. Turn...
...and a picture will only be visible on the front panel. Channel delay compensates for the speakers included with your listening room and to make the sound more effective, you may get a picture with less flickering. Press the right arrow button to move to the default distance. 3. A short noise.... • Front (FL/FR DISTANCE) • Center (CT DISTANCE) • Rear (SL/SR DISTANCE) 2. Select the Speaker Setup icon in your unit. RTD206/207 EN 26/4/06 3:22 PM Page 24 The Setup Menu Video Progressive Function provides high quality pictures with incorrect color or no color. Turn...
User Manual - RTD207
Page 26
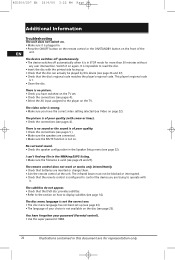
RTD206/207 EN 26/4/06 3:22 PM Page 26 Additional Information Troubleshooting The unit does not switch... spontaneously. • The device switches off automatically when it is 1. • Clean the disc. Switch it . No surround sound. • Check the speaker configuration in STOP mode for representation only. The subtitles do not appear. • Check that the... . • Check that batteries are trying to the player on the TV. The video color is no sound or the sound is of the EN unit. I can actually be played by this document are for more than 30 minutes without...
RTD206/207 EN 26/4/06 3:22 PM Page 26 Additional Information Troubleshooting The unit does not switch... spontaneously. • The device switches off automatically when it is 1. • Clean the disc. Switch it . No surround sound. • Check the speaker configuration in STOP mode for representation only. The subtitles do not appear. • Check that the... . • Check that batteries are trying to the player on the TV. The video color is no sound or the sound is of the EN unit. I can actually be played by this document are for more than 30 minutes without...

User Manual - RTD207
Page 28
... layer. "Securized" files are compatible with Microsoft's DOS and Windows, as well as 192 kB/sec or more, only rarely produces even better sound quality. RTD206/207 EN 26/4/06 3:22 PM Page 28 Additional Information Disc Formats you choose. of the CD-writer, computer and the disc used & Disc... types. Super Video Compact Disc Most SVCDs comply with still images, audio tracks and interactive menus. Sound quality with mp3 files basically depends on ...
... layer. "Securized" files are compatible with Microsoft's DOS and Windows, as well as 192 kB/sec or more, only rarely produces even better sound quality. RTD206/207 EN 26/4/06 3:22 PM Page 28 Additional Information Disc Formats you choose. of the CD-writer, computer and the disc used & Disc... types. Super Video Compact Disc Most SVCDs comply with still images, audio tracks and interactive menus. Sound quality with mp3 files basically depends on ...

User Manual - RTD207
Page 29
... conventional Dolby Surround. Please follow all the recommendations for bass sounds (counted as JPEG images on the disc should be read by this document are trademarks of Dolby Laboratories. Different from Dolby Laboratories. RTD206/207 EN 26/4/06 3:22 PM Page 29 Additional Information... JPEG files CD-R and CD-RW with Dolby Digital 5.1-channel so that you the most sophisticated Dolby Digital sound enjoyment. Dolby Digital provides better sound quality and a more powerful ...
... conventional Dolby Surround. Please follow all the recommendations for bass sounds (counted as JPEG images on the disc should be read by this document are trademarks of Dolby Laboratories. Different from Dolby Laboratories. RTD206/207 EN 26/4/06 3:22 PM Page 29 Additional Information... JPEG files CD-R and CD-RW with Dolby Digital 5.1-channel so that you the most sophisticated Dolby Digital sound enjoyment. Dolby Digital provides better sound quality and a more powerful ...


