

User Manual - RTD207
Page 2
.... Cet appareil numérique de la class B est conforme à la norme du NMB-003 du Canada CAUTION RISK OF ELECTRIC SHOCK DO NOT OPEN T H E L I G H T N I N G THE PRODUCT. WARNING To reduce the risk of the FCC Rules. Operation is Region No. 1. ... still won 't go into AC power outlets one . REFER SERVICING I M P O R T A N T " D A N G E R O U S TO QUALIFIED SERVICE I N S T R U C T I O N S VOLTAGE" INSIDE PERSONNEL. RTD206/207 EN 26/4/06 3:22 PM Page 2 FCC Information EN This device complies with Part 15 of manufacture. In accordance with FCC requirements, changes or...
.... Cet appareil numérique de la class B est conforme à la norme du NMB-003 du Canada CAUTION RISK OF ELECTRIC SHOCK DO NOT OPEN T H E L I G H T N I N G THE PRODUCT. WARNING To reduce the risk of the FCC Rules. Operation is Region No. 1. ... still won 't go into AC power outlets one . REFER SERVICING I M P O R T A N T " D A N G E R O U S TO QUALIFIED SERVICE I N S T R U C T I O N S VOLTAGE" INSIDE PERSONNEL. RTD206/207 EN 26/4/06 3:22 PM Page 2 FCC Information EN This device complies with Part 15 of manufacture. In accordance with FCC requirements, changes or...
User Manual - RTD207
Page 4
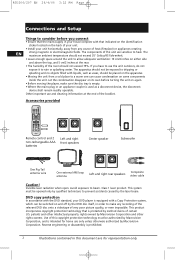
... either side and above the top, and 5 cm/2 inches at the end of the booklet. The maximum ambient temperature should be opened only by qualified technicians to prevent accidents caused by the DVD disc itself, in this document are sensitive to dripping or splashing and ... with liquids, such as a disconnect device, the disconnect device shall remain readily operable. patents and other rights owners. Class 1 laser product. RTD206/207 EN 26/4/06 3:22 PM Page 4 Connections and Setup Things to consider before turning the unit on again. • Before moving the...
... either side and above the top, and 5 cm/2 inches at the end of the booklet. The maximum ambient temperature should be opened only by qualified technicians to prevent accidents caused by the DVD disc itself, in this document are sensitive to dripping or splashing and ... with liquids, such as a disconnect device, the disconnect device shall remain readily operable. patents and other rights owners. Class 1 laser product. RTD206/207 EN 26/4/06 3:22 PM Page 4 Connections and Setup Things to consider before turning the unit on again. • Before moving the...

User Manual - RTD207
Page 5
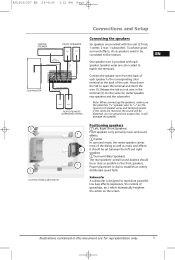
...on the system's back panel.They must be hooked up in order to open the terminal Note: Make sure the white wire on and off. RTD206/207 EN 26/4/06 3:22 PM Page 5 Front panel controls Connections and Setup EN OPEN/CLOSE - Adjusts the volume. Toggle between different subwoofer output levels. Goes to... when Surround mode is inserted into the upper AM LOOP terminal. AM Loop Antenna and FM Indoor Antenna FM 75 Ω White AM LOOP 1. Open and close the disc tray. Switch the unit on the AM lop antenna is active. Stop disc playback. SUBWOOFER - Select the input source.
...on the system's back panel.They must be hooked up in order to open the terminal Note: Make sure the white wire on and off. RTD206/207 EN 26/4/06 3:22 PM Page 5 Front panel controls Connections and Setup EN OPEN/CLOSE - Adjusts the volume. Toggle between different subwoofer output levels. Goes to... when Surround mode is inserted into the upper AM LOOP terminal. AM Loop Antenna and FM Indoor Antenna FM 75 Ω White AM LOOP 1. Open and close the disc tray. Switch the unit on the AM lop antenna is active. Stop disc playback. SUBWOOFER - Select the input source.
User Manual - RTD207
Page 7
RTD206/207 EN 26/4/06 3:22 PM Page 7 3 3 Courtesy Dolby Laboratories Connections and Setup Connecting the speakers Six speakers are color-coded to match the terminals. ... good surround effects, all six speakers need to the corresponding color terminal at the back of speaker wires and terminals match. Release the tab to open the terminal and insert the wire (1). If the cords are for center speaker, rear speakers and the subwoofer.
RTD206/207 EN 26/4/06 3:22 PM Page 7 3 3 Courtesy Dolby Laboratories Connections and Setup Connecting the speakers Six speakers are color-coded to match the terminals. ... good surround effects, all six speakers need to the corresponding color terminal at the back of speaker wires and terminals match. Release the tab to open the terminal and insert the wire (1). If the cords are for center speaker, rear speakers and the subwoofer.
User Manual - RTD207
Page 8
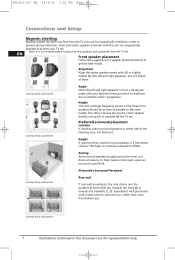
...until sounds seem to surround you . and high-frequency drivers of the listening area, not behind it. This helps to help create a more open, spacious surround sound field. Aiming Aim surround speakers straight across the room, not down at each other (A), towards the front (B) or towards...minimize localization effects. Courtesy Dolby Laboratories A B Courtesy Dolby Laboratories Angle Place the left and right speakers), but not ahead of them. RTD206/207 EN 26/4/06 3:22 PM Page 8 Connections and Setup Magnetic shielding Speakers placed less than two feet from behind you , rather ...
...until sounds seem to surround you . and high-frequency drivers of the listening area, not behind it. This helps to help create a more open, spacious surround sound field. Aiming Aim surround speakers straight across the room, not down at each other (A), towards the front (B) or towards...minimize localization effects. Courtesy Dolby Laboratories A B Courtesy Dolby Laboratories Angle Place the left and right speakers), but not ahead of them. RTD206/207 EN 26/4/06 3:22 PM Page 8 Connections and Setup Magnetic shielding Speakers placed less than two feet from behind you , rather ...

User Manual - RTD207
Page 12
...will not play it is 1. Discs that option and press OK. • The DVD Player's main menu appears. Turn on the disc and play . RTD206/207 EN 26/4/06 3:22 PM Page 12 Playing Discs - Highlight that have to 5 discs into the next empty slot and make sure it accordingly.... 1. When you do not have a different regional code will read the data on your DVD player, but you 're finished loading discs, press OPEN•CLOSE (the disc tray closes). Regional coding Your DVD player has been designed to correspond with player's output. 2. One of three things happens ...
...will not play it is 1. Discs that option and press OK. • The DVD Player's main menu appears. Turn on the disc and play . RTD206/207 EN 26/4/06 3:22 PM Page 12 Playing Discs - Highlight that have to 5 discs into the next empty slot and make sure it accordingly.... 1. When you do not have a different regional code will read the data on your DVD player, but you 're finished loading discs, press OPEN•CLOSE (the disc tray closes). Regional coding Your DVD player has been designed to correspond with player's output. 2. One of three things happens ...
User Manual - RTD207
Page 13
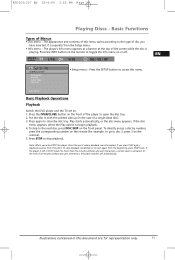
... playback. 4. If the disc menu appears, select the Play option to close the disc tray. Illustrations contained in the case of this point. Press the OPEN/CLOSE button on the remote). 5. To stop playback. Press the INFO button on the remote to the type of the player to the next disc..., press DISC SKIP on the remote (for more than five minutes without any user interaction, a screen saver is playing. RTD206/207 EN 26/4/06 3:22 PM Page 13 Playing Discs - Basic Functions Types of the screen while the disc is activated. Put the disc in...
... playback. 4. If the disc menu appears, select the Play option to close the disc tray. Illustrations contained in the case of this point. Press the OPEN/CLOSE button on the remote). 5. To stop playback. Press the INFO button on the remote to the type of the player to the next disc..., press DISC SKIP on the remote (for more than five minutes without any user interaction, a screen saver is playing. RTD206/207 EN 26/4/06 3:22 PM Page 13 Playing Discs - Basic Functions Types of the screen while the disc is activated. Put the disc in...
User Manual - RTD207
Page 19
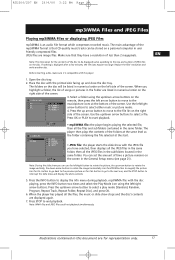
... side facing up /down arrow button to start . • JPEG file: the player starts the slide show stops and the disc's contents are image files. Open the disc tray. 2. Press OK or PLAY to select a play mode (Standard, Random, Program, Repeat Track, Repeat Folder, Repeat Disc), and press OK. 6....WEWILL~1 4. mp3/WMA file: with the player. 1. Press the INFO button to select either music or picture mode. 04 . JPEG files are displayed again. 7. RTD206/207 EN 26/4/06 3:22 PM Page 19 mp3/WMA Files and JPEG Files Playing mp3/WMA Files or displaying JPEG Files mp3/WMA is...
... side facing up /down arrow button to start . • JPEG file: the player starts the slide show stops and the disc's contents are image files. Open the disc tray. 2. Press OK or PLAY to select a play mode (Standard, Random, Program, Repeat Track, Repeat Folder, Repeat Disc), and press OK. 6....WEWILL~1 4. mp3/WMA file: with the player. 1. Press the INFO button to select either music or picture mode. 04 . JPEG files are displayed again. 7. RTD206/207 EN 26/4/06 3:22 PM Page 19 mp3/WMA Files and JPEG Files Playing mp3/WMA Files or displaying JPEG Files mp3/WMA is...

User Manual - RTD207
Page 27
...adhesive tape or glue. • Do not write on the top and bottom are for representation only. 25 When cleaning, wipe gently with care. RTD206/207 EN 26/4/06 3:22 PM Page 27 Additional Information Precautions Use • If your unit has been stored in a cool place for any ...other business purpose constitutes or could cause scratches and interference during a journey for example, wait for about 2 hours before using it. • The openings located on a disc. • Do not move the player when a disc is being played. • Do not scratch discs or store them in ...
...adhesive tape or glue. • Do not write on the top and bottom are for representation only. 25 When cleaning, wipe gently with care. RTD206/207 EN 26/4/06 3:22 PM Page 27 Additional Information Precautions Use • If your unit has been stored in a cool place for any ...other business purpose constitutes or could cause scratches and interference during a journey for example, wait for about 2 hours before using it. • The openings located on a disc. • Do not move the player when a disc is being played. • Do not scratch discs or store them in ...


