RTB1013 Product Manual
Page 6
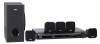
... is used as vases, should not exceed 75%. The components of your unit. • Installyourunithorizontally,awayfromanysourceofheat(fireplace)orappliancescreatingstrongmagnetic or electric fields. Connections and Setup What's Included Remote control and 2 Left and right front AAA batteries speakers Subwoofer Left and right Surround speakers Center speaker One Pig-Tail antenna wire...
... is used as vases, should not exceed 75%. The components of your unit. • Installyourunithorizontally,awayfromanysourceofheat(fireplace)orappliancescreatingstrongmagnetic or electric fields. Connections and Setup What's Included Remote control and 2 Left and right front AAA batteries speakers Subwoofer Left and right Surround speakers Center speaker One Pig-Tail antenna wire...
RTB1013 Product Manual
Page 7
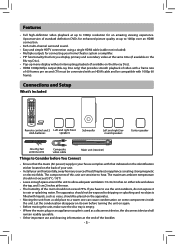
... highest possible video resolution. It must be hooked up in order to match your TV's resolution capabilities, please see instructions on your TV. Connections and Setup Connecting the Antenna FM antenna The FM antenna connects to the FM terminal on your TV. Method 2 Component Video Cable (not supplied) VIDEO IN Y PB...
... highest possible video resolution. It must be hooked up in order to match your TV's resolution capabilities, please see instructions on your TV. Connections and Setup Connecting the Antenna FM antenna The FM antenna connects to the FM terminal on your TV. Method 2 Component Video Cable (not supplied) VIDEO IN Y PB...
RTB1013 Product Manual
Page 8
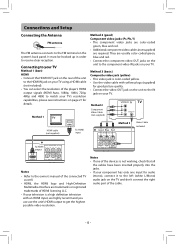
Connections and Setup Connecting AUDIO IN from External Sources such as a second audio amplifier or perhaps a wireless audio transmitter. Press OPTICAL button on remote control or ...
Connections and Setup Connecting AUDIO IN from External Sources such as a second audio amplifier or perhaps a wireless audio transmitter. Press OPTICAL button on remote control or ...
RTB1013 Product Manual
Page 9
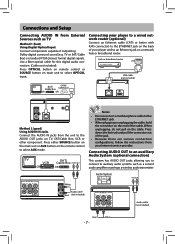
.... Do not let the speaker wires touch each other speakers FR, CT, SW, SL, SR. Speaker gains may also depend on the receiver. Connections and Setup Connecting the Speakers Speaker wires are reversed, the sound will damage the system's amplifier. - 8 - For example, red wire to open the terminal and...
.... Do not let the speaker wires touch each other speakers FR, CT, SW, SL, SR. Speaker gains may also depend on the receiver. Connections and Setup Connecting the Speakers Speaker wires are reversed, the sound will damage the system's amplifier. - 8 - For example, red wire to open the terminal and...

RTB1013 Product Manual
Page 10
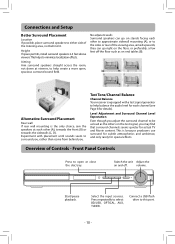
... be as close as music and effects. This often requires placing the center speaker directly on top (A) or beneath (B) the TV set . - 9 - Connections and Setup Positioning Speakers 3 1 2 Front Speaker Placement For best results, follow the speaker placement below. Left, Right (Front Speakers) Front speakers carry primarily music and sound eff...
... be as close as music and effects. This often requires placing the center speaker directly on top (A) or beneath (B) the TV set . - 9 - Connections and Setup Positioning Speakers 3 1 2 Front Speaker Placement For best results, follow the speaker placement below. Left, Right (Front Speakers) Front speakers carry primarily music and sound eff...
RTB1013 Product Manual
Page 11
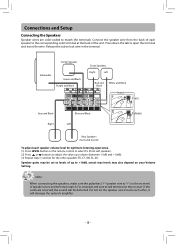
... sidewalls (C, D). Front Panel Controls Press to either side of Controls - Select the input sources. Switch the unit Adjust the on end tables (B). volume. Connections and Setup Better Surround Placement Location If possible, place surround speakers to open , spacious surround sound field. Overview of the listening area, not behind you adjust...
... sidewalls (C, D). Front Panel Controls Press to either side of Controls - Select the input sources. Switch the unit Adjust the on end tables (B). volume. Connections and Setup Better Surround Placement Location If possible, place surround speakers to open , spacious surround sound field. Overview of the listening area, not behind you adjust...
RTB1013 Product Manual
Page 12
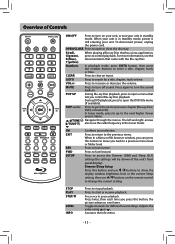
.... In tuner mode, press to go to pause playback. Press to the next higher /lower preset station. , /TUNE Navigate through the menus. Dimmer/Sleep Setup Press this button, the picture advances one frame. MUTE Press to the previous menu. Press to return to turn the sound back on your unit...twice, then each time you control Blu-ray Disc playback. OPEN/CLOSE Press to open the DVD title menu (if available). OK EXIT REV FWD SETUP Confirms your unit in the tuner mode. To disconnect power, unplug the power cord. Press to stop playback. STOP PLAY STEP/ LEVEL ...
.... In tuner mode, press to go to pause playback. Press to the next higher /lower preset station. , /TUNE Navigate through the menus. Dimmer/Sleep Setup Press this button, the picture advances one frame. MUTE Press to the previous menu. Press to return to turn the sound back on your unit...twice, then each time you control Blu-ray Disc playback. OPEN/CLOSE Press to open the DVD title menu (if available). OK EXIT REV FWD SETUP Confirms your unit in the tuner mode. To disconnect power, unplug the power cord. Press to stop playback. STOP PLAY STEP/ LEVEL ...
RTB1013 Product Manual
Page 14
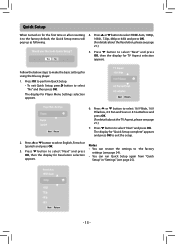
... Pillarbox, 4:3 Pan and Scan or 4:3 Letterbox and press OK. (For details about the Resolution, please see page 21.) 7. Press or button to exit the setup. 2. Resolution HDMI Auto 1080p 1080i 720p 480p 480i Next Return - 13 - TV Aspect 16:9 Wide 16:9 Pillarbox 4:3 Pan and Scan 4:3 Letterbox Next Return ...after resetting it to make the basic settings for using the Blu-ray player. 1. Follow the below steps to the factory default, the Quick Setup menu will pop up as following. Press button to select "Next" and press OK, then the display for TV Aspect selection appears. Press...
... Pillarbox, 4:3 Pan and Scan or 4:3 Letterbox and press OK. (For details about the Resolution, please see page 21.) 7. Press or button to exit the setup. 2. Resolution HDMI Auto 1080p 1080i 720p 480p 480i Next Return - 13 - TV Aspect 16:9 Wide 16:9 Pillarbox 4:3 Pan and Scan 4:3 Letterbox Next Return ...after resetting it to make the basic settings for using the Blu-ray player. 1. Follow the below steps to the factory default, the Quick Setup menu will pop up as following. Press button to select "Next" and press OK, then the display for TV Aspect selection appears. Press...
RTB1013 Product Manual
Page 22
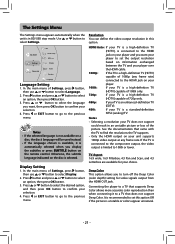
...finition TV (EDTV). 480i: If your player and you display the subtitles or press SUBTITLE button on your selection. 4. BD-ROM Settings Info Quick Setup BD-Live Dispaly Connected Audio Speaker Language Language Setting 1. Otherwise, the subtitle language indicated on information exchanged between the TV and your player over the...
...finition TV (EDTV). 480i: If your player and you display the subtitles or press SUBTITLE button on your selection. 4. BD-ROM Settings Info Quick Setup BD-Live Dispaly Connected Audio Speaker Language Language Setting 1. Otherwise, the subtitle language indicated on information exchanged between the TV and your player over the...
RTB1013 Product Manual
Page 23
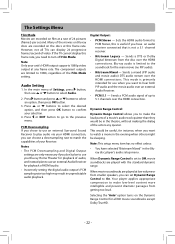
... of audio, and instead plan to use or button to watch a movie in the evening when others might be in the Bluray disc player's audio setup menu. Digital Output: • PCM Stereo - This mode is limited to the previous menu. When Dynamic Range Control is not a 5.1 channel receiver. ... making the dialog of the movies on the Dynamic Range Control for playback of video. Sends a PCM audio signal of your selection. 4. Note: This setup menu item has no PIP audio). • Bitstream Mixed - However, not all BD movie soundtracks except Dolby TrueHD. - 22 - Press button and press...
... of audio, and instead plan to use or button to watch a movie in the evening when others might be in the Bluray disc player's audio setup menu. Digital Output: • PCM Stereo - This mode is limited to the previous menu. When Dynamic Range Control is not a 5.1 channel receiver. ... making the dialog of the movies on the Dynamic Range Control for playback of video. Sends a PCM audio signal of your selection. 4. Note: This setup menu item has no PIP audio). • Bitstream Mixed - However, not all BD movie soundtracks except Dolby TrueHD. - 22 - Press button and press...
RTB1013 Product Manual
Page 26
...code. • Some Blu-ray discs will switch off automatically if it on -screen instructions to customize the following settings to go through the full setup menu later", and then press OK. • Or press button directly. 3. Blu-ray Disc or DVD does not play . In the main menu ...the screen is black • Erase BD Storage. • Make sure that the internet cable is displayed next to highlight "No thanks. To exit the setup menu: • Use button to BDLive Storage. After finishing all bookmarks and BD-Live content saved in -Picture(PiP) does not work - Never...
...code. • Some Blu-ray discs will switch off automatically if it on -screen instructions to customize the following settings to go through the full setup menu later", and then press OK. • Or press button directly. 3. Blu-ray Disc or DVD does not play . In the main menu ...the screen is black • Erase BD Storage. • Make sure that the internet cable is displayed next to highlight "No thanks. To exit the setup menu: • Use button to BDLive Storage. After finishing all bookmarks and BD-Live content saved in -Picture(PiP) does not work - Never...
RTB1013 Quick Start Guide
Page 1
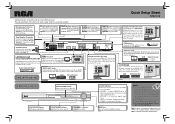
... jacks from Center Speaker to connect the AUDIO IN jacks on your new RCA product. Please read these instructions for quick setup sheet on and off. wires from Subwoofer Speaker to the terminals. Buttons Adjusts the volume. Quick Setup Sheet RTB1013 Blue Speaker Terminals Purple Speaker Terminals Green Speaker Terminals Red Speaker Terminals White...
... jacks from Center Speaker to connect the AUDIO IN jacks on your new RCA product. Please read these instructions for quick setup sheet on and off. wires from Subwoofer Speaker to the terminals. Buttons Adjusts the volume. Quick Setup Sheet RTB1013 Blue Speaker Terminals Purple Speaker Terminals Green Speaker Terminals Red Speaker Terminals White...


