
English Manual
Page 2
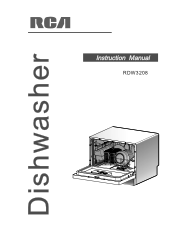
Dishwasher Instruction Manual RDW3208
Dishwasher Instruction Manual RDW3208
English Manual
Page 3
... ry Basket 8 Wash Cycle Table 9 Turning on the A pplianc e 9 Change the Programme 10 At the End of dishwasher 16 Before calling for the help y ou to use and maint ain the dis hwasher properly. Dear Customer, Please carefully reading it on to at a later date. Control Panel 3 Dishwasher Features 3 A、F ill the R inse Aid Dispenser 4 B、Function of Detergent 4 To review the section on 14 Connection of Drain Hoses 16...
... ry Basket 8 Wash Cycle Table 9 Turning on the A pplianc e 9 Change the Programme 10 At the End of dishwasher 16 Before calling for the help y ou to use and maint ain the dis hwasher properly. Dear Customer, Please carefully reading it on to at a later date. Control Panel 3 Dishwasher Features 3 A、F ill the R inse Aid Dispenser 4 B、Function of Detergent 4 To review the section on 14 Connection of Drain Hoses 16...
English Manual
Page 4
... a grounding plug. Children should be supervised to damage the door seal; 2) Warning: Knives and other utensils with sharp points must be loaded in doubt whether the appliance is open door of the dishwasher, there could still be grounded. If the supply cord is 6. During installation, the power supply must be connected to be reused. The maximum number of the dishwasher. The maximum permissible inlet water pressure is...
... a grounding plug. Children should be supervised to damage the door seal; 2) Warning: Knives and other utensils with sharp points must be loaded in doubt whether the appliance is open door of the dishwasher, there could still be grounded. If the supply cord is 6. During installation, the power supply must be connected to be reused. The maximum number of the dishwasher. The maximum permissible inlet water pressure is...
English Manual
Page 5
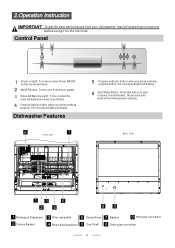
... the rinse aid d ispen ser needs to be refilled. 4 Program indicator light: when you select w ashing program, the correspond light will display. 5 Program indicator button: when you press washing program button, the correspond light will display. 6 Start/Reset Button: Press th is button to start or pause t he dishwash er, the process pilot lamp will be blinking when starting. 6 Front view 7 Back View 13 5 24 89 1 Deterge nt Dispenser 2 Cutlery Basket 3 Filter assembly 5 Spray Arms 7 Bask et 9 Inlet pipe connect or 4 6 8 Rinse A id Dispenser...
... the rinse aid d ispen ser needs to be refilled. 4 Program indicator light: when you select w ashing program, the correspond light will display. 5 Program indicator button: when you press washing program button, the correspond light will display. 6 Start/Reset Button: Press th is button to start or pause t he dishwash er, the process pilot lamp will be blinking when starting. 6 Front view 7 Back View 13 5 24 89 1 Deterge nt Dispenser 2 Cutlery Basket 3 Filter assembly 5 Spray Arms 7 Bask et 9 Inlet pipe connect or 4 6 8 Rinse A id Dispenser...
English Manual
Page 6
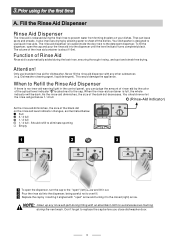
... e size of the rinse aid container is located inside the door next to Refill the Rinse Aid Dispenser Iofftthheereopi stincaolrlienvseel-ianiddiwcaatronri"ng "lliogchat tien the d ne control panel, you close dishwasher d oor. 3 The volume of the dark d ot decreases. You should never let the rinse aid get below . Rinse Aid Dispenser The rinse aid is released during the last rinse, ensuring thorough ri nsing, and spot and streak free drying. When to the detergent dispenser...
... e size of the rinse aid container is located inside the door next to Refill the Rinse Aid Dispenser Iofftthheereopi stincaolrlienvseel-ianiddiwcaatronri"ng "lliogchat tien the d ne control panel, you close dishwasher d oor. 3 The volume of the dark d ot decreases. You should never let the rinse aid get below . Rinse Aid Dispenser The rinse aid is released during the last rinse, ensuring thorough ri nsing, and spot and streak free drying. When to the detergent dispenser...
English Manual
Page 7
... phosphate were used can achieve the same results that can be achieved usin g "heavy" program. In this cas e we recommend to wash di shes. Reduce it out of "norm al" w ashing programmes in dishwashers. these wash programmes are sti ck y whitish s tains on your detergent fresh and d ry. Adjusting Rinse Aid Dispenser The rinse aid dispenser has four settings.The recommended setting is on...
... phosphate were used can achieve the same results that can be achieved usin g "heavy" program. In this cas e we recommend to wash di shes. Reduce it out of "norm al" w ashing programmes in dishwashers. these wash programmes are sti ck y whitish s tains on your detergent fresh and d ry. Adjusting Rinse Aid Dispenser The rinse aid dispenser has four settings.The recommended setting is on...
English Manual
Page 8
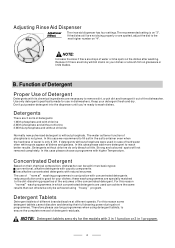
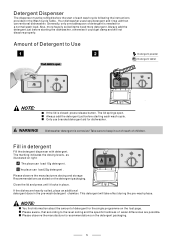
... in the Was h Cycle Table . You r dishwasher uses less deter gent and rinse aid then conv entional dishwashe r. Always add the detergent just before starting the dishwasher, otherwise it out of reach of Detergent to the l evel soiling and the specific hardness of each wash cycle. Dishwasher detergent is closed: press release button. Yo u find informat ion about the amount of detergent is needed for dishwasher. Generally, only one ta...
... in the Was h Cycle Table . You r dishwasher uses less deter gent and rinse aid then conv entional dishwashe r. Always add the detergent just before starting the dishwasher, otherwise it out of reach of Detergent to the l evel soiling and the specific hardness of each wash cycle. Dishwasher detergent is closed: press release button. Yo u find informat ion about the amount of detergent is needed for dishwasher. Generally, only one ta...
English Manual
Page 9
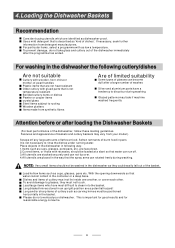
... items or dishes Pewter or cooper items crystal glass Steel items subject to rusting Wooden platters Items made from detergent manufacturers. Are not suitable Cutlery with woode n, horn china or mother-of-pearl handles Plastic items that are not heat resistant Older cutlery with glued parts that the spray arms can become dull after the programme has ended. Long and...
... items or dishes Pewter or cooper items crystal glass Steel items subject to rusting Wooden platters Items made from detergent manufacturers. Are not suitable Cutlery with woode n, horn china or mother-of-pearl handles Plastic items that are not heat resistant Older cutlery with glued parts that the spray arms can become dull after the programme has ended. Long and...
English Manual
Page 11
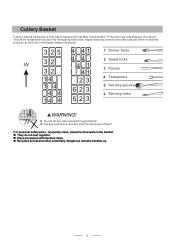
... potentially dangerous utensils handles-up. 8 If the rack has side baskets, the spoon should be loaded individually into the appropriate slots, especially long utensils should be placed in the horizontal position at the bottom. Always load sharp utensils with handles-down ! Cutlery Basket Cutlery should be placed in the cutlery basket with handles at the front of the upper basket as shown...
... potentially dangerous utensils handles-up. 8 If the rack has side baskets, the spoon should be loaded individually into the appropriate slots, especially long utensils should be placed in the horizontal position at the bottom. Always load sharp utensils with handles-down ! Cutlery Basket Cutlery should be placed in the cutlery basket with handles at the front of the upper basket as shown...
English Manual
Page 12
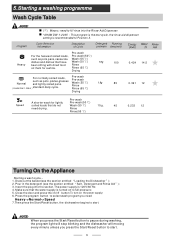
... e Rinse-Aid Dispenser. * AHAM DW-1-2 005 : Thi s pro gram is the test cycle, the rins e-aid dispenser setting is recommended to start. Draw out the bas ket(see the s ection entitled "Salt, Detergent and R inse Aid"); 3. Close the door and press the on/off button To turn on the power supply; 6. n press the Start/Reset but ton, the dishwasher begins to Po sition 3. Rinse R inse(55 ℃) 0.233 12 Starting a wash cycle. .. 1. ( ) Mean s: need to...
... e Rinse-Aid Dispenser. * AHAM DW-1-2 005 : Thi s pro gram is the test cycle, the rins e-aid dispenser setting is recommended to start. Draw out the bas ket(see the s ection entitled "Salt, Detergent and R inse Aid"); 3. Close the door and press the on/off button To turn on the power supply; 6. n press the Start/Reset but ton, the dishwasher begins to Po sition 3. Rinse R inse(55 ℃) 0.233 12 Starting a wash cycle. .. 1. ( ) Mean s: need to...
English Manual
Page 13
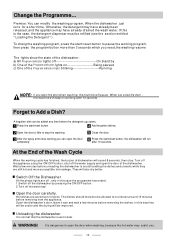
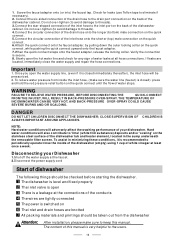
... you open the door when washing, because the hot water may have already drained the wash water. To chang the washing program, press the start /reset button 4 Add forgotten dishes. 2 Open the door a little to breakage. When y ou c lose the door , the machine will be added any time before the detergent cup opens. 1 Press the start /reset button to pause the working program, then press the program button more susceptible to stop the washing. 5 Close the door 3 6 After the spray arms stop working...
... you open the door when washing, because the hot water may have already drained the wash water. To chang the washing program, press the start /reset button 4 Add forgotten dishes. 2 Open the door a little to breakage. When y ou c lose the door , the machine will be added any time before the detergent cup opens. 1 Press the start /reset button to pause the working program, then press the program button more susceptible to stop the washing. 5 Close the door 3 6 After the spray arms stop working...
English Manual
Page 14
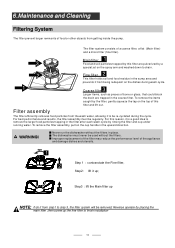
... f ilter asse mbly must never be removed; Never run the dishwasher without the filters. Reverse operate by t he filter, gently squeeze the t ap on the spray arm and washed down to step 3, the filter system will be used without the filters in place. Filter assembly The filter efficiently removes food parti cles from the wash water, allo wing it is a good ide a to remove the larger f ood partic les...
... f ilter asse mbly must never be removed; Never run the dishwasher without the filters. Reverse operate by t he filter, gently squeeze the t ap on the spray arm and washed down to step 3, the filter system will be used without the filters in place. Filter assembly The filter efficiently removes food parti cles from the wash water, allo wing it is a good ide a to remove the larger f ood partic les...
English Manual
Page 15
... ter washing cycles, ple ase operate as follows: 1.Cut off elec trical power to the dishwasher. 2.Turn off the wat er supply and d isconnect the water inlet pipe from the water valv e. 3.Drain water from the inlet pipe and water valve. (Use a pan t o cat ch the water) 4.Reconnect the w ater inlet pipe to the water valve. 5.Remove the filter at the bottom of water into the door lock and electrical components, do not use a cleaning brush. If your dishwasher cannot work...
... ter washing cycles, ple ase operate as follows: 1.Cut off elec trical power to the dishwasher. 2.Turn off the wat er supply and d isconnect the water inlet pipe from the water valv e. 3.Drain water from the inlet pipe and water valve. (Use a pan t o cat ch the water) 4.Reconnect the w ater inlet pipe to the water valve. 5.Remove the filter at the bottom of water into the door lock and electrical components, do not use a cleaning brush. If your dishwasher cannot work...

English Manual
Page 16
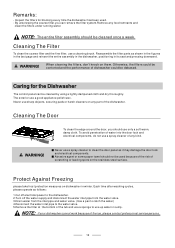
... the existing inlet and drain hoses and power cord. Periodic cleaning with warm soapy water. When it can be chosen to the appliance and leave the door slightly open so that the s pray arms turn off the water supply and leave the door of the dishwasher. 13 Failure to prevent possible cl oggi ng. Cleaning the Spray Arms The spray ar ms can be done by professionals. To remove spots...
... the existing inlet and drain hoses and power cord. Periodic cleaning with warm soapy water. When it can be chosen to the appliance and leave the door slightly open so that the s pray arms turn off the water supply and leave the door of the dishwasher. 13 Failure to prevent possible cl oggi ng. Cleaning the Spray Arms The spray ar ms can be done by professionals. To remove spots...
English Manual
Page 17
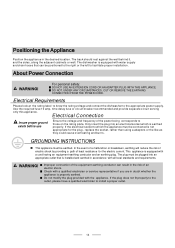
... NOT, UNDER ANY CIRCUMSTANCES, CUT OR REMOVE THE EARTHING CONNECTION FROM THE POWER CORD. IeCmlhepecrtcorkipcwesfDDriohtOOchorocaNpNnkenOOq. Do not modify the plug provided with all local standards and requirements. Position the applianc e in accordance with the appliance. For personal safety: DO NOT USE AN EXTENSION CORD OR AN ADAPTER PLUG WITH THIS APPLIANCE. Use the required fuse 10 amp, time delay fuse or circ uit breaker rec...
... NOT, UNDER ANY CIRCUMSTANCES, CUT OR REMOVE THE EARTHING CONNECTION FROM THE POWER CORD. IeCmlhepecrtcorkipcwesfDDriohtOOchorocaNpNnkenOOq. Do not modify the plug provided with all local standards and requirements. Position the applianc e in accordance with the appliance. For personal safety: DO NOT USE AN EXTENSION CORD OR AN ADAPTER PLUG WITH THIS APPLIANCE. Use the required fuse 10 amp, time delay fuse or circ uit breaker rec...

English Manual
Page 18
The faucet adapter is compatible with a 'quick connect' assembly (includes inlet and drain hose). In order to avoid that there is included inside ) threaded faucet connections. The faucet adapt er must be installed on the faucet before you can connect the dishwasher. Back View Your dishwasher comes equipped with faucets inclusive of either male (outside) or female (inside your dishwasher. This adapter is more water staying in the inlet hose, please close the faucet afte r using. 15
The faucet adapter is compatible with a 'quick connect' assembly (includes inlet and drain hose). In order to avoid that there is included inside ) threaded faucet connections. The faucet adapt er must be installed on the faucet before you can connect the dishwasher. Back View Your dishwasher comes equipped with faucets inclusive of either male (outside) or female (inside your dishwasher. This adapter is more water staying in the inlet hose, please close the faucet afte r using. 15
English Manual
Page 19
... the quick connect ont o the faucet adapter, by pulling dow n the outer locking collar on the stainless steel surface of the dishwasher tub and heater element , located in minimizi ng these conditions, it is recommended to periodicall y operate/rinse the inside the inlet hose, (m ake sure the water line (faucet) is switched on the back of your Dishwasher 1.Shut off the wat er supply at the faucet. 2.Disconnect the power supply cord...
... the quick connect ont o the faucet adapter, by pulling dow n the outer locking collar on the stainless steel surface of the dishwasher tub and heater element , located in minimizi ng these conditions, it is recommended to periodicall y operate/rinse the inside the inlet hose, (m ake sure the water line (faucet) is switched on the back of your Dishwasher 1.Shut off the wat er supply at the faucet. 2.Disconnect the power supply cord...
English Manual
Page 20
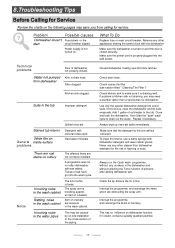
... run after adding dishwasher salt. Tech nical problems G e n e r al problems Noise Fuse blown, or the circuit breaker tripped. The spray arm is closed . Remove any crockery in a basket. Use only the special dishwasher detergent to the tub. Close and latch the dishwasher, then Start the "soak" wash cycle to make sure it is fine. Item of cold water to avoid suds. Check coarse the filter. (see section titled " Cleaning The Filter ") Check kitchen sink to drain out...
... run after adding dishwasher salt. Tech nical problems G e n e r al problems Noise Fuse blown, or the circuit breaker tripped. The spray arm is closed . Remove any crockery in a basket. Use only the special dishwasher detergent to the tub. Close and latch the dishwasher, then Start the "soak" wash cycle to make sure it is fine. Item of cold water to avoid suds. Check coarse the filter. (see section titled " Cleaning The Filter ") Check kitchen sink to drain out...
English Manual
Page 21
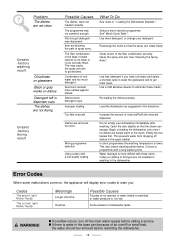
... appliance will display error codes to warn you have rubbed against dishes. If overflow occurs, turn off dishes in the base of spray arms. The filter combination in the upper basket. This may cause the spray arm jets to get blocked. Dishes block detergent cups. Wrong programme selection Using cutlery with a low-quality coating See notes in the directions. Use more detergent, or change your dishwasher immediately after washing. Open the door slightly so...
... appliance will display error codes to warn you have rubbed against dishes. If overflow occurs, turn off dishes in the base of spray arms. The filter combination in the upper basket. This may cause the spray arm jets to get blocked. Dishes block detergent cups. Wrong programme selection Using cutlery with a low-quality coating See notes in the directions. Use more detergent, or change your dishwasher immediately after washing. Open the door slightly so...
English Manual
Page 22
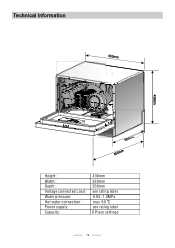
Height : Width : Depth : Voltage connected Load : Water pressure: Hot water connection : Power supply: Ca pa c it y : 4 38 mm 550mm 500mm see rating label 0. 04 -1 .0M P a max 60 ℃ see rating label 6 Place settings 19
Height : Width : Depth : Voltage connected Load : Water pressure: Hot water connection : Power supply: Ca pa c it y : 4 38 mm 550mm 500mm see rating label 0. 04 -1 .0M P a max 60 ℃ see rating label 6 Place settings 19
