
User Guide & Warranty
Page 1
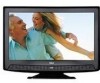
visit our website at www.rca.com/tv or call 1-877-794-7977 contents connections 6 remote 19 features 20 menus 25 FAQs 30 warranty 36 user's guide | LCD FLAT PANEL HDTV For use with models: L22HD41/L22HD41V /L26HD41/L26HD31R Need assistance?
visit our website at www.rca.com/tv or call 1-877-794-7977 contents connections 6 remote 19 features 20 menus 25 FAQs 30 warranty 36 user's guide | LCD FLAT PANEL HDTV For use with models: L22HD41/L22HD41V /L26HD41/L26HD31R Need assistance?

User Guide & Warranty
Page 2
...base or mounted to shut the power off . Refer to qualified service personnel. In order to the wall. For US customers: Your RCA Consumer Electronics product may also be connected to the grounding system of the building as close to the point of cable entry as the ... the rear of adequate size and strength to your local authorities or the Electronic Industries Alliance: www.eiae.org. Don't place the TV on the product. Model No Serial No Purchase Date Dealer/Address/Phone This symbol indicates important instructions accompanying the product WARNING To reduce ...
...base or mounted to shut the power off . Refer to qualified service personnel. In order to the wall. For US customers: Your RCA Consumer Electronics product may also be connected to the grounding system of the building as close to the point of cable entry as the ... the rear of adequate size and strength to your local authorities or the Electronic Industries Alliance: www.eiae.org. Don't place the TV on the product. Model No Serial No Purchase Date Dealer/Address/Phone This symbol indicates important instructions accompanying the product WARNING To reduce ...

User Guide & Warranty
Page 3
... periods of the polarized or grounding-type plug. If the provided plug does not fit your outlet, consult an electrician for your safety. When the TV is grounded so as radiators, heat registers, stoves, or other . See following example: ELECTRIC SERVICE EQUIPMEN T ANTENNA LEAD IN W I RE GROUND CLAMP ANTENNA DISCHARGE UNIT...
... periods of the polarized or grounding-type plug. If the provided plug does not fit your outlet, consult an electrician for your safety. When the TV is grounded so as radiators, heat registers, stoves, or other . See following example: ELECTRIC SERVICE EQUIPMEN T ANTENNA LEAD IN W I RE GROUND CLAMP ANTENNA DISCHARGE UNIT...

User Guide & Warranty
Page 4
...Protect Against Power Surges ...6 Safety Information ...6 Avoid Audio Interference ...6 Avoid Direct Light ...6 Check Supplied Parts ...6 Removing the Table Stand ...7 Mounting Your TV to the Wall ...7 Obtain the Signal ...8 What You Need ...8 What You Need to Know ...8 Choose Your Connections ...9 Connecting a Component with Composite ... Viewing the Picture from the Connected Component 13 Viewing a PC...13 Plug in the TV ...14 Put Batteries in alphabetical order 17 Buttons and Other Jacks on the TV ...14 Using the Remote Control to Complete Initial Setup 14 Complete the Initial Setup ...15...
...Protect Against Power Surges ...6 Safety Information ...6 Avoid Audio Interference ...6 Avoid Direct Light ...6 Check Supplied Parts ...6 Removing the Table Stand ...7 Mounting Your TV to the Wall ...7 Obtain the Signal ...8 What You Need ...8 What You Need to Know ...8 Choose Your Connections ...9 Connecting a Component with Composite ... Viewing the Picture from the Connected Component 13 Viewing a PC...13 Plug in the TV ...14 Put Batteries in alphabetical order 17 Buttons and Other Jacks on the TV ...14 Using the Remote Control to Complete Initial Setup 14 Complete the Initial Setup ...15...
User Guide & Warranty
Page 5
...23 Block Channel ...23 Block Buttons ...24 Change Password ...24 Additional Features ...24 Screen Formats ...24 Chapter 4 I Using the TV Menu Using the Menu System ...25 Picture Menu ...25 Sound Menu ...26 Setup Menu ...27 List & Labels Menu ...29 Parental Control Menu ...29 Chapter 5 I Using... TV Features Channel Banner ...20 Parental Controls and V-Chip ...20 V-Chip - Chapter 2 I Using the Remote Control Remote Control Buttons ...19 Chapter 3...
...23 Block Channel ...23 Block Buttons ...24 Change Password ...24 Additional Features ...24 Screen Formats ...24 Chapter 4 I Using the TV Menu Using the Menu System ...25 Picture Menu ...25 Sound Menu ...26 Setup Menu ...27 List & Labels Menu ...29 Parental Control Menu ...29 Chapter 5 I Using... TV Features Channel Banner ...20 Parental Controls and V-Chip ...20 V-Chip - Chapter 2 I Using the Remote Control Remote Control Buttons ...19 Chapter 3...
User Guide & Warranty
Page 6
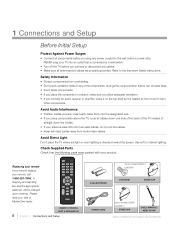
NEVER plug your TV into an outlet that is directed toward the screen. A shipping and handling fee, and the appropriate sales tax, will be charged upon ordering. REMOTE CONTROL PART # RC2463001/01 6 Chapter 1 Connections and Setup 2 AAA BATTERIES only for models L26HD41/ L26HD31R ST-SCREW STAND ...-7946. insert each cable firmly into the wall outlet or power strip. Refer to replace your remote If you place components above the TV, route all antennas and cables are presentation only. Check Supplied Parts Check that air can circulate freely. • Don't stack components ...
NEVER plug your TV into an outlet that is directed toward the screen. A shipping and handling fee, and the appropriate sales tax, will be charged upon ordering. REMOTE CONTROL PART # RC2463001/01 6 Chapter 1 Connections and Setup 2 AAA BATTERIES only for models L26HD41/ L26HD31R ST-SCREW STAND ...-7946. insert each cable firmly into the wall outlet or power strip. Refer to replace your remote If you place components above the TV, route all antennas and cables are presentation only. Check Supplied Parts Check that air can circulate freely. • Don't stack components ...

User Guide & Warranty
Page 7
... 3 (Only for models L22HD41/L22HD41V) Attach the stand cap to the TV cabinet. 1 Step 3 (Only for models L26HD41 /L26HD31R). TV cabinet with stand cap attached. Mounting Your TV to the Wall To mount your TV to the wall, purchase a VESA wall Models L22HD41/L22HD41V/L26HD41/ L26HD31R Purchase a VESA 100 x100, Size M4 screw The VESA number...
... 3 (Only for models L22HD41/L22HD41V) Attach the stand cap to the TV cabinet. 1 Step 3 (Only for models L26HD41 /L26HD31R). TV cabinet with stand cap attached. Mounting Your TV to the Wall To mount your TV to the wall, purchase a VESA wall Models L22HD41/L22HD41V/L26HD41/ L26HD31R Purchase a VESA 100 x100, Size M4 screw The VESA number...

User Guide & Warranty
Page 8
... Channel Banner displays the type of antenna to use in connecting your TV is obtaining the signal. They may need to receive analog and/or digital channels ... Chapter 1 Connections and Setup You are ready to view digital channels. A "D" at the bottom of the TV. The back panel of the TV. What You Need Antenna (Rabbit Ears) or Outdoor Antenna with Coaxial Cable Plug the antenna or coaxial cable ... the screen denotes digital channels and an "A" denotes analog channels. Before you connect your TV, you have a set-top box, you may recommend special cables to allow you to call your...
... Channel Banner displays the type of antenna to use in connecting your TV is obtaining the signal. They may need to receive analog and/or digital channels ... Chapter 1 Connections and Setup You are ready to view digital channels. A "D" at the bottom of the TV. The back panel of the TV. What You Need Antenna (Rabbit Ears) or Outdoor Antenna with Coaxial Cable Plug the antenna or coaxial cable ... the screen denotes digital channels and an "A" denotes analog channels. Before you connect your TV, you have a set-top box, you may recommend special cables to allow you to call your...

User Guide & Warranty
Page 9
... Pr Component Video Audio page 10 pages 10-11 Customer Support For additional assistance in using your TV. Please use the following chart to your RCA product, please visit the support page at www.rca.com/tv. 1 INPUT HDMITM OR pages 11-12 Audio R and L HDMI/DVI PC INPUT HDMITM + HDMI/DVI Adapter + Audio...
... Pr Component Video Audio page 10 pages 10-11 Customer Support For additional assistance in using your TV. Please use the following chart to your RCA product, please visit the support page at www.rca.com/tv. 1 INPUT HDMITM OR pages 11-12 Audio R and L HDMI/DVI PC INPUT HDMITM + HDMI/DVI Adapter + Audio...

User Guide & Warranty
Page 10
... jacks on the DVD player. 2. Connect the red and white audio cables to the (VID 2) right and left AUDIO jacks on the back of the TV and to page 8 for instructions. Connect three video cables or special Y Pb Pr cables to the COMPONENT INPUT (CMPT) Y Pb Pr jacks on the back... of the TV and to the audio output jacks on the side of the TV and to the Y Pb Pr outputs on the DVD player. Connect your red and white audio cables to the COMPONENT...
... jacks on the DVD player. 2. Connect the red and white audio cables to the (VID 2) right and left AUDIO jacks on the back of the TV and to page 8 for instructions. Connect three video cables or special Y Pb Pr cables to the COMPONENT INPUT (CMPT) Y Pb Pr jacks on the back... of the TV and to the audio output jacks on the side of the TV and to the Y Pb Pr outputs on the DVD player. Connect your red and white audio cables to the COMPONENT...

User Guide & Warranty
Page 11
... have a DVI output jack. Go to the right and left audio jacks on the back of the TV and to page 8 for specific instructions. Example: Set-top box with DVI jack: To connect an HDMI...back of an integrated mini-plug cable. Go to the HDMI/DVI INPUT 1 jack on the back of the TV. 2. RED= RIGHT AUDIO, WHITE=LEFT AUDIO COMPONENT VIDEO CABLES (Y Pb Pr) ARE COLOR CODEDGREEN, BLUE ...3. Since HDMI technology is based on Digital Visual Interface (DVI), the jack on the back of your TV is also compatible with HDMI (Best) High-Definition Multimedia Interface (HDMI) technology is an example of the ...
... have a DVI output jack. Go to the right and left audio jacks on the back of the TV and to page 8 for specific instructions. Example: Set-top box with DVI jack: To connect an HDMI...back of an integrated mini-plug cable. Go to the HDMI/DVI INPUT 1 jack on the back of the TV. 2. RED= RIGHT AUDIO, WHITE=LEFT AUDIO COMPONENT VIDEO CABLES (Y Pb Pr) ARE COLOR CODEDGREEN, BLUE ...3. Since HDMI technology is based on Digital Visual Interface (DVI), the jack on the back of your TV is also compatible with HDMI (Best) High-Definition Multimedia Interface (HDMI) technology is an example of the ...

User Guide & Warranty
Page 12
... and use your PC's video output isn't 15-pin, you'll need an adapter that can connect to a 15-pin monitor cable. 2. Note: If your TV as 1/8" stereo mini-pin) to the PC AUDIO jack on the back of a connection using the HDMI/DVI INPUT 1 jack. Go to page 11 for.... Connect a 3.5mm stereo mini-pin audio cable (sometimes referred to as a monitor, follow these steps: 1. HDMI/DVI Connection (Best) This is an example of the TV and the other end to the audio output jack on the TV and the other end to the PC's video output jack.
... and use your PC's video output isn't 15-pin, you'll need an adapter that can connect to a 15-pin monitor cable. 2. Note: If your TV as 1/8" stereo mini-pin) to the PC AUDIO jack on the back of a connection using the HDMI/DVI INPUT 1 jack. Go to page 11 for.... Connect a 3.5mm stereo mini-pin audio cable (sometimes referred to as a monitor, follow these steps: 1. HDMI/DVI Connection (Best) This is an example of the TV and the other end to the audio output jack on the TV and the other end to the PC's video output jack.

User Guide & Warranty
Page 13
...the INPUT button on the remote control to display the signal source. Note: When you have connected all additional components to your TV, go back to viewing TV channels, use the number buttons to select PC. Press the INPUT button on the remote control to display the signal source. ... 2. HDMI/DVI INPU 1 AUDIO PC INPUT Don't forget: If necessary, connect antenna or cable to confirm your component is an example of the TV screen. Press OK to get a picture. VIDEO Viewing the Picture from the DVD player appears black and white and your selection. Note: If the...
...the INPUT button on the remote control to display the signal source. Note: When you have connected all additional components to your TV, go back to viewing TV channels, use the number buttons to select PC. Press the INPUT button on the remote control to display the signal source. ... 2. HDMI/DVI INPU 1 AUDIO PC INPUT Don't forget: If necessary, connect antenna or cable to confirm your component is an example of the TV screen. Press OK to get a picture. VIDEO Viewing the Picture from the DVD player appears black and white and your selection. Note: If the...

User Guide & Warranty
Page 14
...allows you to complete the setup of your choice and select it. Do not plug the TV into an outlet, inserting the plug completely. Using the Remote Control to Complete Initial Setup... You will need to use the remote control to navigate through and select items that appear in the on your TV by a light switch. To select a menu item, press the arrows to move up or down . Use ...the up or down arrow to highlight one of the items listed on all menu screens: highlight your TV. Use OK button or right arrow to view other selections for a menu choice or to the previous menu, ...
...allows you to complete the setup of your choice and select it. Do not plug the TV into an outlet, inserting the plug completely. Using the Remote Control to Complete Initial Setup... You will need to use the remote control to navigate through and select items that appear in the on your TV by a light switch. To select a menu item, press the arrows to move up or down . Use ...the up or down arrow to highlight one of the items listed on all menu screens: highlight your TV. Use OK button or right arrow to view other selections for a menu choice or to the previous menu, ...

User Guide & Warranty
Page 15
...Auto Channel Search Running Searching for the menu system. Set the Menu Language The first step of the setup. Choosing "Home" for the TV Location assigns the optimal picture settings for you may not be able to "Natural" and the Setup Menu will be time-consuming, so ...channels, press MENU and choose List and Labels. Any channels already found next to view. Complete the Initial Setup The menu system in your TV allows all available channels, (analog and digital) and initially includes scrambled channels. After Choosing "Home," press OK; This is because the ...
...Auto Channel Search Running Searching for the menu system. Set the Menu Language The first step of the setup. Choosing "Home" for the TV Location assigns the optimal picture settings for you may not be able to "Natural" and the Setup Menu will be time-consuming, so ...channels, press MENU and choose List and Labels. Any channels already found next to view. Complete the Initial Setup The menu system in your TV allows all available channels, (analog and digital) and initially includes scrambled channels. After Choosing "Home," press OK; This is because the ...

User Guide & Warranty
Page 16
... Connections and Setup Go to page 24 for more slowly than usual. What To Expect Watching TV Analog Channels An "A" next to the channel number denotes that you may eliminate the bars. Watching TV Digital Channels A "D" next to the channel number denotes that you are bars on how the... station or source component is perfectly normal. Your TV can 't be removed because of screen formats. Some bars can display ...
... Connections and Setup Go to page 24 for more slowly than usual. What To Expect Watching TV Analog Channels An "A" next to the channel number denotes that you may eliminate the bars. Watching TV Digital Channels A "D" next to the channel number denotes that you are bars on how the... station or source component is perfectly normal. Your TV can 't be removed because of screen formats. Some bars can display ...

User Guide & Warranty
Page 17
...The left audio connection when using a 15-pin, D-sub cable. When using CMPT Y Pb Pr, make sure you also connect audio cables from your TV is connected to select S-VID. The left audio connector is usually white. Note: If using the VIDEO INPUT 1 jack or the S-VIDEO INPUT jack.... a digital cable box, with a VGA output to both video and audio data by way of an integrated mini-plug cable. PC VIDEO INPUT Connect your TV. S-VIDEO INPUT Allows you connect a component, such as a DVD player. • CMPT Y Pb Pr (Component Video) Provides good picture quality because the ...
...The left audio connection when using a 15-pin, D-sub cable. When using CMPT Y Pb Pr, make sure you also connect audio cables from your TV is connected to select S-VID. The left audio connector is usually white. Note: If using the VIDEO INPUT 1 jack or the S-VIDEO INPUT jack.... a digital cable box, with a VGA output to both video and audio data by way of an integrated mini-plug cable. PC VIDEO INPUT Connect your TV. S-VIDEO INPUT Allows you connect a component, such as a DVD player. • CMPT Y Pb Pr (Component Video) Provides good picture quality because the ...

User Guide & Warranty
Page 18
... a component that has composite video jacks, such as a VCR or DVD player. • L AUDIO Provides left audio connectors are usually white. In the TV menu system, it acts like the right arrow on the remote control and can be used to select menu options. VOL ( ) Increases the volume. CH... ( ) Scans up through the channel list. VOL ( ) Decreases the volume. AUDIO/VIDEO INPUT 2 (VID 2) Lets you cannot locate your TV to the sound coming from the TV. Buttons and Other Jacks on the remote control and can be used to select menu options. The left audio connection when using...
... a component that has composite video jacks, such as a VCR or DVD player. • L AUDIO Provides left audio connectors are usually white. In the TV menu system, it acts like the right arrow on the remote control and can be used to select menu options. VOL ( ) Increases the volume. CH... ( ) Scans up through the channel list. VOL ( ) Decreases the volume. AUDIO/VIDEO INPUT 2 (VID 2) Lets you cannot locate your TV to the sound coming from the TV. Buttons and Other Jacks on the remote control and can be used to select menu options. The left audio connection when using...
User Guide & Warranty
Page 19
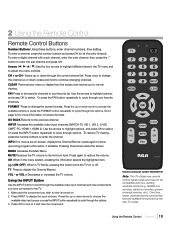
... to restore the volume. MENU Accesses the Main Menu. Press again to the previous channel. or VOL + Decreases or increases the TV volume. Over time, newer universal remote controls that become available should pick up or down through your favorite list. press again to display... the Channel Banner. TV Press to show upcoming program information, if available. Using the INPUT Button Use the INPUT button to scroll through the options. 3. Press...
... to restore the volume. MENU Accesses the Main Menu. Press again to the previous channel. or VOL + Decreases or increases the TV volume. Over time, newer universal remote controls that become available should pick up or down through your favorite list. press again to display... the Channel Banner. TV Press to show upcoming program information, if available. Using the INPUT Button Use the INPUT button to scroll through the options. 3. Press...

User Guide & Warranty
Page 20
... received with no content themes are displayed. If the current channel is displayed. US and Canada V-Chip reads the program's age-based rating (TV-MA, TV-14, etc.) and content themes (Violence (V), Adult Language (L), etc.). Change the channel or press OK to lock V-Chip, see page 21...Current time. This display is being broadcast in stereo or mono. If the current channel is turned off or unlocked. If available, TV programs can unblock them by age-based ratings (See page 23). For instructions to enter your password and temporarily deactivate the parental controls...
... received with no content themes are displayed. If the current channel is displayed. US and Canada V-Chip reads the program's age-based rating (TV-MA, TV-14, etc.) and content themes (Violence (V), Adult Language (L), etc.). Change the channel or press OK to lock V-Chip, see page 21...Current time. This display is being broadcast in stereo or mono. If the current channel is turned off or unlocked. If available, TV programs can unblock them by age-based ratings (See page 23). For instructions to enter your password and temporarily deactivate the parental controls...


