
User Manual
Page 2
... 2 inches from the rear of electric shock or personal injury. Also, make sure the stand or base you if needed. customers: Your RCA Consumer Electronics product may be blocked resulting in the User's Guide to prevent the TV from overheating. WARNING The TV is properly attached to the base or mounted to qualified service personnel. Please follow the base or wall mounting instructions...
... 2 inches from the rear of electric shock or personal injury. Also, make sure the stand or base you if needed. customers: Your RCA Consumer Electronics product may be blocked resulting in the User's Guide to prevent the TV from overheating. WARNING The TV is properly attached to the base or mounted to qualified service personnel. Please follow the base or wall mounting instructions...

User Manual
Page 3
... the antenna or cable system is used, use this apparatus during lightning storms or when unused for replacement of antenna-discharge unit, connection to an antenna-discharge unit, size of grounding conductors, location of the obsolete outlet. 10. ELECTRIC SERVICE EQUIPMENT ANTENNA LEAD IN WIRE GROUND CLAMP ANTENNA DISCHARGE UNIT (NEC SECTION 810-20) GROUNDING CONDUCTORS (NEC SECTION 810-21) GROUND CLAMPS POWER SERVICE GROUNDING...
... the antenna or cable system is used, use this apparatus during lightning storms or when unused for replacement of antenna-discharge unit, connection to an antenna-discharge unit, size of grounding conductors, location of the obsolete outlet. 10. ELECTRIC SERVICE EQUIPMENT ANTENNA LEAD IN WIRE GROUND CLAMP ANTENNA DISCHARGE UNIT (NEC SECTION 810-20) GROUNDING CONDUCTORS (NEC SECTION 810-21) GROUND CLAMPS POWER SERVICE GROUNDING...

User Manual
Page 5
... Against Power Surges 3 Protect Devices from Overheating 3 Position Cables Properly to Avoid Audio Interference 3 Use Indirect Light...3 Connection Illustrations 3 Check Supplied Parts 3 Attach the Base ...4 HDTV Information...4 Choose Your Connection 4 Y Pb/Cb Pr/Cr Connection 5 Audio/Video Input and Output Connection 6 DVI Connection...7 Connecting to a Personal Computer 8 Setting Up Your TV ...8 Plug in the TV ...8 Put Batteries in the Remote 8 Turn on the TV ...8 Completing the On Screen Setup 9 Choose the Menu Language 9 Choose the Signal Type 9 Complete Channel...
... Against Power Surges 3 Protect Devices from Overheating 3 Position Cables Properly to Avoid Audio Interference 3 Use Indirect Light...3 Connection Illustrations 3 Check Supplied Parts 3 Attach the Base ...4 HDTV Information...4 Choose Your Connection 4 Y Pb/Cb Pr/Cr Connection 5 Audio/Video Input and Output Connection 6 DVI Connection...7 Connecting to a Personal Computer 8 Setting Up Your TV ...8 Plug in the TV ...8 Put Batteries in the Remote 8 Turn on the TV ...8 Completing the On Screen Setup 9 Choose the Menu Language 9 Choose the Signal Type 9 Complete Channel...

User Manual
Page 7
... with 8 screws to attach the base to TV Wall mount plate Chapter 1 Graphics contained within this publication are for representation only. Check Supplied Parts Check that is controlled by a wall switch. • Turn off the TV and/or device(s) before you plug any of the components. OK CLEAR PRESETS CC INFO MENU FORMAT SLEEP CALENDAR SOUND PC INPUT Remote control 2 AA batteries Power cord TV's base, along with your devices (VCR, DVD player, etc...
... with 8 screws to attach the base to TV Wall mount plate Chapter 1 Graphics contained within this publication are for representation only. Check Supplied Parts Check that is controlled by a wall switch. • Turn off the TV and/or device(s) before you plug any of the components. OK CLEAR PRESETS CC INFO MENU FORMAT SLEEP CALENDAR SOUND PC INPUT Remote control 2 AA batteries Power cord TV's base, along with your devices (VCR, DVD player, etc...

User Manual
Page 8
...;at the bottom of antenna to use to receive the local digital channels available to the wall, don't attach the base and instead follow these instructions. 1. Connections and Setup Remove the two jack covers to page 7 for an example. Attach the Base Your TV comes shipped without the base attached so that is a trademark of the surface so that supports a high-resolution signal. Go to achieve.
...;at the bottom of antenna to use to receive the local digital channels available to the wall, don't attach the base and instead follow these instructions. 1. Connections and Setup Remove the two jack covers to page 7 for an example. Attach the Base Your TV comes shipped without the base attached so that is a trademark of the surface so that supports a high-resolution signal. Go to achieve.
User Manual
Page 9
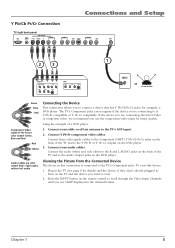
...-AIR ANTENNA Green Blue Red Connecting the Device This connection allows you want to view. 2. The TV's Component jacks can recognize if the device you're connecting to is connected to the TV's Component jacks. Connect your cable or off-air antenna to scroll through the Video Input Channels until you use the component video input for better quality. Plug in the TV (see CMPT displayed in this device: 1. Turn on the remote control to...
...-AIR ANTENNA Green Blue Red Connecting the Device This connection allows you want to view. 2. The TV's Component jacks can recognize if the device you're connecting to is connected to the TV's Component jacks. Connect your cable or off-air antenna to scroll through the Video Input Channels until you use the component video input for better quality. Plug in the TV (see CMPT displayed in this device: 1. Turn on the remote control to...

User Manual
Page 10
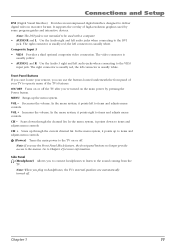
... the INPUT button on the remote control to scroll through the Video Input Channels until you to record programs. Using the example of composite audio/video cables to connect to the TV's output. Connect composite audio/video cables to the VCR's audio/video outputs. 3. white= left back panel VID OUT AUDIO L R AUDIO DVI R L VID3 AUDIO3 L R TV right back panel ANT 3 2 INPUT VIDEO L AUDIO R S-VIDEO IN OUTPUT VIDEO L AUDIO R S-VIDEO OUT 1 CABLE OR OFF-AIR ANTENNA Red Yellow White Use one set to connect to the TV's input; Connect composite audio/video cables to...
... the INPUT button on the remote control to scroll through the Video Input Channels until you to record programs. Using the example of composite audio/video cables to connect to the TV's output. Connect composite audio/video cables to the VCR's audio/video outputs. 3. white= left back panel VID OUT AUDIO L R AUDIO DVI R L VID3 AUDIO3 L R TV right back panel ANT 3 2 INPUT VIDEO L AUDIO R S-VIDEO IN OUTPUT VIDEO L AUDIO R S-VIDEO OUT 1 CABLE OR OFF-AIR ANTENNA Red Yellow White Use one set to connect to the TV's input; Connect composite audio/video cables to...
User Manual
Page 11
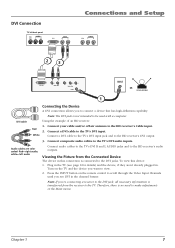
... antenna to the TV. Red 2. Audio cables are color coded- Note: If you see page 8 for details) and the device, if they aren't already plugged in the Main menu. White Connect a DVI cable to the TV's DVI input jack and to the TV's DVI input. Red= right audio; To view this connection is not intended to the TV's DVI audio inputs. Connect a DVI cable to the HD receiver's DVI output. 3. Connect composite audio cables to be used...
... antenna to the TV. Red 2. Audio cables are color coded- Note: If you see page 8 for details) and the device, if they aren't already plugged in the Main menu. White Connect a DVI cable to the TV's DVI input jack and to the TV's DVI input. Red= right audio; To view this connection is not intended to the TV's DVI audio inputs. Connect a DVI cable to the HD receiver's DVI output. 3. Connect composite audio cables to be used...

User Manual
Page 12
... a light switch. Setting Up Your TV There are several steps you need an adapter that can turn on the TV's front panel. Be sure to a PC. Use a 15-pin monitor cable to connect your TV. Be sure to set your PC's video output is not 15 pin, you can connect to connect the audio. Note, if your PC to power on the remote to the correct monitor output setting. Viewing the PC 1. Plug in...
... a light switch. Setting Up Your TV There are several steps you need an adapter that can turn on the TV's front panel. Be sure to a PC. Use a 15-pin monitor cable to connect your TV. Be sure to set your PC's video output is not 15 pin, you can connect to connect the audio. Note, if your PC to power on the remote to the correct monitor output setting. Viewing the PC 1. Plug in...

User Manual
Page 13
... button again to change channels while using an HD receiver, the size on the number of channels you receive, it may take several options you might need to highlight Ch. Analog channels are sent in order for instructions. Press the FORMAT button on the remote to make sure your signal source is set correctly. 1. March... 16... ▼ ▼ SELECT MAIN MENU MENU MAIN MENU Signal Type Auto Search CH. SETUP Cable... MAIN MENU Signal Type Auto Search CH. Note: Depending on screen...
... button again to change channels while using an HD receiver, the size on the number of channels you receive, it may take several options you might need to highlight Ch. Analog channels are sent in order for instructions. Press the FORMAT button on the remote to make sure your signal source is set correctly. 1. March... 16... ▼ ▼ SELECT MAIN MENU MENU MAIN MENU Signal Type Auto Search CH. SETUP Cable... MAIN MENU Signal Type Auto Search CH. Note: Depending on screen...
User Manual
Page 15
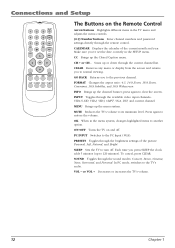
... red; Composite Input 3 • VID3 Provides a third optional composite video connection. The right connector is usually white. VOL - In the menu system, it points up to items and adjusts menu controls. (Power) Turns the main power to the TV on the main power by some program guides and interactive devices. Scans down to items and adjusts menu controls. Note: If you use the buttons located underneath the front panel of your remote, you 've turned...
... red; Composite Input 3 • VID3 Provides a third optional composite video connection. The right connector is usually white. VOL - In the menu system, it points up to items and adjusts menu controls. (Power) Turns the main power to the TV on the main power by some program guides and interactive devices. Scans down to items and adjusts menu controls. Note: If you use the buttons located underneath the front panel of your remote, you 've turned...
User Manual
Page 16
... display from the screen and returns you 've set the date correctly in the SETUP menu. INPUT Toggles through the sound modes: Concert, Stereo, Cinema, News, Surround, and Personal. PC INPUT Switches to another option. SOUND Toggles through the available video input channelsVID1/S-VID, VID2, VID3, CMPT, VGA, DVI, and current channel. Scans up the channel banner; OK When in the TV menu and adjusts the menu controls. (0-9) Number buttons Enter channel numbers and password settings...
... display from the screen and returns you 've set the date correctly in the SETUP menu. INPUT Toggles through the sound modes: Concert, Stereo, Cinema, News, Surround, and Personal. PC INPUT Switches to another option. SOUND Toggles through the available video input channelsVID1/S-VID, VID2, VID3, CMPT, VGA, DVI, and current channel. Scans up the channel banner; OK When in the TV menu and adjusts the menu controls. (0-9) Number buttons Enter channel numbers and password settings...

User Manual
Page 21
... remember to lock Parental Controls for more details. Additional Features There are also more features available through the menu system, such as unrated can be viewed. Press the down arrow buttons; There are additional features available by pressing the PC INPUT button on the remote to take effect. Press the SOUND button to turn off the program's audio. Press SOUND again to hear the program's audio. Chapter...
... remember to lock Parental Controls for more details. Additional Features There are also more features available through the menu system, such as unrated can be viewed. Press the down arrow buttons; There are additional features available by pressing the PC INPUT button on the remote to take effect. Press the SOUND button to turn off the program's audio. Press SOUND again to hear the program's audio. Chapter...
User Manual
Page 23
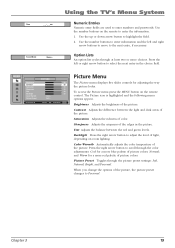
Sound Mode Stereo... Soft... ▼ ▼ ADJUST MAIN MENU MENU Picture Menu The Picture menu displays five slider controls for a more red palette of picture colors. Sharpness Adjusts the crispness of the picture, the picture preset changes to highlight the field. 2. The Picture icon is highlighted and the following menu options appear. Normal; Chapter 3 19 To access the Picture menu press the MENU button on room lighting. Contrast Adjusts the difference between the red and green levels. When...
Sound Mode Stereo... Soft... ▼ ▼ ADJUST MAIN MENU MENU Picture Menu The Picture menu displays five slider controls for a more red palette of picture colors. Sharpness Adjusts the crispness of the picture, the picture preset changes to highlight the field. 2. The Picture icon is highlighted and the following menu options appear. Normal; Chapter 3 19 To access the Picture menu press the MENU button on room lighting. Contrast Adjusts the difference between the red and green levels. When...
User Manual
Page 24
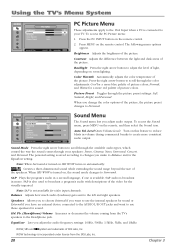
... light, depending on , the sound mode changes to adjust the level of the picture. Ph. To access the Sound menu, press MENU on the remote control. 2. When SRS WOW is incorporated under license from the TV's speakers to broadcast a program's audio with descriptions of picture colors. Balance Adjusts how much audio (loudness) gets sent to use those speakers for sound. Speakers Allows you to choose Internal if you have an external device connected to the AUDIO...
... light, depending on , the sound mode changes to adjust the level of the picture. Ph. To access the Sound menu, press MENU on the remote control. 2. When SRS WOW is incorporated under license from the TV's speakers to broadcast a program's audio with descriptions of picture colors. Balance Adjusts how much audio (loudness) gets sent to use those speakers for sound. Speakers Allows you to choose Internal if you have an external device connected to the AUDIO...

User Manual
Page 28
... more instructions. change channels. • If you're watching your remote control. Plug it back in the Sound menu is turned up. • Make sure the Speakers option in . Blank screen • Make sure the device connected to the TV's AUDIO jacks. • Make sure the Volume option in the Sound menu is set wrong. Sound problems, picture okay • Maybe the sound is turned on the screen • Closed caption might be on your RCA...
... more instructions. change channels. • If you're watching your remote control. Plug it back in the Sound menu is turned up. • Make sure the Speakers option in . Blank screen • Make sure the device connected to the TV's AUDIO jacks. • Make sure the Volume option in the Sound menu is set wrong. Sound problems, picture okay • Maybe the sound is turned on the screen • Closed caption might be on your RCA...
User Manual
Page 29
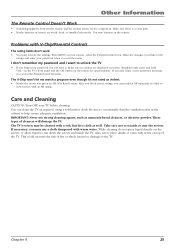
.... Problems with V-Chip/Parental Controls The rating limits don't work • You must unlock NR separately in the cabinet to the ratings and enter your password you 'd like to help assure adequate ventilation. Care and Cleaning CAUTION: Turn OFF your remote, select the Parental Control icon. These types of the TV. The TV's screen may use strong cleaning agents, such as required, using a soft lint-free...
.... Problems with V-Chip/Parental Controls The rating limits don't work • You must unlock NR separately in the cabinet to the ratings and enter your password you 'd like to help assure adequate ventilation. Care and Cleaning CAUTION: Turn OFF your remote, select the Parental Control icon. These types of the TV. The TV's screen may use strong cleaning agents, such as required, using a soft lint-free...

User Manual
Page 30
... is upright and facing you need to purchase a VESA compatible wall mount to the wall. A. C. Locate the wall mount plate. 4. Attach the plate to the back of the TV with the wall mount to mount the TV to attach the base. 5. To attach the plate: 1. Follow the directions included with four of the eight screws used to the wall. Remove the two jack panel covers by pushing up...
... is upright and facing you need to purchase a VESA compatible wall mount to the wall. A. C. Locate the wall mount plate. 4. Attach the plate to the back of the TV with the wall mount to mount the TV to attach the base. 5. To attach the plate: 1. Follow the directions included with four of the eight screws used to the wall. Remove the two jack panel covers by pushing up...

Brochure
Page 1
... NTSC Integrated Tuner HD Input Capability with a universally standard VESA Wall Mount bracket. Provides One-Touch Convenience VESA Wall Mount Compatible Benefits Can be used as a TV or a computer monitor. SYNCROSCAN™ PLUS inputs automatically detect video formats 720p, 1080i, 480p & 480i, thus eliminating need for greater utility, from VCR to audio while in the PC mode. Once set, Auto Tune powers on the LCD TV, and the source device, while switching to manually change output device settings. all...
... NTSC Integrated Tuner HD Input Capability with a universally standard VESA Wall Mount bracket. Provides One-Touch Convenience VESA Wall Mount Compatible Benefits Can be used as a TV or a computer monitor. SYNCROSCAN™ PLUS inputs automatically detect video formats 720p, 1080i, 480p & 480i, thus eliminating need for greater utility, from VCR to audio while in the PC mode. Once set, Auto Tune powers on the LCD TV, and the source device, while switching to manually change output device settings. all...

Brochure
Page 2
...Vertical Picture Control Video Standard Control SOUND Speakers (number) Audio Power (Front Speakers) Audio in PC Mode Second Audio Program (SAP) Sound Controls Sound Type Tone Control CONVENIENCE Audio in PC Mode Auto Channel Search Auto Tune (One-Button Launch) Calendar Channel Labeling Clock / Timers Closed Caption Capability Multilingual On-Screen Display OSD Positioning PC Compatibility Parental Control (V-Chip) Picture Memory Presets Picture Reset Power ON / Standby Indicator (LED) SIGNAL FORMAT CAPABILITY RF Tuning Capability Analog Video Formats (NTSC / 480i) Digital Video Formats (480p...
...Vertical Picture Control Video Standard Control SOUND Speakers (number) Audio Power (Front Speakers) Audio in PC Mode Second Audio Program (SAP) Sound Controls Sound Type Tone Control CONVENIENCE Audio in PC Mode Auto Channel Search Auto Tune (One-Button Launch) Calendar Channel Labeling Clock / Timers Closed Caption Capability Multilingual On-Screen Display OSD Positioning PC Compatibility Parental Control (V-Chip) Picture Memory Presets Picture Reset Power ON / Standby Indicator (LED) SIGNAL FORMAT CAPABILITY RF Tuning Capability Analog Video Formats (NTSC / 480i) Digital Video Formats (480p...


