Warranty Card
Page 1
... normal use the provided glove when open up the device cover, avoid direct contact with a minimum distance 20cm between 16 VAC and 24 VAC. • The power supply must conform to costs incurred for the transmitter by Industry Canada. To reduce potential radio interference to other users, the antenna type and its gain should be repaired or replaced with new or...
... normal use the provided glove when open up the device cover, avoid direct contact with a minimum distance 20cm between 16 VAC and 24 VAC. • The power supply must conform to costs incurred for the transmitter by Industry Canada. To reduce potential radio interference to other users, the antenna type and its gain should be repaired or replaced with new or...

Quick Start Guide
Page 1
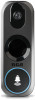
WHO IS IT? Installation Guide English instructions 1 Instructions en français 15 Instrucciones en español 29 HSDB2 QSG 04 NOW YOU NEVER HAVE TO ASK...
WHO IS IT? Installation Guide English instructions 1 Instructions en français 15 Instrucciones en español 29 HSDB2 QSG 04 NOW YOU NEVER HAVE TO ASK...
Quick Start Guide
Page 2
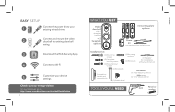
EASY SETUP 1 Connect the power kit to your existing wired chime 2 Connect and mount the video doorbell to existing doorbell wiring 3 Download the RCA Security App 4 Connect to Wi-Fi 5 Customize your device settings Check out our setup videos On your computer, go to http://www.rcaaudiovideo.com/doorbell2installvideo 2 WHAT YOU GET Video doorbell with 1 faceplate installed + 2 faceplate options 3 mounting plate options Power kit + connection wires and wire nuts Installation kit: (3) Mounting screws...
EASY SETUP 1 Connect the power kit to your existing wired chime 2 Connect and mount the video doorbell to existing doorbell wiring 3 Download the RCA Security App 4 Connect to Wi-Fi 5 Customize your device settings Check out our setup videos On your computer, go to http://www.rcaaudiovideo.com/doorbell2installvideo 2 WHAT YOU GET Video doorbell with 1 faceplate installed + 2 faceplate options 3 mounting plate options Power kit + connection wires and wire nuts Installation kit: (3) Mounting screws...
Quick Start Guide
Page 3
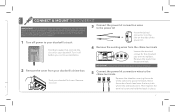
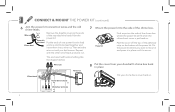
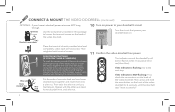
... solid-wire power kit leads. Find the breaker that controls the circuit for the doorbell you want to the chime terminals. REAR TRANS FRONT REAR TRANS FRONT Remove the leads from your doorbell's chime box Find your doorbell's chime. ncil or marker CONNECT & MOUNT THE POWER KIT IMPORTANT: If your doorbell does not have a chime box, you will need to install the...
... solid-wire power kit leads. Find the breaker that controls the circuit for the doorbell you want to the chime terminals. REAR TRANS FRONT REAR TRANS FRONT Remove the leads from your doorbell's chime box Find your doorbell's chime. ncil or marker CONNECT & MOUNT THE POWER KIT IMPORTANT: If your doorbell does not have a chime box, you will need to install the...
Quick Start Guide
Page 4
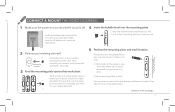
... old chime lead together and insert them into a wire nut. Chime box terminals REAR TRANS FRONT 4 Put the power kit where you feel tension. Wire nut Chime lead Twist Power kit wire lead Remove the sheaths covering the ends of leads and wire nut. CONNECT & MOUNT THE POWER KIT (continued) 6 Join the power kit connection wires and the old chime leads. Repeat with the other set of the stranded-wire...
... old chime lead together and insert them into a wire nut. Chime box terminals REAR TRANS FRONT 4 Put the power kit where you feel tension. Wire nut Chime lead Twist Power kit wire lead Remove the sheaths covering the ends of leads and wire nut. CONNECT & MOUNT THE POWER KIT (continued) 6 Join the power kit connection wires and the old chime leads. Repeat with the other set of the stranded-wire...
Quick Start Guide
Page 5
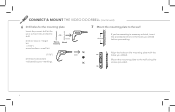
... over the hole where your home's doorbell wiring comes out, and (2) the mounting plate is off before you want for your doorbell. CONNECT & MOUNT THE VIDEO DOORBELL 1 Make sure the power to your doorbell's circuit is level Use a marker or pencil to mark the top and bottom holes. Make sure that controls the circuit for your home's wiring from the wall. Then unhook...
... over the hole where your home's doorbell wiring comes out, and (2) the mounting plate is off before you want for your doorbell. CONNECT & MOUNT THE VIDEO DOORBELL 1 Make sure the power to your doorbell's circuit is level Use a marker or pencil to mark the top and bottom holes. Make sure that controls the circuit for your home's wiring from the wall. Then unhook...
Quick Start Guide
Page 6
... the holes you drilled before proceeding. CONNECT & MOUNT THE VIDEO DOORBELL (continued) 6 Drill holes for the mounting plate Insert the correct drill bit for your markings. 7 Mount the mounting plate to the wall Anchors If you're mounting to the wall using the screws provided. 6 Insert brick or... stucco = larger bit (7/32") Stucco, masonry Wood wood surface = small bit (1/16") Drill Drill two holes where indicated by your surface into an electric drill: -OR- Mount the mounting plate to...
... the holes you drilled before proceeding. CONNECT & MOUNT THE VIDEO DOORBELL (continued) 6 Drill holes for the mounting plate Insert the correct drill bit for your markings. 7 Mount the mounting plate to the wall Anchors If you're mounting to the wall using the screws provided. 6 Insert brick or... stucco = larger bit (7/32") Stucco, masonry Wood wood surface = small bit (1/16") Drill Drill two holes where indicated by your surface into an electric drill: -OR- Mount the mounting plate to...
Quick Start Guide
Page 7
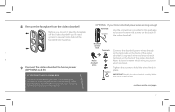
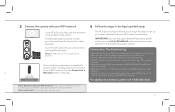
... wire you 'll need access to several items behind the faceplate during setup. 9 Connect the video doorbell to home power (OPTIONS A & B) IF YOU DON'T HAVE A CHIME BOX You must use the resistor provided in this package to loosen the terminal screws on the back of the video doorbell. Doorbell camera back Terminals Home doorbell wires Tighten Connect the doorbell power wires directly to your home's doorbell power wires are long...
... wire you 'll need access to several items behind the faceplate during setup. 9 Connect the video doorbell to home power (OPTIONS A & B) IF YOU DON'T HAVE A CHIME BOX You must use the resistor provided in this package to loosen the terminal screws on the back of the video doorbell. Doorbell camera back Terminals Home doorbell wires Tighten Connect the doorbell power wires directly to your home's doorbell power wires are long...
Quick Start Guide
Page 8
... power to your doorbell's circuit Turn the circuit that powers your home's doorbell power wires are NOT long enough. If the indicator is flashing: Go to your home doorbell wire following the instructions below. RESISTOR INSTRUCTIONS (IF YOU DON'T HAVE A CHIME BOX) To install the resistor provided: Remove the sheaths covering the ends of each provided wire lead completely under each terminal screw. Terminals Loosen Use...
... power to your doorbell's circuit Turn the circuit that powers your home's doorbell power wires are NOT long enough. If the indicator is flashing: Go to your home doorbell wire following the instructions below. RESISTOR INSTRUCTIONS (IF YOU DON'T HAVE A CHIME BOX) To install the resistor provided: Remove the sheaths covering the ends of each provided wire lead completely under each terminal screw. Terminals Loosen Use...

Quick Start Guide
Page 9
... holes on the mounting plate Route the power wires and/or wire leads into the wall. Make sure you 'll need it in a safe place Gently peel off the QR code sticker from the front of the video doorbell and store it to complete setup! 14 Install the faceplate of your choice Place the faceplate of your choice onto the front of...
... holes on the mounting plate Route the power wires and/or wire leads into the wall. Make sure you 'll need it in a safe place Gently peel off the QR code sticker from the front of the video doorbell and store it to complete setup! 14 Install the faceplate of your choice Place the faceplate of your choice onto the front of...
Quick Start Guide
Page 10
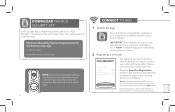
... installing and setting up your doorbell camera, make sure you carefully remove the protective film covering its lens and IR light. 10 CONNECT TO WIFI 1 Launch the App Once the RCA Security App has installed on your camera securely. Click "Allow" to let the App push notifications to your phone or tablet. 2 Register as a new user The first time you launch the RCA Security App, you'll need...
... installing and setting up your doorbell camera, make sure you carefully remove the protective film covering its lens and IR light. 10 CONNECT TO WIFI 1 Launch the App Once the RCA Security App has installed on your camera securely. Click "Allow" to let the App push notifications to your phone or tablet. 2 Register as a new user The first time you launch the RCA Security App, you'll need...
Quick Start Guide
Page 11
... your WiFi network in the manuals section for 4 seconds. on the back of the doorbell. on router or add MAC address to router whitelist. +Reset the camera to set up to 5‑6 minutes to use. +Make sure the camera is getting a good signal from the front of the video doorbell. Connection Troubleshooting +Make sure your phone or tablet is connected to the WiFi network...
... your WiFi network in the manuals section for 4 seconds. on the back of the doorbell. on router or add MAC address to router whitelist. +Reset the camera to set up to 5‑6 minutes to use. +Make sure the camera is getting a good signal from the front of the video doorbell. Connection Troubleshooting +Make sure your phone or tablet is connected to the WiFi network...

Quick Start Guide
Page 12
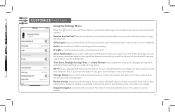
Camera view shows you switch between high- The snapshot file is saved to turn motion alarms on the view screen. Press this icon to your smartphone or tablet. (Video Quality) lets you the image from the camera on and off , adjust camera audio, check storage status and the version of the device's software, adjust the time and date settings, and more. The...
Camera view shows you switch between high- The snapshot file is saved to turn motion alarms on the view screen. Press this icon to your smartphone or tablet. (Video Quality) lets you the image from the camera on and off , adjust camera audio, check storage status and the version of the device's software, adjust the time and date settings, and more. The...
Quick Start Guide
Page 13
... camera makes when motion is on the new network. Choose this item in your home (electrical, mechanical, or none installed). CUSTOMIZE AND USE! Using the Settings Menu Press the camera. icon in the menu means that the SD card requires attention. A dot next to receive alerts on your doorbell camera and keep the device active on by default. 13 This option is detected. Chime type lets you set...
... camera makes when motion is on the new network. Choose this item in your home (electrical, mechanical, or none installed). CUSTOMIZE AND USE! Using the Settings Menu Press the camera. icon in the menu means that the SD card requires attention. A dot next to receive alerts on your doorbell camera and keep the device active on by default. 13 This option is detected. Chime type lets you set...
Quick Start Guide
Page 14
... SD card that comes with an SD card pre-installed, for 15 seconds). RESET button restores the doorbell camera to remove the doorbell camera's faceplate by unlocking its set screw and screw it back in ambient light and adjusts video settings accordingly. To remove or replace this card, you'll first need to factory settings (hold for recording alerts. IR sensor detects changes in place. 14...
... SD card that comes with an SD card pre-installed, for 15 seconds). RESET button restores the doorbell camera to remove the doorbell camera's faceplate by unlocking its set screw and screw it back in ambient light and adjusts video settings accordingly. To remove or replace this card, you'll first need to factory settings (hold for recording alerts. IR sensor detects changes in place. 14...
WIFI Troubleshooting Manual
Page 1
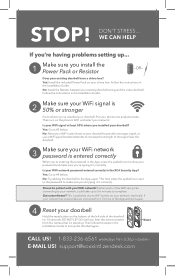
... WiFi network password entered correctly in the Installation Guide. WE CAN HELP If you're having problems setting up the doorbell again. Follow the instructions in the RCA Security App? Is your chime box. No: Try adding the doorbell to it in the Installation Guide. 2 Make sure your doorbell? This is entered correctly When you 're typing it . Does your phone into airplane mode. No: Install the...
... WiFi network password entered correctly in the Installation Guide. WE CAN HELP If you're having problems setting up the doorbell again. Follow the instructions in the RCA Security App? Is your chime box. No: Try adding the doorbell to it in the Installation Guide. 2 Make sure your doorbell? This is entered correctly When you 're typing it . Does your phone into airplane mode. No: Install the...


