User Manual
Page 4
...16 Product registration 16 For your records 16 Service Information 16 Technical specifications 16 Copyright warning 16 Back up your data 17 Visiting RCA website 17 Warranty information Limited warranty 18 Playback mode Playing back recordings 12 4 Inserting microSD memory card 7 4. Content of the... 2 Deleting Deleting recordings 13 Safety information Important battery information 3 Precautions for the player 3 Menu settings Using the camcorder menu 13 Menu options and settings 13 Contents End user license agreement End user license agreement 5 Getting started 1.
...16 Product registration 16 For your records 16 Service Information 16 Technical specifications 16 Copyright warning 16 Back up your data 17 Visiting RCA website 17 Warranty information Limited warranty 18 Playback mode Playing back recordings 12 4 Inserting microSD memory card 7 4. Content of the... 2 Deleting Deleting recordings 13 Safety information Important battery information 3 Precautions for the player 3 Menu settings Using the camcorder menu 13 Menu options and settings 13 Contents End user license agreement End user license agreement 5 Getting started 1.
User Manual
Page 7
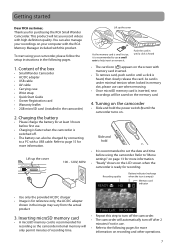
..., 60Hz Lift up the cover As the memory card is small in the camcorder) 2. Refer to page 15 for purchasing the RCA Small Wonder Camcorder. Getting started Dear RCA customer, Thank you record videos with a USB cable. Content of recording time. • Repeat this product. Turning on the camcorder • Slide and hold • It is recommended to...
..., 60Hz Lift up the cover As the memory card is small in the camcorder) 2. Refer to page 15 for purchasing the RCA Small Wonder Camcorder. Getting started Dear RCA customer, Thank you record videos with a USB cable. Content of recording time. • Repeat this product. Turning on the camcorder • Slide and hold • It is recommended to...
User Manual
Page 8
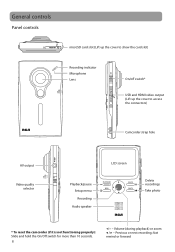
Volume (during playback) or zoom / - fast rewind or forward Previous or next recording; General controls Panel controls microSD card slot (Lift up the cover to show the card slot) Recording indicator Microphone Lens On/off switch* USB and HDMI video output (Lift up the cover to access the connectors) Camcorder strap hole AV output Video quality selector Playback/pause Setup menu Recording Audio speaker LCD screen Delete recordings Take photo * To reset the camcorder (if it is not functioning properly): Slide and hold the On/Off switch for more than 10 seconds. 8 +/- -
Volume (during playback) or zoom / - fast rewind or forward Previous or next recording; General controls Panel controls microSD card slot (Lift up the cover to show the card slot) Recording indicator Microphone Lens On/off switch* USB and HDMI video output (Lift up the cover to access the connectors) Camcorder strap hole AV output Video quality selector Playback/pause Setup menu Recording Audio speaker LCD screen Delete recordings Take photo * To reset the camcorder (if it is not functioning properly): Slide and hold the On/Off switch for more than 10 seconds. 8 +/- -
User Manual
Page 9
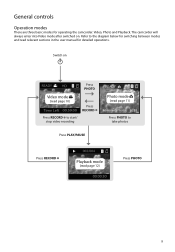
General controls Operation modes There are three basic modes for detailed operations. Switch on . The camcorder will always enter into Video mode after switched on Press PHOTO Video mode (read page 10) Press RECORD Press RECORD to start/ stop video recording Press PLAY/PAUSE Photo mode (read page 11) Press PHOTO to the diagram below for switching between modes and read page 12) Press PHOTO 9 Refer to take photos Press RECORD Playback mode (read relevant sections in the user manual for operating the camcorder: Video, Photo and Playback.
General controls Operation modes There are three basic modes for detailed operations. Switch on . The camcorder will always enter into Video mode after switched on Press PHOTO Video mode (read page 10) Press RECORD Press RECORD to start/ stop video recording Press PLAY/PAUSE Photo mode (read page 11) Press PHOTO to the diagram below for switching between modes and read page 12) Press PHOTO 9 Refer to take photos Press RECORD Playback mode (read relevant sections in the user manual for operating the camcorder: Video, Photo and Playback.
User Manual
Page 10
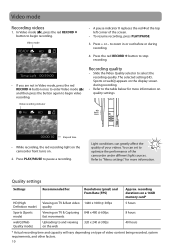
...Video Quality selector to pause a recording. to optimize the performance of your videos. You can greatly affect the quality of the camcorder under different light sources. The selected setting (HD, Sports or webQ) appears on the display screen during recording. 4. Refer to... begin video recording. Video recording indicator Elapsed time • While recording, the red recording light on the camcorder front turns on. 2. Quality settings Settings Recommended for more information on type of the screen. • To resume recording, press PLAY...
...Video Quality selector to pause a recording. to optimize the performance of your videos. You can greatly affect the quality of the camcorder under different light sources. The selected setting (HD, Sports or webQ) appears on the display screen during recording. 4. Refer to... begin video recording. Video recording indicator Elapsed time • While recording, the red recording light on the camcorder front turns on. 2. Quality settings Settings Recommended for more information on type of the screen. • To resume recording, press PLAY...

User Manual
Page 11
... settings" for more information. * 8 mega pixel is 8 mega pixel*. After taking photos, press the red RECORD button to exit Photo mode ( ) and return to the camcorder menu. You can select among 3, 5, 8 and 12 mega pixel by going to Video mode ( ). Photo mode You must return to Video mode ( ) before recording videos...
... settings" for more information. * 8 mega pixel is 8 mega pixel*. After taking photos, press the red RECORD button to exit Photo mode ( ) and return to the camcorder menu. You can select among 3, 5, 8 and 12 mega pixel by going to Video mode ( ). Photo mode You must return to Video mode ( ) before recording videos...
User Manual
Page 13
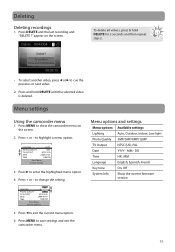
...settings Lighting Auto, Outdoor, Indoor, Low light Photo Quality 3MP/5MP/8MP/12MP TV Output NTSC (US), PAL Date YYYY - Menu settings Using the camcorder menu 1. Press + or - MM - Press MENU to Save and Exit 5. LIGHTING PHOTO QUALITY TV OUTOUT DATE TIME AUTO NTSC (US) 2009-01...-01 12:00 PM Press Menu to show the camcorder menu on the screen. Deleting Deleting recordings 1. Press DELETE and the last recording and "DELETE ?" To delete all videos, press & hold ...
...settings Lighting Auto, Outdoor, Indoor, Low light Photo Quality 3MP/5MP/8MP/12MP TV Output NTSC (US), PAL Date YYYY - Menu settings Using the camcorder menu 1. Press + or - MM - Press MENU to Save and Exit 5. LIGHTING PHOTO QUALITY TV OUTOUT DATE TIME AUTO NTSC (US) 2009-01...-01 12:00 PM Press Menu to show the camcorder menu on the screen. Deleting Deleting recordings 1. Press DELETE and the last recording and "DELETE ?" To delete all videos, press & hold ...
User Manual
Page 14
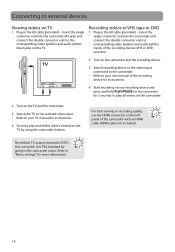
... 3. Plug in the AV cable (provided) - You can switch it to PAL standard by using the camcorder buttons. Switch the TV to the selected video input. • Refer to the camcorder menu. You may play all videos on the TV. Refer to the corresponding video (yellow) and audio ...recording quality, use the HDMI connector on TV 1. Switch recording device to the video input connected to the camcorder. • Refer to play and delete videos viewed on the camcorder for 3 seconds to your TV manual for more information. 14 The default TV output standard is NTSC. ...
... 3. Plug in the AV cable (provided) - You can switch it to PAL standard by using the camcorder buttons. Switch the TV to the selected video input. • Refer to the camcorder menu. You may play all videos on the TV. Refer to the corresponding video (yellow) and audio ...recording quality, use the HDMI connector on TV 1. Switch recording device to the video input connected to the camcorder. • Refer to play and delete videos viewed on the camcorder for 3 seconds to your TV manual for more information. 14 The default TV output standard is NTSC. ...
User Manual
Page 15
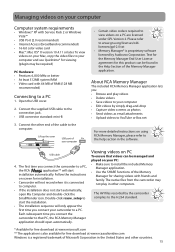
...Delete videos • Save videos to the help section in the United States and other computers. The first time you connect the camcorder to a PC, the RCA application** will not record when it is connected to computer. • If the installation does not start the installation. •...; The installation sequence will only appear the first time you connect the camcorder to install the included Memory Manager application. • ...
...Delete videos • Save videos to the help section in the United States and other computers. The first time you connect the camcorder to a PC, the RCA application** will not record when it is connected to computer. • If the installation does not start the installation. •...; The installation sequence will only appear the first time you connect the camcorder to install the included Memory Manager application. • ...
User Manual
Page 16
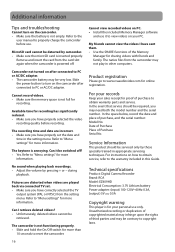
...of Purchase Serial No. My friends cannot view the videos I retrieve deleted videos? • Unfortunately, deleted videos cannot be detected by camcorder. • Make sure the microSD card is not functioning properly. • Slide and hold the On/Off switch for recording. ...to obtain warranty parts and service. Remove and insert the card from the setting menu. Technical specifications Product: Digital Camera Recorder Brand: RCA Model: EZ409HD Electrical Consumption: 3.7V Lithium battery Power adapter: (input) 100-120V~60Hz 0.3A, (output) 5V 0.5A Copyright warning This player...
...of Purchase Serial No. My friends cannot view the videos I retrieve deleted videos? • Unfortunately, deleted videos cannot be detected by camcorder. • Make sure the microSD card is not functioning properly. • Slide and hold the On/Off switch for recording. ...to obtain warranty parts and service. Remove and insert the card from the setting menu. Technical specifications Product: Digital Camera Recorder Brand: RCA Model: EZ409HD Electrical Consumption: 3.7V Lithium battery Power adapter: (input) 100-120V~60Hz 0.3A, (output) 5V 0.5A Copyright warning This player...


