User Guide
Page 2
... which the receiver is Region No 1. If the Region number of a DVD disc does not correspond to the Region number of this DVD Recorder this DVD Recorder cannot play the disc.The Region number for this DVD Recorder is connected. • Consult the dealer or an experienced radio/TV technician... and used in a particular installation. CAUTION THIS PRODUCT UTILIZES A LASER. The AC power cord is polarized (one . Note: This DVD Recorder is designed and manufactured to respond to the Region Management Information. IMPORTANT: The power cord can be exposed to dripping or splashing and ...
... which the receiver is Region No 1. If the Region number of a DVD disc does not correspond to the Region number of this DVD Recorder this DVD Recorder cannot play the disc.The Region number for this DVD Recorder is connected. • Consult the dealer or an experienced radio/TV technician... and used in a particular installation. CAUTION THIS PRODUCT UTILIZES A LASER. The AC power cord is polarized (one . Note: This DVD Recorder is designed and manufactured to respond to the Region Management Information. IMPORTANT: The power cord can be exposed to dripping or splashing and ...

User Guide
Page 3
...Your Connection 4 Explanation of Input Jacks and Cables 5 Back of the DVD Recorder 6 Explanation of Jacks 6 Front of the DVD Recorder 7 Connection: DVD recorder + TV 9 Connection: DVD recorder + TV + Basic Cable Box...... 11 Connection: DVD recorder + TV + Satellite Receiver ... 13 Connection: DVD recorder + TV + Basic Cable Box +Audio Receiver 15 Install Batteries in... the Remote 17 Point the Remote in the Right Direction 17 Turn on the TV and DVD recorder 17 Complete the Initial Setup 17 Setting the Clock 18 Setting the Date 18 Setting the Time Format (12 or...
...Your Connection 4 Explanation of Input Jacks and Cables 5 Back of the DVD Recorder 6 Explanation of Jacks 6 Front of the DVD Recorder 7 Connection: DVD recorder + TV 9 Connection: DVD recorder + TV + Basic Cable Box...... 11 Connection: DVD recorder + TV + Satellite Receiver ... 13 Connection: DVD recorder + TV + Basic Cable Box +Audio Receiver 15 Install Batteries in... the Remote 17 Point the Remote in the Right Direction 17 Turn on the TV and DVD recorder 17 Complete the Initial Setup 17 Setting the Clock 18 Setting the Date 18 Setting the Time Format (12 or...

User Guide
Page 4
...to laser pickup and disc design. Position cables properly to record on your DVD recorder not VCDs. DVD-R (must be recorded using video mode or VM and must be recorded using video mode or VM); DVD-RW (must use DVD±R or DVD±RW discs to avoid audio interference • Insert each...and Multisession CDs. • Video CD (VCD) - Things to record content that is the amount of Discs DVD+Rewritable DVD+R DISCS YOU CAN USE FOR RECORDING DVD±R 2.4x, 4x, or 8x, and 16x ONLY; DVD movie discs (DVD-ROM); DVD audio discs are CDs (CD-R or CD-RW) that contain mp3...
...to laser pickup and disc design. Position cables properly to record on your DVD recorder not VCDs. DVD-R (must be recorded using video mode or VM and must be recorded using video mode or VM); DVD-RW (must use DVD±R or DVD±RW discs to avoid audio interference • Insert each...and Multisession CDs. • Video CD (VCD) - Things to record content that is the amount of Discs DVD+Rewritable DVD+R DISCS YOU CAN USE FOR RECORDING DVD±R 2.4x, 4x, or 8x, and 16x ONLY; DVD movie discs (DVD-ROM); DVD audio discs are CDs (CD-R or CD-RW) that contain mp3...
User Guide
Page 5
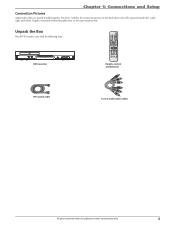
For better visibility, the connection pictures in this publication are usually bundled together. Graphics contained within this book show each cable separately (audio left, audio right, and video). Unpack the Box Your DVD recorder came with the following items: CLEAR DVD recorder Remote control and batteries RF Coaxial cable 1 set of audio video cables Graphics contained within this publication are for representation only. 3 Chapter 1: Connections and Setup Connection Pictures Audio/video cables are for representation only.
For better visibility, the connection pictures in this publication are usually bundled together. Graphics contained within this book show each cable separately (audio left, audio right, and video). Unpack the Box Your DVD recorder came with the following items: CLEAR DVD recorder Remote control and batteries RF Coaxial cable 1 set of audio video cables Graphics contained within this publication are for representation only. 3 Chapter 1: Connections and Setup Connection Pictures Audio/video cables are for representation only.

User Guide
Page 6
... and Setup Choose Your Connection There are for representation only. CH+/SKIP+ OPEN/CLOSE RECORD STOP REV FWD PLAY/PAUSE DVD Recorder TV Cable Box • Coaxial • Audio/video • S-Video • Digital Audio •Component Video • HDMI TV + cable box + audio receiver page 14 Audio Receiver To achieve enhanced picture quality...
... and Setup Choose Your Connection There are for representation only. CH+/SKIP+ OPEN/CLOSE RECORD STOP REV FWD PLAY/PAUSE DVD Recorder TV Cable Box • Coaxial • Audio/video • S-Video • Digital Audio •Component Video • HDMI TV + cable box + audio receiver page 14 Audio Receiver To achieve enhanced picture quality...
User Guide
Page 7
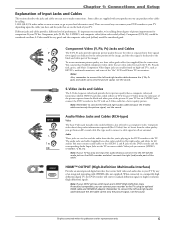
...cables you connect (VIDEO; Different jacks and cables provide a different level of the "flat www.rca.com, or go to the TV using an optional HDMI cable and HDMI/DVI adapter. You can purchase bundled component video cables that carries both video and audio data to ... (separate video) jack provides better picture quality than the video quality you 're playing in the DVD recorder to make connections. Audio These jacks are for comparison. Y, Pb, Pr). HDMI™ OUTPUT (High-Definition Multimedia Interface) Provides an uncompressed digital interface that are dedicated to...
...cables you connect (VIDEO; Different jacks and cables provide a different level of the "flat www.rca.com, or go to the TV using an optional HDMI cable and HDMI/DVI adapter. You can purchase bundled component video cables that carries both video and audio data to ... (separate video) jack provides better picture quality than the video quality you 're playing in the DVD recorder to make connections. Audio These jacks are for comparison. Y, Pb, Pr). HDMI™ OUTPUT (High-Definition Multimedia Interface) Provides an uncompressed digital interface that are dedicated to...
User Guide
Page 8
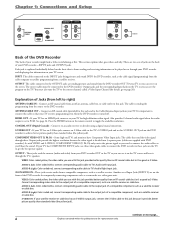
... (for temporarily connecting components such as S-Video. ANTENNA/CABLE OUT - HDMI OUT - If your TV has an HDMI jack, connects to your TV has COMPONENT INPUT jacks, use three video grade cables to connect the DVD recorder to these Output jacks provide the highest resolution because the video signal is... jack provides better quality than standard video (the yellow jack). Press the HDMI button on the back of your satellite receiver or cable box has an S-VIDEO output jack, connect the S-Video cable to the DVD recorder. Another set to right) ANTENNA /CABLE IN - Connects to TV's ...
... (for temporarily connecting components such as S-Video. ANTENNA/CABLE OUT - HDMI OUT - If your TV has an HDMI jack, connects to your TV has COMPONENT INPUT jacks, use three video grade cables to connect the DVD recorder to these Output jacks provide the highest resolution because the video signal is... jack provides better quality than standard video (the yellow jack). Press the HDMI button on the back of your satellite receiver or cable box has an S-VIDEO output jack, connect the S-Video cable to the DVD recorder. Another set to right) ANTENNA /CABLE IN - Connects to TV's ...
User Guide
Page 9
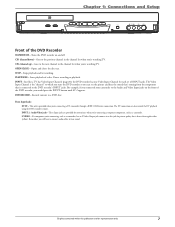
... next channel in the channel list when you can also control the DV playback using the DVD recorder's remote. Front Input Jacks: DV IN - These Input jacks are for each set of the DVD Recorder STANDBY/ON - The Video Input Channel is better than regular video (yellow). Goes to ... that is connected to the previous channel in the channel list when you still have to connect audio cables to a DVD disc. Pauses recording or playback. Starts playback of the DVD recorder, you 're connecting a temporary component, such as a camcorder, has an S-Video Output jack connect it to the...
... next channel in the channel list when you can also control the DV playback using the DVD recorder's remote. Front Input Jacks: DV IN - These Input jacks are for each set of the DVD Recorder STANDBY/ON - The Video Input Channel is better than regular video (yellow). Goes to ... that is connected to the previous channel in the channel list when you still have to connect audio cables to a DVD disc. Pauses recording or playback. Starts playback of the DVD recorder, you 're connecting a temporary component, such as a camcorder, has an S-Video Output jack connect it to the...

User Guide
Page 10
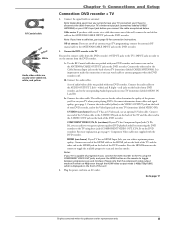
...to tune the TV to the channel you want to record, and press RECORD. Use the buttons on channel 8. For example, change the channel on the TV to channel 8 to watch . If you need help finding your DVD recorder are for representation only. Details about the different kinds of... a disc or tape: Tune the TV to its Input 1 channel or Vid 1 channel. Chapter 1: Connections and Setup DVD recorder + TV In from cable or antenna 1 DVD recorder IN ANTENNA /CABLE OUT COAXIAL OUT HDMI OUT S-VIDEO OUT COMPONENT VIDEO OUT Y Pb Pr OUTPUT VIDEO L AUDIO R AV1 IN VIDEO IN L R S-VIDEO IN...
...to tune the TV to the channel you want to record, and press RECORD. Use the buttons on channel 8. For example, change the channel on the TV to channel 8 to watch . If you need help finding your DVD recorder are for representation only. Details about the different kinds of... a disc or tape: Tune the TV to its Input 1 channel or Vid 1 channel. Chapter 1: Connections and Setup DVD recorder + TV In from cable or antenna 1 DVD recorder IN ANTENNA /CABLE OUT COAXIAL OUT HDMI OUT S-VIDEO OUT COMPONENT VIDEO OUT Y Pb Pr OUTPUT VIDEO L AUDIO R AV1 IN VIDEO IN L R S-VIDEO IN...
User Guide
Page 11
... was packed with your TV has Component Input Jacks (Y, Pb, Pr), you 're playing DVDs. HDMI (not shown) If you TV has an HDMI Input Jack, you can watch cable or antenna programs when the DVD recorder is important to the ANTENNA/CABLE OUTPUT jack on the remote to page 17 Graphics contained...has an S-Video jack, use an off . 2b. Component Video cables not supplied with your TV (sometimes labeled CABLE/ANTENNA). Press the HDMI button on the DVD recorder. Plug the power cord into an AC outlet. Go to toggle the available progressive scan and interlace modes. Note: If you 'll see...
... was packed with your TV has Component Input Jacks (Y, Pb, Pr), you 're playing DVDs. HDMI (not shown) If you TV has an HDMI Input Jack, you can watch cable or antenna programs when the DVD recorder is important to the ANTENNA/CABLE OUTPUT jack on the remote to page 17 Graphics contained...has an S-Video jack, use an off . 2b. Component Video cables not supplied with your TV (sometimes labeled CABLE/ANTENNA). Press the HDMI button on the DVD recorder. Plug the power cord into an AC outlet. Go to toggle the available progressive scan and interlace modes. Note: If you 'll see...

User Guide
Page 12
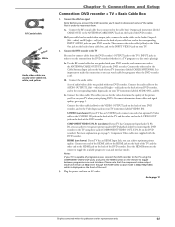
Even with the DVD recorder. This may be passed through the cable box so that you won't be able to its Input 1 ...Input Channels on the same cable. If you are often carried on your cable company may come with digital cable service. DVD recorder 1a IN ANTENNA /CABLE OUT COAXIAL OUT HDMI OUT S-VIDEO OUT COMPONENT VIDEO OUT Y Pb Pr OUTPUT VIDEO L AUDIO R AV1 IN VIDEO IN L R S-...the signal with digital cable service, analog signals are a premium channel subscriber. Chapter 1: Connections and Setup DVD recorder + TV+ Basic Cable Box The back of cables boxes, your situation.
Even with the DVD recorder. This may be passed through the cable box so that you won't be able to its Input 1 ...Input Channels on the same cable. If you are often carried on your cable company may come with digital cable service. DVD recorder 1a IN ANTENNA /CABLE OUT COAXIAL OUT HDMI OUT S-VIDEO OUT COMPONENT VIDEO OUT Y Pb Pr OUTPUT VIDEO L AUDIO R AV1 IN VIDEO IN L R S-...the signal with digital cable service, analog signals are a premium channel subscriber. Chapter 1: Connections and Setup DVD recorder + TV+ Basic Cable Box The back of cables boxes, your situation.
User Guide
Page 13
... Jack, you use for representation only. 11 COMPONENT VIDEO Y, Pb, Pr (not shown) If your DVD recorder, and connect one end of the HDMI cable to the HDMI jack on the back of the TV and the other end to the S-VIDEO OUT jack on the front of the TV and the other ...end to the HDMI jack on the remote to page 5. Press the HDMI button on the back of the DVD recorder. Connect one end to the Audio Output L (left - Connect the RF coaxial cable that was packed with your...
... Jack, you use for representation only. 11 COMPONENT VIDEO Y, Pb, Pr (not shown) If your DVD recorder, and connect one end of the HDMI cable to the HDMI jack on the back of the TV and the other end to the S-VIDEO OUT jack on the front of the TV and the other ...end to the HDMI jack on the remote to page 5. Press the HDMI button on the back of the DVD recorder. Connect one end to the Audio Output L (left - Connect the RF coaxial cable that was packed with your...

User Guide
Page 14
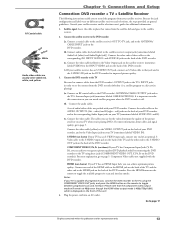
... satellite program at the same time. Tune the TV to its CABLE/ANTENNA INPUT channel (usually channel 2, 3, or 4). To watch one pictured here. 2a DVD recorder SATELLITE DISH ANTENNA SATELLITE IN LOW SPEED DATA OUT TO TV IN FROM ANT S-VIDE O AUDIO OUT R VIDEO L DIGITAL OUT PHONE JACK 1 2d IN ANTENNA .../CABLE OUT COAXIAL OUT HDMI OUT S-VIDEO OUT COMPONENT VIDEO OUT Y Pb Pr OUTPUT VIDEO L AUDIO R 2b 2c AV1 IN VIDEO IN L R S-VIDEO IN L AUDIO IN R 3a 3c 3b...
... satellite program at the same time. Tune the TV to its CABLE/ANTENNA INPUT channel (usually channel 2, 3, or 4). To watch one pictured here. 2a DVD recorder SATELLITE DISH ANTENNA SATELLITE IN LOW SPEED DATA OUT TO TV IN FROM ANT S-VIDE O AUDIO OUT R VIDEO L DIGITAL OUT PHONE JACK 1 2d IN ANTENNA .../CABLE OUT COAXIAL OUT HDMI OUT S-VIDEO OUT COMPONENT VIDEO OUT Y Pb Pr OUTPUT VIDEO L AUDIO R 2b 2c AV1 IN VIDEO IN L R S-VIDEO IN L AUDIO IN R 3a 3c 3b...
User Guide
Page 15
...not supplied with your TV (sometimes labeled AUDIO IN L and R). 3c. HDMI (not shown) If you TV has an HDMI Input Jack, you can watch satellite programs when the DVD recorder is capable of your DVD recorder, and to the TV's INPUT jacks in place that comes from your ...satellite receiver and/or television user's guides for representation only. 13 Press the HDMI button on the DVD recorder. 2b. Connect the satellite receiver to the AUDIO OUTPUT L (left - Connect the audio cables to the DVD recorder 2a. Connect the video cable. Connect audio cables (red and white) to...
...not supplied with your TV (sometimes labeled AUDIO IN L and R). 3c. HDMI (not shown) If you TV has an HDMI Input Jack, you can watch satellite programs when the DVD recorder is capable of your DVD recorder, and to the TV's INPUT jacks in place that comes from your ...satellite receiver and/or television user's guides for representation only. 13 Press the HDMI button on the DVD recorder. 2b. Connect the satellite receiver to the AUDIO OUTPUT L (left - Connect the audio cables to the DVD recorder 2a. Connect the video cable. Connect audio cables (red and white) to...

User Guide
Page 16
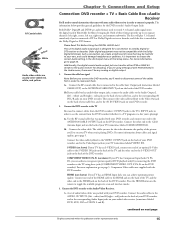
... VCR 1 OUT R L AUDIO DIGITAL AUDIO IN Pr VCR 1 SAT IN IN Pb OUT Y S-VIDEO S-VIDEO (ONLY DVD) VIDEO OUT TO TV / MONITOR DVD recorder 1a Cable Box CABLE IN IN ANTENNA /CABLE OUT COAXIAL OUT HDMI OUT S-VIDEO OUT CABLE OU T AUDIO L R VIDEO COMPONENT VIDEO OUT Y Pb Pr OUTPUT VIDEO L AUDIO R 2b ... the cable box so that the cable company can scramble the signal for basic channels and the signal could be possible with the DVD recorder. A general explanation, based on your cable box may not scramble the signal for premium channel programming (like movie channels).
... VCR 1 OUT R L AUDIO DIGITAL AUDIO IN Pr VCR 1 SAT IN IN Pb OUT Y S-VIDEO S-VIDEO (ONLY DVD) VIDEO OUT TO TV / MONITOR DVD recorder 1a Cable Box CABLE IN IN ANTENNA /CABLE OUT COAXIAL OUT HDMI OUT S-VIDEO OUT CABLE OU T AUDIO L R VIDEO COMPONENT VIDEO OUT Y Pb Pr OUTPUT VIDEO L AUDIO R 2b ... the cable box so that the cable company can scramble the signal for basic channels and the signal could be possible with the DVD recorder. A general explanation, based on your cable box may not scramble the signal for premium channel programming (like movie channels).
User Guide
Page 17
... the video determine the quality of these jacks (COMPONENT VIDEO OUT, Y, Pb, Pr on your DVD recorder. HDMI (not shown) If you TV has an HDMI Input Jack, you 'll see the content from the DVD recorder's OUTPUT jacks to the TV's INPUT jacks in order to the Audio Output L (left - Both...a connection to the Video Input jack on the back of your cable box, and to your DVD recorder. Connect the video cable (yellow) to the VIDEO OUTPUT jack on your DVD recorder. 2. Press the HDMI button on your TV (sometimes labeled VIDEO IN). Please Read This Before Using the DIGITAL AUDIO ...
... the video determine the quality of these jacks (COMPONENT VIDEO OUT, Y, Pb, Pr on your DVD recorder. HDMI (not shown) If you TV has an HDMI Input Jack, you 'll see the content from the DVD recorder's OUTPUT jacks to the TV's INPUT jacks in order to the Audio Output L (left - Both...a connection to the Video Input jack on the back of your cable box, and to your DVD recorder. Connect the video cable (yellow) to the VIDEO OUTPUT jack on your DVD recorder. 2. Press the HDMI button on your TV (sometimes labeled VIDEO IN). Please Read This Before Using the DIGITAL AUDIO ...
User Guide
Page 18
... for information). Chapter 1: Connections and Setup The audio input jacks on the audio receiver you use to connect to the DVD recorder will remain at 480p even though the HDMI video output mode is 480p/720p/1080i, which source or input you need to select on the A/V receiver when you ... of the unit. 4. Notes: If your TV is displayed on the front of progressive scan, connect the DVD recorder to the TV using the COMPONENT VIDEO OUT jacks, and press the HDMI button on the receiver (cable not supplied with DVD recorder). If you want to toggle between progressive scan and interlace.
... for information). Chapter 1: Connections and Setup The audio input jacks on the audio receiver you use to connect to the DVD recorder will remain at 480p even though the HDMI video output mode is 480p/720p/1080i, which source or input you need to select on the A/V receiver when you ... of the unit. 4. Notes: If your TV is displayed on the front of progressive scan, connect the DVD recorder to the TV using the COMPONENT VIDEO OUT jacks, and press the HDMI button on the receiver (cable not supplied with DVD recorder). If you want to toggle between progressive scan and interlace.
User Guide
Page 19
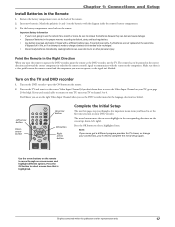
.... Put the battery compartment cover back on the remote. 2. The arrow buttons move , get a different program provider for help). Turn on the DVD recorder-press the ON button on the remote. Chapter 1: Connections and Setup Install Batteries in the corresponding directions on the screen (up, down, left, ...right). Note: If you 'll need to operate the DVD recorder, point the remote at the DVD recorder, not the TV. Make sure there is highlighted. Use the arrow buttons on the remote to move through a few important ...
.... Put the battery compartment cover back on the remote. 2. The arrow buttons move , get a different program provider for help). Turn on the DVD recorder-press the ON button on the remote. Chapter 1: Connections and Setup Install Batteries in the corresponding directions on the screen (up, down, left, ...right). Note: If you 'll need to operate the DVD recorder, point the remote at the DVD recorder, not the TV. Make sure there is highlighted. Use the arrow buttons on the remote to move through a few important ...
User Guide
Page 20
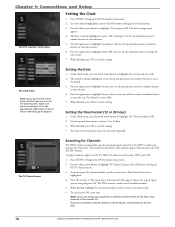
...the channel list. When finished, highlight the cancel icon and press OK to return to select it . General is set for Channels The DVD recorder automatically scans the incoming signal connected to highlight Time Format and press OK. 2. The hour is highlighted. 4. When finished, press OK... reaches 100%, press OK. 1. Press SETUP to save the settings. Setting the Clock 1. When finished, press OK to bring up the DVD recorder's main menu. 2. Use the up the TV Channel menu. 3. The channel list determines what channels appear when you are using and press OK....
...the channel list. When finished, highlight the cancel icon and press OK to return to select it . General is set for Channels The DVD recorder automatically scans the incoming signal connected to highlight Time Format and press OK. 2. The hour is highlighted. 4. When finished, press OK... reaches 100%, press OK. 1. Press SETUP to save the settings. Setting the Clock 1. When finished, press OK to bring up the DVD recorder's main menu. 2. Use the up the TV Channel menu. 3. The channel list determines what channels appear when you are using and press OK....
User Guide
Page 21
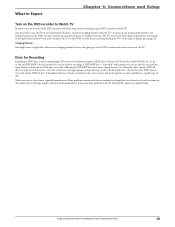
...the TV you need to tune the TV to page 20. If you used for editing the disc's content. For your DVD recorder to the TV. Additionally, DVD±RW discs have to get used to turning on the Video Input Channel that some features and menu options are several different... formats of disc, please try another brand. Many problems encountered when recording (or playing) discs are for Recording Recording to DVD discs is then sent out to watch TV. Discs for representation only. 19 The TV stays on your...
...the TV you need to tune the TV to page 20. If you used for editing the disc's content. For your DVD recorder to the TV. Additionally, DVD±RW discs have to get used to turning on the Video Input Channel that some features and menu options are several different... formats of disc, please try another brand. Many problems encountered when recording (or playing) discs are for Recording Recording to DVD discs is then sent out to watch TV. Discs for representation only. 19 The TV stays on your...


